November 5, 2024

Korean-Style Tuna Salad

Korean Tuna Salad resize

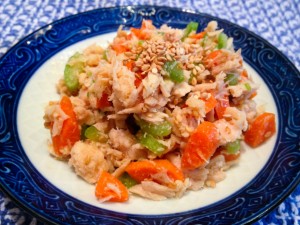
Now that school is starting up again, it’s time for some lunchbox ideas.  One of my favorites as a kid was tuna salad.  Growing up, I had it only two ways:  with mayonnaise, and the way my Mom made it, which was with mayo and chopped celery.  It wasn’t until I was in high school that I had tuna salad made with mayo and pickle relish.  (Thanks, Mrs. Carson!)  It’s really easy to believe that a food will only taste good if prepared in the way you’re familiar with.  I mean, even 15 years ago, I would have been hard-pressed to believe that I would like tuna salad made without mayonnaise.  But old dogs can learn new tricks, so here I present to you:  Korean-Style Tuna Salad!

My husband asked me to make this for him several years ago, because this is the way he grew up eating canned tuna.  Believe it or not, Koreans do enjoy tuna salad, and even make a dish called Tuna Kimbap with it – tuna salad rolled up in rice and seaweed (kind of a Korean sushi roll.)  In this Korean-style dish, the mayonnaise is gone, replaced by savory sesame oil.  The celery is joined by minced carrot and green onion, and the whole dish is seasoned with a little vinegar and a healthy shake of sesame seeds.  It’s a whole new take on tuna!

Try this wrapped in lettuce or served on crackers for lunch.  Ready to break out of your comfort food comfort zone?  Let’s go!

Korean-Style Tuna Salad

Ingredients:

  • 2 cans tuna, drained
  • 2 green onions
  • 1 large carrot
  • 2 celery stalks
  • 2 tablespoons sesame oil (or more, to taste)
  • 1 teaspoon rice vinegar (or use lemon juice)
  • 2 tablespoons sesame seeds
  • 1/2 teaspoon salt

Directions:

  1. In a mixing bowl, add the tuna.
  2. Finely mince the green onion, carrot, and celery.  Add to the tuna.
  3. Pour in the sesame oil and rice vinegar.  Toss to combine.
  4. In a small bowl, combine the sesame seeds and salt. Crush them together with the back of a spoon until most of the seeds are crushed.  (You can also do this quickly in a mortar and pestle, if you have one.)  Pour the sesame seed salt mixture over the tuna and mix well.  Taste – now you can add more sesame oil, vinegar, or salt.  Refrigerate until ready to serve.

Explore, experiment, enjoy! — Dana


To view even more of Dana’s unique recipe, you can visit her at Frugal Girlmet!
 

Kale and Barley Salad

Kale and Barley Salad resize

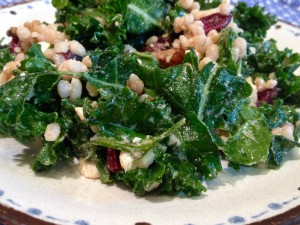
My husband and I eat mostly Paleo.  That means we avoid grains.  But occasionally, I do eat whole grains like barley, wheat berries, or quinoa.  I like their hearty texture and nutty flavor.  They go especially well with greens, as in this Kale and Barley Salad.

You pretty much cover all the bases with this one:  leafy green kale, salty feta, tart dried cranberries (or cherries, or raisins), rich walnuts, and a dressing with a balance of sweet and savory to tie it all together.  You can make this hours ahead of time – even in the morning – and the kale will still have a sturdy texture.  I even eat the leftovers the next day and the kale is chewy and wonderful.  Can’t say that about a lettuce salad!

Try this with pearl barley, wheat berries, or quinoa.  Let me know what you think!

Kale and Barley Salad

Ingredients:

  • 1/3 cup pearl barley
  • 1 large bunch of kale
  • 1 heaping tablespoon tahini
  • 1 teaspoon lemon juice or apple cider vinegar
  • 1/2 teaspoon honey
  • 1/4 teaspoon soy sauce
  • 1/4 cup olive oil or sesame oil
  • 1/3 cup dried cranberries
  • 2 ounces crumbled feta cheese
  • 1/2 cup walnuts

Directions:

  1. Boil one cup of salted water.  When the water boils, add barley and reduce heat to a simmer.  Cook until done and the water has evaporated, about 20 minutes.  (Depending on the grain you’re using and other factors, these directions may vary.  Use your best judgment.)
  2. While the barley is cooking, prepare the kale:  Tear bite-sized pieces off the tough ribs and wash thoroughly.  Spin dry and place in a very large bowl.
  3. Make the dressing:  In a bowl, combine tahini, vinegar, honey, and soy sauce.  Mix in oil.  Pour it over the kale and mix it in with your hand.  Really!  Get in there and massage and squeeze the kale, to make the dressing stick and soften up the tough leaves.
  4. Add the barley, cranberries, feta, and walnuts.  Toss again and refrigerate until ready to serve.

Explore, experiment, enjoy! — Dana


To view even more of Dana’s unique recipes, you can visit her at Frugal Girlmet!

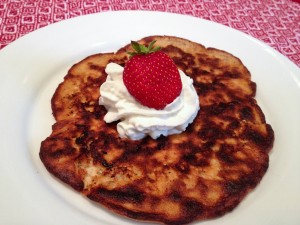
Tahini Pancakes

Tahini Pancakes resize

Oh, pancakes!   We all love them.  But sometimes you just don’t want to make them, even when the kids are whining for them.  They take time to mix up (unless you’re using a pre-made mix like Bisquick…in which case, check out that long list of chemicals and preservatives!), and they’re pretty high in carbs.  Ready for a game changer?  Try these Tahini Pancakes!

This recipe is just three ingredients long.  WHAT?!?!  All you need is a very ripe banana, an egg, and a tablespoon of tahini.  You could use another kind of nut butter, but we use tahini to avoid allergies in my house.  Tahini is an amazing thing.  I keep a can of it in my fridge at all times, because it is crucial to homemade hummus, baba ghanoush, and this kale salad.  It’s just sesame seed butter, but it’s lovely.  These pancakes have no gluten and no nuts, plus they’re high in protein.  Win! Win!

Dress these up however you like.  Add in chocolate chips, coconut flakes, or raisins.  They don’t rise like regular pancakes, but they’re certainly more substantial than a crepe.  Try them for breakfast tomorrow and you—and your pancake-loving kids—will thank me!

Tahini Pancakes

(makes two six-inch pancakes.  Go ahead and double or triple the recipe if you like.)

Ingredients:

  • 1 large egg
  • 1 overripe banana
  • 1 heaping tablespoon tahini
  • coconut oil or butter for the pan

Directions:

  1. Heat a small skillet over medium heat.  Add a teaspoon or so of coconut oil or butter.  Make sure the pan is really well lubricated.  These pancakes can fall apart if they stick.
  2. In a bowl, beat the egg.  Mix in the banana and mash and mix well.  Beat in the tahini.
  3. Pour half the pancake batter into the frying pan and reduce the heat to medium low.  Let cook for a few minutes until, like a normal pancake, it gets dry with burst air bubbles on top.  Very carefully, flip the pancake over and turn the heat all the way to low, or even turn it off.  Let cook a minute or two, then slide off the pan and onto a plate.  Smother with whipped cream and berries, or maple syrup, sliced bananas and walnuts.

Explore, experiment, enjoy! — Dana


To view even more of Dana’s unique recipe, you can visit her at Frugal Girlmet!
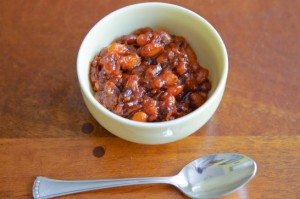
Baked Beans

Baked Beans resize Happy Independence Day!  I’m hoping you are able to celebrate with family and friends today.  What’s on the menu? One of my guilty food pleasures is a right-off-the-grill hot dog.  I know, not the most gourmet of foods, or the healthiest, but everything in moderation, right? And what goes better with hot dogs than baked beans?  Now you could just open a can of baked beans and plop them in a saucepan, but where’s the fun in that? Make your own!

Once I decided to do just that, I found my Mom’s recipe for baked beans.  That poor note card has seen better days, but its hard-used appearance proves what a popular recipe it is.
Baked Beans Recipe Card Mom resize
 
I didn’t have any canned white beans in the pantry, but I did have a one-pound bag of dried white beans. They take more preparation than canned beans (obviously – canned beans come out ready for use) but are worth the effort.  First, dried beans are cheaper than their canned cousins, because once you soak and rehydrate them, they double in weight. (Put another way, when you buy canned beans, you are paying for water.)  Second, you are avoiding any salt, preservatives, or chemicals in the canned beans, not to mention the chance of BPA in the can itself.
 
Anyway, I soaked the beans the night before, but they double in size, so I only used half. (You could freeze the rehydrated beans in a Ziploc bag and thaw them when you have another recipe for them.)  I used my Mom’s recipe as a jumping off point, and they were just as delicious as hers were.  I realized they don’t need to bake in the oven and are great on the stovetop—that way you won’t have to heat up your kitchen on a hot summer day to make them.  These are easy, cheap to make, and will impress everyone who has them.  Hearty, smoky, and fantastic, these put those  gloopy canned baked beans to shame!

Baked Beans

Ingredients:
  • 1/2 pound dried white beans, soaked overnight in 6 cups water (or use 2 cans of white beans, reserving some of the canning liquid)
  • 5 slices bacon, diced 
  • 1 onion, diced
  • 3/4 cup ketchup
  • 1 tablespoon mustard
  • 1/4 cup BBQ sauce (optional, but I like the smokiness – you could also try a few dashes of liquid smoke)
  • 1/4 cup molasses
  • 1/4 cup dark brown sugar
Directions:
  1. If you are using canned beans, skip to Step 2.  If you are using dried beans: Drain the water from the beans you soaked overnight. Put the beans in a pot, cover with about 4 cups of water and a lid, and cook over medium heat for about 2 hours. You don’t want to cook off all the water, so check in on them every once in a while. When they’re done, save about a cup of the cooking water to use in the baked beans, in case you like them a little “saucier” than I do.  
  2. In a Dutch oven or very heavy-bottomed pot, fry the bacon. When it’s about halfway to crunchy, add the onion. When the bacon looks done, add the beans. Turn the heat down to low and stir everything together for a few minutes.
  3. Add the rest of the ingredients and stir to combine. Give it a taste and see if you need to adjust the seasonings. It likely won’t need salt, but you may like some pepper.
  4. Cover and cook on low heat for half an hour. Check the consistency – if it’s too thick, add some of the bean cooking water; too thin, take the lid off and let simmer.  Serve hot.
Explore, experiment, enjoy! — Dana


To view even more of Dana’s unique recipe, you can visit her at Frugal Girlmet!
Cranberry Orange Scones (Gluten-Free)

Cranberry Orange Scones resize

If you have kids, you probably know what summer break is like:  trying to keep them busy and entertained without letting their brains turn to mush!  One of my favorite ways to do that is baking together.    I have my older girl (first grader now!) read the recipe out loud, and both girls love to stir and mix and pour ingredients.  Today’s group baking exercise?  Cranberry Orange Scones!

These are gluten-free, made with coconut flour.  If you’ve never tried it, I can’t recommend it highly enough.  For six big scones, you only need half a cup of coconut flour!  I like making treats for the girls that are single serving – that way there’s no arguing over whether the slice of bread is big enough, or having to share the last one.  These came together in a snap.  The original recipe (found on the Elana’s Pantry website) directs you to mix all the ingredients in a food processor, and I’m sure that would have made the recipe go even faster!  But because my girls wanted to help, we mixed them by hand – dry ingredients in a large bowl, wet ingredients in a smaller bowl, and then mixed wet into dry.

Try these little heaven-scented beauties today!

Cranberry Orange Scones (Gluten-Free)     makes six large scones

Ingredients:

  • 1/2 cup coconut flour
  • 1/4 teaspoon salt
  • 1/4 teaspoon baking soda
  • 1/4 cup coconut oil or softened butter
  • 1/4 cup honey
  • 4 eggs
  • 1/2 cup dried sweetened cranberries
  • zest of one orange, plus the juice of half the orange

Directions:

  1. In a large bowl, blend together the flour, salt, and baking soda.
  2. In another bowl, beat together the coconut oil or butter, honey, and eggs.
  3. Mix the egg mixture into the flour mixture.  Stir in the cranberries, orange zest, and orange juice.
  4. On a Silpat mat or parchment paper, make six mounds of dough.
  5. Bake for about 15 minutes at 350*F.

Explore, experiment, enjoy! — Dana


To view even more of Dana’s unique recipe, you can visit her at Frugal Girlmet!
Crunchy Chopped Salad


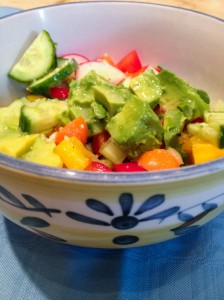
Crunchy Chopped Salad resize

I think this was originally a recipe from a South Beach Diet cookbook.  But I started making it so long ago, and have added and deleted ingredients over the years…so that I am not sure it’s the same one in the book.  That’s okay – it’s not about exact ingredients.  You can add or subtract as you like.  It’s about CRUNCH!  And that’s what you get in this Crunchy Chopped Salad!

I know that chips aren’t great for me.  I usually don’t crave them, and I make sure I don’t keep them in the house (because as a stay-at-home mom, you DO eat whatever is in the pantry!)  But sometimes you just get that urge for something kind of salty and crunchy.  I make this salad instead.  Is it the same?  Of course not!  (Otherwise I’d call it Doritos Salad!)  But this satisfying, fun-to-eat dish  scratches that itch for me, and maybe it will for you too.

If you need a break from lettuce, try this.  If you have lots of singleton vegetables in your crisper drawer, try this.  If you want something fresh and different for your next cookout, try this!

Crunchy Chopped Salad

(Serves four as a side dish)

Ingredients:

  • 6 baby carrots
  • 1 bunch radishes, trimmed
  • 3 stalks celery, trimmed
  • 2 Persian cucumbers, or one large cucumber
  • 1/2 red bell pepper
  • 1/2 yellow bell pepper
  • 2 green onions
  • 2 cloves garlic
  • juice of 1 lemon or lime
  • 2 or 3 drops of honey
  • salt and pepper
  • 1/4 to 1/3 cup olive oil
  • 2 avocados

Directions:

  1. Wash and trim all your veggies.  Cut them all into medium-small pieces.  This is up to you, but for example, I cut the peppers into 1/2″ square pieces.  The radishes, cucumbers, carrots, and celery all get sliced vertically, then cut into 1/4″ slices.  If you dice everything too small, you won’t get the crunchiness.  If you cut everything too large, you’ll only get one or two veggies on your spoon at a time.  Experiment and see what size you like best.  If you are using a large cucumber, you may want to peel off the waxy skin and scoop out the seeds.  I like Persians because they are thin-skinned and have very little squishy gel around the seeds.  Pile all your chopped veggies into a big bowl and toss.  Beautiful, right?
  2. In a little food processor, blend up your garlic, lemon juice, honey, salt and pepper, and 1/4 cup olive oil.  Taste and dilute with more oil if you like.
  3. To serve, dish the salad into a bowl and drizzle liberally with dressing.  For each serving, dice half of an avocado and place it on top (otherwise it gets smushed.)  Eat this salad with a big soup spoon so you get a little of each vegetable in every bite!

If you have leftovers, you can mix in a can of tuna the next day.  It’s wonderful!


Explore, experiment, enjoy! — Dana


To view even more of Dana’s unique recipe, you can visit her at Frugal Girlmet!

Crockpot Curry Chicken and Curry Chicken Stew

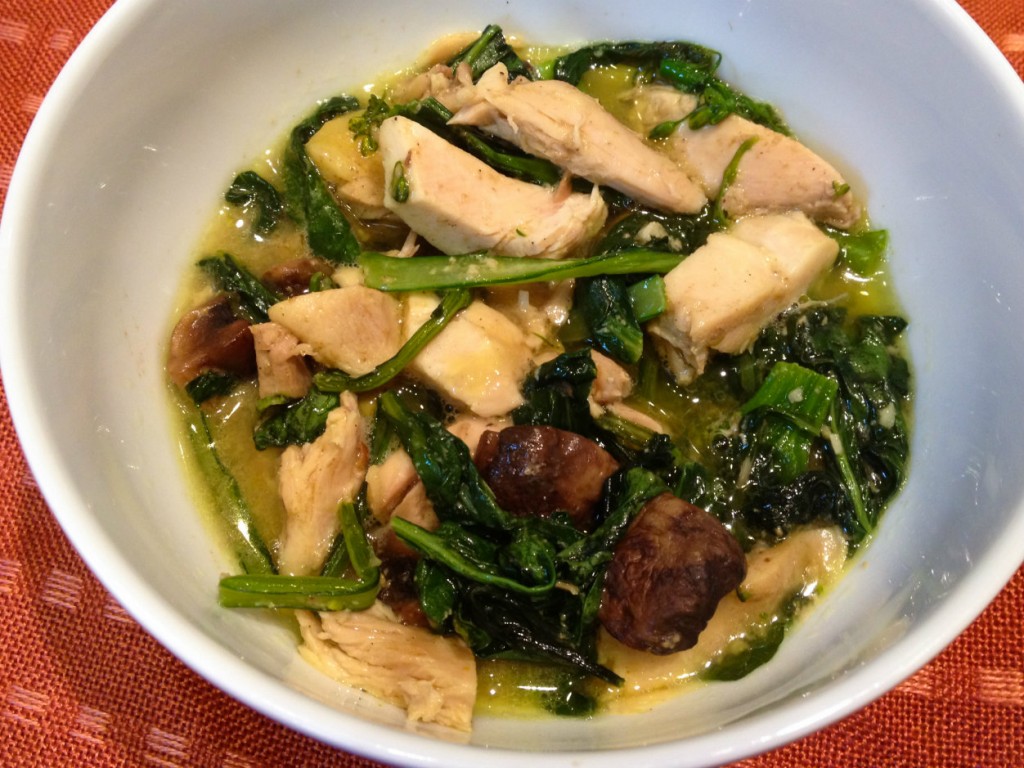
Curry Chicken Stew resize

Two for the price of one!  That’s what you get when you start this recipe in the crockpot.  It’s not very glamorous, but oh boy! does it smell and taste divine!  A simple list of ingredients  and a crockpot are all you need to make two delicious meals: Crockpot Curry Chicken and Curry Chicken Stew!

First you need a can of coconut milk or coconut cream.  It needs to be a can, because the coconut milk “beverage” they put in cartons is all watery, and you need the high fat content of the canned stuff.  Trader Joe’s has both canned coconut milk and coconut cream, or you can try an Asian market or online.  Next thing you need is curry.  You can use curry paste; I just used curry powder and it was lovely.  You’ll need an 8-ounce package of mushrooms, any kind – I used regular button mushrooms, but shiitakes or creminis would be nice too, and give it a stronger flavor.  And last is this beauty:

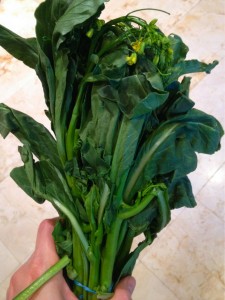
Chinese Broccoli resize

I buy it at the farmer’s market from a Vietnamese lady who tells me it’s called “Chinese broccoli”.  A little online research shows its real name is kai lan.  Its leaves are like spinach, and its cooked stems have the consistency of asparagus.  If you can’t find it, use spinach instead…although the Chinese broccoli has a stronger, more bitter flavor.

I made this with whole chicken legs – skin, bones and all – but I think next time I’ll try it with just boneless, skinless thighs.  Chicken skin in the crockpot is not a nice thing – we actually peeled it off before we ate the Curry Chicken the first night because it just seemed kind of rubbery.  But I think the skin and bones do add to the stock for the stew the next day, so it’s up to you.  Either way, you get two healthy, delicious meals out of one crockpot – you can’t beat that!

Crockpot Curry Chicken

Ingredients:

  • 3 pounds whole chicken legs
  • 1 can of coconut cream, or use coconut milk (not low-fat)
  • 3 tablespoons curry powder or curry paste of your choice
  • juice of 1 lemon or lime
  • 1 tablespoon salt

Directions:

  1. In a large crockpot, set the time for 8 hours on low or 4-6 on high.  Put the chicken legs on the bottom.
  2. Mix together the coconut cream, curry, lemon juice and salt.  Pour over the chicken and stir to combine.
  3. Cook until a thermometer reads 180*F.  Remove chicken legs from the pot and cover them with foil.  Pour the coconut broth into a large pan and simmer for about 15 minutes.  It will reduce a little.  Serve chicken legs with coconut broth.

Now, at this point, I had 2 very large legs leftover and about a cup of coconut broth.  I put them together in a Tupperware container.  Then the next day, I made…

Curry Chicken Stew

Ingredients:

  • 1 tablespoon butter, coconut oil or olive oil
  • 8 ounces mushrooms, quartered
  • 1 pound Chinese broccoli, cut into 2-inch pieces  (or use fresh spinach)
  • 2 large cooked chicken legs (or use 1 pound of chicken thighs)
  • leftover coconut broth – as much as you have
  • optional chicken broth
  • optional jasmine rice to serve

Directions:

  1. In a large pan, saute the mushrooms in 1 tablespoon butter, coconut oil, or olive oil.  Stir, and after five minutes, add the Chinese broccoli and cover.
  2. While the mushrooms are cooking, prepare the chicken:  peel off the skin and any subcutaneous fat you find from the cooked chicken legs.  Remove the meat from the bones and roughly chop.
  3. Add the chopped chicken and remaining coconut broth to the mushrooms and Chinese broccoli.  If you want it to be soupier, add some chicken broth.  Cook until the chicken is hot, about ten minutes.

This would be lovely with some steamed jasmine rice!  I ate this for lunch, and liked it so much I ate it again for breakfast.


Explore, experiment, enjoy! — Dana


To view even more of Dana’s unique recipes, you can visit her at Frugal Girlmet!

Grilled Caesar Salad


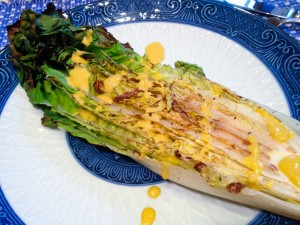
Grilled Caesar Salad resize

Before we go any further:  Yes, you grill the lettuce.  Say what?!  I first encountered this recipe at an Italian restaurant in our neighborhood a few years back.  It was a revelation—you can grill lettuce! And  instead of making it nasty and squishy, just a tiny bit of char adds so much flavor and texture as to change the whole dish!  Then I saw the idea again in a magazine last week and, that was it, I had to try it at home.  (Okay – I made my husband do the actual grilling.  But I supervised, I promise!)

The dressing comes together in a snap in the food processor (or you can do it old-school in a wooden salad bowl with a fork, but I find it is hard on my forearms!)  The only ingredient you may not have is anchovy paste.  It’s pretty cheap and lasts forever in your fridge, and it adds that “umami” flavor you can’t get anywhere else.  It’s also great in spaghetti sauce, if you’re worried you won’t make a lot of Caesar salad.  This dressing also calls for a raw egg yolk.  I would highly recommend buying the highest quality eggs you can find – check your local farmer’s market – or at least getting organic, free-range, or both.  (If you are immunosuppressed you could substitute a spoonful of store-bought mayonnaise, but it’s just not the same.)  Also, you’ll notice there are no croutons on my plate.  We almost never eat bread, but if croutons are your thing, go ahead and pile them on!

This salad was a side dish to a dinner of grilled steaks and grilled veggies.  Feel free to chop up some grilled chicken and make it a whole meal!  For a side dish, plan on one half of a head of lettuce per person.  If you are making it the main dish, serve a whole head of lettuce per person.  Curious?  Let’s go!

Grilled Caesar Salad

Ingredients:

  • 2 cloves garlic, peeled
  • 1 teaspoon Dijon mustard
  • 1/2 teaspoon Worcestershire sauce
  • 1 egg yolk
  • 1 teaspoon anchovy paste
  • juice of one lemon
  • 1/4 – 1/3 cup olive oil
  • 1 head romaine lettuce
  • croutons and grated parmesan cheese to serve

Directions:

  1. Prepare the dressing:  In a food processor, blend together the garlic, mustard, Worcestershire sauce, egg yolk, anchovy paste,  and lemon juice.  Blend in 1/4 cup of oil.  Taste to see if you like the consistency.  If you want it more diluted, add more oil.  Refrigerate until ready to serve.
  2. Prepare the lettuce:  Slice it vertically down through the core.  You have two long halves now.  Wipe with a dry paper towel.  The lettuce needs to be completely dry or else it will stick and wilt.  No washing it, no oiling it!  Place the lettuce on the grill, cut side down, for 2 minutes without moving it.  With tongs, take it off the grill and lay it grilled-side up on a plate.  Don’t cover it or it will get soggy.  Drizzle with dressing, and add croutons or grated cheese to serve.  Eat it now!

Explore, experiment, enjoy! — Dana


To view even more of Dana’s unique recipes, you can visit her at Frugal Girlmet!

Shrimp with Cilantro Pesto

Shrimp with Cilantro Pesto resize

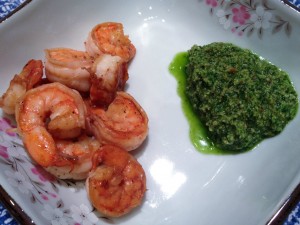
One thing that will bum me out, without fail, is seeing a wilted, mushy bunch of herbs that I didn’t get to in time.  Just makes me feel terrible.  So I had this nearly full bunch of cilantro in my produce drawer and no clue what to make with it.  Aha!  How about try it in pesto?  This recipe for Shrimp with Cilantro Pesto was a big hit at dinner last night!

You can cook the shrimp however you like.  Here, we just pan-fried them quickly with salt and pepper, and let the pesto do the heavy lifting in the flavor category.  This comes together so quick it’s laughable.  Make the pesto whenever you like – even the day before – and keep in the fridge until you are ready to eat.  We ate this with roasted baby potatoes and roasted broccoli.  The pesto was especially delicious on the potatoes.  Try it and see!

Shrimp with Cilantro Pesto

Ingredients:

  • 1 large bunch cilantro
  • 1/3 cup toasted pepitas
  • 1 teaspoon minced garlic
  • juice of 1 lemon or lime
  • 1/3 cup olive oil
  • salt and pepper
  • 1 pound shrimp, peeled
  • 1 tablespoon olive oil

Directions:

  1. Wash and shake the cilantro and trim about half an inch off the bottom of the stems.  Place them in the bowl of a food processor.  Blend with the pepitas, garlic, lemon juice, and olive oil.  Taste and add salt and pepper to your liking.  Pour into a bowl and store in the fridge until ready to use.
  2. Prepare the shrimp: peel the shell off, remove the tail, and de-vein.  Season with salt and pepper and drizzle with olive oil.  Heat a pan on medium-high, and quickly sauté the shrimp.  They will only take about 2 minutes per side – don’t let them get tough and overdone!  Remove shrimp from pan to a plate and serve with the cilantro pesto (and a squeeze of lemon if you like.)

Explore, experiment, enjoy! — Dana


To view even more of Dana’s unique recipe, you can visit her at Frugal Girlmet!

Strawberry Overload Cake

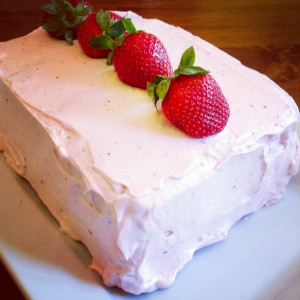
Strawberry Overload Cake sliceDespite my tomboy nature, both my daughters are girly-girls.  Princesses, fairies, dress-up, and everything pink rules their world.  This year we ended up celebrating my three year-old’s birthday on Mother’s Day, so I had a lot going on and didn’t want to spend too much time planning and decorating an elaborate cake.  Instead, I found a recipe online for a strawberry cake, created a strawberry frosting for it, and filled it with even more fresh strawberries.  The result is Strawberry Overload Cake!

The strawberry flavor comes from three sources:  fresh berries, frozen berries, and strawberry Jell-O.  Be sure to keep the cake in the fridge until time to serve.  The original recipe called for two 9-inch round cake pans, but I used a rectangular 9×13 pan and cut that in half to make two layers.  Your girly-girl will delight in the layers of pink in this sweet treat!

Strawberry Overload Cake resize

Strawberry Overload Cake

Ingredients:

  • 1 1/2 cups sugar
  • 1 three-ounce package of strawberry Jell-O
  • 1 cup butter, softened
  • 4 eggs, room temperature
  • 2 3/4 cups sifted cake flour
  • 2 1/2 teaspoons baking powder
  • 1 cup whole milk
  • 1 teaspoon vanilla
  • 1/2 cup pureed frozen strawberries

Directions:

  1. Preheat the oven to 350*F.  Grease and flour your pans (two 9-inch round, or one 9×13 rectangular.)
  2. Cream together the sugar, Jell-O and butter.  Blend in the eggs, one at a time.
  3. In a small bowl, mix together the flour and baking powder.
  4. Add the flour mixture and milk to the butter mixture, alternating flour and milk, and blend well.  Mix in the pureed strawberries.
  5. Pour batter into pans and bake.  Check the cakes at 25 minutes.  I took mine out at about 35 minutes, because I was using a bigger pan.  Do a toothpick test to make sure the cake is not wet inside.
  6. Cool for ten minutes in the pan, then turn out on a rack to continue cooling.

For the frosting and filling:

Strawberry Frosting

Ingredients:

  • 1 8-ounce package of cream cheese, room temperature
  • 1 stick butter, room temperature
  • 1 cup frozen strawberries
  • juice of 1 lemon
  • 1/2 cup powdered sugar
  • 1 cup whipped cream (or try Cool Whip)
  • 1 cup fresh strawberries for layering

Directions:

  1. In a pot with a lid, simmer the frozen strawberries and break them up with a wooden spoon, smashing them.  When they are all cooked and smashed, add the cream cheese, butter, and lemon juice and beat with a hand mixer.
  2. Add in the powdered sugar, beating well.  Beat in the whipped cream.  Taste.  It should be sweet tart – the cake is very sweet, so I wanted the icing to be a little different.  You can add a squeeze more lemon if you like, or  take it the other direction and add more sugar if you like.  It’s pretty flexible and you can change it to suit your taste.

To assemble:

  1. Cut the large cake in half, width-wise, so you have two 9×6 rectangles (or just put one of the round cakes on a plate.)  On a large serving platter, place the cake on the bottom, and frost the top of it with about half a cup of the frosting.  Slice the fresh strawberries and layer them over the frosting.  Carefully add another layer of frosting on top of the fresh berries.  Then place the next layer on top and frost the whole thing, top and sides.  Garnish with more fresh strawberries.
  2. This cake is kind of dense and rich, so small pieces are a good thing.


Explore, experiment, enjoy! — Dana


To view even more of Dana’s unique recipe, you can visit her at Frugal Girlmet!