April 26, 2024

Salmon Cakes

Salmon Cakes

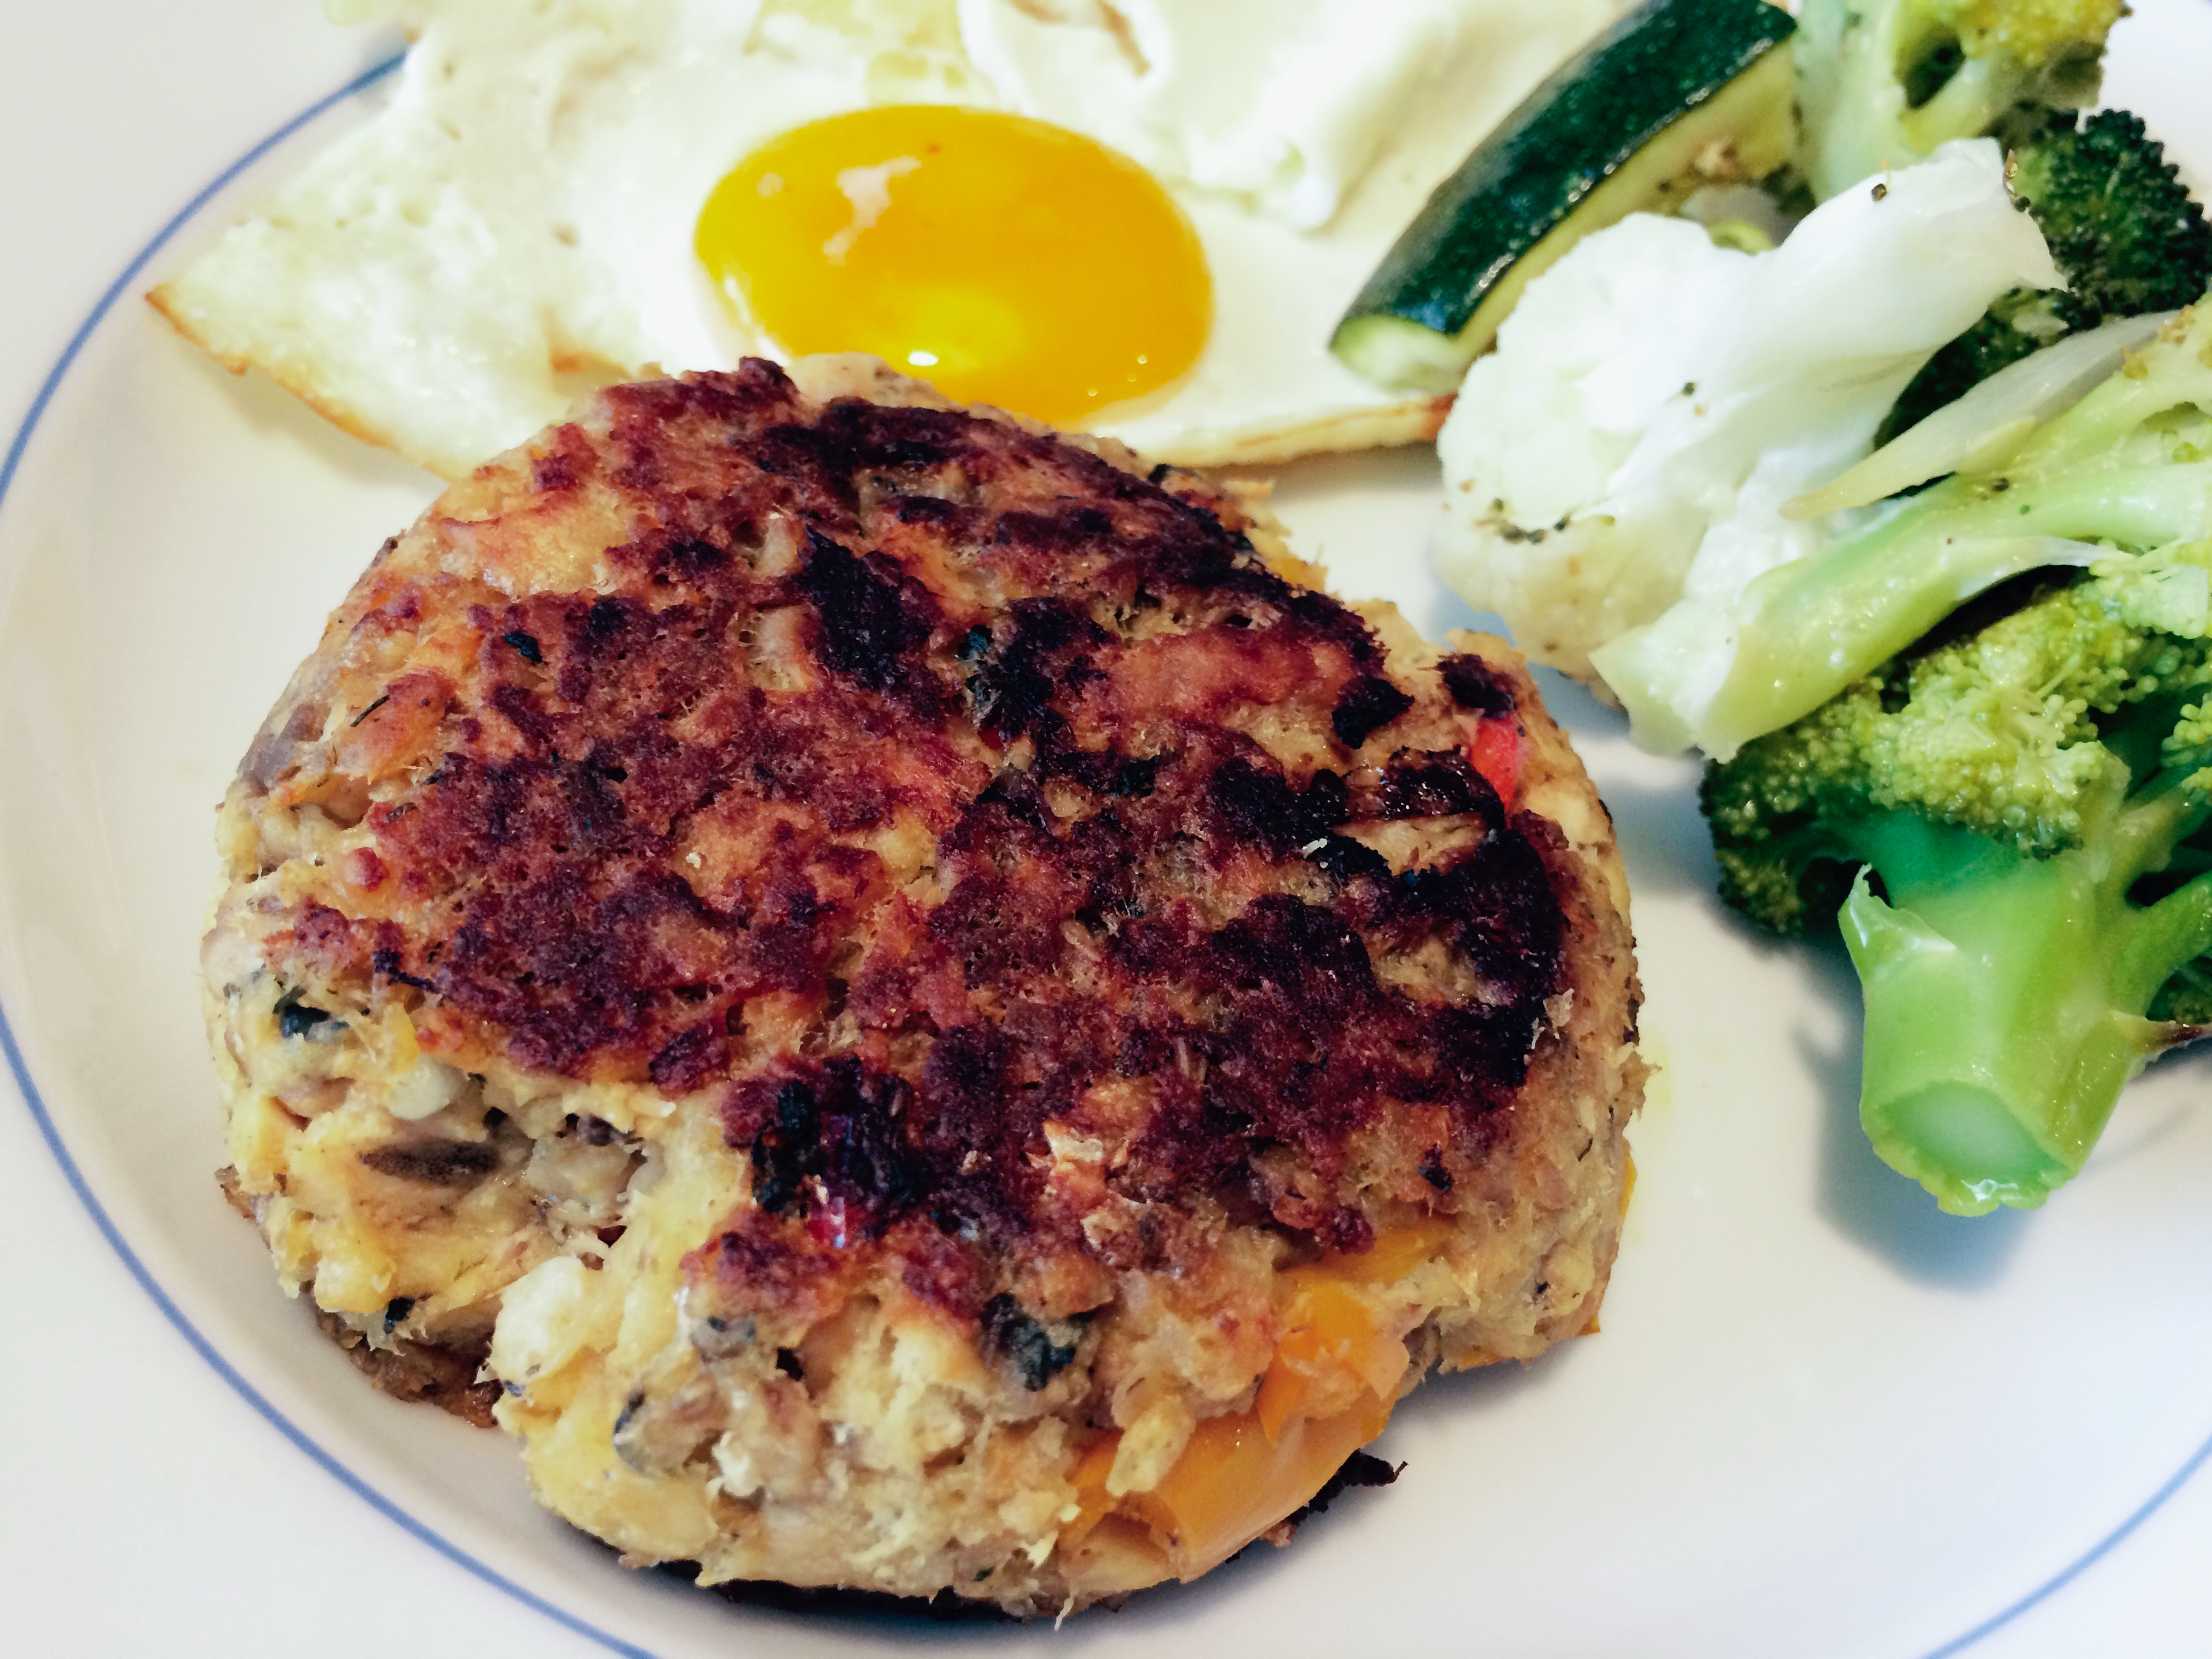
Not as fancy as crab cakes, but higher up the gourmet rankings than a tuna melt, these Salmon Cakes make a quick, protein-filled lunch that can be dressed up or down, depending on your mood.

Dressing up?  Stack them with a poached egg and hollandaise sauce, along with a side of steamed or grilled asparagus.  Going casual?  Serve the salmon cakes in a salad with a vinaigrette and some goat cheese, or with a fried egg and a side of roasted vegetables.  These would go great with tartar sauce or remoulade.  Any way you plate these up, you’ll love these savory salmon cakes!

Salmon Cakes

Ingredients:

  • 1 (14.75 ounce) can of boneless salmon
  • 2 teaspoons mayonnaise
  • 1 teaspoon mustard
  • 1/2 teaspoon celery salt
  • 1/2 teaspoon dried dill
  • 1/2 cup chopped roasted bell peppers and onions (or 1/2 cup diced bell pepper and 1/2 cup diced onion, cooked in olive oil until soft)
  • 10 large crackers (use saltines, Ritz, or whatever plain cracker you have around)
  • 1 tablespoon butter
  • 2 tablespoons olive oil

Directions:

  1. Combine the salmon, mayo, mustard, celery salt, dill, peppers, and onions in a large bowl.  Crumble the crackers into crumbs and mix into  the salmon.
  2. Using a bowl or a cup (I used a half-cup measuring cup), pack the salmon mixture into 4 ounce portions.  Remove the salmon cakes from the cup and place them all on a plate.  Refrigerate for 30 minutes.
  3. In a large frying pan, heat the butter and oil together.  Cook the salmon cakes for about 8-10 minutes on one side over medium heat, until they have a nice golden crust.  Flip them carefully, and cook again for about 8 minutes.  Remove and serve warm.

Explore, experiment, enjoy! — Dana


To view even more of Dana’s unique recipe, you can visit her at Frugal Girlmet

Polish Sandwich

Polish Sandwich

Ladies, I’m not proud of this entry.  I mean, I AM proud of it, because this sandwich is seriously delicious!  It’s my attempt at copycatting a recipe from a hot dog chain in Southern California called Der Wienerschnitzel.  It comes pretty close to the original Polish Sandwich, with melted Swiss cheese, snappy sauerkraut, and tart pickles.  I haven’t been to Wienerschnitzel in years, yet I still found myself craving one of these babies.  (Sometimes you just gotta scratch that itch.)

But seriously, I am going to eat better next year.  No—really!  Bread will become a special treat, sugar will become verboten, and my veggie uptake will increase!  So as we finish out this year, I decided to give in to the desire for a Polish Sandwich, as a farewell to some not-so-healthy habits.  These sandwiches easy to make, and so satisfying.  You can use hot dogs or any kind of Polish-type sausage you like.  Try yellow or spicy brown mustard.  Find some good rye bread and make this sandwich.  You’ll take one bite and say Danke!

Polish Sausage

For each sandwich you will need:

  • a 5-inch piece of Polish sausage, or hot dogs, cut in half lengthwise
  • pat of butter
  • 2 slices rye bread
  • 1 slice Swiss cheese
  • 1/4 – 1/2 cup Sauerkraut, warmed up
  • 1 large dill pickle, cut lengthwise into quarters
  • yellow or brown mustard

Directions:

  1. Cook sausage or hot dogs until done and hot all the way through.
  2. Meanwhile, in a large pan, heat the pat of butter.  Put both slices of rye bread down in the butter.  Top one slice of bread with the Swiss cheese.  Cook over low until the cheese melts and the bottoms of the bread are lightly toasted.
  3. To assemble:  Place the plain (non-cheese) slice of bread on the bottom and squirt with mustard.  Top with two halves of the sausage (or three halves of the hot dogs, cut side down.  In between the sausage, place as many of the quartered pickles as you like.  Cover the sausage and pickles with hot sauerkraut.  Top with cheese-y slice of rye bread.  Cut in half and eat hot.

Explore, experiment, enjoy! — Dana


To view even more of Dana’s unique recipe, you can visit her at Frugal Girlmet!

Korean-Style Tuna Salad

Korean Tuna Salad resize

Now that school is starting up again, it’s time for some lunchbox ideas.  One of my favorites as a kid was tuna salad.  Growing up, I had it only two ways:  with mayonnaise, and the way my Mom made it, which was with mayo and chopped celery.  It wasn’t until I was in high school that I had tuna salad made with mayo and pickle relish.  (Thanks, Mrs. Carson!)  It’s really easy to believe that a food will only taste good if prepared in the way you’re familiar with.  I mean, even 15 years ago, I would have been hard-pressed to believe that I would like tuna salad made without mayonnaise.  But old dogs can learn new tricks, so here I present to you:  Korean-Style Tuna Salad!

My husband asked me to make this for him several years ago, because this is the way he grew up eating canned tuna.  Believe it or not, Koreans do enjoy tuna salad, and even make a dish called Tuna Kimbap with it – tuna salad rolled up in rice and seaweed (kind of a Korean sushi roll.)  In this Korean-style dish, the mayonnaise is gone, replaced by savory sesame oil.  The celery is joined by minced carrot and green onion, and the whole dish is seasoned with a little vinegar and a healthy shake of sesame seeds.  It’s a whole new take on tuna!

Try this wrapped in lettuce or served on crackers for lunch.  Ready to break out of your comfort food comfort zone?  Let’s go!

Korean-Style Tuna Salad

Ingredients:

  • 2 cans tuna, drained
  • 2 green onions
  • 1 large carrot
  • 2 celery stalks
  • 2 tablespoons sesame oil (or more, to taste)
  • 1 teaspoon rice vinegar (or use lemon juice)
  • 2 tablespoons sesame seeds
  • 1/2 teaspoon salt

Directions:

  1. In a mixing bowl, add the tuna.
  2. Finely mince the green onion, carrot, and celery.  Add to the tuna.
  3. Pour in the sesame oil and rice vinegar.  Toss to combine.
  4. In a small bowl, combine the sesame seeds and salt. Crush them together with the back of a spoon until most of the seeds are crushed.  (You can also do this quickly in a mortar and pestle, if you have one.)  Pour the sesame seed salt mixture over the tuna and mix well.  Taste – now you can add more sesame oil, vinegar, or salt.  Refrigerate until ready to serve.

Explore, experiment, enjoy! — Dana


To view even more of Dana’s unique recipe, you can visit her at Frugal Girlmet!


Tzatziki Wrap

Tzatziki Wrap resize

What a fun word to say:  Tzatziki!  With spring in full swing now, I am in love with using fresh herbs in as many ways possible.  This recipe for my Tzatziki Wrap uses a small handful of dill. Dill is a lovely thing to grow in a windowbox, if you can, or in your garden, because it goes with so many other flavors and cuisines.  If you have leftover dill after making the tzatziki, use it on fresh or smoked salmon.

Tzatziki is just a fancy way to say “yogurt dip.”   It is found in Greek and Mediterranean dishes, and goes well with all grilled meats—chicken, beef, lamb, salmon—as well as vegetarian dishes like falafel.  Blend this up in your food processor in five minutes, and enjoy for lunch or a light dinner tonight!

Tzatziki Wrap (Makes two wraps)

Ingredients:

  • 1/2 cup plain yogurt (Greek yogurt or regular.  Avoid nonfat as the texture is too runny)
  • 1 big handful dill sprigs, any tough parts trimmed away
  • juice of 1/2 lemon
  • salt and pepper
  • 1 teaspoon minced garlic
  • 1/2 large cucumber, peeled and seeded
  • 1/2 red bell pepper
  • 1/2 green bell pepper
  • 1 cup baby spinach, or a few leaves of romaine lettuce
  • 1 cooked chicken breast
  • tortillas or pita bread for wrapping

Directions:

  1. Make the tzatziki:  In a food processor or blender, blend the yogurt, dill, lemon juice, salt, pepper, and garlic together.  Cut the half a cucumber in half again, and add one half to the blender and combine.  (You should now have one-quarter of a cucumber left.  Math!)  Refrigerate the tzatziki until ready to use.
  2. Slice the peppers and cucumber into very fine strips.  If you are using romaine lettuce, wash and dry the leaves and stack them on a cutting board.  Cut the leaves into fine strips.  Mix the peppers, cucumber, and lettuce in a large bowl and toss to combine.
  3. Very thinly slice the chicken breast.  Prepare your tortilla or pita bread for filling.  (I always warm up tortillas in the microwave, covered with a damp paper towel, so they’re pliable and won’t break.)  Fill tortilla with chicken breast slices, vegetables, and a big drizzle of tzatziki.  Roll up and eat, with more tzatziki if you like.

Cutting carbs, or do you have leftover wrap filling?  Toss with tzatziki and eat it like a salad!  It also goes great as a dip—try with carrots.

Explore, experiment, enjoy! — Dana


To view even more of Dana’s unique recipe, you can visit her at Frugal Girlmet!

Italian Tuna Wraps


Italian Tuna Wraps resize

I love it when a plan comes together!  I was hungry at lunchtime yesterday, so I opened my pantry.  I stared at the shelf for a good minute…eyes glazing over.  “There’s got to be something here, some combination of flavors that will fill and delight me” I thought.  And bingo!  Inspiration struck and I made these Italian Tuna Wraps.

Okay, this is pretty much just tuna salad in a lettuce wrap.  But the addition of white beans makes it filling, contributes a creamy texture, and ups the fiber.  A handful of chopped parsley adds freshness.  This recipe serves two for lunch.  Or just do what I did, and put it in the fridge for tomorrow’s lunch.  It will still taste great the next day!

Italian Tuna Wraps

Ingredients:

  • 1 can of tuna
  • 1 can of white beans
  • juice of 2 lemons
  • 1 tablespoon olive oil
  • salt and pepper
  • pinch of garlic powder
  • 1/4 cup roughly chopped parsley
  • Boston lettuce leaves (or other lettuce leaves of choice) for wrapping

Directions:

  1. Drain the can of tuna and put it in a large bowl.  Drain the beans, rinse them in a strainer and then add them to the tuna.
  2. Toss the tuna mixture with the lemon juice and olive oil.  Season with salt, pepper, and garlic powder; toss again.  Add parsley and toss.
  3. To serve, wash and shake dry the lettuce leaves, and place a large spoonful of tuna in the lettuce.  Wrap and eat.  Couldn’t be easier!

Explore, experiment, enjoy! — Dana


To view even more of Dana’s unique recipe, you can visit her at Frugal Girlmet!