April 26, 2024

Sweet and Sour Cucumber Salad

Sweet and Sour Cucumber Salad

Happy Summer!  Today was my daughter’s last day of school.  Memorial Day is in the past, and it’s quickly heating up.  That means it’s BBQ time!  Next cookout you go to—bring this Sweet and Sour Cucumber Salad.

This is an alternative to that played-out coleslaw.  Feel free to double or triple this recipe.  The cucumbers keep it light and crunchy.  You can adjust the balance of sweet to sour to suit your own taste.  I like this salad fresh, but the longer you leave it to mix and mature – up to two or three days – the more pickled and nuanced the flavors get.  Ready?  Let’s go!

Sweet and Sour Cucumber Salad

Ingredients:

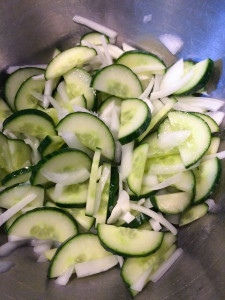
  • 1 large cucumber (I like English in this recipe)
  • 1/2 sweet onion
  • 2 tablespoons vinegar – white or rice
  • 3 tablespoons sugar
  • 4 tablespoons whole milk
  • salt and pepper to taste

Directions:

  1. Cut the cucumber in half lengthwise, then slice into thin half-moons.  Place in a large bowl
  2. Slice the onion as fine as possible.  Add to the cucumber.
  3. Mix together the vinegar, sugar, and milk.  Taste, and add more of what you like, or leave it as-is.  Pour over the cucumber and onion.  Season with salt and pepper.  Keep refrigerated until ready to eat.  This is great the next day, and even more pronounced after two days.  Eat with spicy foods, BBQ’d meat, or really salty foods.

Explore, experiment, enjoy! — Dana


To view even more of Dana’s unique recipe, you can visit her at Frugal Girlmet!


Napa Cabbage with Peas and Prosciutto

Napa Cabbage with Peas and Prosciutto

Punxatawney Phil, that old son-of-a-gun, just declared there would be six more weeks of winter.  Growing up in Southern California, it didn’t mean much to me—maybe a day or two of drizzle, or a heavier jacket if the temperature dipped into the fifties at night.  Now that we’re in Texas, winter is FOR REAL!  There are no good farmer’s markets, no fresh produce for cheap.  So when it’s the dreary days of February and you can’t plant your garden yet, it’s time to make the most of what you have.  This recipe for Napa Cabbage with Peas and Prosciutto can’t bring spring, but it can warm up your belly!

I had half of a head of cabbage left after making a batch of Stuffed Cabbage Soup and needed a recipe for it.  If you haven’t searched through Epicurious.com, please do.  I used the search function to find recipes for Napa cabbage, stumbled onto this one, and tried it.  Fantastic!  I followed the instructions, except I replaced prosciutto with bacon.  Warm, smoky, sweet, and salty.  Try it tonight!

Napa Cabbage with Peas and Prosciutto (recipe courtesy Epicurious)

Ingredients:

  • 2 tablespoons olive oil
  • 1 cup frozen peas, thawed
  • 1 small napa cabbage, trimmed and sliced crosswise
  • 1 ounce prosciutto, chopped (I substituted 3 slices of bacon, minced, cooked, and drained)
  • 1 teaspoon freshly grated lemon zest
  • 1/2 teaspoon fresh lemon juice (or more, to taste)
  • 2 tablespoons freshly grated Parmesan cheese

Directions:

  1. In a large heavy skillet, heat oil over moderate heat until hot but not smoking. Add peas, cabbage, prosciutto, and zest and cook, stirring, 4 to 5 minutes, or until cabbage is wilted and tender.
  2. Remove skillet from heat and stir in lemon juice, Parmesan, and salt and pepper to taste.


Explore, experiment, enjoy! — Dana


To view even more of Dana’s unique recipe, you can visit her at Frugal Girlmet!

Barley Shiitake Risotto

Barley Shiitake Risotto resize

Sometimes I have to peek in my pantry and decide, “Enough is enough!”  Time to use up those odds and ends of things.  I had about a cup of barley left in a bag, so I went in search of a recipe for it.  I found one, made some tweaks, and now I present to you:  Barley Shiitake Risotto!

Barley has a fantastic texture:  firmer than rice, closer to a chewy and delicious wheat berry.  It is wonderful in stews and soups, but it is strong enough to be a star on its own.  This recipe calls for dried mushrooms.  You can use any kind of dried mushroom.  I buy dried shiitake mushrooms at the Korean market, and they’re much cheaper there than what you’ll pay for dried mushrooms at a regular grocery store.  For the broth, I made bone broth…but you can use any kind—chicken, beef, or even vegetable broth, that you like.  The original recipe called for grated parmesan, which I didn’t have.  I used a very hard white cheddar.  You can use any hard cheese you like – if you can grate it, you can use it here!

This is not a forget-it-type recipe.  You do need to stir it every few minutes to get the right texture.  Just start this on the stove while you’re making a salad or prepping the rest of your dinner and it will all work out…I promise!

Barley Shiitake Risotto

Ingredients:

  • 1 cup dried shiitake mushrooms (or other dried mushroom)
  • 1 cup white wine
  • 1 tablespoon olive oil
  • 1/2 small onion
  • 2 cloves garlic
  • 1 cup barley
  • 4-5 cups broth
  • salt and pepper to taste
  • 1/4 cup grated hard cheese (parmesan, very firm white cheddar, or other cheese)

Directions:

  1. Put the dried shiitake mushrooms in a bowl.  Pour over the white wine.  Put another bowl on top of the mushrooms so that they remain submerged in the wine and microwave for 30-60 seconds.  Let the mushrooms rehydrate while you work on step 2.
  2. Mince the onion fine.  In a large, heavy-bottomed pot, heat the olive oil, and add the onion.  Stir over medium heat.  You want the onions to turn golden.  Meanwhile, in a smaller pot, heat the broth to a simmer.  Keep it simmering over low heat.
  3. Mince the garlic, and add garlic and barley to the pan with the onions.  Stir to combine, cooking for 3 minutes.
  4. Squeeze the mushrooms over the bowl and chop.  Add the mushrooms and the wine from the bowl to the barley.
  5. When the wine is almost all absorbed, add a ladle-full of broth.  Stir to combine.  Repeat this process, adding more broth every five minutes or so, when the last addition of broth is nearly absorbed.  You don’t want the pan to get dry, but you don’t want to make soup either.  This should take about 30 minutes for all of the broth to be added, stirred, and absorbed.
  6. After all the broth is added, taste a bit of the barley.  It should be firm and chewy.  If it’s still dry and not al dente, add more stock or water.
  7. When barley is done—chewy and al dente—season with salt and pepper.  Stir in grated cheese and serve hot. (Garnish with extra cheese and take a photo – optional.)

Explore, experiment, enjoy! — Dana


To view even more of Dana’s unique recipe, you can visit her at Frugal Girlmet!

Kale and Barley Salad

Kale and Barley Salad resize

My husband and I eat mostly Paleo.  That means we avoid grains.  But occasionally, I do eat whole grains like barley, wheat berries, or quinoa.  I like their hearty texture and nutty flavor.  They go especially well with greens, as in this Kale and Barley Salad.

You pretty much cover all the bases with this one:  leafy green kale, salty feta, tart dried cranberries (or cherries, or raisins), rich walnuts, and a dressing with a balance of sweet and savory to tie it all together.  You can make this hours ahead of time – even in the morning – and the kale will still have a sturdy texture.  I even eat the leftovers the next day and the kale is chewy and wonderful.  Can’t say that about a lettuce salad!

Try this with pearl barley, wheat berries, or quinoa.  Let me know what you think!

Kale and Barley Salad

Ingredients:

  • 1/3 cup pearl barley
  • 1 large bunch of kale
  • 1 heaping tablespoon tahini
  • 1 teaspoon lemon juice or apple cider vinegar
  • 1/2 teaspoon honey
  • 1/4 teaspoon soy sauce
  • 1/4 cup olive oil or sesame oil
  • 1/3 cup dried cranberries
  • 2 ounces crumbled feta cheese
  • 1/2 cup walnuts

Directions:

  1. Boil one cup of salted water.  When the water boils, add barley and reduce heat to a simmer.  Cook until done and the water has evaporated, about 20 minutes.  (Depending on the grain you’re using and other factors, these directions may vary.  Use your best judgment.)
  2. While the barley is cooking, prepare the kale:  Tear bite-sized pieces off the tough ribs and wash thoroughly.  Spin dry and place in a very large bowl.
  3. Make the dressing:  In a bowl, combine tahini, vinegar, honey, and soy sauce.  Mix in oil.  Pour it over the kale and mix it in with your hand.  Really!  Get in there and massage and squeeze the kale, to make the dressing stick and soften up the tough leaves.
  4. Add the barley, cranberries, feta, and walnuts.  Toss again and refrigerate until ready to serve.

Explore, experiment, enjoy! — Dana


To view even more of Dana’s unique recipes, you can visit her at Frugal Girlmet!

Dijon Dill Green Beans

Dijon Dill Green Beans resize

If I remember correctly, this is a recipe from the South Beach Diet book.   In any case, regardless of origin, these Dijon Dill Green Beans are delicious and healthy…and sure to please!

The Dijon dill dressing is very light and won’t hide the sweetness of the green beans.  I’ve used both dried dill and fresh, and they both taste great, so don’t fret or make a trip to the store if you only have dried.  Low-carb, low-cal, and tasty for sure, this veggie side will taste great with whatever main dish you’re making tonight!

Dijon Dill Green Beans

Ingredients:

  • 1 pound green beans, fresh or frozen
  • 2 tablespoons butter
  • 1 tablespoon Dijon mustard
  • 2 tablespoons chopped fresh dill (or one scant teaspoon dried dill)
  • salt and pepper to taste
  • squeeze of lemon, optional

Directions:

  1. Prepare the green beans:  (If using fresh, take off the ends and cut into 2-inch lengths.)  Steam or microwave the beans until they are still a little firm.
  2. While the beans are cooking, heat a large pan over medium and add the butter and dill.  Stir to keep the dill from burning and cook for a few minutes until the butter is bubbly and starting to brown.  Add the Dijon mustard and salt and pepper.
  3. Drain away any excess water from the beans, then add to the dill mixture.  Stir to coat the beans, then serve hot with a squeeze of lemon or another pinch of salt.

Leftovers?  I ate mine cold, with a can of tuna mixed in and (surprise!) a little more lemon juice squeezed over the top.  Yum!

Explore, experiment, enjoy! — Dana


To view even more of Dana’s unique recipe, you can visit her at Frugal Girlmet!


Roasted Vegetables with Buttermilk Herb Sauce

Roasted Vegetables with Buttermilk Herb Sauce Resize

Did you have a fun and festive St. Patrick’s Day?  We didn’t do too much to celebrate.  (I have a little Irish in me, but no freckles!)   I did make a cabbage dish on Monday, leaving me with half a head of green cabbage.  I love roasting wedges of cabbage, but I wanted something a little more assertive, so I decided to make an herb dressing for them.  Add in some other roasted veggies, and I came up with this recipe for Roasted Vegetables with Buttermilk Herb Sauce.

Buttermilk is not something I grew up with, so I can’t really say much about it.  It does have a pleasantly sour taste that adds complexity to baked goods (think pancakes) and sauces.   If you add a lot of dill and pepper to this recipe, you’d have something very close to ranch dressing, but without all the chemicals and preservatives in bottled or packaged varieties.  I used parsley because that’s what I had but I’d like to try it next time with a big handful of tarragon.  If you grow your own herbs, this is the perfect canvas for trying new flavor combinations!

I served the sauce over roasted cabbage wedges and roasted golden beets.  Here is a list of other vegetables I think this would taste good on:  carrots, leeks, green beans, baked potatoes, and Brussels sprouts with bacon.  I served this with balsamic-glazed salmon last night, and you know what?  The sauce went great on the fish too!  I had a little sauce left over, so this morning I used it to make chicken salad for my husband’s lunch.  Find your own way with this delightfully green and springy sauce—start here!

Roasted Vegetables with Buttermilk Herb Sauce

Ingredients:

  • 4 beets
  • olive oil
  • 1/2 head green cabbage
  • 1/2 cup buttermilk
  • 3 tablespoons plain yogurt
  • 4 green onions
  • handful of fresh herbs:  use parsley, tarragon, dill, or a combination of these
  • 1 clove garlic or 1/2 teaspoon garlic powder
  • salt and pepper to taste
  • squeeze of lemon if desired (I used a big squeeze – okay, two big squeezes!)

Directions:

  1. Preheat oven to 400*F.  Prepare the beets for roasting:  Wash them and remove any greens from the top.  In a large rectangle of aluminum foil, place the beets, root tip facing up, in the middle.  Drizzle with a little olive oil, maybe a tablespoon total.  Wrap up the beets in the foil and place in a pie plate or Pyrex bowl.  Bake for one hour or until they give when you push on them.  Set aside to cool.
  2. While the beets are baking, prepare the cabbage: Cut out the core of the cabbage, then cut the cabbage into 4 wedges.  Place them on a foil-lined baking sheet and drizzle each wedge with about 1/2 teaspoon of olive oil.  After the beets have been in the oven for half an hour or so, add the cabbage.  Bake for about 15 minutes, then flip them over and bake again for about ten minutes.  (The time will vary depending on your oven, your cabbage, et cetera.  You want the cabbage to get golden and a little crispy at the edges, but not too dark!)
  3. While the vegetables are cooking, combine buttermilk, yogurt, green onions, herbs, and garlic in a food processor.  Taste it…need more garlic?  Go ahead!  Add salt and pepper and a squeeze of lemon if you like and blend again.  Taste to make sure it’s yummy, and then put in the fridge until ready to serve.
  4. Skin the beets:  once they are cool enough to handle simply slip the skins off with your fingers.  If you are using red beets, you may want to wear gloves, since they will turn your fingers pink!
  5. On each plate, lay down a wedge of cabbage and a beet cut into quarters.  Serve the hot veggies with the cold buttermilk herb sauce.

Explore, experiment, enjoy! — Dana


To view even more of Dana’s unique recipe, you can visit her at Frugal Girlmet!

Brussels Sprouts and Kale Salad

Kale and Brussels Sprouts Salad Resize

Now you ladies know I love a good salad.  I will eat a salad for breakfast – in fact, I’m finishing this big bowl of Brussels Sprouts and Kale Salad right now, with my morning coffee!  Raw Brussels sprouts—for breakfast?!  Yes indeed!

I found this recipe on the Bon Appetit website, which I tweaked to my liking.  The best thing about this salad, aside from the fact that it tastes good, is that it is so hearty.  I made it last night, had some for dinner, and it’s still good this morning!  But because it’s so sturdy, you’ll want to keep the nuts, fruit, and cheese separate until you’re ready to eat it.  You can sub any dried fruit you like for the cranberries:  cherries, blueberries, golden raisins, and diced dried apricot would be delicious too.  And if you don’t have toasted almonds, substitute pecans, walnuts, or hazelnuts.  Check it out, and report back with your chosen combination of flavors!

Brussels Sprouts and Kale Salad

Ingredients:

  • 1 bunch Tuscan kale (also called dinosaur or lacinato kale)
  • 1/2 pound large Brussels sprouts
  • 1 shallot (or 1/4 red onion)
  • juice of one large lemon
  • 1/3 cup olive oil
  • 1/2 teaspoon honey
  • to serve:  almonds, dried cranberries, and Parmesan cheese
  • salt and pepper

Directions:

  1. Prepare kale:  Strip the leaf off the thick stem, then soak the leaves in cold water to remove any dirt.
  2. While the kale is soaking, prepare the Brussels sprouts:  cut off the stem end and any brown or wilted leaves.  Slice in half lengthwise, and lay down flat on the cut side.  Thinly slice each sprout half to create shreds.  Place shredded sprouts in a very large bowl.
  3. Dry the kale.  Grab a handful and sort of wad it up, then run your knife through the kale to shred it.  Add to the sprouts in the  bowl.
  4. In a small food processor, blend together the shallot, lemon juice, olive oil, and honey.
  5. Pour over the kale and mix with your hands.  I mean get in there!  Massage the dressing into the kale, squeezing it to soften everything up and get the dressing into all the sprouts and kale.
  6. To serve:  Dish salad into a bowl.  Take a handful of almonds and crush with a knife or in a mortar and pestle – just crack them lightly, you don’t need to pulverize them.  Add the cracked nuts and cranberries to the salad, then shred some Parmesan to go on top.  I shaved the block of Parmesan with my vegetable peeler, but you don’t have to do that if you don’t want.  Season with salt and pepper and serve.

Explore, experiment, enjoy! — Dana


To view even more of Dana’s unique recipe, you can visit her at Frugal Girlmet!

Crustless Kale Quiche

Crustless Kale Quiche Resize

Talk about a tongue twister!  It’s worth the effort to say, and the little bit to make, because this Crustless Kale Quiche hits the spot.

I’ve only made this once … and I’ve already eaten almost half of it.  The kale adds a little bitterness and chew to what would otherwise be a run-of-the-mill spinach pie.  Nutmeg, currants, and pepitas add an almost sweet, Middle Eastern flavor profile.  The three eggs are just enough to combine the ingredients without becoming heavy or custardy like a regular spinach quiche.  Don’t get me wrong – a traditional spinach and swiss cheese quiche is wonderful, but this one is lighter, with an unexpected combination of flavors that will have you craving it again.

I ate this hot, and I ate it cold, cut right out of the fridge.  I ate this with a big slab of goat cheese on top and I ate it plain.  I’m going to eat more of it with dinner tonight and see if I can’t discover some new way to enjoy it.  If you want your greens, with a little extra zing, try this instead of a salad tonight!

Crustless Kale Quiche

Ingredients:

  • 1 pound bag of frozen chopped spinach
  • 1 large bunch of kale
  • 3/4 cup pepitas (or try pine nuts or sunflower seeds)
  • 1 tablespoon coconut oil (or butter) plus more for greasing the pie plate
  • 1 teaspoon chopped garlic (about 2 cloves)
  • 1/2 cup currants or raisins (next time I’m trying golden raisins!)
  • 1/8 teaspoon ground nutmeg
  • 1/2 teaspoon salt
  • 3 eggs
  • Goat cheese, to serve, if desired

Directions:

  1. Wash the kale and remove from the stem, tearing it into smaller-than-bite-sized pieces.  Saute on medium heat in a large pot with a lid.  Don’t add any extra water or oil – just the damp kale by itself.  Stir occasionally until it gets soft, about 15 minutes.  When it appears soft and has reduced in volume, pour in the bag of frozen spinach.  Stir to combine and replace the lid.  Cook on medium-low for another five minutes until the spinach is thawed.  Remove from the heat and let cool.
  2. Preheat the oven to 350*F.  While the spinach and kale are cooling, heat the coconut oil over medium and add the pepitas.  Stir frequently for 5 minutes, then add the garlic and currants.  Stir for another 3 minutes.
  3. Squeeze out as much water from the kale mixture as possible, then dump it into a large bowl.  Pour over the pepita mixture and combine.  Add nutmeg and salt.
  4. Beat 3 eggs well and mix into kale mixture.  Grease a pie plate, then fill with the kale mixture.  Smooth it down so you have a flat top.  Bake for 35 minutes or until not wet in the middle.  Serve warm or cold, with goat cheese or without.

Explore, experiment, enjoy! — Dana


To view even more of Dana’s unique recipe, you can visit her at Frugal Girlmet!

Chinese Chicken Salad

Chinese Chicken Salad Resize

As Coleen pointed out in her post on Monday, this is National Soup Month!  She will be sharing some of her favorite soups with us.  And what makes a better meal than soup and salad?   One of my favorite salads is Chinese Chicken Salad!

This is perfect for winter, because all of the ingredients are in season now.  Instead of canned mandarin oranges, you can probably find fresh ones now – I’ve got Clementines and Satsumas left and right at my grocery store.  Red cabbage and carrots are always around, as are green onions.  For the base, I used Napa cabbage, but if you don’t have that, you can use any kind of lettuce you like, or really finely chopped green cabbage.  I cooked some extra chicken breasts last night so I could chop them up cold and throw them over the salad, but you can use whatever chicken you like – roasted, store-bought rotisserie, or even breaded chicken nuggets!

This recipe serves two as part of a lunch or dinner menu.  Try this salad with any soup you like, or paired up with a sandwich, wrap, or pasta dish.  Filling, nutritious and delicious – and it won’t break any of your New Year’s resolutions!

Chinese Chicken Salad

Ingredients:

  • 1 small head Napa cabbage, or romaine lettuce
  • 1/2 head small red cabbage
  • 2 carrots
  • 2 or 3 green onions
  • 2 mandarin oranges
  • 2 cooked chicken breasts, or 3 cups chopped cooked chicken
  • 2 tablespoons sesame oil
  • 2 tablespoons rice vinegar
  • 1 tablespoon sesame seeds
  • salt and pepper to taste

Directions:

  1. Chop the Napa cabbage into inch-wide strips.  Finely slice the red cabbage.  Place both in a salad spinner and rinse under cold water, then spin dry.
  2. Cut the carrots into matchsticks.  Finely slice the green onions.  Peel the oranges and remove as much of the white pith as possible.  Separate into segments.  Dice or thinly slice the chicken breasts.
  3. To assemble:  In two very large bowls, mix together the cabbages, carrots, and onions.  Arrange the oranges and chicken breasts on top.  Drizzle each salad with one tablespoon each of sesame oil and rice vinegar, and sprinkle the sesame seeds, salt, and pepper on top.

Explore, experiment, enjoy! — Dana


To view even more of Dana’s unique recipe, you can visit her at Frugal Girlmet!

The Five B’s: Butternut, Brussels Sprouts, Baby Bellas, Bacon, and Balsamic

2013-11-06 18.45.34


Raise your hand, please, if you—like me—are planning out and testing recipes to serve at your Thanksgiving Day meal!  Over the next few weeks, both here on the blog and also over in our FaceBook GCH-Fellowship page, we will be chatting about recipes for the big feast.  Last Friday, Dana shared that “…it is always good to have a couple of side dish recipes in mind.”  She gave us her recipe for a delicious-looking side dish salad here on the At Home with GCH blog.

So today I am giving you a recipe entitled The Five B’s: bacon (yum!), butternut (oh, yum!), brussels sprouts (yumm-o!), baby bellas (yum-yum!) and balsamic (yummy!)….silly, I know.  But seriously, consider trying this as a side dish for your Thanksgiving feast!  Easy to prepare (the veggies can be prepped the day before).  And the prepared dish can be popped into the oven the moment you take the bird out!  It will be done and piping hot when your bird has finished resting and been carved.  This dish definitely fits into our healthy but oh-so-yummy point of view!  Enjoy!

2013-11-06 18.45.52

Five B’s: Butternut, Brussels Sprouts, Baby Bellas, Bacon and Balsamic

Ingredients:

3-4 tablespoons olive oil, divided
1/2# thickly sliced bacon, chopped
1+1/2# Brussels sprouts, trimmed and halved
1 medium-large butternut squash, cleaned and cubed
8 ounce container Baby Bellas, cleaned and quartered
3 tablespoons balsamic vinegar
2 tablespoons maple syrup (the REAL stuff, please!)
1+1/2 teaspoon coarse kosher salt
1 teaspoon fresh ground pepper
1/2 teaspoon ground allspice
pinch fresh grated nutmeg

Preparation:

  • Preheat oven to 400.
  • In a medium-sized saute pan, heat 1 tablespoon of oil over medium heat. Add the chopped bacon and cook 8-10 minutes ‘til crispy. Lay out on a paper towel to drain; set aside.
  • Lightly oil a large sheet pan (or two!) with olive oil.
  • In a very large bowl, or stockpot, pour in the prepared veggies…Brussels sprouts, butternut squash, Baby Bella mushrooms…along with 1-2 tablespoons olive oil; stir well to evenly disperse the oil and season well with salt & pepper.
  • In a small bowl, whisk together balsamic vinegar, additional 1 tablespoon olive oil, and maple syrup. Drizzle this mixture over the vegetables and toss so that they are evenly coated.
  • Spread out vegetables in a single layer (very important!) in the pan(s); sprinkle with salt, pepper, allspice and nutmeg.
  • Roast in the oven for about 20 minutes; carefully remove pan(s) stir and flip over the veggies so that the other side can caramelize. Place back in over and continue to cook for an additional 10-15 minutes or ‘til the veggies are slightly brown and caramelized.
  • Remove from oven and, just before serving, top with crumbled bacon

♥  ♥  ♥  ♥  ♥

God loves you ♥  (Don’t ever forget that!)

♥  coleen