April 26, 2024

Baked Beans

Baked Beans resize Happy Independence Day!  I’m hoping you are able to celebrate with family and friends today.  What’s on the menu? One of my guilty food pleasures is a right-off-the-grill hot dog.  I know, not the most gourmet of foods, or the healthiest, but everything in moderation, right? And what goes better with hot dogs than baked beans?  Now you could just open a can of baked beans and plop them in a saucepan, but where’s the fun in that? Make your own!

Once I decided to do just that, I found my Mom’s recipe for baked beans.  That poor note card has seen better days, but its hard-used appearance proves what a popular recipe it is.
Baked Beans Recipe Card Mom resize
 
I didn’t have any canned white beans in the pantry, but I did have a one-pound bag of dried white beans. They take more preparation than canned beans (obviously – canned beans come out ready for use) but are worth the effort.  First, dried beans are cheaper than their canned cousins, because once you soak and rehydrate them, they double in weight. (Put another way, when you buy canned beans, you are paying for water.)  Second, you are avoiding any salt, preservatives, or chemicals in the canned beans, not to mention the chance of BPA in the can itself.
 
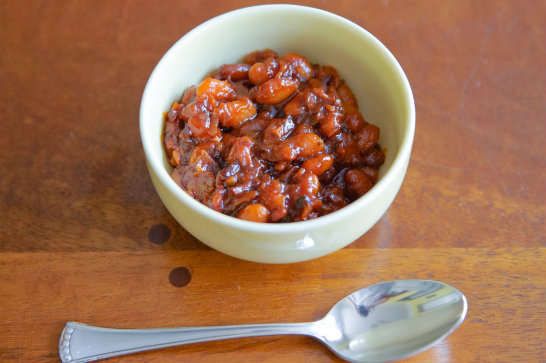
Anyway, I soaked the beans the night before, but they double in size, so I only used half. (You could freeze the rehydrated beans in a Ziploc bag and thaw them when you have another recipe for them.)  I used my Mom’s recipe as a jumping off point, and they were just as delicious as hers were.  I realized they don’t need to bake in the oven and are great on the stovetop—that way you won’t have to heat up your kitchen on a hot summer day to make them.  These are easy, cheap to make, and will impress everyone who has them.  Hearty, smoky, and fantastic, these put those  gloopy canned baked beans to shame!

Baked Beans

Ingredients:
  • 1/2 pound dried white beans, soaked overnight in 6 cups water (or use 2 cans of white beans, reserving some of the canning liquid)
  • 5 slices bacon, diced 
  • 1 onion, diced
  • 3/4 cup ketchup
  • 1 tablespoon mustard
  • 1/4 cup BBQ sauce (optional, but I like the smokiness – you could also try a few dashes of liquid smoke)
  • 1/4 cup molasses
  • 1/4 cup dark brown sugar
Directions:
  1. If you are using canned beans, skip to Step 2.  If you are using dried beans: Drain the water from the beans you soaked overnight. Put the beans in a pot, cover with about 4 cups of water and a lid, and cook over medium heat for about 2 hours. You don’t want to cook off all the water, so check in on them every once in a while. When they’re done, save about a cup of the cooking water to use in the baked beans, in case you like them a little “saucier” than I do.  
  2. In a Dutch oven or very heavy-bottomed pot, fry the bacon. When it’s about halfway to crunchy, add the onion. When the bacon looks done, add the beans. Turn the heat down to low and stir everything together for a few minutes.
  3. Add the rest of the ingredients and stir to combine. Give it a taste and see if you need to adjust the seasonings. It likely won’t need salt, but you may like some pepper.
  4. Cover and cook on low heat for half an hour. Check the consistency – if it’s too thick, add some of the bean cooking water; too thin, take the lid off and let simmer.  Serve hot.
Explore, experiment, enjoy! — Dana


To view even more of Dana’s unique recipe, you can visit her at Frugal Girlmet!

Crunchy Chopped Salad


Crunchy Chopped Salad resize

I think this was originally a recipe from a South Beach Diet cookbook.  But I started making it so long ago, and have added and deleted ingredients over the years…so that I am not sure it’s the same one in the book.  That’s okay – it’s not about exact ingredients.  You can add or subtract as you like.  It’s about CRUNCH!  And that’s what you get in this Crunchy Chopped Salad!

I know that chips aren’t great for me.  I usually don’t crave them, and I make sure I don’t keep them in the house (because as a stay-at-home mom, you DO eat whatever is in the pantry!)  But sometimes you just get that urge for something kind of salty and crunchy.  I make this salad instead.  Is it the same?  Of course not!  (Otherwise I’d call it Doritos Salad!)  But this satisfying, fun-to-eat dish  scratches that itch for me, and maybe it will for you too.

If you need a break from lettuce, try this.  If you have lots of singleton vegetables in your crisper drawer, try this.  If you want something fresh and different for your next cookout, try this!

Crunchy Chopped Salad

(Serves four as a side dish)

Ingredients:

  • 6 baby carrots
  • 1 bunch radishes, trimmed
  • 3 stalks celery, trimmed
  • 2 Persian cucumbers, or one large cucumber
  • 1/2 red bell pepper
  • 1/2 yellow bell pepper
  • 2 green onions
  • 2 cloves garlic
  • juice of 1 lemon or lime
  • 2 or 3 drops of honey
  • salt and pepper
  • 1/4 to 1/3 cup olive oil
  • 2 avocados

Directions:

  1. Wash and trim all your veggies.  Cut them all into medium-small pieces.  This is up to you, but for example, I cut the peppers into 1/2″ square pieces.  The radishes, cucumbers, carrots, and celery all get sliced vertically, then cut into 1/4″ slices.  If you dice everything too small, you won’t get the crunchiness.  If you cut everything too large, you’ll only get one or two veggies on your spoon at a time.  Experiment and see what size you like best.  If you are using a large cucumber, you may want to peel off the waxy skin and scoop out the seeds.  I like Persians because they are thin-skinned and have very little squishy gel around the seeds.  Pile all your chopped veggies into a big bowl and toss.  Beautiful, right?
  2. In a little food processor, blend up your garlic, lemon juice, honey, salt and pepper, and 1/4 cup olive oil.  Taste and dilute with more oil if you like.
  3. To serve, dish the salad into a bowl and drizzle liberally with dressing.  For each serving, dice half of an avocado and place it on top (otherwise it gets smushed.)  Eat this salad with a big soup spoon so you get a little of each vegetable in every bite!

If you have leftovers, you can mix in a can of tuna the next day.  It’s wonderful!


Explore, experiment, enjoy! — Dana


To view even more of Dana’s unique recipe, you can visit her at Frugal Girlmet!

Shrimp with Corn and Black Bean Salad

So, remember last week I shared my husband’s epiphany in realizing he really does like Tex-Mex, Cal-Mex, Mexican type foods?  Ok…n-o-w he is requesting it as part of our weekly menu!   The following is an easy, quick-to-make weekday supper that is healthy but oh-so-yummy!  First dish is a Black Bean and Corn Salad along with some delicious Tex-Mex influenced shrimp.  I am definitely going to keep this in the summertime meal rotation…light, refreshing, and won’t heat up the kitchen!

Black Bean and Corn Salad

2014-06-01 15.44.41

ingredients:
2 cups corn (fresh or frozen)
1/2 cup cucumber, peeled, small diced
1 small jalapeno, seeded and finely diced (optional)
1 (15 ounce) can black beans, drained and rinsed
1/2 cup sweet onion, finely diced
juice of 1/2 large lime
1 teaspoon olive oil
sea salt and freshly ground pepper, to taste

salad directions:
combine all ingredients; pour into a storage bag or container and refrigerate for at least 30 minutes for flavors to combine.

Tex-Mex Shrimp

marinade ingredients:
juice of 1/2 large lime
1 tablespoon olive oil
1 tablespoon chipotle chili powder
1 heaping tablespoon chopped garlic
1 teaspoon honey
pinch of cayenne pepper (optional)
sea salt to taste (I used a lemon-pepper-salt combo)
1/2 # medium to large shrimp, tails removed

marinade directions:

  • simply whisk ingredients together in a medium-sized glass bowl
  • add in shrimp and refrigerate for 30 minutes.

To finalize your dish

  • heat a saute pan over medium-high heat
  • pour shrimp and some of the marinade into the pan
  • cook for 1-2 minutes ‘til starting to turn pink
  • immediately flip over and cook other side for additional 2 minutes
  • remove from heat; do not over cook

2014-06-01 19.45.41

To serve:
I warmed up a couple of gluten free flour tortillas, and placed them (folded up) on each plate with a portion of the Black Bean and Corn Salad and some of the marinated shrimp. On the side, we also had some Spanish rice, fresh guacamole, and a dollop of sour cream.

This would also be delish (and low-carb) served with lettuce leaves to spoon the shrimp and salad into and roll up. I would love to hear of some of your ideas for serving and side dishes!


♥   ♥   ♥   ♥   ♥

God loves you!  ♥  (Don’t ever forget that!)

♥  coleen

Lemon – Mustard Roasted Baby Potatoes

2014-03-29 20.57.45Sometimes I find that I am preparing the same boring side dishes to serve with our meals.  How about you?  So I always have my eye open for little tweaks or twists on the ‘same old, same old’ standards…like roasted potatoes.  These were on my menu this week. So I planned on buying some red potatoes.  And then, when I was at the grocery store, I found some lovely baby red potatoes.  Oh, happy me!

2014-03-29 20.08.29

Take a look around in the produce aisle at the grocery store or at the Farmer’s market.  They come in either red or yellow (Yukon Gold) or (my favorites!) even purple varieties.  When you find them, buy ‘em!  You will not regret it!  They can be boiled, steamed, roasted, baked, grilled…I suppose you could even microwave them.

These Lemon-Mustard Potatoes will get some crispy edges and have a yummy coating baked right on!  We enjoyed them with baked tilapia filets and steamed fresh green beans.  This recipe makes approximately 4 servings…easily doubled!

2014-03-29 21.05.09

Lemon – Mustard Roasted Baby Potatoes

Ingredients:
3 tablespoons extra-virgin olive oil
Zest of 1 large lemon
Juice of that lemon (approximately 3 tablespoons)
2 tablespoons Dijon mustard
1 tablespoon fresh thyme (or dried, if that is all you have)
1/2 teaspoon sea salt
1/2 teaspoon freshly ground black pepper (I used lemon pepper)

1 1/2 pounds baby red potatoes
1/2 teaspoon kosher salt
1/2 teaspoon freshly ground black pepper

Directions:

  • Preheat oven to 375. Line a heavy baking sheet with foil. Set aside.

For the vinaigrette:

  • Zest and juice the lemon.
  • In a large bowl, whisk together the lemon juice, lemon zest, olive oil, mustard, thyme, salt, and pepper until smooth. Remove 2 tablespoons of the vinaigrette and set aside. (I used this extra bit to coat the fish filets.)

Prepare the potatoes:

  • Scrub the potatoes.
  • Cut in half any that are larger so that all of the potatoes are approximately the same size.
  • Place the prepared potatoes into the bowl along with the vinaigrette.
  • Stir to thoroughly coat them.
  • Pour out onto the lined baking sheet.
  • Bake for 15 minutes, then turn over.
  • Check the potatoes with a thin-bladed knife after 25 minutes. They are done when the knife easily slides right through the potato. They might take up to 45 minutes depending on their size. (If not quite done, continue roasting.)
  • When done, scoop into a serving bowl and sprinkle with a bit more salt and pepper. Enjoy!

♥  ♥  ♥  ♥  ♥

God loves you!  ♥  (Don’t ever forget that!)

♥  coleen


Brussels Sprouts with Bacon


Brussels Sprouts with Bacon

Fall is here, and I couldn’t be happier!  One of my favorite cool weather veggies is Brussels sprouts.  I remember growing up, my sister hated them so much, she only managed to choke them down if she smothered them in yellow mustard.  If you have someone like that in your family, reintroduce them to this wonderful, healthy vegetable with this recipe for Brussels Sprouts with Bacon!  This side dish comes together quickly…and, yes, you can feel free to double the amount of bacon in the recipe.

Brussels Sprouts with Bacon

Ingredients:

  • 2 slices bacon
  • 1 pound Brussels sprouts
  • 1/4 cup plain yogurt or sour cream
  • 1 teaspoon prepared horseradish
  • salt and pepper

Directions:

  1. Fry the bacon.  You want it pretty crispy.  When done, remove from pan to cool, but do NOT drain the bacon grease from the pan.
  2. While the bacon is cooking, prepare the Brussels sprouts:  Trim off the bottoms and slice in half lengthwise.  Remove any outer leaves that are yellow or spotty.
  3. Add the sprouts to the bacon grease in the pan.  Saute for about five minutes until they start to color a little.  Add 2 tablespoons of water and cover with a lid, so you are now steaming them.  Cook for another five minutes, then remove the lid and cook them uncovered for about 3 minutes.  They should be getting golden and softening up a bit.
  4. While the sprouts are steaming, combine the yogurt and horseradish in a large bowl.  When the sprouts are done and al dente, pour them into the bowl and toss with the yogurt mixture.  Dice the bacon and add it to the bowl, or you can sprinkle it over the top if you like. Season with salt and pepper, and toss again.  Serve warm!

Explore, experiment, enjoy! — Dana


To view even more of Dana’s unique recipe, you can visit her at Frugal Girlmet!

At Home with GCH: Broccoli Bacon Salad


Broccoli Bacon Salad

Bacon!  Did that get your attention?  (My husband’s ears always perk up when he hears that word.)  This salad is a family favorite.  I love vegetables of every kind, but it’s nice to take a break from lettuce-based salads.  You probably have everything you need for this salad at home already.  If not, pick up some broccoli and let’s get to it!

Broccoli Bacon Salad

Ingredients:

  • one pound small broccoli florets, about 7 cups
  • 1/4 cup minced red onion
  • 1/4 cup sunflower seeds
  • 1/4 cup raisins
  • 4 strips bacon
  • 3/4 cup mayonnaise
  • 1 teaspoon lemon juice or apple cider vinegar
  • 1 teaspoon sugar, honey, or other sweetener of choice
  • salt and pepper

Directions:

  1. In a large bowl, gently toss together the broccoli, onion, sunflower seeds, and raisins.
  2. Cook the bacon until done – I like it crunchy rather than chewy.  Drain and dice.  Add to the bowl and combine.
  3. Mix together the mayonnaise, lemon juice, sugar, and salt and pepper.  Pour over the broccoli mix and toss to combine.  Taste for seasoning – I usually add a little more lemon juice over the top.  Chill for an hour before serving.That’s it!  This salad is nice the next day, too, since the broccoli softens up a bit.


Explore, experiment, enjoy! — Dana


To view even more of Dana’s unique recipes, you can visit her at Frugal Girlmet!

At Home with GCH: Carrot and Raisin Salad

Carrot Raisin Salad

When I was a kid, we used to have Carrot and Raisin salad all the time.  I’m pretty sure the sole ingredients were shredded carrots, raisins, and mayonnaise.  I loved it!  But these days I want something a little healthier.  Also, I want something I can take to a potluck or family gathering and not have to worry about it sitting out unrefrigerated.  Food poisoning is a real bummer.  Time for a make over!

This recipe is about as simple as it comes, but with a few twists to make it sophisticated and different.  Mint is easy to find (and pretty easy to grow, even on a window sill) and is what sets this Carrot and Raisin salad apart.  This recipe can easily be doubled or tripled so it’s great for parties.  Make this for dinner, or bring to your next potluck, and you’ll be a hero!

Carrot and Raisin Salad

(From Martha Stewart’s Living Cookbook)

Ingredients:

  • 1 pound large carrots
  • 3 tablespoons golden raisins (I usually use closer to 1/4 cup – I love raisins!)
  • 2/3 cup fresh mint leaves, cut into 1/4-inch strips
  • 2 teaspoons fresh lemon juice
  • 1 tablespoon olive oil
  • salt and pepper to taste

Directions:

  1. Grate the carrots on the large holes of a box grater or with a food processor using the grater blade.  In a large  bowl, combine the carrots with the raisins, mint, lemon juice, and olive oil.  Season with salt and pepper and  toss to combine well.  Keep in the refrigerator until ready to serve (I think it tastes better chilled.)

Explore, experiment, enjoy! — Dana


To view even more of Dana’s unique recipe, you can visit her at Frugal Girlmet!


If you would like to contact Dana in regards to this blog, please email her at Dana@girlfriendscoffeehour.com

At Home with GCH: Vegetable Pancakes

Vegetable Pancakes

My Jewish friends call them “latkes” and my Korean friends call them “jeon.”  I call them veggie pancakes, and I wonder why I don’t make them more often!  Kind of like hash browns, these crispy little guys are a great way to get more vegetables in your diet.  I also like them for cleaning out my fridge and getting rid of my “singleton” vegetables – you know, that ONE zucchini in a plastic bag, or the last carrot in the sack.  Frugal, I say!

If you have a food processor with a shredder attachment, you can have this recipe mastered in minutes.  If not, you’ll have to get out the box grater and put some muscle into it.  You can experiment with a large variety of firm vegetables—roots are best—like potatoes, carrots, yams, parsnips, or turnips.  You can also mix in some softer veggies, like zucchini, and any kind of minced herbs you like.  I usually just use green onions, because I always have those on hand, but feel free to try thyme, tarragon, or very finely minced rosemary.  Top with sour cream or plain yogurt and you have a nutritious, unusual side dish that’s at home next to a salad or a steak.  These make a great breakfast, too—add eggs, bacon, and fruit, and you’re in business!

Vegetable Pancakes

Ingredients:

  • 2 small potatoes (Russet or white), peeled
  • 1 large carrot, peeled
  • 1 smallish zucchini
  • salt and pepper
  • 1 egg, beaten
  • 2 teaspoons flour, optional
  • vegetable oil for frying

Directions:

  1. In the food processor with shredder attachment, shred the potatoes, carrot and zucchini.  If you are using a box grater, use the largest holes and coarsely shred all the vegetables.  Season with salt and pepper and set aside, in a large bowl, for ten minutes.  
  2. After ten minutes, squeeze out the water accumulating in the bottom of the bowl.  This will keep your pancakes from getting soggy!  Then mix in the beaten egg – I just use my hand.  If it’s still really watery, you can add a teaspoon or two of flour.
  3. In a large non-stick pan over medium heat, add about 3 tablespoons of the vegetable oil.  You aren’t deep-frying the pancakes, but you do want to make sure there’s plenty of oil, so they don’t stick to the pan.  Drop quarter-cup sized dollops of pancake mixture into the pan, and make sure they don’t touch each othe… they are hard to separate, and won’t cook evenly.  Fry for 3 to 5 minutes per side, so they are crispy and firm.  Repeat with the rest of the pancake mixture, adding more oil to the pan if necessary.  Drain on a paper bag or paper towels and sprinkle with a little salt.  Serve with sour cream.

Explore, experiment, enjoy! — Dana


To view even more of Dana’s unique recipes, you can visit her at Frugal Girlmet!


If you would like to contact Dana in regards to this blog, please email her at Dana@girlfriendscoffeehour.com

GCH:What’s on Your Plate? – Roasted Winter Veggies & Broccoli Craisin Salad!

Thanksgiving week!  Oh boy…here we go!  Don’t you just love it?  I do.  My favorite foods on the table are always the side dishes.  So this week I am going to share two recipes.  Maybe one of them might even end up on your table this year!  Both of these recipes also fall into the healthy but oh-so-yummy category, too!

The first recipe is for Roasted Winter Veggies.  I love roasted veggies…the melange of colors, and textures, and flavors; the nicely caramelized bits; the few little pieces that hover just this side of burnt!  Making roasted veggies is a very forgiving recipe, too.  I have the veggies ready to go into the oven the moment the turkey comes out to rest and be carved.* There are a few basic ingredients; but then you can add and subtract to your heart’s content.

Ingredients:

1/3 cup olive oil

1 medium butternut squash, halved, seeded and peeled

1 large Vidalia onion, peeled

3 large Yukon Gold potatoes  (or 4-5 medium red potatoes), peeled

1 bag (12-16 ounces) carrot chips (or baby carrots)

1# brussel sprouts, trim end off and remove outer leaves (if large, cut in half)

1 small head of cauliflower, trimmed and cut into 1+1/2″ florets

12 ounce pkg Baby Bella mushrooms, stemmed and cleaned; cut into appropriate size

3 medium red beets, peeled (rinse your hands after handling the beets..unless you like a pink tint to your nails and fingers!)

1 tablespoon each: sea salt,  freshly ground pepper


Directions: Prep the veggies, washing anything that needs it. Place two really large low-sided roasting pans (sometimes called cookie sheets with sides) into the oven and preheat oven to 425. Cut everything into approximately 1+1/2″ pieces; don’t cut the veggies too small as all they will shrink a bit while roasting. Just try and have everything fairly close to the same size.

Place all the veggies, EXCEPT for the beets, into a really large bowl (or stockpot). Pour most of the oil over the veggies (add the rest if necessary), add salt &pepper, then gently mix together making sure to thoroughly coat each piece of veggie. Pour onto the heated pans. Then place the cut-up beets into the bowl stirring to coat, and add them to the veggies on the roasting pans. It is important that the veggies are not piled up on one another. You do not want them to steam but to roast.  They should be in a single layer. It might be very snug but they will shrink slightly as they roast.

Roast for 30-35 minutes ‘til the most dense veggies are done when poked with a fork.  I like to <attempt> to turn the veggies over after the first 15 minutes; that way more sides of each piece will caramelize; yum.  Be fairly quick during this turning process as you don’t want to leave the oven open very long!  Once you have determined that they are done, remove from oven.  Turn off the oven.   Carefully taste, adding additional salt and pepper (I always add more!) and place into your serving bowl.  <3

A few other things to keep in mind:

If you are preparing this recipe…and there is nothing else in the oven…follow the directions in the recipe.  HOWEVER, if you are making this on Thanksgiving Day: put the pans into the oven for about 10 minutes before you take the turkey out.  Then while the bird is resting, and being carved, and the gravy is being made, the veggies can be roasting. When the turkey is removed, bump the heat up to 425.  Fill the heated pans, and place them back into the oven.  Roast the veggies for approximately 30-35 minute, check that the densest veggies are done and, if so, remove the pans from the oven and turn off the oven.

At this point, if the meal is not ready to be brought to the table, place the veggies into a serving dish, and place back into the oven ‘til you are ready to go. Other veggies to consider: asparagus, broccoli, parsnips, sweet potatoes, fingerlings, fennel. Leftover roasted veggies?  (Hard to believe, but…) Use them as the key ingredients to roasted veggie lasagna, roasted veggie chowder, roasted veggie omelet or frittata, roasted veggie burritos…the list could go on and on.  These are particular dishes I have made.  How kind would you be to yourself but to have one of these chosen as a quick and easy meal to come home to after Christmas shopping-til-you-drop?

*  *  *  *  *  *  *  *  *  *

And here is the recipe for the second side dish: Broccoli-Craisin Salad.  This is a beautiful raw salad, a very healthy but oh-so-yummy addition to the side dish array on your Thanksgiving Day table.  It has a slightly smoky (from the bacon), slightly sweet (from the honey), slightly tart (from the vinegar), very mellow taste.  I have had MANY supposed broccoli haters be prompted to try just one tiny taste…only to find they enjoy it and come back for more!  We enjoy this salad all year long!  Hoping that your family enjoys it, too!

Ingredients:

2 heads broccoli crowns, cut into small florets*

1/2 pkg Craisins (dried cranberries)

6 slices bacon, cooked and crumbled

1/2 red onion, very thinly sliced

1/2 cup mayonnaise

1/2  cup sour cream

1/4 cup honey, warmed

2 tablespoons apple cider vinegar

1 cup sunflower seeds

freshly ground pepper


Directions:

In a small bowl, stir together mayonnaise, sour cream, honey, and vinegar; set aside. In a large bowl, combine first 4 ingredients. Take mayo mixture and pour over broccoli mixture, tossing gently to thoroughly coat. I pour the dressed mixture into a large zip-top bag to go into the fridge.  Every once in a while, give the bag a flip-over and a couple of squeezes to massage the yumminess all around!

Then when your meal is ready to go onto the table, just pour the salad out into a serving bowl.  Easy-peasy!

Should be prepared at least 4 hours beforehand, up to 8 hours or so. Just prior to serving, stir in the sunflower seeds and ground pepper to taste.

* The biggest hint I can offer to you for this salad is to cut the broccoli florets as small as you possibly can.  I consider it a labor of love and, oh, so worth it!  It is MUCH more palatable to have little florets in your mouth as you munch on this salad rather than a large hunk of broccoli!  Trust me!  You can do the chopping ahead of time, even a day or so, and simply store in the fridge. 😉

Honestly, I have been known to sit in front of the television while doing it! <3

Have a wonderful, thanks-filled Thanksgiving Day! May we each always remember how very much we have to be thankful for and give thanks to the One Who so perfectly and abundantly and graciously provides for our every need!

Psalms 30:12

To the end that my tongue and my heart and everything glorious within me may sing praise to You and not be silent. O Lord my God, I will give thanks to You forever. <3

God loves you!  and I do too.

Coleen <3