April 20, 2024

Cinnamon Baked Apple Chips

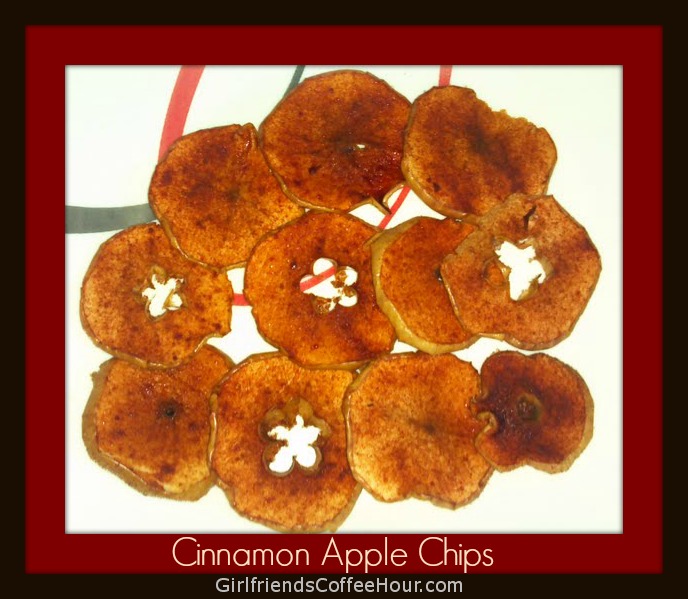
If you are looking for a healthy snack that is easy to make, this is it!  Anything with cinnamon satisfies my taste buds!  That’s why this recipe really appealed to me!  It’s great for you, and for the kids; plus it is just so easy to make!!  Make a few ahead of time and keep in a Tupperware-type storage container.

For this recipe, I am referencing ingredients for just one serving.  You will use one small Gala apple for each person that you are serving.


Cinnamon Baked Apple Chips

Ingredients:

1 Gala Apple, thinly sliced

1/2 teaspoon cinnamon

1 tablespoon Splenda

Directions:

  • Preheat the oven to 225 degrees.
  • Spray a cookie sheet with Olive Oil Cooking Spray.
  • Place sliced apples on the cookie sheet and sprinkle with cinnamon and splenda.
  • Bake in 225 degree oven for 1 hour.
  • Remove from oven, and place sliced apples on a cooling rack for 20 minutes.

ENJOY!!


Cinnamon Apple Chips

Homemade Coconut Flour, and Homemade Cheezits


Homemade Cheezits


So, you fell in love with coconut milk too, right?  It’s your end-all, be-all, new favorite thing? That’s okay if it’s not.  But if you have made it, or plan to, you will be left with a cheesecloth-wrapped ball of pulp.  Now, someone who didn’t know better might just chuck that in the trash.  But not us!  We are going to use the pulp to make Homemade Coconut Flour and, with that flour, we’re going to make Homemade Cheezits!

First, the tools you will need:  You’ll need a baking sheet, parchment paper, and a food processor or blender.  If you have a Silpat silicone baking liner, now is the time to use it.  And you’re in luck:  the ingredients are already in your house, right now!  Once you make (or purchase) coconut flour, you can whip these crackers up in minutes.  The good news is that they have no preservatives, artificial colors or flavors, or any unpronounceable chemicals – hooray!  They come out of the oven the perfect blend of crispy and  chewy, ready for snacking.  The bad news is, because they lack any of that lab-created stuff, they don’t stay crispy.  But that is easily remedied by a quick pass through a toaster oven.  Just a few minutes is enough to make these crackers crunchy again.

Ready to make some homemade, preservative-free snacks your family will love?  Let’s go!

Homemade Coconut Flour

Ingredients:

  • Pulp from 2 batches of coconut milk

Directions:

  1. Preheat oven to 250 F.  Cover a large baking sheet with parchment paper or a Silpat mat.  Spread out the coconut pulp, breaking up any lumps.  Toast the pulp until completely dry and powdery.  You really need to make sure all the moisture is removed.  This can take anywhere from one to two hours.  Stir occasionally to make sure the lumps are broken up and there are no hot-spots, and don’t let it burn!
  2. When the pulp is very dry, let it cool in the oven for another hour or so.  Transfer to a blender or food processor and blend for 5 minutes.  Depending on how powerful your blender is, you can get it pretty fine.  My food processor did a decent job, but the flour was not silky fine in texture.  That’s okay!  Get it as powdery in texture as your tools allow.


Homemade Coconut Flour


Homemade Cheezits

Ingredients:

  • 1/2 cup coconut flour
  • 1 egg
  • 2 tablespoons butter, softened
  • pinch salt
  • 1 1/2 cups shredded cheese (I used cheddar)

Directions:

  1. Preheat the oven to 400F.  In a food processor, blend all the ingredients together.  You will end up with a moist ball of dough.
  2. Line a baking sheet with parchment paper or Silpat liner.  Plop the ball of dough down on the liner, and cover with a piece of parchment paper.  Roll out the dough very thinly, to about 1/8″ thickness.  Try to make it even thickness all the way across – you can see my edges were a little thinner, and they got crispier than in the middle.  That’s fine, but you don’t want a huge variation in thickness.  Remove top sheet of parchment paper and bake for 8-10 minutes until starting to color.
  3. Remove from oven and score with a sharp knife.  You don’t need to go all the way through, because you don’t want to cut your liner or parchment paper.  Bake again for another 8-10 minutes until golden brown and starting to get crispy at the edges.
  4. When it’s cool enough to touch, cut all the way through the crackers, or just use your hands to break them at the perforations.  When cool, store crackers in sealed container.  To crisp, put them on a baking sheet in the toaster oven or regular oven for five minutes.

I think next time I make these, I’ll add a little paprika or garlic powder.  New flavor combinations are exciting!  My girls helped me make these, so here is a photo of them enjoying their handiwork:


B+L Homemade Cheezits


Explore, experiment, enjoy! — Dana


To view even more of Dana’s unique recipes, you can visit her at Frugal Girlmet!

An Easy Gardening Tip for Flower Lovers

Every year as a little girl, my mom would take me and my sisters to pick out summer flowers to plant. My favorite ones were petunias and still are to this day. My mom taught us girls at a very young age about planting flowers. It was always something I enjoyed and have continued as an adult.

Here recently, I learned a tip from my mom that amazed me. She has some large flower pots in her backyard and they are overflowing with petunias, see below.

Pic1

I found out that at the end of the summer she will crumble the dead dried up flowers onto the soil. And alas, they came back the next year. I am finding them everywhere around her yard where they indeed have re-flowered.  Now would be the time to go and get some flowers to plant so you can have fresh blooming flowers next year just by following this simple tip.

Items Needed:

Petunias

Large Flower Pot

Potting Soil

Water


Directions:

Empty the potting soil into the flower pot, almost to the top. Place your flowers about 2-3” apart. The flower pots shown below could take up to 3 large petunias or 6-8 small petunias depending on what type you buy.

Pic2and3

Once you have the flowers in place, add more potting soil until the roots of the flowers are covered.

Water the flowers. (If the soil sinks in around the flowers after watering the first time, just add more soil.)

You will need to water these flowers almost every day, depending on the weather. You will also need to pull off any dead flowers during the blooming season. At the end of the summer when the plants turn brown and are thoroughly dried out, crumple the plants on top of the soil. Doing this will keep the seeds from the flowers in the soil. All you have to do is wait for next spring for them to re-bloom.

Have Fun and Garden Away!

Amy 🙂

Watermelon – Arugula Salad

Here on our At Home with GCH blog, Mondays are always focused on healthy but oh-so-yummy! recipes.  Starting today we are beginning a series on summer salads featuring in-season ingredients.  Our featured ingredient is watermelon and today’s recipe is for a Watermelon – Arugula – Feta Salad. This salad has such a range of flavors—citrusy vinaigrette, sweet watermelon, salty cheese, and peppery arugula—and it is so refreshing!  Almost everyone I know enjoys watermelon…how about you?  Watermelon is available throughout the summer nationwide.  In addition to being oh-so-yummy (a requirement here, y’know!), watermelon is loaded with healthy benefits.  This salad is a nice side dish to something on the grill…chicken, burgers, or fish.  Enjoy!

2013-07-10 18.36.29

Ingredients:

Vinaigrette:
1/4 cup grapefruit or orange juice
1/4 cup freshly squeezed lemon juice (2 lemons)
1 tablespoon honey
1 teaspoon kosher salt
1/2 teaspoon freshly ground black pepper
1/2 cup good olive oil

Salad:
1/4 cup finely diced vidalia onion
6 cups baby arugula
3-4 cups seedless watermelon, (about 2# with rind)
8 ounces crumbled feta cheese
1 ounce pine nuts

Directions:

For the vinaigrette: Pour all of the ingredients (except olive oil) into a bowl, and slowly whisk in the olive oil.  Set aside.

For the salad: Using a melon baller, scoop out watermelon balls into a bowl.  Place arugula and onion into a large salad bowl. Toss with approximately 1/2 of the vinaigrette.  Add watermelon balls, cheese, and nuts.  Toss again.  Serve immediately, offering the rest of the vinaigrette to add to taste.

Substitutions:
For the feta cheese, you could substitute ricotta salata or another salty cheese.
For the pine nuts, sliced almonds would be a wonderful alternative.

♥  ♥  ♥  ♥  ♥

God loves you!  ♥  (Don’t ever forget that!)

♥  coleen

_________________________________

If you would like to send a personal message to Coleen concerning this blog post, you may email her at: Coleen@girlfriendscoffeehour.com

Thai Coconut Chicken Soup (Tom Kha Gai)

Thai Coconut Chicken Soup

I am convinced that every culture, every civilization, has a chicken soup recipe.  Nothing else satisfies or feels so much like a hug to the tummy like a big bowl of chicken soup made by someone you love.  If you are like me and are a frugal girl, you buy a whole chicken at least once a week.  I remove the breasts and legs and cook them one night, then cook the carcass for broth and about two cups of shredded chicken left on the body.  If you have a chicken body and the desire to try something new, read on – here comes Thai Coconut Chicken Soup, also known as Tom Kha Gai!

Now that you know how to make coconut milk from scratch, you’ll need about 2 cups of homemade coconut milk, or you can use one can of packaged coconut milk.  There are a few other unusual ingredients for this recipe:  ginger, cilantro, and fish sauce.  Ginger really isn’t that out of the ordinary, and goes great in smoothies and peach dishes; but if you aren’t going to use it soon, you can peel whatever is left and freeze it to use later.  Cilantro shows up in many different cuisines, so if you don’t want to waste half a bunch of cilantro, you have many options (like Mexican or Indian food), or try this  and  this.  Fish sauce is a savory liquid distillation of anchovy, sugar and salt.  If you can’t find it, you can still make the soup, but fish sauce is the secret ingredient that really brings everything together.  It keeps in the fridge forever, and is a great flavor booster for clam chowder or a substitute for anchovy paste (think Caesar salad.)  The only other ingredients you need are a chicken, some limes, and mushrooms.  Thai restaurants use straw mushrooms, and you can find them in a can, but I used dried shiitake mushrooms here, and they’re delicious.  You could also use cremini mushrooms.

Try this with Jasmine rice and a green salad for a light but satisfying dinner!

Thai Coconut Chicken Soup (Tom Kha Gai)

Ingredients:

  • 1 chicken body, breasts and legs removed (or use two cooked chicken breasts, diced, plus 3 cups of chicken broth)
  • 1 large piece of ginger, 2 or 3 inches long, peeled and bashed with the handle of your knife
  • 1 can coconut milk, or about 2 cups homemade coconut milk
  • 1 ounce dried mushrooms, broken into little pieces, or 8 ounces fresh mushrooms, chopped
  • 1/2 bunch fresh cilantro, chopped
  • 1/2 teaspoon or so fish sauce (to taste – if you don’t have fish sauce, use salt)
  • 2 limes, juiced

Directions:

  1. In a large pot, cook the chicken carcass with 4 cups of water and the peeled, bashed ginger, until the chicken is cooked through. Remove chicken to a large bowl; shred meat from bones and set aside. Strain the broth into another bowl, discarding ginger. Wash the pot and return to stove. Over medium low, add the dried mushrooms to the chicken broth and cook ten minutes. (If using fresh mushrooms, add them in Step 2.)
  2. Add back the chicken to the broth, and pour in coconut milk (and fresh mushrooms, if using).  Cook until simmering.  Add chopped cilantro, fish sauce, and lime juice, and stir to combine.  Taste for seasoning – may need more salt, or you may like more lime (you can add the zest of the lime too, if you want a stronger citrus flavor.)  Serve hot with more chopped cilantro.  You can also stir in a little hot sauce or chili flakes if you like!

Explore, experiment, enjoy! — Dana


To view even more of Dana’s unique recipe, you can visit her at Frugal Girlmet!

How to Make a Decorative Swag

Today, At Home w/ GCH would like to introduce you to our newest blogger, Amy Boyd!  Amy will be sharing some of her craft and DIY projects with us, each Wednesday.  I hope you enjoy her segment and will share your comments with her!

And now…. here’s Amy!!

_______________________________________


Today, I would like to teach you how to make a decorative swag, as shown below.

Swags_Pic1


My favorite place to shop for these items is Hobby Lobby. Other places like Garden Ridge, Trees and Trends, and Walmart would have these items as well. Typically, I spend about $20 to $40 on a project like this. I always have some materials left over, so I definitely save them and use them at a later date.

The size of your swag will depend on the location where you would like to hang it. They come in various sizes. The ones I have completed and have shown below are about 2 feet long. I have found some swags that have a handle at the top which makes for easy hanging.

The types of flowers, adornments, and fillers that you choose for this project is simply a reflection of your own personal taste; find something pleasing to your eye and that will match the décor of the room. Since the swag I chose is brown, I tend to gravitate to lighter colors that will stand out. I myself love butterflies. Every time I see one, I think God is reminding me how beautiful life is and how much there is to be happy about.

When my son Asher was born, I would sit on the couch and feed him and I had the first swag shown below hanging above our couch. He would stare at it and smile and coo almost every time he looked at it.

Swags_Pic2

So, I made one for his room as well. I tried to make it similar since he liked the other one so much. I found some tiny ladybugs to use for his swag, which matched his bedroom perfectly.

Swags_Pic3

A lot of times, the silk flowers come in bunches or on very long stems so it is necessary to cut them apart or to cut off part of their stem with wire pliers. They need to be about half the size of the swag. Then, I begin sticking the flower stems on each side of the swag. You can cut off a piece of floral wire and wrap around the stem to make it stay in a certain place. There is a middle knot that separates each side of the swag. I typically do not glue on the flowers and eucalyptus because they stay in place pretty easily. The butterflies I used have clips on them so I just clip it in place.  I did hot glue the ladybugs right onto one of the stems.

A hot glue gun is easy to use.  Just insert a hot glue stick and plug it in. Always put the hot glue gun on a piece of newspaper or a paper towel because the glue will leak out. You just pull the trigger on the glue gun to squeeze out a small amount that will be used to glue the pieces together.


Items needed:

1 Grapevine Swag

3 Different types of Silk Flowers

2 -6 Adornments like butterflies, lady bugs, sea shells, crosses, etc.

5-6 long pieces of Eucalyptus

2-4 Fillers such as feathers, beads, baby’s breath, etc.

Wire pliers

Floral Wire

Hot Glue Gun

Hot Glue Sticks


Directions:

Basically, you will arrange the materials until you are satisfied with the way it looks. There is no right or wrong way when it comes to making your own crafts.  I’d love to see your pictures if you give it a try.


Have Fun & Craft away!


Amy 🙂


Homemade Coconut Milk and Coconut Chia Pudding

Coconut Milk Jar
I think I speak for everyone who blogs for At Home with GCH when I say that we are not afraid of a little hard work.  Some things are worth the extra time, effort, or energy.  From Christi’s homemade laundry detergent, to Coleen’s gluten-free goodies, we all have tricks to share so you can give your family the safest, freshest, and healthiest choices possible.  I’d like to toss my hat into the ring and offer a recipe for Homemade Coconut Milk!

Coconut milk is a key ingredient in many Indian, Thai, and other Southeast Asian recipes.  It’s also a great staple to have on hand if you are lactose intolerant, or if you are allergic to soy or almond milk.  And while you can find it in a can in many supermarkets, it is quite easy to make at home!  All you need is dried or desiccated coconut flakes, a blender, a colander, and cheesecloth.  Now, this is not the coconut you make into a pie – that stuff is full of sugar and preservatives!  Make sure it is unsweetened, dried coconut.  You can use fresh coconut too, if you can find one. (I can get them at my local Thai market, but you may not have one of those nearby.)  The coconut milk is good for about a week in your refrigerator.  I keep mine in a Ball jar with a lid, but I can’t make it last more than 3 days – it’s that delicious!

What you do with it is up to you.  Pour it over your cereal (or Christi’s Granola), use it in coffee in place of creamer, or make this delicious Coconut Chia Pudding.  Chia seeds can be found online at Amazon, at nearly all health food stores or Whole Foods, and at Trader Joe’s.   Chia seeds are teeny, tiny, little health bombs!  Full of Omega-3 fatty acids, protein, and other necessary things, chia seeds can add crunch to homemade crackers, or top sweet potatoes and salads.  Even better, when mixed with liquid, they create a gel, and make a delicious “pudding” that feels decadent, but is actually quite healthy.  Think tapioca or rice pudding, without all the diet-busting starch!

Coconut Chia Pudding


Next week I’ll have more recipes that use coconut milk, but for now, here are the basics.  Check it out!

Homemade Coconut Milk

Ingredients:

  • 1 cup shredded, dried coconut
  • 1 1/2 cups boiling water

Directions:

  1. Boil water.  (I know, but it has to be said.)  In the pitcher of a blender or a large food processor (I use a food processor and it works fine), pour in one cup of coconut flakes.  Measure out 1 1/2 cups of boiling water and pour over the coconut.  Let sit for about 20 minutes.  Then blend for 2 or 3 minutes if you have a really strong blender, or about 4 minutes in a food processor.  You want to see a foamy slurry.
  2. Line a sieve or colander with a large piece of cheesecloth, folded over on itself.  Place the colander over a large bowl.  Pour the coconut mixture into the cheesecloth and squeeze, squeeze, SQUEEZE!!!  Pour the coconut milk into a jar with a lid and keep refrigerated.
  3. Don’t throw away the coconut pulp!  This can be mixed into smoothies, or spread out on a baking sheet lined with parchment paper and baked at 200*F for about 1 to 2 hours.  When it is completely dry, grind again in the food processor … and you just made coconut flour!  And now for the other recipe…

Coconut Chia Pudding

Ingredients:

  • 1 cup coconut milk
  • 1/4 cup chia seeds
  • 1/2 teaspoon honey (optional, depending on how ripe and sweet your fruit is)
  • 1 cup chopped fruit – I like strawberries, blueberries, or peaches, but find what you like best

Directions:

  1. In a Tupperware container with a lid, pour in one cup of coconut milk and 1/4 cup chia seeds.  Put the lid on and shake to combine.  Put in the refrigerator.  Shake again in one hour.  
  2. The chia pudding should be ready in about 3 hours.  When ready, it should be very thick, like tapioca pudding.  To serve, divide chia pudding between two bowls, drizzle with a tiny bit of honey if desired, and stir in the chopped fruit.  This makes a great dessert, or a nice, light breakfast.


Explore, experiment, enjoy! — Dana


To view even more of Dana’s unique recipe, you can visit her at Frugal Girlmet!


How to Make Cloth Dinner Napkins / Placemats

Ok, I will admit it…I DO NOT KNOW HOW TO SEW that good at all!!!  But by golly, I’ve always wanted to learn! I only know how to sew a baby blanket, and that’s as good as it gets!!  LOL  So today, I ran across a pattern that looked so amazingly simple even I could do it!! And I did!  🙂

Now for you who are awesome seamstresses, you may think “Dinner Napkins/Placemats? Piece of cake!!” But for me, sewing does not come easily! It did for my grandmother and mother, but for some reason that creative gene has hidden itself in me, and is just now beginning to cause a stir in my heart; which I LOVE because I’ve always wanted to be creative like the two women in my life that I loved so very much! Their handiwork was simply amazing, and I’ve asked God, sort of secretly, in my heart for years to bless me with the ability to do some of the things that they did.

So when I say that is BIG for me to show my handiwork to you, it truly IS! I’m like a little girl at Christmastime just waiting for you to open my gift to you, and I can’t wait to see your expression when you see it! Yea, I know, I seem to get a little too excited at times!! My husband reminds me of that often! LOL

So without further adieu, here are the instructions to make your own Cloth Dinner Napkins/Placemats.

How to Make Cloth Dinner Napkins/Placemats

Items Needed:

Materials (to make 6 cloth napkins)

  • 12 fat quarters of quilting cotton (a fat quarter is an 18″ x 22″ piece of fabric found in most fabric stores for as little as $1)
  • scissors
  • ruler
  • chopstick
  • sewing machine
  • coordinating thread
  • iron

Directions:

Step 1

The directions I found instructed me to cut each fat quarter into a square measuring 18 inches x 18 inches.  Choose two fabrics that coordinate well with each other (I used just one piece of fabric) and place the two pieces of fabric right sides together. (For placemats as seen below, you will cut your fabric 11″ x 18″, and then follow all of the steps below.)

Step 2

Sew the squares together along the raw edges using a straight stitch and a 1/4 inch seam allowance, backstitch both at the beginning and at the end of the stitch to secure it. Make sure to leave a 3 inch opening along one side for turning the napkin right side out.

Step 3

Clip each corner to help give the napkin a nice pointed corner once turned right side out. Make sure not to clip the seam you just made!

Step 4

Turn the napkin right side out. Take a chopstick or other pointy-edged object and use it to help push out each corner to a nice point.  This is really a must for tight corners.  I used my fingers because I didn’t have any pointy object, and the corners turned out okay, but they could be better!  My first time…we’ll get by!! 🙂

Step 5

Press the napkin with an iron, making sure to turn in the opening a 1/4 inch.

Step 6

Topstitch around the napkin by sewing a straight stitch and using an 1/8 inch seam allowance, backstitch at both the beginning and end of the stitch to secure it. Topstitching will give the napkin a nice flat decorative finish as well as closing up the opening used for turning the cloth napkin right side out.

The total time it took me to make the six cloth placemats pictured below, including the cutting time, was a total of maybe an hour and a half!  That made me even more excited because I began to think of some awesome Christmas gifts I can give to my kids this year!!

I hope you will give this simple pattern a try, and let me know how you did! 🙂

cloth2(1)


Enjoy your beautiful Cloth Dinner Napkins/Placemats!!


Blueberry Almond Muffins (Gluten Free)

Here on our At Home with GCH blog, Monday’s are always focused on healthy but oh-so-yummy! recipes.  As promised, for the next few weeks I am sharing some gluten free treats that you can bring to your bbq’s, picnics, hoedowns, and block parties.  Perhaps your family loves to hike or go backpacking—this recipe is perfect for you!  

2013-06-25 16.18.01

Today’s recipe is for gluten free Blueberry Almond Muffins.  These are full of protein, contain no refined sugars, and have no added fat (except the 1 tablespoon used for the topping).   Also, a nice substitution for the blueberries would be raspberries…don’t forget to see the tip about freezing them!

Blueberry Almond Muffins

makes 10 muffins

Ingredients2013-06-25 15.23.16
• 2 cups almond flour
• 1/2 cup coconut flour
• 1/2 teaspoon sea salt
• 1/2 teaspoon baking soda
• 6 eggs
• 1/2 cup honey, agave nectar or maple syrup
• 12 drops liquid vanilla stevia (or additional sweetener of your choice)
• 1 teaspoon vanilla extract
• 1 teaspoon almond extract
• 1 cup blueberries, frozen*

Topping Ingredients
• 1 tablespoon butter, softened
• 1 tablespoon coconut sugar

Directions

  1. Put blueberries into freezer
  2. Preheat oven to 350. Put liners into muffin tin
  3. In a large mixing bowl, whisk together almond flour, coconut flour, salt and baking powder
  4. In a separate bowl, whisk eggs; then add honey, stevia, and extracts
  5. Stir liquid ingredients into dry ingredients and blend thoroughly
  6. Gently fold in frozen blueberries*
  7. Spoon batter into lined muffin cups
  8. Lightly pat tops down into rounded heaps; use a pastry brush to dab with butter and sprinkle with coconut sugar
  9. Bake for 22-25 minutes; the tops should be springy yet firm when they are done
  10. Remove from muffin tin immediately and let cool on a rack
  11. Keep in the refrigerator, or place into freezer storage bags or a container

* The purpose of freezing (or using pre-frozen) blueberries is that this batter is very thick; if you used non-frozen berries, they would smoosh. 🙂

♥  ♥  ♥  ♥  ♥

God loves you!  ♥  (Don’t ever forget that!)

♥  coleen

_________________________________

If you would like to send a personal message to Coleen concerning this blog post, you may email her at: Coleen@girlfriendscoffeehour.com

Curried Potato Salad

Curried Potato Salad

No matter what you think of Martha Stewart, you can’t argue that she doesn’t know what she’s doing in the kitchen.  Sometimes when I’m looking around for inspiration and new recipes, I come across something that I might be on the fence about.  Maybe it sounds unusual, or I don’t know if I can make it right, or sometimes the measurements or directions don’t seem correct.  But when you make a Martha Stewart recipe, you know you’re going to end up with something pretty good.  And that’s what you get with this recipe for Curried Potato Salad!

My husband bought me the Martha Stewart Living cookbook 12 years ago, and we’ve certainly gotten our money’s worth out of it.  This was one of the first recipes we made and it has become a family favorite – my Dad, in particular, requests it.  Every ingredient is easy to find in the grocery store, although you may have to look a little harder for cilantro and curry powder, depending on where you live.  Trust me (and Martha) – this recipe is a keeper!

Curried Potato Salad

(Recipe courtesy of Martha Stewart Living)

Ingredients:

  • 3 pounds baby white potatoes, scrubbed (I’ve used red potatoes, too – just make sure they are small, and all the same size)
  • 1 tablespoon plus 1 teaspoon salt
  • 2 tablespoons white wine vinegar (I’ve used red wine vinegar too – it’s fine)
  • 5 large eggs
  • 1/2 cup plus 2 tablespoons homemade mayonnaise, or from a jar
  • 3 tablespoons curry powder
  • 1 medium onion, very thinly sliced
  • 1/4 cup fresh cilantro, finely chopped

Directions:

  1. Place potatoes in a large pot with enough water to cover by several inches.  Bring to a boil over high heat, add 1 tablespoon salt, and reduce to a gentle boil.  Cook until potatoes are tender when pierced with a knife, 15 to 20 minutes.  Drain into a colander. Using gloves or paper towels to protect  your hands, cut potatoes into wedges while still hot.  Drizzle with vinegar, and set aside to cool.
  2. Place eggs in a small pan with enough water to cover by 1 inch, and place over medium-high heat.  When water comes to a boil, turn off heat, cover, and let stand for 13 minutes. Drain, and place in a bowl with cold water to cover. When cold, peel hard-boiled eggs, and cut into quarters lengthwise.
  3. Place mayonnaise, curry powder, and remaining teaspoon of salt in a large bowl; whisk to combine.  Add potatoes to mayonnaise mixture.  Add eggs, onion, and cilantro.  Stir to combine.  Chill until ready to serve.

Explore, experiment, enjoy! — Dana


To view even more of Dana’s unique recipe, you can visit her at Frugal Girlmet!