April 20, 2024

About Amy Boyd

Amy Boyd - Blog Contributor
Amy lives in Owensboro, KY, with her two sons, Tristan (age 10) and Asher (age 10 months). Amy has a BA in Psychology from the University of Louisville, KY. She enjoys reading, writing, painting, crafts, cooking, gardening, and online GCH Bible studies :)

Table Decorations for Women’s Christmas Luncheon

Merry Christmas Everyone!!!

On behalf of myself and my boys, Tristan and Asher, I would like to wish you all a very Merry Christmas Day. Recently I celebrated with my church, River City Church in Owensboro, KY, attending the Women’s Christmas Luncheon. It was a lot of fun and a great way to fellowship with others. I would like to share with you some of my ideas that I used to put together to make table settings and chair decorations for the luncheon.

Items Needed to Decorate the Table:

20131213_2034542 Tablecloths (a long white one and a gold shorter one overlapping)
8 Red Napkins – poinsettia design
8 Placemats
8 Poinsettia Dish settings with silverware, coffee cups, and drinking glasses
2 Silk poinsettias
Greenery – I had one premade with snowmen
Tealights
Greenery Tealight Holders

Arrange the placements, napkins, dishes, cups, and silverware around the table. Place the decorations of your choice in the middle of the table.

Items Needed to Decorate the Chairs:

20131213_203520Gold ribbon
Red mesh Ribbon
Narrow red ribbon
3″x5″ Canvas
Red and White acrylic paints
Green paint marker
Paint brushes
Hot Glue gun

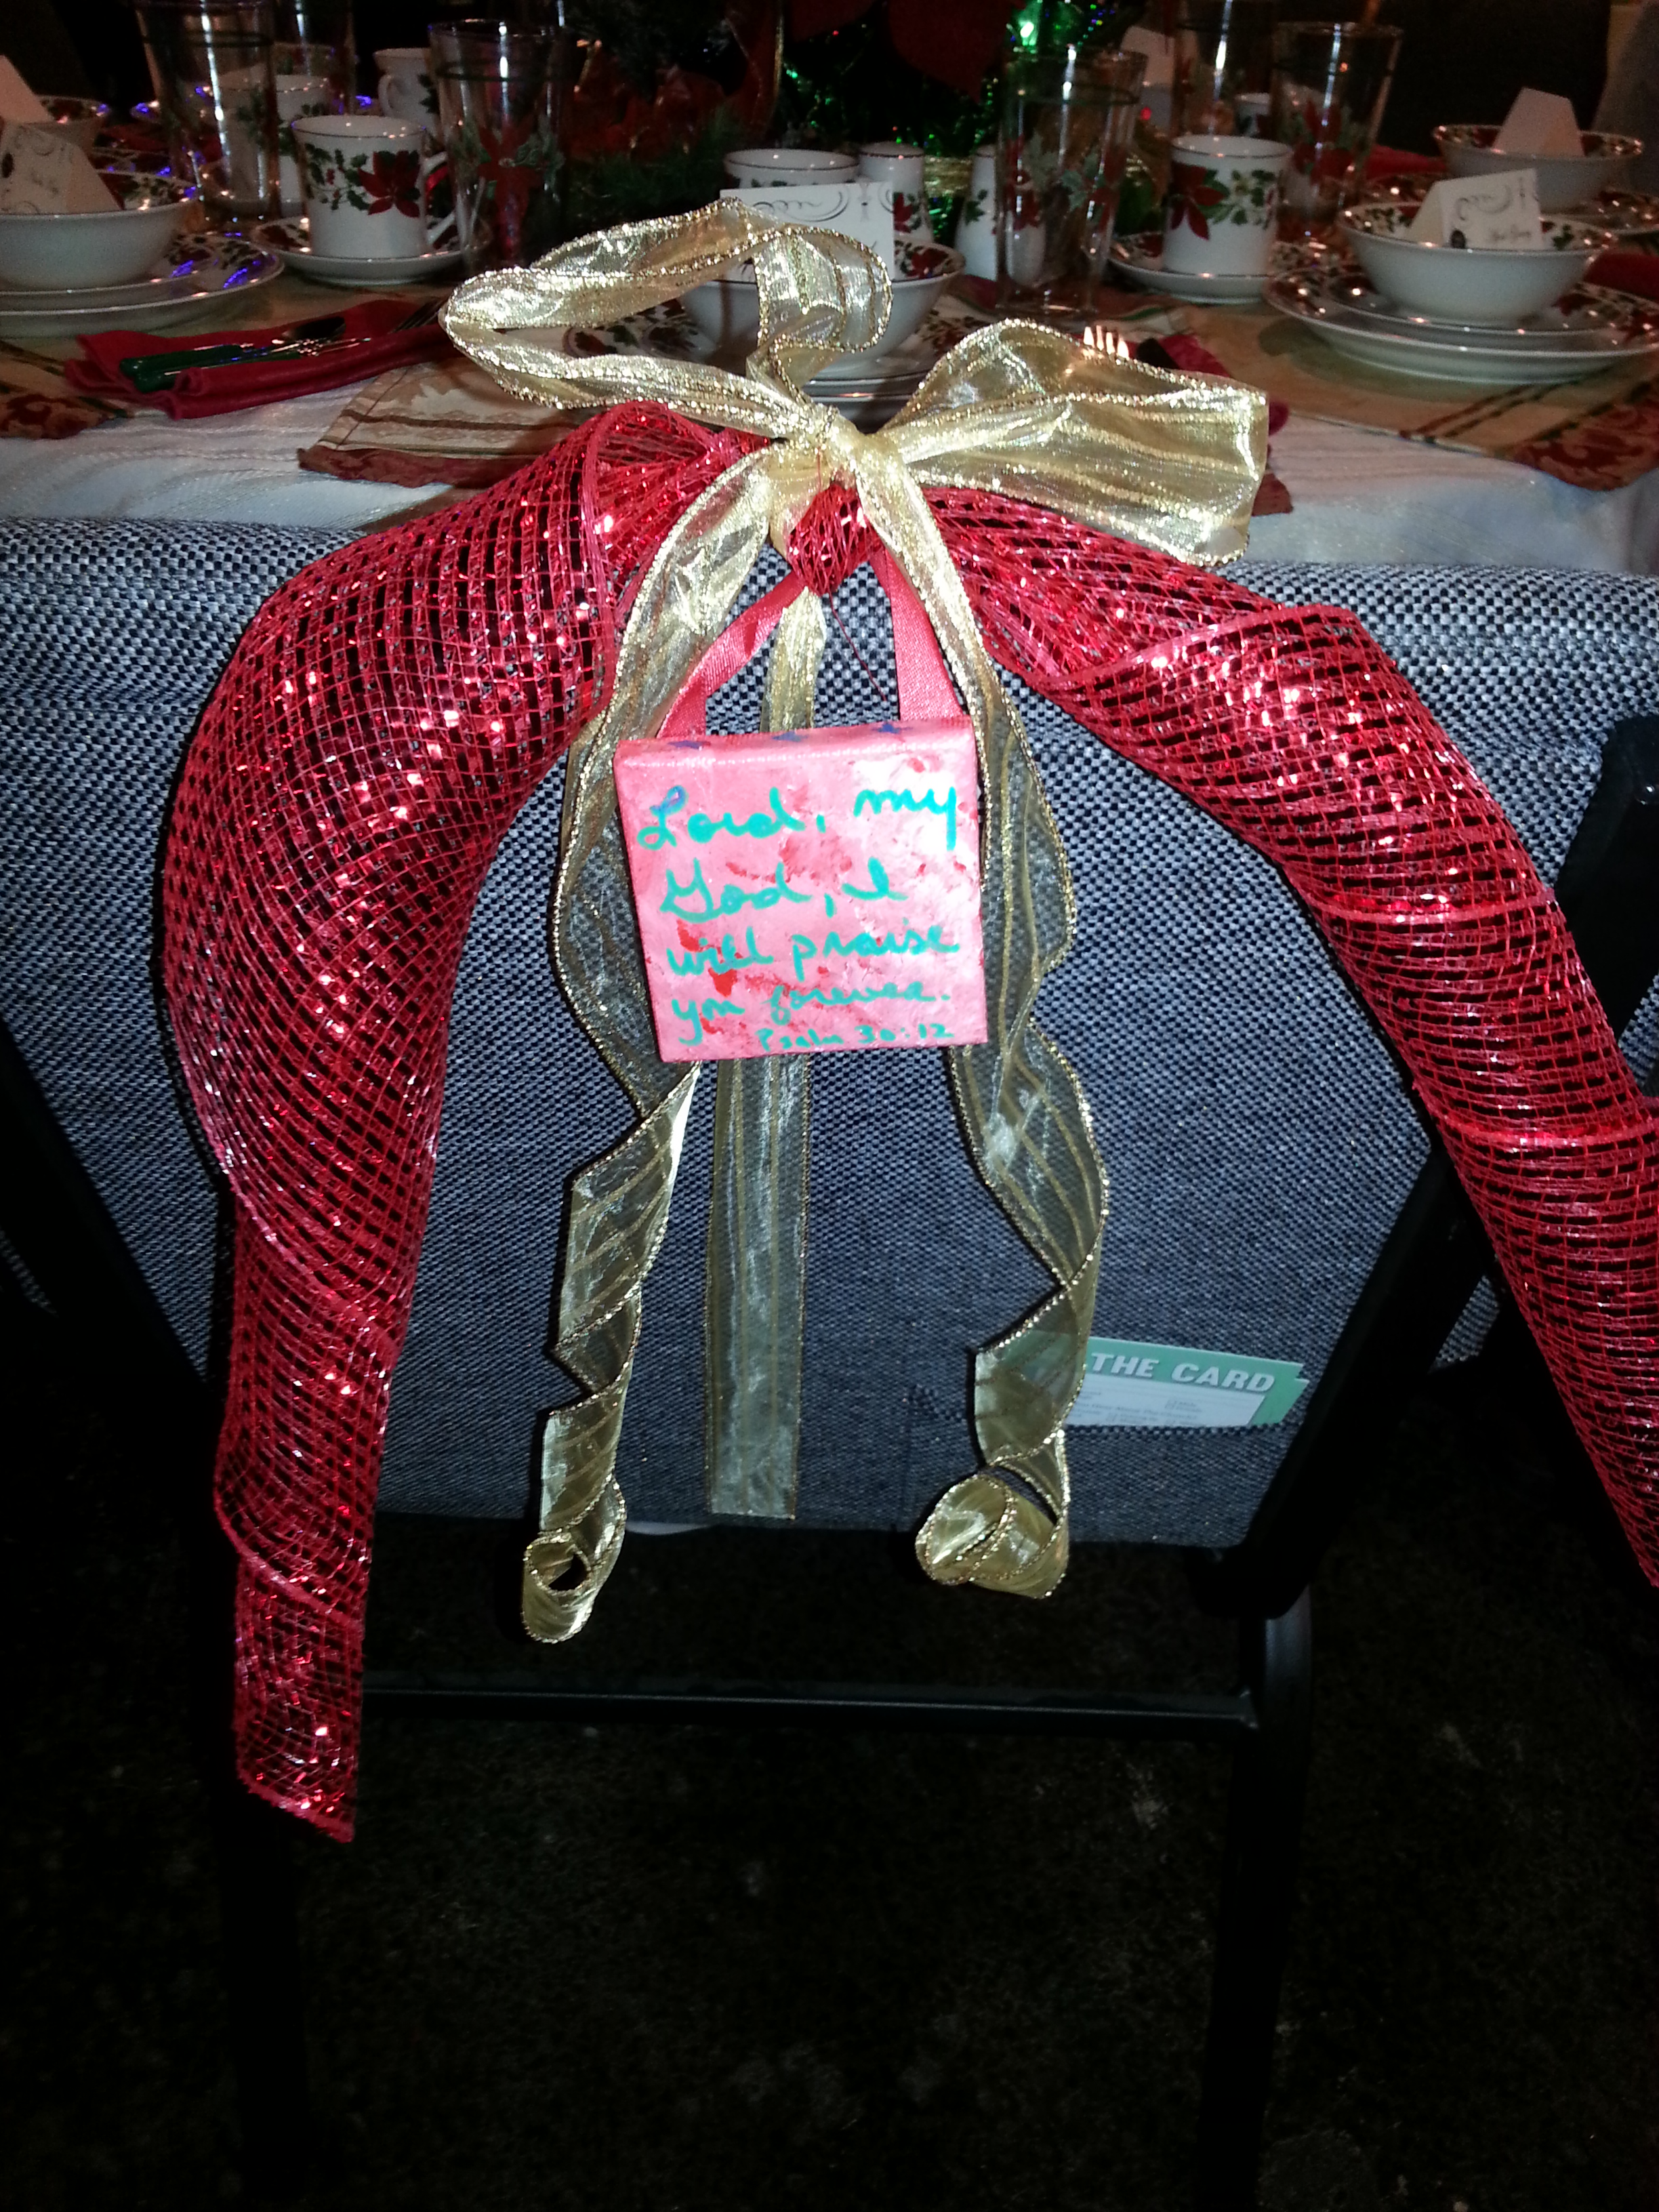
Paint the canvas using the red and white paint. Let dry. Write a favorite Bible verse with the green paint marker. Let dry. Cut about 8” of the narrow red ribbon, form a loop, and hot glue to the back of the canvas to hang the decoration.
Using the gold ribbon and the painted canvas, tie it to the top of the chair with a double knot. Now, tie the red mesh ribbon on top of the gold ribbon, it will curl up. Then take another piece of gold ribbon and make a simple bow. Tighten and you are done. (Use this photo to see the details.)

Everyone will love the time and effort you took to make things beautiful!

Merry Christmas!

Amy

Yummy Christmas Candy

photo3

My sister, Nicole, and our kids and I made some delicious, easy, and kid-friendly Christmas treats this weekend. You just need a few simple ingredients and you are ready to go.


Items Needed: photo2

Snowflake Ritz crackers
Creamy Peanut Butter
Pretzels – 2 types: Rods and Tiny Twists
White Chocolate Bark – 2 Packages
Red and Green Sprinkles

Wax Paper


Directions:

  • First make peanut butter sandwiches out of your Ritz crackers and Peanut Butter photo1
  • Second, lay down wax paper on the table or cabinet to place the candy for drying.
  • Next, melt your white chocolate in the microwave or on the stove top. Make sure you stir thoroughly during the melting process. We used two packages for all of the candy we made. We melted each package separately to make the melting process easier.
  • Once the chocolate is melted, put the peanut butter sandwiches in the chocolate and remove with a spoon once it is coated. Do the same thing with the pretzel twists. For the pretzel rods, break in half, and just dip the tip into the chocolate.
  • Place the candy on wax paper.
  • Now, sprinkle the pretzels with either the red or green sprinkles of your choice.
  • Let the chocolate harden and enjoy this tasty treat.

Happy Candy Making!

Amy

Christmas Ornaments

amyornaments01

It’s that time of year again, when Christmas decorations go up and we begin to celebrate the birth of our Lord and Savior, Jesus Christ. On our tree, we have ornaments with different sayings, initials, or ones with our names on them but I realized this year we didn’t have any Christian themed ornaments. So I decided to make some. Here is a way to do just that:

amyornamentsphoto3

  • Round Ornaments
  • Paint Markers – various colors.

 Directions:

First decide what you want to write or draw on your ornament. I made two different ones. The first one I wrote: “Glory to God in the highest and Peace to His people on Earth.”  The second one I made an ornament just for Jesus with His name on it.

Take your paint marker and shake well. If it is new, you will have to prime it to make sure the paint is all the way to the tip. You do so, by placing the tip on a piece of paper and push it up and down until the paint colors the tip. Now, you know you are ready.

Now just write your bible verse or Jesus’ name on the ornament with the paint marker. You can paint other things on your ornaments as well. I did polka dots on one of mine, but you could add stars, swirls, or whatever you like. The great thing is that the paint markers dry really quickly.

Hang it on the tree. Instead of using a hook, you can use a tiny ribbon and tie it together to make a loop. You can purchase these premade in the store as well.

amyornamentsphoto2

Happy Crafting!

Amy

How to Make a Decorative Wreath

20131112_071346


One of my favorite things to make for my home is a decorative wreath. I have several that I have made throughout the years. This wreath is a good one to try for your first time decorating a wreath.

Items Needed:

· Grapevine Wreath – I like to use the medium size ones, but any size is fine
· 3 – 4 silk flower stems, various kinds
· Ivy or any other type of greenery
· Wire Cutters
· Hot Glue Gun
· Wreath Hanger

Directions:

· Cut off the excess flower stems, leaving about 4-6 inches of the stem.
· Arrange the flowers where you want them on the wreath. I tend to start on the edges and work my way down. Insert the stem in between the grapevine wreath. If needed, hot glue the flowers in place. A lot of times, I do not use the hot glue if the flowers are wedged in place real well.
· Wrap the greenery around the wreath and glue in place.
· Hang on a wreath hanger.   Enjoy!

Have Fun and Happy Crafting

Amy

School Projects in a Jiffy

School Projects in a Jiffy.

amynov6-3.jpg

For me, being a crafty person has paid off this week. Tristan, my sixth grader, told me last night that he had a science project due in the morning.  Luckily, we had all the supplies he needed at the house.  Below is a list of items that would be good to have on-hand if you have schoolaged children.  This is also what Tristan used for his diorama science project.

Items Needed:

Paint
Paint brushes
Box (shoe box or decorative box)
Foam animals
Plastic Trees
Plastic Rocks
Glue Gun
Stick Glue
Note cards
Tape
Pens, Pencils, or Markers

Directions:

Tristan’s project was to create an animal habitat. We looked through the house, his toys, and my art supplies and found what we had in order to create an animal habitat. It turns out, that we had enough items to create a rain forest with frogs.

Tristan painted the scenery: blue for the sky, light blue for the pond, and green for the grass.  He hot-glued the rocks, trees and frogs in place.  He then labeled the parts of the habitat with a marker and cut out pieces of note cards.  He  used the stick glue to glue those in place.

Tristan had to make a presentation about his project, so he made notes on a note card and taped it to the top of the box.

Below is the before and after project.  I am so proud of Tristan.  He did a great job with very little direction from me. This is something fun to do with your kids. Hope you give it a try.

amynov6-1.jpg


amynov6-2.jpg


Have Fun!

Amy

Sprucing Up the Place! :)

This weekend, I moved into a new rental home. It is really cute and was well taken care of, for the most part. It is an older house so some of the closets and cabinets needed some sprucing up. So, I decided to re-cover the shelves in one of the closets and to re-cover the cabinet underneath the bathroom sink.

Items needed:

  • Contact Paper – any design you choose
  • Scissors or Box Cutter

Directions:

• Clean the area you want to re-cover the best you can. I had to bleach underneath the bathroom sink before I could begin this process. I let it dry overnight as well because it was really dirty!

Pre-measure the amount of contact paper you will need. Then, cut the paper.

• For the shelves, I wrapped the contact paper around the edges so it would stay in place. For the bathroom cabinet, I had to use two pieces of contact paper and overlap them in order to cover completely.

• Take off the back of the contact paper and gently stick the paper in place. Rub all the air bubbles out with your hand or a sponge.

• Put the shelves back in place and you are done.

Pic1


Pic2

The before and after pictures tell it all. I like the creative designs and colors. Little things like this make me happy and I must admit it is a big improvement.

Have Fun,

Amy 🙂

Homemade Chicken Noodle Soup

Yesterday, I was off work and took my little boys to the doctor. Turns out they both have ear infections. So, I decided to make homemade chicken noodle soup. It is so healthy and delicious. Below is my recipe.

Homemade Chicken Noodle Soup

Homemade Chicken Noodle Soup

Ingredients:

3 Large Chicken Breasts

1 Medium White Onion – diced

4 Carrots – diced

3 Celery Stalks – diced

2 boxes of Chicken Broth

Salt and Pepper

Egg Noodles – ¾ bag


Directions:

In a large pan, boil the chicken breasts for about 45 minutes (until the inside is white).  Add salt and pepper during cooking.

Remove the cooked chicken breasts and place them on a plate. When they cool slightly, cut up the chicken into small bite-size pieces.

In the water that you cooked the chicken, add the diced onions, carrots, celery, and cooked chicken into the water. Add one box of the chicken broth. Season with salt and pepper. Let cook on medium heat for about an hour.

Once the carrots and celery are tender, add ¾ of the bag of Egg Noodles. Add the other box of chicken broth. Turn up the heat for the noodles to boil, for about 20 – 30 minutes. I always test the noodles for tenderness to see if they are done before serving.

You can add a cup or two of water if you like more broth to your soup.

Serve the soup in a bowl or coffee mug, shown below. I like using the coffee mug so you can sip the broth. Make sure that you let the soup cool for about 5 minutes before serving.

This is something easy to make and we always have plenty of leftovers for the rest of the week. This is nice, especially when everyone is a little under the weather.

Another tip: You can boil more than 3 chicken breasts and use the others for dinner another night during the week. I like making Chicken Casserole or Chicken Salad with boiled chicken. What are some of your favorite chicken recipes?

Happy Cooking J

Amy

How to Make Roasted Pumpkin Seeds

Almost every year, when we carve a pumpkin for Halloween, we make a tasty snack out of the seeds. My oldest son, Tristan, loves to help make these. He thinks they are delicious, too.

 roasted pumpkin seeds

Items Needed:

  • Pumpkin/Seeds
  • Carving Knife
  • 11 x 13 Baking Pan
  • ½ stick of butter
  • Salt

Directions:

  • Heat oven to 350 degrees.
  • Put the butter in the pan, place in oven and let it melt. Remove when melted.
  • Carve your pumpkin by cutting a circle around the top of the stem. Remove.
  • Pull out the insides of the pumpkin, making sure you remove all the seeds.
  • If you wish, carve out a design or face on your pumpkin and use it for an outdoor decoration. I always like to put a tealight candle in mine and set it by my front door.
  • Take the seeds and remove the excess guts, the orange slimy insides, from the seeds.
  • Put the seeds in the baking dish, making sure you coat each one with butter by stirring. Its best to just have one layer of seeds.
  • Salt the seeds.
  • Bake in the oven about 30 – 45 minutes.
  • If you like your seeds extra crispy, you can turn on the broiler, and toast the seeds for about 2 – 3 minutes.
  • Remove from oven.
  • Let cool.
  • Enjoy!

This is an easy healthy snack that you can make at home that has become one of our family traditions. I hope you give it a try.

Have Fun!

Amy

Preparing For a New Season!

NoClutterZone_Boyd

It’s that time of year again, ladies!  Fall is here and winter is soon upon us.  It’s time to declutter those closets!!

Living in Kentucky where it goes from blazing hot to freezing cold, I have to admit I have a lot of clothes that I really only wear a few months out of the year. Due to limited drawer and closet space, I have come up with a routine that I learned from my own mom. This is a way to help keep you organized. It always seems to me that I feel better the more organized and tidy my house is. Being a single mom with two little boys, there is a beautiful mess in my home all the time. So I like to clear out unneeded clutter when I can.

Items Needed:

  •  Boxes or Totes
  •  Markers or Labels

Directions:

  •  Go through each person’s clothing individually and pull out the clothing they will not be wearing for the upcoming season. Also, this is a good time to pull out items that you no longer need, or no longer fit. You can save them for a garage sale or donate them to a friend or to a non-profit agency, like Goodwill or Salvation Army.
  •  Put the clothes in a box. I always use a separate box for each family member. If you would like, you can use the plastic totes with lids to store the items.
  •  Label the boxes or totes with the person’s name and what clothing is inside. Example: “Tristan’s Summer Clothes”
  •  Store the boxes out of the way, until they are needed again.

I hope you find this decluttering tip helpful. Little things can make a big difference in the long run.

Happy Cleaning!

Amy

How to Make Moving a Little Bit Easier

How many of you have moved, making tons of trips back and forth carrying out your clothes that have been hanging in the closet?  I know I have.  This weekend, my Aunt Karen showed my sister and I a simple idea that was super easy.  I thought it was so amazing I had to share it with you all. Instead of making about 20 trips back and forth to the moving truck, we made two!!!

Items Needed:

  • All you need is a large queen size sheet and some muscles.

Directions:

  • Lay the sheet flat on the floor.

  • Start placing the clothes (still on their hangers) in the middle of the sheet.  We took  6-7 hangers and laid them on the sheet. Then the next 6-7 hangers, we would lay the clothes so the hangers would be in the opposite direction from the first pile.  This makes for better stacking.  Keep doing this until you have your clothes piled up.

  • Taking opposite corners of the sheet, tie them together in a knot. Do the same thing with the other two corners.

Insert1

  • Depending on how heavy it is, you may need two people to carry it out to the truck.  But in some instances you can just pack it on your shoulder.

Insert2
This definitely makes for easier moving, especially when stairs are involved.  Hope you give it a try.  If you know of any moving tips I would love to hear them.  We were moving my mom this past weekend, but I will be moving within the next month, and could use some of your ideas. Thanks a bunch!

Have Fun & Happy Packing!

Amy