May 3, 2024

Message Balloons

Message Balloons:  A great way to remember your lost loved ones on the anniversary of their death.

Amy1

My dad died in 2009.  When the next year came around, my family and I wanted to get together in honor of our father.  So we began something that has become an annual tradition. The grandkids especially enjoy it.

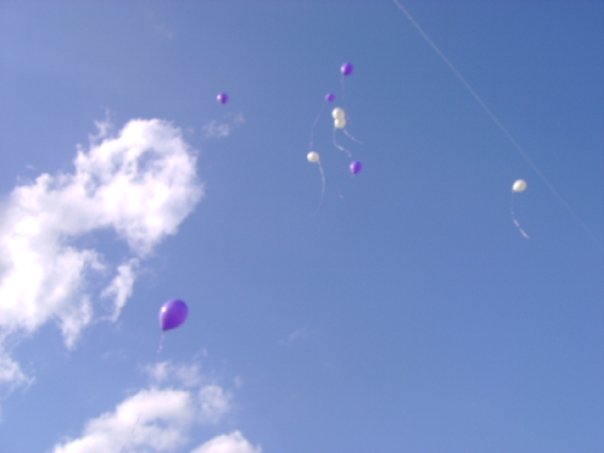
We get about a dozen helium balloons and take them out to the cemetery. We chose purple and white balloons in honor of pancreatic cancer research which is what my dad died from.

Each  person was given a balloon and a black sharpie in order to write a message to Dad or to Grandad on them.  After everyone has finished, we say a prayer then we release the balloons together at the same time.  We tell the kids that the balloons are going up to heaven and that granddaddy will get their message.  They think that is the neatest thing ever. I hope you give this a try.
This can be done anywhere.  My sister lives in Florida and they have gone to the beach and let balloons off there.  And now, on my son’s birthday, he always wants to give a balloon to Granddaddy. It really is a sweet way for them to connect with someone that they don’t even see anymore but definitely someone that we want them to remember.
—–

Below are instructions on how to do this and what you would need. It is  very simple actually.

Items needed:
Helium balloons — the amount needed depends on how many people will be there.

Sharpie™  –any color

Directions:
Write your message on the balloon with a Sharpie™.  Example: “Dad, I love you and I miss you!  Rest in peace.  Your daughter, Amy.”

After everyone has written their message on their balloon, gather around and take a moment of silence and/or say a prayer in honor of your lost loved one.
Release all the balloons at once.

I LOVE watching them drift off into the air and taking pictures of them.


Amy2

This a very special tradition for me and my family and I’m honored to share it with you.


With love,
Amy 🙂

Decorative Floral Arrangements for the Home

Amy1
One of my favorite things to do is make different crafts with silk flowers. Today, I will show you how to create a flower arrangement in a decorative vase. It is really simple,  and makes your home beautiful!

Items needed:
Vase (any type)
Silk flowers (any variety)
Eucalyptus
Styrofoam craft ball or block (size proportionate to the vase you choose)
Wire pliers

Directions:
Insert the Styrofoam ball into the bottom of the vase. You may have to trim the Styrofoam so it will fit into the vase.

Begin arranging the silk flower stems anyway you like by inserting the stem into the Styrofoam. If the stems are too long, cut the stems with the wire pliers before inserting it into the vase.

Insert the eucalyptus in between the flowers.

Continue to arrange the flowers until you like the final product.

Amy2

Have fun and happy crafting,

Amy 🙂

My Favorite Fruit Salad Recipe

Yummy is the best way to describe this dish. It is perfect for the summertime when you have fresh fruit readily available. You can make a meal of it or it is a perfect healthy side dish too.

Boyd1


Ingredients:
Bag of fresh spinach leaves
Pint of strawberries
2-3 Peaches
Bag of sliced almonds
Raspberry Vinaigrette Dressing

Directions:

  • Rinse the spinach leaves and the fruit.
  • Cut up the strawberries and peaches in bite size pieces.
  • Combine the spinach leaves, fruits and almonds in a bowl. You can also add fresh blueberries or any other of your favorite fruits. You can use sunflower seeds or pecans instead of almonds.
  • Toss the salad and drizzle with the dressing. Any type of vinaigrette dressing tastes great with this salad. I have also used balsamic vinaigrette and strawberry vinaigrette.

This salad keeps well in a Tupperware container overnight. If you know you will have leftovers, it is best to add the dressing per serving instead of on the entire salad directly. Approximately 6 servings.

Serve and Enjoy! 🙂
Amy

How to Make “Game Day” Shakers

It’s that time of year again when the kids have gone back to school and started playing sports. My nephew, Timmy, has started his football season.  So we decided to make shakers to take the game to help cheer him on. This is a great project to do with kids.  My son, Tristan, helped me fill up the shakers and my niece, Chloe, helped me decorate them.  We want to make some NOISE!! 🙂

Items needed:
Construction paper
Markers
Scotch tape
Scissors
Empty containers with lids.
Rocks, rice or other fillers

STEP ONE:

Rinse and dry containers.
Cover with construction paper.
Tape in place.
Decorate with team name,  player’s name and number. Try to use the team colors.

STEP TWO:

Put rocks or rice in the containers.
Replace lid.

STEP THREE:

SHAKE! SHAKE!! SHAKE!!!   LET’S MAKE SOME NOISE!!!!

GAMEDAYSHAKERS
It’s a great way to show the kids in your life you are rooting for them.
Have Fun & Happy Crafting!!

Amy

Random Do It Yourself Tips

One day this week I felt like I had a complete do-it-yourself day.  I’m a single mom of two boys ages 11 and 1. I’ve had to learn to do a lot of things on my own that normally I would have gotten help with.

Today started out with us going shopping.  I’m a guru about finding stuff on sale. I found sunblock for $3, and a bathing suit top for $5.00. Remember to shop the clearance items to save money.  I also did a complete balancing act with a sleepy baby trying to check out.  It’s amazing the things a mom can do with one hand.

After I picked up my son from school, I had to go home and mow the yard.  Thankfully, my son and my nephew helped babysit the baby while I did this.  For two days now, I have been trying to start the lawn mower and it would not start no matter what I did.  I remembered one time my neighbor sprayed some starter fluid into my lawn mower engine and it started right up.  So while I was at Walmart, I bought some engine starter fluid for $3.  I sprayed the starter fluid where the air filter went down into the carburetor and I was amazed all it took was 2-3 seconds of  spraying and it started right up.  You have to remove the air filter and replace it after spraying.  I was able to mow the yard and not have to ask someone for help or not have to take the lawn mower in to get it fixed.  I have to say it was pretty amazing that I was able to fix an engine.

My oldest son had gone camping with his dad over the weekend and he got chiggers.  His little legs are broken out very badly.  I have used a home remedy before on myself and it definitely works.  I used clear fingernail polish to cover every chigger bite. The nail polish will suffocate the chiggers and they will go away.  Needless to say,  I didn’t have time to complete the craft I was going to use for the blog.  So that will be on my to-do list for next week.  The important thing to remember is that we all are able to do things on our own as long as we know how to do it and we just keep trying.  Having faith and believing that you can do things for yourself is a huge self- esteem booster and knowing that God will help you in every step of the way has helped me to believe in myself. The smiles on my boys faces are definitely worth it.

AmysBoys

I hope my tips were helpful for you today!  I would love to hear some of YOUR tips, too!!

Enjoy!!

Amy


Personalized Coffee Mugs

Here at Girlfriends Coffee Hour, we are all about coffee!!  So, today’s blog gives us an interesting and fun way to decorate our coffee mugs!

Items needed:

Solid color coffee mug (make sure it is microwave safe)
Bic(TM) marker(s)

Directions:

Think of an idea that you would like to write on the mug—a word, a picture, a Bible verse, a prayer, etc.  For my coffee mug, I wrote “Dear God, please make me harmless as a dove.  Amen!” I also drew a picture of a dove and decorated the bottom of the mug with hearts, the handle with polka dots and I drew a cross under the handle.

Use your BIC marker(s) to decorate the mug any way you would like.  I used a silver marker on a black coffee mug. The color choices are endless.

Bake it in the oven at 350 degrees for 30 minutes. This will keep the marker from coming off.

Let cool, wash and enjoy!

mugs

Have fun and Be Creative 🙂

Amy

Detox Water

If you’re like me, you have seen a lot lately about cleanses and detoxes for your body to keep you healthy.  I have found a solution to make your own healthy all natural cleanse at home. This is something you can drink once a month or once a week.
detox
Items needed:
4 limes
4 lemons
1 cucumber
1 package of fresh mint
1 gallon of water
1 gallon pitcher
Directions:
Fill the gallon pitcher up with water.  Slice the lemons, limes, and cucumbers, and place in water.  Add 3-4 stalks of the fresh mint to the water. Let chill 1-2 hours in the refrigerator. Drink up to 8 glasses a day.
Enjoy.

A Fun Table Top Decoration for Parties

This past weekend, for my Granddad’s 88th birthday party, we decided to have the great- grandkids decorate the tables.  We had them decorate small brown paper bags any way they wanted.  Some said Happy Birthday, and others had great drawings on them.When the decorations were finished we put a mason jar inside the bag with a tea light candle inside it. Once you light the candle, the bag begins to glow!

Another fun thing you can do with these bags is to write fond memories of the Birthday Person, that you have had over the years. There are so many things you can do with these bags!!  Just get creative!

Items needed:
Small brown paper bags
Mason jars
Tea light candles
Stickers
Crayons
Markers
Directions: 
Decorate the bag with drawings, sayings, pictures, memories; however you want.
Put the candle in the mason jar and light it.
Put the jar in the bag and place on the table.
And then CELEBRATE that special event in your life!
Amy4
ENJOY,
Amy Boyd

An Easy Gardening Tip for Flower Lovers

Every year as a little girl, my mom would take me and my sisters to pick out summer flowers to plant. My favorite ones were petunias and still are to this day. My mom taught us girls at a very young age about planting flowers. It was always something I enjoyed and have continued as an adult.

Here recently, I learned a tip from my mom that amazed me. She has some large flower pots in her backyard and they are overflowing with petunias, see below.

Pic1

I found out that at the end of the summer she will crumble the dead dried up flowers onto the soil. And alas, they came back the next year. I am finding them everywhere around her yard where they indeed have re-flowered.  Now would be the time to go and get some flowers to plant so you can have fresh blooming flowers next year just by following this simple tip.

Items Needed:

Petunias

Large Flower Pot

Potting Soil

Water


Directions:

Empty the potting soil into the flower pot, almost to the top. Place your flowers about 2-3” apart. The flower pots shown below could take up to 3 large petunias or 6-8 small petunias depending on what type you buy.

Pic2and3

Once you have the flowers in place, add more potting soil until the roots of the flowers are covered.

Water the flowers. (If the soil sinks in around the flowers after watering the first time, just add more soil.)

You will need to water these flowers almost every day, depending on the weather. You will also need to pull off any dead flowers during the blooming season. At the end of the summer when the plants turn brown and are thoroughly dried out, crumple the plants on top of the soil. Doing this will keep the seeds from the flowers in the soil. All you have to do is wait for next spring for them to re-bloom.

Have Fun and Garden Away!

Amy 🙂

How to Make a Decorative Swag

Today, At Home w/ GCH would like to introduce you to our newest blogger, Amy Boyd!  Amy will be sharing some of her craft and DIY projects with us, each Wednesday.  I hope you enjoy her segment and will share your comments with her!

And now…. here’s Amy!!

_______________________________________


Today, I would like to teach you how to make a decorative swag, as shown below.

Swags_Pic1


My favorite place to shop for these items is Hobby Lobby. Other places like Garden Ridge, Trees and Trends, and Walmart would have these items as well. Typically, I spend about $20 to $40 on a project like this. I always have some materials left over, so I definitely save them and use them at a later date.

The size of your swag will depend on the location where you would like to hang it. They come in various sizes. The ones I have completed and have shown below are about 2 feet long. I have found some swags that have a handle at the top which makes for easy hanging.

The types of flowers, adornments, and fillers that you choose for this project is simply a reflection of your own personal taste; find something pleasing to your eye and that will match the décor of the room. Since the swag I chose is brown, I tend to gravitate to lighter colors that will stand out. I myself love butterflies. Every time I see one, I think God is reminding me how beautiful life is and how much there is to be happy about.

When my son Asher was born, I would sit on the couch and feed him and I had the first swag shown below hanging above our couch. He would stare at it and smile and coo almost every time he looked at it.

Swags_Pic2

So, I made one for his room as well. I tried to make it similar since he liked the other one so much. I found some tiny ladybugs to use for his swag, which matched his bedroom perfectly.

Swags_Pic3

A lot of times, the silk flowers come in bunches or on very long stems so it is necessary to cut them apart or to cut off part of their stem with wire pliers. They need to be about half the size of the swag. Then, I begin sticking the flower stems on each side of the swag. You can cut off a piece of floral wire and wrap around the stem to make it stay in a certain place. There is a middle knot that separates each side of the swag. I typically do not glue on the flowers and eucalyptus because they stay in place pretty easily. The butterflies I used have clips on them so I just clip it in place.  I did hot glue the ladybugs right onto one of the stems.

A hot glue gun is easy to use.  Just insert a hot glue stick and plug it in. Always put the hot glue gun on a piece of newspaper or a paper towel because the glue will leak out. You just pull the trigger on the glue gun to squeeze out a small amount that will be used to glue the pieces together.


Items needed:

1 Grapevine Swag

3 Different types of Silk Flowers

2 -6 Adornments like butterflies, lady bugs, sea shells, crosses, etc.

5-6 long pieces of Eucalyptus

2-4 Fillers such as feathers, beads, baby’s breath, etc.

Wire pliers

Floral Wire

Hot Glue Gun

Hot Glue Sticks


Directions:

Basically, you will arrange the materials until you are satisfied with the way it looks. There is no right or wrong way when it comes to making your own crafts.  I’d love to see your pictures if you give it a try.


Have Fun & Craft away!


Amy 🙂