April 18, 2024

Sprucing Up the Place! :)

This weekend, I moved into a new rental home. It is really cute and was well taken care of, for the most part. It is an older house so some of the closets and cabinets needed some sprucing up. So, I decided to re-cover the shelves in one of the closets and to re-cover the cabinet underneath the bathroom sink.

Items needed:

  • Contact Paper – any design you choose
  • Scissors or Box Cutter

Directions:

• Clean the area you want to re-cover the best you can. I had to bleach underneath the bathroom sink before I could begin this process. I let it dry overnight as well because it was really dirty!

Pre-measure the amount of contact paper you will need. Then, cut the paper.

• For the shelves, I wrapped the contact paper around the edges so it would stay in place. For the bathroom cabinet, I had to use two pieces of contact paper and overlap them in order to cover completely.

• Take off the back of the contact paper and gently stick the paper in place. Rub all the air bubbles out with your hand or a sponge.

• Put the shelves back in place and you are done.

Pic1


Pic2

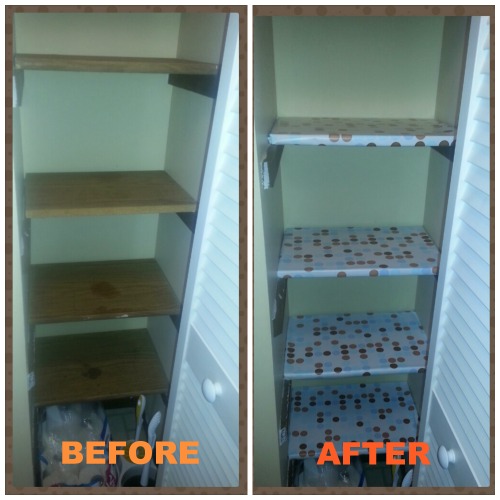
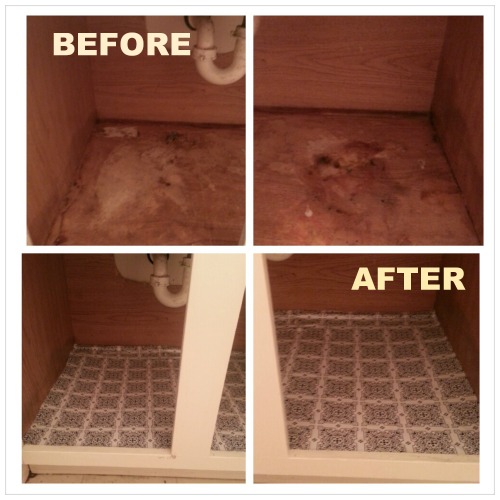
The before and after pictures tell it all. I like the creative designs and colors. Little things like this make me happy and I must admit it is a big improvement.

Have Fun,

Amy 🙂

How to Organize Your Incoming Mail

Several months back, our normal routine for bringing the mail was to simply lay it on the counter in the kitchen, until we found the time to go through it.  Sometimes the stack would just get bigger and bigger; it was always in the way of things I had to do in the kitchen; and I was getting more and more frustrated!

A friend of mine suggested the following organization tip for sorting my daily mail, and I have to tell you — THIS IS AMAZING, and IT WORKS!!

Today, when we bring in the mail, we have a spot in our kitchen that is used specifically for mail. It took a matter of about 3 days to get in the habit of using it, but once we saw how much better this process works, it was so easy to get in the habit of making it part of our daily routine!

So what is this fabulous organization tip, you ask?  I want to first share a picture of it with you to show you how little space it takes up in my kitchen!  Then I will tell you how to set it up.  (The picture is really all you need to learn how to set it up…it is THAT EASY to set up!)

Box2


This little table sits right next to the door that comes into our kitchen from the outside.  So this makes an excellent spot for this box to sit!

What you will need:

Iris(R) Clear Open Top File Storage

Smead Hanging File Folders, Letter, 1/5 Cut Tab, Assorted Primary Colors, 25 Per Box (64059)

Post-it Tabs, 2-Inches, Angled Lined, 4 Assorted Primary Colors, 6-Tabs/Color, 24-Tabs/Pack

Insert all of the file folders into your new Mail Storage Bin.

Mark each tab as:

  • Persons name receiving mail
  • To Be Paid
  • To Be Filed
  • To Be Read
  • To Be Shredded
  • Taxes
  • Miscellaneous

Once you have marked all of your labels, attach them to the individual file folders.

Box1


VIOLA!!!  Your new Mail Storage Bin is ready to be used!!  So now what?

Each day that you retrieve your mail, get in the habit of coming inside and going directly to your Mail Storage Bin!  Sort the mail right then!!  Place inside the folders what needs to be kept, and then TOSS anything else IMMEDIATELY!  I promise you, you will LOVE this system!!  At least two or three times a week, set aside some time to go through each file folder; file what needs to be filed; shred what needs to be shredded; pay what needs to be paid, and so on.

You’re Very Welcome!! 

Christi

At Home w/ GCH – No More “Junk” Drawer

junk drawer

The dreaded junk drawer. What state is yours in? Before you answer that, I have a confession story to tell you, that might just make you feel better if yours is a mess.

Once upon a time, four years ago to be exact, I had not one, but TWO junk drawers. Both were the stuff-everything-in-there-until-practically-overflowing-and-if-anyone-ever-lays-eyes-on-this-I’ll-be-mortified kind of junk drawer. Screws & screwdrivers (don’t those belong in a toolbox?), old video rental cards and my college i.d. from years ago (shouldn’t those be shredded?), receipts, batteries, recipe booklets, more receipts, every writing  utensil known to man, sunglasses, report cards, pads of paper, tealights, keys to the car that was sold a couple years prior, keys that I don’t know what they opened…you name it, it was in there. {Feel better? I thought so.} Then one day, I decided to use my OCD tendencies for good instead of evil, and started living by the golden rule. No, not that one. This one: A place for everything, and everything in its place. The junk drawers were banished from the kingdom, and we all lived happily ever after.

So, again I ask, what state is your junk drawer in? Is it happily organized, a chaotic mess, or somewhere in between?

Pop quiz! What’s my golden rule? That’s right! You get a gold star! Now let’s work on finding a place for everything in YOUR drawer. Assignment: Find the time this week to clean and organize your junk drawer.

  • Empty the contents out onto the table or counter.
  • Wipe the drawer clean, including the crevices and corners of the drawer.
  • Now sort everything….
  • If it doesn’t belong in there, put it where it belongs. If it’s in there BECAUSE it doesn’t have a dedicated place where it belongs, CREATE one for it. This is, in my opinion, the number one cause for messes. If it doesn’t have a home, it will wander. Simple as that.
  • If it’s garbage, throw it away. Be selective in what you keep.
  • Put the remaining items into small boxes or baskets that will fit in your drawer. This is the biggest step you can take to make sure your junk drawer (which you can now call something else, because it doesn’t look so junky anymore) stays neat and organized! I heart boxes! As you can see, the only items I don’t have in a box are the extra notepads for my fridge, my scissors, and my coupon binder.

If you’re looking at the picture of my drawer and swoon over those boxes like I do, you can find them HERE. Not only are they pretty, but watch this: presto change-o!!! …*…*…*…*…

junk drawer 2

Cool, right? Not that lids are essential, but boxes like this would work GREAT for people who have a tendency to overstuff. How many pens or sticky notes do you really NEED in your drawer, right? If you have a problem corralling the clutter, make it a rule that if it doesn’t fit with the lid closed, then it’s too much for the drawer. (As you can see, my one exception is my box with the tape in it, only because the tape is too tall for the lid to fit. The other open box is for my glasses and lens cleaner, and I never bother putting the cover on that, because I know I won’t put other “stuff” in it.)

Don’t want to spend money on boxes? Improvise! Before I bought these, I used Velveeta boxes, and those worked just fine! You can even use double-sided tape to pretty them up with scrapbook paper. Beautiful spaces make me want to keep the space beautiful.

Love & Blessings,

Shandy

***********************

Be sure to visit Shandy’s personal blog Aprons ‘n Pearls for crafts, recipes, home keeping tips & more!

At Home with GCH – Spring Cleaning

spring cleaning

I don’t know about you, but every year around this time, I get a bad case of spring fever. I can’t wait to open the windows, letting the sunshine, fresh air, and sound of birds singing permeate our home.  I like to have the inside of my house spring-cleaned before the calendar tells me spring has arrived. That way, once the end of March rolls around, we can concentrate on spring cleaning the outside of our home, yard, and garage.

When you start is up to you, but in just nineteen days, your home can be completely clean, decorated, and ready for spring! Whether you are a domestic diva or don’t know a duster from a dishcloth, I hope you can take something away from how we spring clean our home. Not sure how to clean or organize something? Go to our Pinterest board, where you will learn how to make your own furniture polish, how to organize your kitchen, and how to clean your blinds, ceiling fan, couch, washer & dryer, dishwasher, the filter in your stove’s hood, deep clean your bathroom, and more!

Day 1. In my experience, any successful cleaning spree starts with clutter control! So, take a garbage bag and quickly go through every room in your house. Anything that needs to be thrown away, throw away! Last week’s newspaper, that drawer full of old makeup, junk mail, those shoes that should have been retired a year ago, the sweater that’s beyond repair, the bag in your teenager‘s room from last night‘s fast food run…fill up that garbage bag! Now you’re going to take a box or a bag and find 25 more things to either give away or throw away…the pile of sweaters you never wear anymore, the jeans that don’t fit or went out of style in the 80’s, the old toaster you have stashed away as a backup, the old books or magazines you’re never going to read again. 25 things. It’s really easy, and your house will start to breathe again. I love a good challenge, and after finding my first 25 items, I usually find a bunch more! It feels so good! I encourage you to have your kids do this as well. Maybe start small with them and have them put 5 things in the giveaway box. Or maybe 10. Make it a game and see who can fill up their box the fastest! The only rule: don’t overthink anything. If you have to think about it, it doesn’t mean as much to you as maybe you thought it did. Once you’re finished, you will want to remove those items from your home right away! Don’t let them hang out in the garage or next to the front door or in the coat closet. Out they go!

While you’re out, pick up any cleaning supplies you don’t have on hand, or the ingredients to make them. {We use non-toxic cleaners in our home.}

Day 2. Entryway/Foyer: clean out and organize the coat closet. Wipe down the closet door. Wipe down walls, trim, and baseboards if dirty or dusty. Wipe down light switch(es). Sweep and mop floor. Clean light fixture.

Day 3. Clean all blinds and window treatments in your living and dining rooms; clean any mirrors and picture frames you have on display…anything with glass. No sense in getting the glass cleaner out repeatedly!

Day 4. Dust living and dining rooms from the top down: ceiling fans, ceilings & walls, baseboards, and woodwork; clean TV, electronics, and remotes; dust shelves, mantles, tables, other wood furniture, decorations, lamps, etc.

Still working in just the living and dining rooms, clean all doors, doorknobs, light switches, and fingerprints/scuffmarks on walls. Get out the touch-up paint and take care of any places that need to be touched up.

Clean out and vacuum the couch and other upholstered furniture. Vacuum, or sweep and mop, the floors in your living and dining rooms, moving all the furniture.

Go through any drawers, cabinets, etc. and organize your belongings, getting rid of anything you no longer need or use.

Day 5. Time to tackle the pantry! Remove everything from your pantry. Throw away anything that is expired or questionable. Wipe down the shelves. Put in new shelf-liner if you’d like! If you have a walk-in pantry, give the walls a scrubbing if they need it, and make sure the ceiling is free of cobwebs. Wipe down the baseboards, sweep and mop the floor. Now it’s time to get organized and put everything back! I just LOVE an organized pantry! All the veggies in one place, all the breakfast items in another, all the pasta in another, etc., etc. If you have cleaning and miscellaneous supplies in your pantry, those get organized, too. Two half-empty bottles of the same cleaner? Combine them, and recycle the extra container. Cleaning rags that should’ve been thrown out long ago? Time to bid them farewell. You get the idea! This is the time I would also clean up my vacuum and disinfect my mop.

Day 6. Today we are working on our refrigerator/freezer! Start by getting rid of expired items and forgotten “science experiments” if you have any. This is definitely the time to have the dishwasher empty and ready to clean any dishes you may be taking out. Now get some hot, soapy water and clean the refrigerator shelves, followed by wiping down the inside walls and door(s). Just like with the pantry, organize as you put items back. Salad dressings go on one shelf; condiments on another, etc. While you’re cleaning the inside, make sure you are cleaning the seal and any crevices carefully. Things like to hide in there if you aren’t careful to keep it clean. Now that the outside is clean, clear off the outside—remove magnets, notes, artwork, and anything else that may be there. Wipe down all sides of the fridge, including the top! Carefully move the fridge away from the wall (careful if you have a water line!) and clear away any dust bunnies that have accumulated. Now is a good time to sweep and wipe down the floor back there before pushing it back up to the wall. Be selective in what you place on top and on the doors and side of your refrigerator. Clutter makes it look untidy, even if it’s the cleanest fridge on the block! {For ideas on how to organize your fridge, click HERE.}

Day 7. Thoroughly clean the microwave, dishwasher, and all small appliances like the toaster and coffee maker. Next, clean the oven/stove. {I personally do not use the chemical sprays in mine. I don’t like the fumes, and it’s just not a very safe method. Also remember not to use chemical cleaners in your microwave.}

Day 8. Clean your kitchen cabinets. Take everything (yes, EVERYTHING) out of your cabinets and put them on your table or kitchen island. Use hot, soapy water (or the cleaner of your choice) to clean the insides of your cabinets. Then take a clean towel to wipe them dry. Put in new shelf liner if you wish. Throw out all the things you never use. (How many empty whipped cream containers does one need anyway?) Then put everything back, organizing as you go.

On to the kitchen drawers. Follow the same procedure for cleaning the cabinets. Be very selective in what you choose to put back in the drawers. A place for everything and everything in its place. Make that your mantra, and you won’t have a junk drawer.

Day 9. Now that the insides of our cabinets and drawers are clean and organized, we are going to focus on the outsides. Get some hot, soapy water to clean them. Don’t forget the top of your cabinets and any decor that’s up there! Dry with a clean towel. And to really make a difference, use your favorite oil or furniture polish to make them shine! Once you’re finished with that, take the time to wipe down your walls & switch plates. Use touch up paint if needed. Lastly, dust wallhangings and other decor.

Day 10. Time to make those windows and patio doors sparkle! We are cleaning the windows, blinds, and window treatments today. (*Hint: crumpled up newspaper works like magic to shine those windows!) Then, move on to the sink and make it shine! I like to disinfect mine with bleach water. {One of the few times you will see me use a chemical cleaner in our home.} Then I rinse it out very, very well before freshening up my garbage disposal.

Clean kitchen light fixtures and replace bulbs if need be. Next, wipe down your counters. Move on to the baseboards, then sweep and mop. (I get down on my hands and knees and give the floor a good scrubbing since we’re deep cleaning.)

Today is also a good day to clean out your garbage can, inside and out. Recycling bin if you have one in the house, too.

Day 11. Break out those rubber gloves…we’re deep cleaning the bathrooms today! This is an important day, I kid you not. A pristine powder room is a must! Every single surface gets cleaned, from the sink and toilet, to the bathtub and mirror, to the floors, walls, and baseboards. Look up at your fan. It’s likely that needs to be cleaned as well.

Day 12. Today, we are showing our master bedroom some love. Start by stripping the bed of all linens, including the mattress cover. Throw them in the washing machine so it can work while we work. Next, take down your window treatments and blinds. Wash your blinds. Wash your window treatments once your bedding is done.

If there’s anything on your floor, or clutter on your dresser or nightstand, pick it up and put it away. We don’t want to clean around “stuff.” Once everything is picked up and organized, we’ll move on to dusting.

Dust your ceiling fan if you have one. Then dust the furniture, lamps, clocks, and decor. Wipe down walls, light switches, trim, and baseboards. Clean your light fixture, then wash the windows and mirrors. (My husband and I agreed not to have a television in our bedroom, but if you have one, now is the time to clean it. Don’t forget to clean your remote, too!)

Before making your bed, clean and flip your mattress. Very important step! Vacuum (be sure to move your furniture!) or sweep and mop if you have hardwood. Then, make your bed, taking the time to make it look nice!

Now let’s clean those closets! When you’re done, put your window treatments back up. You now have your own private retreat to relax in at the end of a long day.

Day 13. Moving on to bedroom #2… Since you’ve mastered the master bedroom, you’ll know what to do for the other bedrooms in your home!

Day 14. Bedrooms #3 & 4 are next. (If you don’t have a 3rd or 4th bedroom, you can catch up on anything you’ve missed, or take a well-deserved day off.)

Day 15. If Mt. Washmore has formed in your laundry room, today is the day to catch up. Wash, dry, fold or hang, put away, and repeat until Washmore is no more. Then, it’s time to clean, clean, clean! Laundry rooms can quickly become dusty, cluttered messes if you don’t take care of them. Toss old detergent and fabric softener containers, and clear away any clutter. I like everything to look pretty, so I use baskets to hide unpretty things and a glass container for my homemade laundry soap. I’m so blessed to have my grandma’s big wicker laundry basket, as well. It makes doing laundry more pleasant. Special even.

Let’s move on to the deep cleaning. By now, you are a pro at this! You know the drill… wiping down shelves, walls, light fixtures, etc. Just save the floor for last, because I have a couple projects for you to do first…cleaning your washer and dryer.

All done? Ok, NOW you can clean the baseboard and floors. {P.S. That homemade laundry detergent I mentioned…you can find it HERE. Check it out! I will never go back to my old favorite. It’s that awesome.}

Day 16. We are deep cleaning the craft room and/or office today, just as we’ve done in the other rooms of our homes. And it’s time to get our paper and craft clutter supplies under control. Remember your mantra: “A place for everything, and everything in its place.” It is the key to organization! Use baskets and decorative boxes whenever you can, and your home will not only be organized, but beautiful, too.

Day 17. Spend today in the basement, cleaning and organizing. For me, this means washing windows, dusting, cleaning walls, floors, and stairs, organizing shelves, and cleaning exercise equipment.

Day 18. Clean any additional areas of your house that haven’t been covered yet. If you don’t have any other rooms, take the time to go through the house and touch-up any areas that need it. Now would be a great time to have your carpeting professionally cleaned, as well!

Day 19. Decorate for spring. This is the fun part! I change out decor, floral arrangements and wreaths, blankets, candles, etc. My house is transformed from a cozy winter retreat to a light, fresh home that says “spring.”

Happy cleaning!

Love & Blessings,

Shandy

***********************

Be sure to visit Shandy’s personal blog Aprons ‘n Pearls for crafts, recipes, home keeping tips & more!

At Home with GCH – Organizing Your Fridge with Baskets

shandy's refrigerator

Is your refrigerator and freezer in need of a little TLC? Maybe you’re constantly throwing away food because you forgot it was there. Or perhaps you don’t have an organization system in place, so everyone ends up putting away items wherever they’ll fit, creating a messy looking fridge in the process. Or (whispering) maybe you know someone who has a science experiment growing in their fridge. (Not you. You would NEVER have moldy food in YOUR fridge. Right?) If you found yourself admitting to any of these things, then this is for you! {Or maybe you have a case of spring fever like me, and are getting a start on your spring cleaning and just want to freshen things up a bit after a cold, dreary winter.}

When I told my oldest daughter what I was blogging about today, she said, “I think we probably have the cutest fridge ever.” My youngest daughter agreed, “I love our fridge! It’s so cute!”

I’ll admit… we have a happy fridge. Like me, it loves the color aqua, and it appreciates that I am OCD enough to use labels and custom fridge mats/coasters/whatever you want to call them. You don’t have to label everything in your refrigerator, but it would love you for it if you did.

Ok, so you want your fridge looking fab? Here’s what you do:

  1. Toss any expired foods and science experiments.
  2. Take EVERYTHING out of your fridge. Put perishables in a cooler to keep cold.
  3. Clean the shelves, walls, and every nook & cranny.
  4. Group like items, and put each “set” of like items in a basket. {Read the FAQs and Helpful Hints to learn what I do.}
  5. Label the basket if you wish.
  6. Repeat steps 4 & 5 until finished.
  7. Repeat the above steps to organize your freezer.
  8. Do a happy dance, ’cause your fridge & freezer look awesome!

Frequently Asked Questions:

1. Q: Where did you get your baskets? A: Dollar Tree. Seriously. I bought 10 baskets for a buck each. Score!

2. Q: Where did you get those labels, and how do they hold up? A: I bought the labels at Staples. They’re from the Martha Stewart Home Office collection, and measure 1 3/4″ x 1 5/8″. They hold up very well – I “laminated” them. Why did I put quotations around ‘laminated’? Because I cheated. I don’t have a fancy schmancy laminator, so I used packing tape. I also used packing tape to affix the labels to the shelves and baskets.

3. Q: What on earth is a fridge mat/coaster/whatever you want to call it? A: Great question! I was perusing Pinterest (of course!) and came across a pin for this blog, and what did I do? Well, I ran right out to the store to buy plastic placemats to make my fridge look cute, too! (Ok, a lot of stores. Eight to be exact! I couldn’t find many places that sell them, and the ones that did didn’t have a pattern or color that I liked, so I ended up getting them at Walmart for $2 each.) They serve double duty, by the way. Not only do they liven the fridge up a bit, but they make clean-up a breeze! And they are easy to make: 1. Take the shelves out of the refrigerator. 2. Trace each piece on a placemat. 3. Cut out. 4. Set it in place. 5. Put shelves back. 6. Smile! {I like these so much, I’m doing the big shelves in my fridge next!}

fridge collage 2

4. Q: What “categories” did you use for your baskets and shelves? A: I’m happy to answer this. I’ll start on the top shelf and work my way down, then over to the shelves in the door.

  • milk & other beverages (This label is on the interior wall to the left of our milk.)
  • dips & condiment packages (This basket lives on the top shelf and is home to sour cream, ranch dip, cream cheese, and all of the condiment packages we’ve collected from fast food places. Don’t judge.)
  • snacks (This is the basket where we keep individual size snacks, like pudding, applesauce, fruit cups, etc.)
  • sandwich kit (This is a basket filled with deli meat and cheese slices. I have a hubby & school-age daughter that I pack lunches for every morning. Grabbing baskets makes this so easy!)
  • meat (This is the drawer where we keep our ground beef, steaks, roasts, etc.)
  • veggies for lunches (for daughter’s and hubby’s lunches)
  • fruit for lunches (for daughter’s and hubby’s lunches)
  • dinner helpers (This basket is where we store our crescent rolls, and other items that help make up our dinner menu.)
  • cheese (This is the basket where we keep all of our shredded, block, string, and spreadable cheese, and hubby’s cheese curds. We used to live in Wisconsin. Can you tell?)
  • fruit (Our fruit drawer has a bowl in it to separate the citrus & apples from the other fruit.)
  • veggies (This drawer is where we keep our refrigerator-loving veggies.)
  • butter
  • condiments
  • jams/jellies & salad dressing
  • juice
  • pop

…and in our freezer:

  • breakfast foods (basket)
  • frozen veggies (basket)
  • crock pot meals (basket)
  • meat (slide-out bin)
  • juice (shelf in door)
  • cold packs (shelf in door)
  • ice cream (shelf in door)
  • canned goods (shelf in door)

fridge collage 3

Helpful Hints:

As soon as I get home from the grocery store, I spend 30-60 minutes (it’s well worth it to save time later!) doing the following….

1. Produce is washed and put in different containers. If it’s fruit or veggies for weekday lunches, they get portioned, put into individual baggies, and put in the appropriate basket. If it’s not for lunch, it gets washed and stored in the fruit and veggie drawers.

2. Deli meats get taken out of their packaging, put into baggies, and get placed in the sandwich kit basket.

3. Outer packaging comes off of individually wrapped cheese slices, string cheese, butter, fruit cups, pudding cups, juice boxes, etc.

4. Anything else that needs to be portioned gets portioned, put in a baggie or container, and put away…chips, trail mix, large packages of ground beef that need to get divided in half/thirds, etc.

5. Pasta, cereal, flour, sugar, etc. get put into the appropriate containers in the pantry or baking cabinet.

This really does save time in the following days and weeks! 

I’d love to hear if you’re going to put some of these ideas to use in your home! Also, feel free to share pictures of your new and improved fridge with me! Just send me a message at the email address below!

Love & Blessings,

Shandy

***********************

Be sure to visit Shandy’s personal blog Aprons ‘n Pearls for crafts, recipes, home keeping tips & more!

If you have any questions, just ask in the comment section, or send me an email at:

shandy@girlfriendscoffeehour.com

At Home with GCH – Household Binder, Part 2

hb1

Last week, I gave you a tour of my household binder. (If you missed it, just click HERE.) This week, I’m giving you another peek into my binder, and am sharing my daily cleaning routine. Let’s get started!

I want to share a secret with you. It is life-changing, and is what has helped me more than anything else in keeping a clean home. FlyLady. If you have never heard of the FlyLady before, do yourself a favor and get acquainted. Just click on “Get Started” at the top of the FlyLady’s page. (By the way, making a household binder is one of the steps to get started! She calls it a “control journal”.) You will see on my daily routines, that one of the first things I do in the morning is check the Launch Pad. This is the foundation of my whole system. Another wonderful tool that has been valuable to our family is Cozi. You may have heard of it. It is a very popular web-based calendar and organizer. We’ve been using it for a long time, and last year, we switched to FlyLady’s Cozi. (They partnered up! Genius!) So between FlyLady’s Cozi (there’s an app!) and my household binder, even the most domestically challenged person can get their house clean and organized!

Let’s take a look at my daily cleaning routines.

cleaning routines

You’ll notice that each day is dedicated to a certain set of tasks…

Monday: Zone Cleaning, Menu & Blog Day 

Tuesday: About Town Day

Wednesday: Just the Basics Day

Thursday: Weekly Home Blessing Day

Friday: Paperwork & Clean Out Day

Saturdays & Sundays are my days to relax, so I only do the basics – cooking, cleaning up after meals, loading the dishwasher, etc.

If you click on the picture above (then click on the one that pops up) you will see what I do every Wednesday. Don’t let the amount of the words on the page overwhelm you! I have almost everything I do in a day on these charts. I am not a slave to my house. 😉 In fact, I find plenty of time in the day for hobbies, catching up with my friends, watching a show on television, playing games with my family, etc. The chart just lays everything out for me and keeps me on task. And should I get sick, my girls can look in my binder and see what needs to be done any given day!

Let’s take a closer look at Wednesday.

You’ll see that after I’m dressed and have my daughter fed and off to school, I check my binder, and then I check  FlyLady’s Launch Pad. The Launch Pad tells me what “zone” I’m cleaning that week (this week it is the master bedroom) and it also gives me a “mission.” For example, this Wednesday’s mission is to dust off the tops of the door jambs and windows. Easy peasy! So on Wednesday mornings, I do my everyday tasks like laundry & dishes, and then after lunch I get my cleaning done.

To see each day’s detailed list, click HERE.

And as promised, here’s another peek into my binder:

hb3

On the left is “My Monthly Bill Planner” from the “Finances” section of my binder. In the left column, I write down everything that is due each month. Then in the boxes, I write down what day each bill is due (if it’s always on the same day) and simply check it off once it’s been paid. If the payment is the same every month, I also write that in the left column.

In the middle is a picture of my beautiful daughter, Gabriella. I made a cute printable for each family member and slipped each one into a sheet protector. These act as the dividers in our “Family” section. Behind each person’s picture is important information that pertains to them. So for Gabbie, her medical, school, and cheerleading information is in her own dedicated section of the binder. This makes life so much easier!

On the right is my “Weekly Menu Planner” from the “Menu Planning” section of my binder. I do meal planning on Mondays, and each day’s breakfast, lunch, and dinner is written down on this chart. There’s a section for snacks on the far right of the chart, but I don’t police what everyone munches on when they want a snack. I simply write a variety of things at the top that I need to plan on having in the pantry.

That wraps up our household binder. I know some of you have started making yours, and others are updating theirs. I’m so glad this has been a help! It’s also fun to see what others have done with theirs as it may give us new ideas!

I’ve really enjoyed the comments that you’ve been emailing me! If you have any questions, or would like to know how I manage something in particular that hasn’t been covered, just ask away in the comments below, or send me an email.

You’re welcome to share a picture of your binder with me as well!

Love & Blessings,

Shandy

Be sure to visit Shandy’s personal blog Aprons ‘n Pearls for crafts, recipes, homekeeping tips & more!

__________________

If you would to send a private email to Shandy in regards to this blog, please email her at Shandy@GirlfriendsCoffeeHour.com


At Home with GCH – Household Binder, Part 1

household binder Recently, I’ve had several people ask me about my household binder and for help in getting a system in place that will help keep their homes clean and organized. Today and a week from today, I will be sharing my binder with you. You will get to see what it looks like, how I have it organized, and what I use to keep my home in order. Plus I will share with you where I purchased all my supplies and where I found some of the printables it contains. Grab a pen and a notepad, find a cozy spot, and read on… and in just a few minutes, you’ll be on your way to a more organized home!

The first thing you see when you look at my binder is an adorable cover, personalized with my monogram. I found this over at lee, me, and the girls. Does your binder have to be cute to be functional? Absolutely not, but it sure helps!

bcollage

Open the cover, and you will find an assortment of labels, tabs, sticky notes, and a pouch… all from the Martha Stewart line at Staples. (I also bought my big Avery binder and sheet protectors there years and years ago when I first made my binder, and it still looks new!) I just went there to replenish supplies, and I thought maybe I was in Heaven. I love, love, love this line of products! The young man at the checkout figured that out fast. The first words out of his mouth were, “You must like Martha Stewart!” Why, yes. Yes, I do. In fact, I drove an hour one way just to get these items. No Staples near me. Booo! But I digress. Inside the pouch are my favorite Paper Mate Flair pens (another Staples find.) Colorful, and they don’t bleed through the paper! A set of twelve lets me color-code everything to my heart’s content!

Next, we come to the first section of my binder… Family Planner.” It contains:

calendar

The next section is called Keeping House.” In this section, you will find:

  • the Homemaker’s Creed
  • my daily routines
  • detailed cleaning lists
  • many, many, MANY reference sheets regarding cleaning
  • a special section for my Shaklee product information

Then, I have a section titled, Blog,” specifically for my personal blog. It includes planning sheets and more.

Next up is my “Ministry” section, with sub-sections for Girlfriends Coffee Hour and projects I work on throughout the year for various ministries (church, Operation Christmas Child, etc.)

Our family’s “Directory” is next. It includes:

The very important “Finances” section is next. In this section, you will find:

Our “Family” section is next. It includes sub-sections for each family member with tabs for:

  • medical
  • school/sports
  • work

The family section also includes:

  • a cemetery info tab so I can keep on top of my dad’s and grandparents’ graves (maintenance, flowers, etc.)
  • online info tab

Last is my “Menu Planning” section, which has:

  • weekly menu planner
  • perforated task list sheets (Martha Stewart line again!) – I can plan my meals on these awesome sheets, and write the ingredients I need to buy at the store on the right side, which then tears off to take to the store!
  • secure top sheet protectors (you guessed it… Martha!) – These are divided in half, so I get two “envelopes” per page, where I keep my coupons organized by category.

That’s it in a nutshell! Be sure to come back next week to learn about my cleaning routine, to find out what has been the single biggest help to me with cleaning, and to get another peek into my binder! In the meantime, you can start thinking about what you want to have in YOUR binder. Start brainstorming! Then have fun gathering or shopping for the materials you need to make one of your own. If you have any questions, just ask away in the comments below, or send me an email at: shandy@girlfriendscoffeehour.com

Love & Blessings,

Shandy

Be sure to visit Shandy’s personal blog Aprons ‘n Pearls for crafts, recipes, homekeeping tips & more!


Saturdays with Shandy: 6 Weeks to Make Your Home Shine for the Holidays! Week Six

Congratulations! You made it to week six, and by Friday your home will be clean, organized, and ready for the holidays! This week we are organizing the office/craft room, and cleaning the laundry room. You’ll also have two days to work on any additional spaces that need cleaning, and to catch up on anything you may have missed.

I’m so excited about getting started, we’re going to get right to it! But first, I just want to quickly thank you for following us these last six weeks, and let you know what we’ll be doing in the upcoming weeks… You are invited to join us for our next series starting next Saturday – “Saturdays with Shandy: Christmas Edition!” That’s right – on to the fun stuff! Decorating ideas and handmade gifts is what we’re focusing on for the four weeks before Christmas. I hope you will join us!

*Don’t forget to share your pictures with us in our Facebook group today! And if you have any questions, or need advice on how to handle a cleaning or organizational problem you have, today is the day! Just ask away in the comment section below!

Now, back to our regularly scheduled programming…

_ _ _ _ _ _ _ _ _ _ _ _ _ _ _ _

Let’s pray:
Lord, I just want to thank You for this time we’ve had together the last several weeks. It’s been a blessing to me, and I pray it’s been a blessing to these awesome ladies and their families. We thank You for all that You’ve given us. Whether we have a little, or a lot, it’s all in thanks to You. Be with our families as we gather for Thanksgiving, Lord. Bless these wonderful women with safe travels and happy memories. In Jesus’ name, Amen.

Your assignment:

***For some fantastic cleaning and organization ideas, go to our “Saturdays with Shandy” board on Pinterest! You’ll find all kinds of tips relevant to this week’s assignments. http://pinterest.com/gchministries/saturdays-with-shandy/

_______________

Today & Monday – If Mt. Washmore has formed in your laundry room, today is the day to catch up. Wash, dry, fold or hang, put away, and repeat until Washmore is no more. Then, it’s time to clean, clean, clean! Laundry rooms can quickly become dusty, cluttered messes if you don’t take care of them. Toss old detergent and fabric softener containers, and clear away any clutter. I like everything to look pretty, so I use baskets to hide unpretty things and a glass container for my homemade detergent. I’m so blessed to have my grandma’s big wicker laundry basket, as well. It makes doing laundry more pleasant. Special even.

Let’s move on to the deep cleaning. By now, you are a pro at this! You know the drill… wiping down shelves, walls, light fixtures, etc. Just save the floor for last, because I have a couple projects for you to do first… cleaning your washer and dryer. And I’m willing to bet you know my next words. That’s right! Check out our Saturdays with Shandy Pinterest board for the how-to. You’re so smart!

All done? Ok, NOW you can clean the baseboard and floors. P.S. That homemade laundry detergent I mentioned… I will be blogging about it on my personal blog at the end of next week. Check it out! I will never go back to my old favorite. It’s that awesome.

Tuesday & Wednesday – We are deep cleaning the craft room and/or office today, just as we’ve done the last five weeks in the other rooms of our homes. And it’s time to get our paper and craft clutter supplies under control.

Paper is my downfall. I am a recovering paper hoarder, really. Fortunately, when I moved last month, I recycled mountains of papers and magazines that I told myself I would use someday. But it created more problems than it was worth. Organization became more important than the stacks of craft magazines, project and decorating ideas, and receipts from years ago. Learning to file things right away, in the right place, and knowing how to discern what to keep and what to throw away is the first step. Check our Pinterest board on Tuesday for some awesome solutions to your paper dilemma! I will have what I’ve found to be the best tips on there.

We also have some ideas for you now about how to organize your craft room. I’ve gone from having bags full of yarn in the closet, to having them organized by color on a shelf. Cute and functional! The key to any kind of organization is, “a place for everything, and everything in its place.” Use baskets and decorative boxes whenever you can, and your home will not only be organized, but beautiful, too.

Thursday & Friday – Catch up on anything else you haven’t completed, then do a happy dance! You did it! You made your home SHINE for the holidays! Enjoy your weekend!

Blessings,
Shandy

_______________

You can visit Shandy’s personal blog at: http://aprons-n-pearls.blogspot.com

Saturdays with Shandy: 6 Weeks to Make Your Home Shine for the Holidays! Week Five

Wow! Can you believe week five is already here? The main living areas of your house must be looking fabulous! This week we are working on bedrooms and bathrooms. Then, for our final week, we’ll be organizing the office/den/craft room – whichever you have! – and cleaning the laundry room. Plus you’ll have two days to work on any additional spaces that need cleaning, and to catch up on anything you may have missed. Let’s finish strong so we can move on to the fun stuff: decorating and making gifts!!!

Let’s talk a little about how our families help around the house. I have a 12 year old daughter. She is old enough to keep her bedroom and bathroom clean, but still needs me to remind and encourage her on a regular basis. She may not clean and organize it exactly how I would, but it’s important that we let our children be responsible for their own belongings. It’s also important that we give our children proper instruction. If we tell them to do something, but don’t take the time to teach them how, we can’t get frustrated when the results are not what we expected. When cleaning the bedrooms and bathrooms in your house this week, please don’t do it all by yourself if you have children at home. Even preschoolers can (and should!) help keep their rooms clean! For those of you with children, how do you encourage them to help keep their space clean? Share your tips below, then head on over to our facebook group where we’ll have a little fun and share pictures of our progress!

_ _ _ _ _ _ _ _ _ _ _ _ _ _ _ _

Let’s pray:

We just want to thank you, Lord, for helping us stay on task. Please give us the fortitude we will need to finish strong these next two weeks.  Replace unwilling and complaining attitudes with cooperation and cheerfulness as we ask our families to pitch in, and instill in us an attitude of gratitude as we care for all You’ve blessed us with. In Jesus’ name, Amen.

Your assignment:

***For some brilliant cleaning and organization ideas, go to our “Saturdays with Shandy” board on Pinterest! You’ll find all kinds of tips relevant to this week’s assignment. http://pinterest.com/gchministries/saturdays-with-shandy/

Today –  Break out those rubber gloves, girls. We’re deep cleaning the bathrooms today! This is an important day, I kid you not. A pristine powder room is a must, especially when you have company coming over for holiday celebrations! Because there are so many things I want to share with you about cleaning your bathrooms, please head on over to Pinterest for everything you need to know to do the job, and do it well.

Monday – Today, we are showing our master bedroom some love. I could do a whole post on just this room alone! Your bedroom is your own private retreat. Do you treat it as such, or is it a catch-all? Let’s work on making it a serene, inviting, romantic place to be.

Let’s start by stripping the bed of all linens, including the mattress cover. Throw them in the washing machine so it can work while we work. Next, take down your window treatments and blinds. Wash your blinds (remember, there’s an excellent way to do this… see the post on Pinterest!) Wash your window treatments once your bedding is done.

If there’s anything on your floor, or clutter on your dresser or nightstand, pick it up and put it away. We don’t want to clean around “stuff.” Once everything is picked up and organized, we’ll move on to dusting…

Dust your ceiling fan (check our Pinterest board for the how-to!) Then dust the furniture, lamps, clocks, and decor. Wipe down walls, light switches, trim, and baseboards. Clean your light fixture, then wash the windows and mirrors. (My husband and I agreed not to have a television in our bedroom, but if you have one, now is the time to clean it. Don’t forget to clean your remote, too!)

Before making your bed, check out Pinterest to find out how to clean your mattress. Very important step! Vacuum (be sure to move your furniture!) or sweep & mop if you have hardwood. Then, make your bed, taking the time to make it look nice!

Now let’s clean those closets! You guessed it! Check our Pinterest board! (I’m telling you… it’s absolutely awesome!) When you’re done, put your window treatments back up, light a candle, and invite your hubby in to look at what you’ve accomplished!

Tuesday –  Moving on to bedroom #2… Since you’ve mastered the master bedroom, you’ll know what to do for the other bedrooms in your home! 🙂 Check out Pinterest for tips especially for children’s rooms and guest rooms.

Wednesday – Bedroom #3 is next. (If you don’t have a 3rd bedroom, you can catch up on anything you’ve missed, or work in an area of your house, like the basement, that we’re not covering during these six weeks.)

Thursday – Today, we’re working on bedroom #4. (See Wednesday’s assignment if you don’t have a 4th bedroom.)

Friday – Catch up on anything else you haven’t completed. Smile at a job well done, then enjoy your evening!

Blessings,

Shandy

You can visit Shandy’s personal blog at: http://aprons-n-pearls.blogspot.com

Saturdays with Shandy: 6 Weeks to Make Your Home Shine for the Holidays! Week 3


Happy Saturday! Are your living and dining rooms sparkling clean? Doesn’t it feel like a weight is being lifted each week? I know it does for me! Each week, we are one step closer to having a sparkling clean home for the holidays! And how did you do with tuning into your five senses while cleaning? Let me tell you… my house smells amazing!

This week and next, we are focusing on the kitchen! These are, perhaps, the two most important weeks of this 6 week journey, as the kitchen is where we do all of our preparing! Cooking, baking, freezing items for later, wrapping presents… the list goes on!

It’s possible you noticed the picture at the top of the page and maybe it made you smile a little. I want you to read (or sing!) these words with me…

A robin feathering his nest has very little time to rest while gathering his bits of twine and twig.  Though quite intent in his pursuit, he has a merry tune to toot.  He knows a song will move the job along…

We all know that song, right? At least most of us here in the States. So what does Mary Poppins have to do with cleaning? Listen carefully to the words she says at the beginning of the song…

In every job that must be done

There is an element of fun.

You find the fun, and… snap!

The job’s a game!

Do any of us really think that scrubbing our floors, cleaning the stove, and polishing woodwork is fun? I’m going to be 100% honest with you. As much as I love being a housewife, that part of my job is usually not a fun time for me. I love the results, and I love blessing my family this way. I do not, however, love the hard work. I want to love the work, but I’m just not there yet. Can you relate? But remember in Colossians 3:23 we’re told to do everything enthusiastically, so let’s do this with a smile on our faces, a song in our hearts, and some songs on our iPods or CD players! Music can be the element of FUN! A song will move the job along! “They themselves lift up their voices and sing to the tambourine and the lyre and rejoice to the sound of the pipe.” Job 21:12 (AMP)

After we pray, and after reading your assignments for the week, please comment here letting us know how last week went for you and share your thoughts about this week… what do YOU do to make a job fun??? Then head on over to our Facebook group to share your pictures and to find out what our fun activity it is! And be sure to join us next week as we continue to make our homes shine for the holidays, and for some free Christmas planning printables!

_ _ _ _ _ _ _ _ _ _ _ _ _ _ _ _

Let’s pray:

O come, let us sing to the Lord; let us make a joyful noise to the Rock of our salvation! Lord, thank you for another week. Thank you that we are able to work with our hands to serve our families this way. Let our work be pleasing to you, and let it bless our families. Holy Spirit, please be with us and put a song in our hearts. In Jesus’ name, Amen.

Your assignment:

Today – Today we are tackling our pantries! This is super important, as we tend to do a lot of shopping for holiday cooking/baking, and need plenty of room. Remove everything from your pantry. Throw away anything that is expired or questionable. Wipe down the shelves. Put in new shelf-liner if you’d like! If you have a walk-in pantry, give the walls a scrubbing if they need it, and make sure ceiling is free of spider webs. Wipe down the baseboard, and sweep & mop the floor.

Now it’s time to get organized and put everything back! I just LOVE an organized pantry!  All the veggies in one place, all the breakfast items in another, all the pasta in another, etc., etc. If you have cleaning and miscellaneous supplies in your pantry, those get organized, too. Two half-empty bottles of the same cleaner? Combine them, and recycle the extra container.  Cleaning rags that should’ve been thrown out long ago? Time to bid them farewell. You get the idea! This is the time I would also clean up my vacuum and disinfect my mop.

For some awesome pantry organization ideas, you can go to our Saturdays with Shandy board on Pinterest! I will have some great cleaning tips there for you, too! http://pinterest.com/gchministries/saturdays-with-shandy/

Monday – Today we are working on our refrigerator! Start by getting rid of expired items and forgotten “science experiments” if you have any. This is definitely the time to have the dishwasher empty and ready to clean any dishes you may be taking out. Now get some hot, soapy water and clean the refrigerator shelves, followed by wiping down the inside walls and door(s). Just like with the pantry, organize as you put items back. Do you have a bunch of ketchup or hot sauce packets from take-out places? Toss them if they’re old, or if you have newer ones you want to keep, put them all together in a plastic container. Salad dressings go on one shelf; condiments on another, etc. I will post a picture today (Saturday) of my before and after from when I did this a few months ago, so you can see how I organize my fridge. Now that we’ve moved, that refrigerator is now in our garage and is all clean, empty, and awaiting Christmas goodies and extra beverages, but I do have the refrigerator in our new kitchen to clean! I am doing this right along with you!  Grumbling Rejoicing right along with you!

Now that you are done with the inside of the refrigerator, do the same with the freezer. While you’re cleaning the inside, make sure you are cleaning the seal and any crevices carefully. Things like to hide in there if you aren’t careful to keep it clean. Now that the outside is clean, clear off the outside – remove magnets, notes, artwork, and anything else that may be there. Wipe down all sides of the fridge, including the top! Carefully move the fridge away from the wall (careful if you have a water line!) and clear away any dust bunnies that have accumulated. Now is a good time to sweep and wipe down the floor back there before pushing it back up to the wall. Be selective in what you place on top and on the doors and side of your refrigerator. Clutter makes it look untidy, even if it’s the cleanest fridge on the block!

Tues – Today we are cleaning our microwave and small appliances like the toaster and coffee maker. If anyone needs tips on how to get any of these clean, just ask! I have a great tip on how to clean your microwave on our Saturdays with Shandy Pinterest board! It’s the way I personally clean mine and it works great! You definitely don’t want to clean the inside of your microwave with a chemical cleaner, so take special care.

Wed – Time to clean the dishwasher. For a great how-to, check out our Pinterest board!

Thurs – We are cleaning our oven/stove today. I personally do not use the chemical sprays in mine. I don’t like the fumes, and it’s just not a very safe method. And you guessed it… there is another how-to on our Pinterest board! (Why try to reinvent the wheel? LOL)

Fri – Catch up on anything you haven’t completed. Then, enjoy your evening! You’ve definitely earned it this week!  We’ll be back in the kitchen for week 4, but isn’t it great to know the hard stuff is behind us? What a relief!!!

Blessings,

Shandy