March 29, 2024

At Home w/ GCH – No More “Junk” Drawer

junk drawer

The dreaded junk drawer. What state is yours in? Before you answer that, I have a confession story to tell you, that might just make you feel better if yours is a mess.

Once upon a time, four years ago to be exact, I had not one, but TWO junk drawers. Both were the stuff-everything-in-there-until-practically-overflowing-and-if-anyone-ever-lays-eyes-on-this-I’ll-be-mortified kind of junk drawer. Screws & screwdrivers (don’t those belong in a toolbox?), old video rental cards and my college i.d. from years ago (shouldn’t those be shredded?), receipts, batteries, recipe booklets, more receipts, every writing  utensil known to man, sunglasses, report cards, pads of paper, tealights, keys to the car that was sold a couple years prior, keys that I don’t know what they opened…you name it, it was in there. {Feel better? I thought so.} Then one day, I decided to use my OCD tendencies for good instead of evil, and started living by the golden rule. No, not that one. This one: A place for everything, and everything in its place. The junk drawers were banished from the kingdom, and we all lived happily ever after.

So, again I ask, what state is your junk drawer in? Is it happily organized, a chaotic mess, or somewhere in between?

Pop quiz! What’s my golden rule? That’s right! You get a gold star! Now let’s work on finding a place for everything in YOUR drawer. Assignment: Find the time this week to clean and organize your junk drawer.

  • Empty the contents out onto the table or counter.
  • Wipe the drawer clean, including the crevices and corners of the drawer.
  • Now sort everything….
  • If it doesn’t belong in there, put it where it belongs. If it’s in there BECAUSE it doesn’t have a dedicated place where it belongs, CREATE one for it. This is, in my opinion, the number one cause for messes. If it doesn’t have a home, it will wander. Simple as that.
  • If it’s garbage, throw it away. Be selective in what you keep.
  • Put the remaining items into small boxes or baskets that will fit in your drawer. This is the biggest step you can take to make sure your junk drawer (which you can now call something else, because it doesn’t look so junky anymore) stays neat and organized! I heart boxes! As you can see, the only items I don’t have in a box are the extra notepads for my fridge, my scissors, and my coupon binder.

If you’re looking at the picture of my drawer and swoon over those boxes like I do, you can find them HERE. Not only are they pretty, but watch this: presto change-o!!! …*…*…*…*…

junk drawer 2

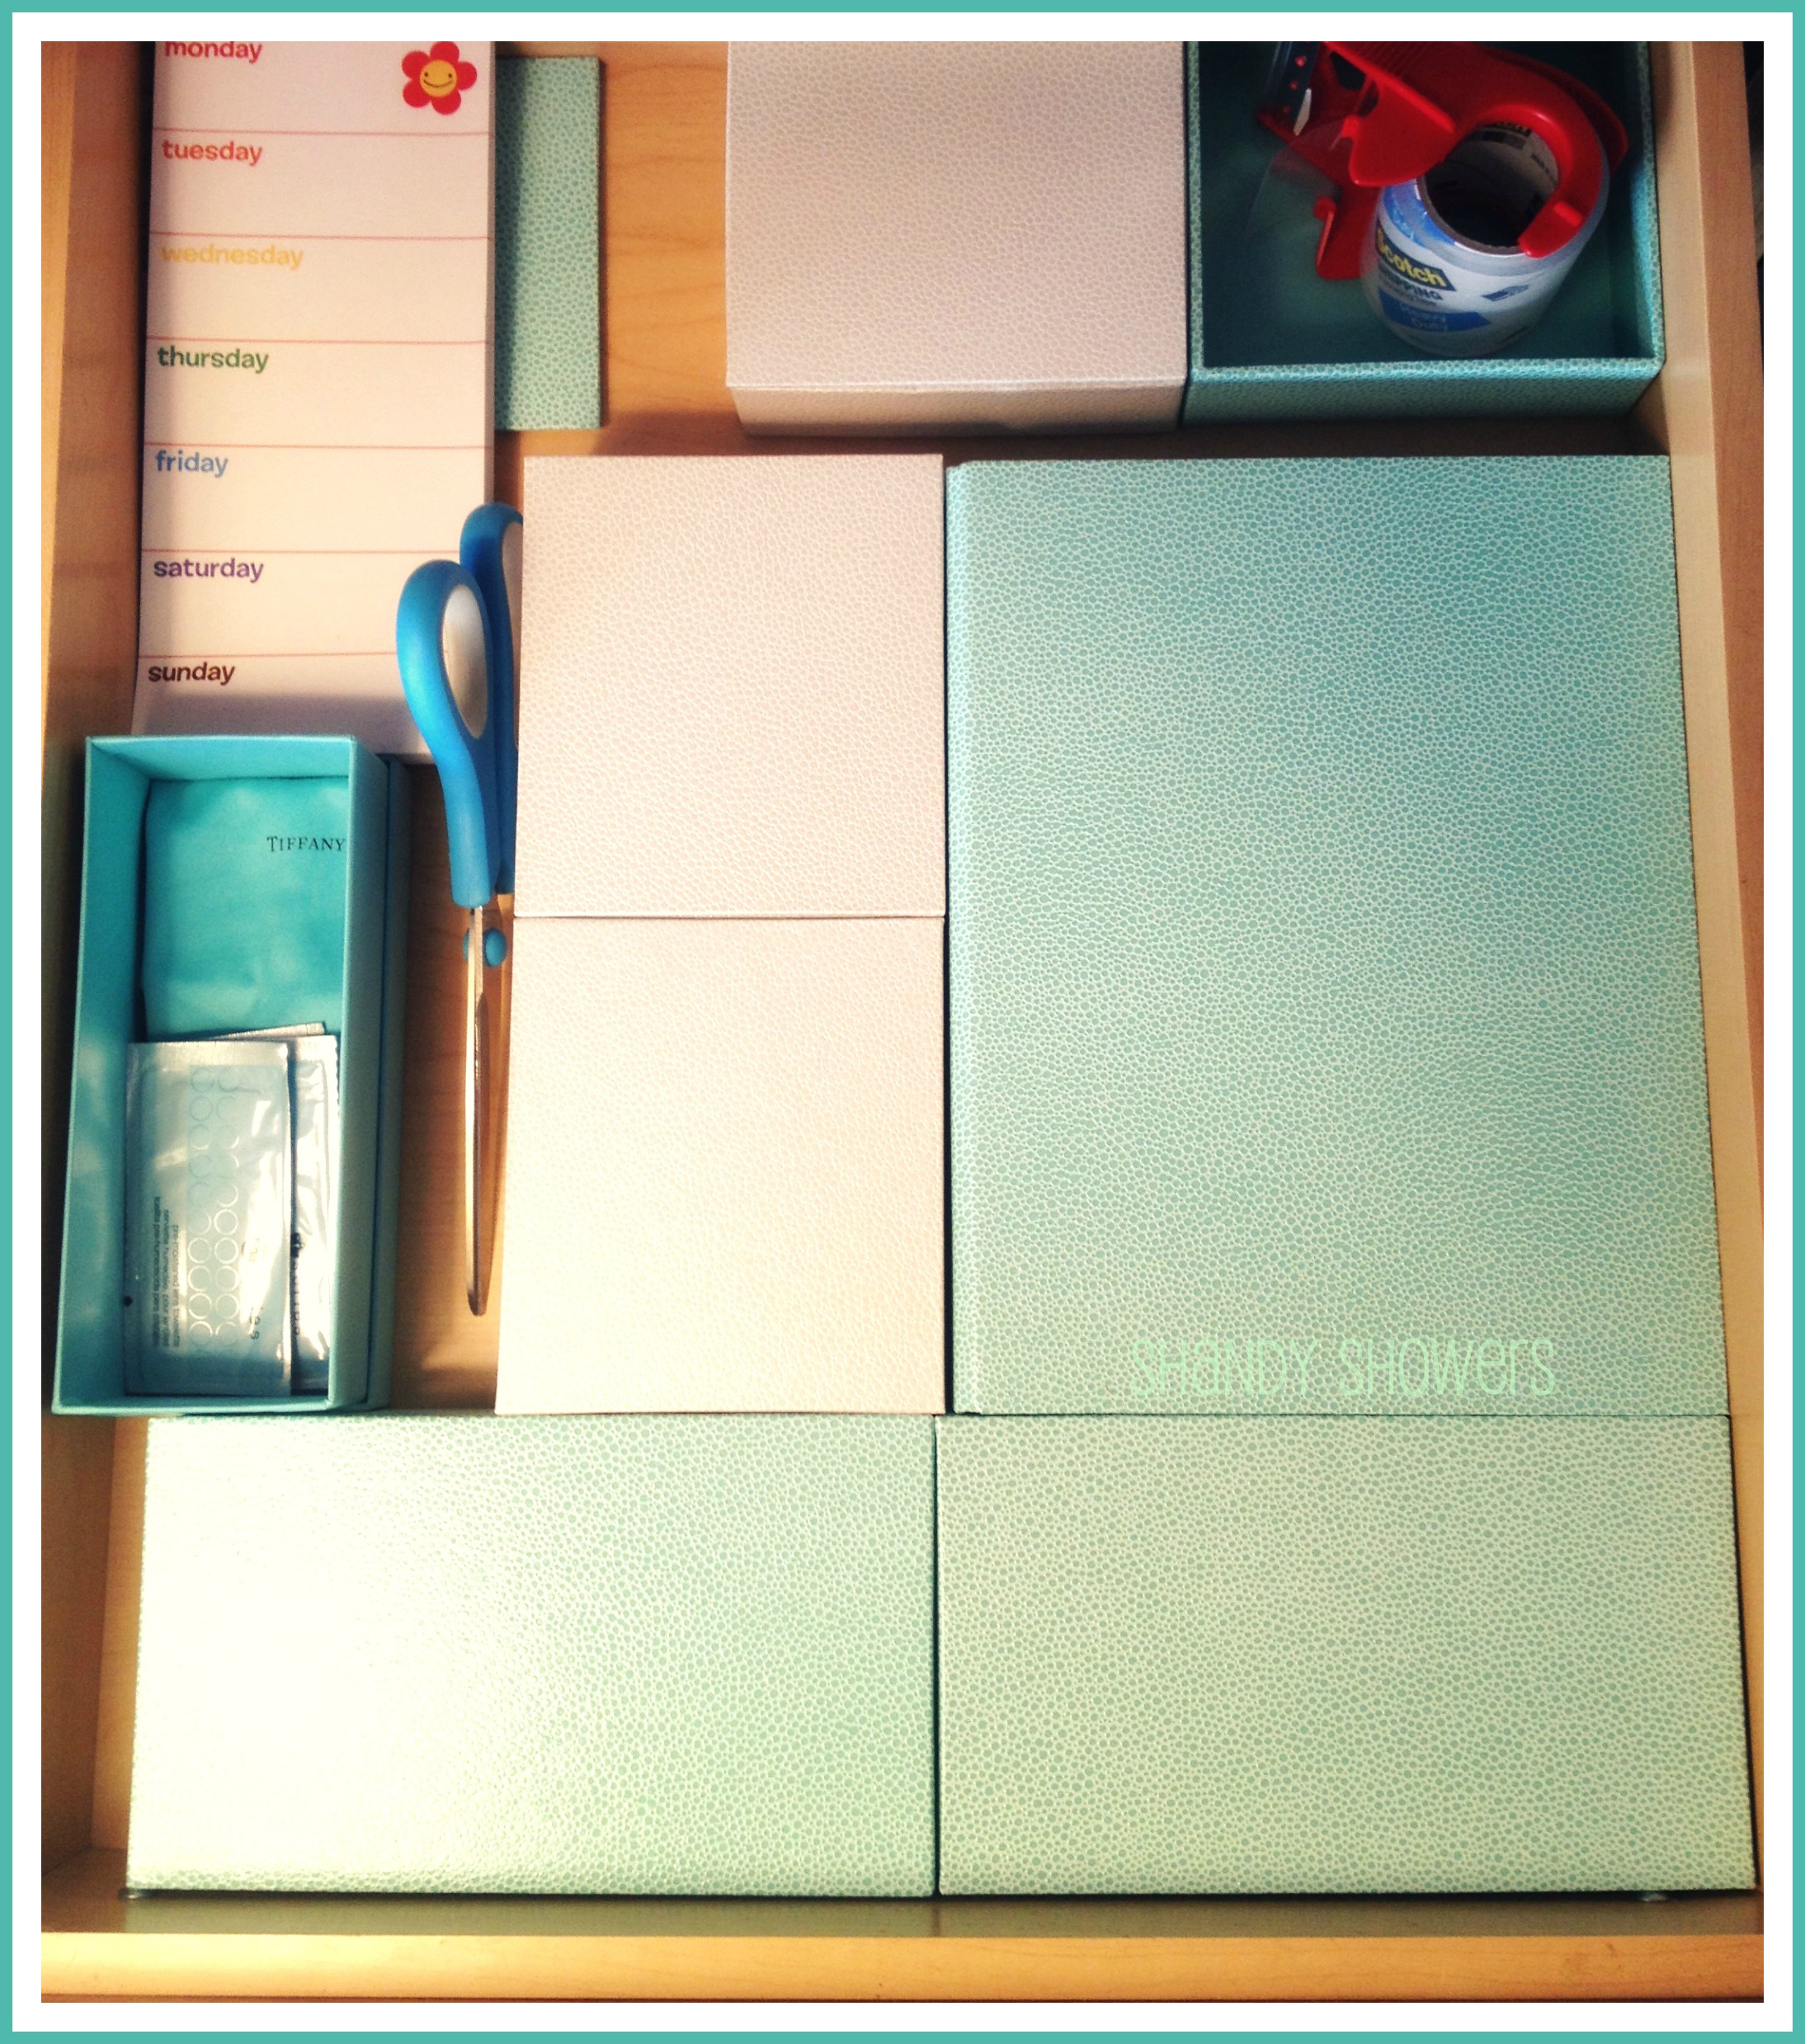
Cool, right? Not that lids are essential, but boxes like this would work GREAT for people who have a tendency to overstuff. How many pens or sticky notes do you really NEED in your drawer, right? If you have a problem corralling the clutter, make it a rule that if it doesn’t fit with the lid closed, then it’s too much for the drawer. (As you can see, my one exception is my box with the tape in it, only because the tape is too tall for the lid to fit. The other open box is for my glasses and lens cleaner, and I never bother putting the cover on that, because I know I won’t put other “stuff” in it.)

Don’t want to spend money on boxes? Improvise! Before I bought these, I used Velveeta boxes, and those worked just fine! You can even use double-sided tape to pretty them up with scrapbook paper. Beautiful spaces make me want to keep the space beautiful.

Love & Blessings,

Shandy

***********************

Be sure to visit Shandy’s personal blog Aprons ‘n Pearls for crafts, recipes, home keeping tips & more!

At Home with GCH – Spring Cleaning

spring cleaning

I don’t know about you, but every year around this time, I get a bad case of spring fever. I can’t wait to open the windows, letting the sunshine, fresh air, and sound of birds singing permeate our home.  I like to have the inside of my house spring-cleaned before the calendar tells me spring has arrived. That way, once the end of March rolls around, we can concentrate on spring cleaning the outside of our home, yard, and garage.

When you start is up to you, but in just nineteen days, your home can be completely clean, decorated, and ready for spring! Whether you are a domestic diva or don’t know a duster from a dishcloth, I hope you can take something away from how we spring clean our home. Not sure how to clean or organize something? Go to our Pinterest board, where you will learn how to make your own furniture polish, how to organize your kitchen, and how to clean your blinds, ceiling fan, couch, washer & dryer, dishwasher, the filter in your stove’s hood, deep clean your bathroom, and more!

Day 1. In my experience, any successful cleaning spree starts with clutter control! So, take a garbage bag and quickly go through every room in your house. Anything that needs to be thrown away, throw away! Last week’s newspaper, that drawer full of old makeup, junk mail, those shoes that should have been retired a year ago, the sweater that’s beyond repair, the bag in your teenager‘s room from last night‘s fast food run…fill up that garbage bag! Now you’re going to take a box or a bag and find 25 more things to either give away or throw away…the pile of sweaters you never wear anymore, the jeans that don’t fit or went out of style in the 80’s, the old toaster you have stashed away as a backup, the old books or magazines you’re never going to read again. 25 things. It’s really easy, and your house will start to breathe again. I love a good challenge, and after finding my first 25 items, I usually find a bunch more! It feels so good! I encourage you to have your kids do this as well. Maybe start small with them and have them put 5 things in the giveaway box. Or maybe 10. Make it a game and see who can fill up their box the fastest! The only rule: don’t overthink anything. If you have to think about it, it doesn’t mean as much to you as maybe you thought it did. Once you’re finished, you will want to remove those items from your home right away! Don’t let them hang out in the garage or next to the front door or in the coat closet. Out they go!

While you’re out, pick up any cleaning supplies you don’t have on hand, or the ingredients to make them. {We use non-toxic cleaners in our home.}

Day 2. Entryway/Foyer: clean out and organize the coat closet. Wipe down the closet door. Wipe down walls, trim, and baseboards if dirty or dusty. Wipe down light switch(es). Sweep and mop floor. Clean light fixture.

Day 3. Clean all blinds and window treatments in your living and dining rooms; clean any mirrors and picture frames you have on display…anything with glass. No sense in getting the glass cleaner out repeatedly!

Day 4. Dust living and dining rooms from the top down: ceiling fans, ceilings & walls, baseboards, and woodwork; clean TV, electronics, and remotes; dust shelves, mantles, tables, other wood furniture, decorations, lamps, etc.

Still working in just the living and dining rooms, clean all doors, doorknobs, light switches, and fingerprints/scuffmarks on walls. Get out the touch-up paint and take care of any places that need to be touched up.

Clean out and vacuum the couch and other upholstered furniture. Vacuum, or sweep and mop, the floors in your living and dining rooms, moving all the furniture.

Go through any drawers, cabinets, etc. and organize your belongings, getting rid of anything you no longer need or use.

Day 5. Time to tackle the pantry! Remove everything from your pantry. Throw away anything that is expired or questionable. Wipe down the shelves. Put in new shelf-liner if you’d like! If you have a walk-in pantry, give the walls a scrubbing if they need it, and make sure the ceiling is free of cobwebs. Wipe down the baseboards, sweep and mop the floor. Now it’s time to get organized and put everything back! I just LOVE an organized pantry! All the veggies in one place, all the breakfast items in another, all the pasta in another, etc., etc. If you have cleaning and miscellaneous supplies in your pantry, those get organized, too. Two half-empty bottles of the same cleaner? Combine them, and recycle the extra container. Cleaning rags that should’ve been thrown out long ago? Time to bid them farewell. You get the idea! This is the time I would also clean up my vacuum and disinfect my mop.

Day 6. Today we are working on our refrigerator/freezer! Start by getting rid of expired items and forgotten “science experiments” if you have any. This is definitely the time to have the dishwasher empty and ready to clean any dishes you may be taking out. Now get some hot, soapy water and clean the refrigerator shelves, followed by wiping down the inside walls and door(s). Just like with the pantry, organize as you put items back. Salad dressings go on one shelf; condiments on another, etc. While you’re cleaning the inside, make sure you are cleaning the seal and any crevices carefully. Things like to hide in there if you aren’t careful to keep it clean. Now that the outside is clean, clear off the outside—remove magnets, notes, artwork, and anything else that may be there. Wipe down all sides of the fridge, including the top! Carefully move the fridge away from the wall (careful if you have a water line!) and clear away any dust bunnies that have accumulated. Now is a good time to sweep and wipe down the floor back there before pushing it back up to the wall. Be selective in what you place on top and on the doors and side of your refrigerator. Clutter makes it look untidy, even if it’s the cleanest fridge on the block! {For ideas on how to organize your fridge, click HERE.}

Day 7. Thoroughly clean the microwave, dishwasher, and all small appliances like the toaster and coffee maker. Next, clean the oven/stove. {I personally do not use the chemical sprays in mine. I don’t like the fumes, and it’s just not a very safe method. Also remember not to use chemical cleaners in your microwave.}

Day 8. Clean your kitchen cabinets. Take everything (yes, EVERYTHING) out of your cabinets and put them on your table or kitchen island. Use hot, soapy water (or the cleaner of your choice) to clean the insides of your cabinets. Then take a clean towel to wipe them dry. Put in new shelf liner if you wish. Throw out all the things you never use. (How many empty whipped cream containers does one need anyway?) Then put everything back, organizing as you go.

On to the kitchen drawers. Follow the same procedure for cleaning the cabinets. Be very selective in what you choose to put back in the drawers. A place for everything and everything in its place. Make that your mantra, and you won’t have a junk drawer.

Day 9. Now that the insides of our cabinets and drawers are clean and organized, we are going to focus on the outsides. Get some hot, soapy water to clean them. Don’t forget the top of your cabinets and any decor that’s up there! Dry with a clean towel. And to really make a difference, use your favorite oil or furniture polish to make them shine! Once you’re finished with that, take the time to wipe down your walls & switch plates. Use touch up paint if needed. Lastly, dust wallhangings and other decor.

Day 10. Time to make those windows and patio doors sparkle! We are cleaning the windows, blinds, and window treatments today. (*Hint: crumpled up newspaper works like magic to shine those windows!) Then, move on to the sink and make it shine! I like to disinfect mine with bleach water. {One of the few times you will see me use a chemical cleaner in our home.} Then I rinse it out very, very well before freshening up my garbage disposal.

Clean kitchen light fixtures and replace bulbs if need be. Next, wipe down your counters. Move on to the baseboards, then sweep and mop. (I get down on my hands and knees and give the floor a good scrubbing since we’re deep cleaning.)

Today is also a good day to clean out your garbage can, inside and out. Recycling bin if you have one in the house, too.

Day 11. Break out those rubber gloves…we’re deep cleaning the bathrooms today! This is an important day, I kid you not. A pristine powder room is a must! Every single surface gets cleaned, from the sink and toilet, to the bathtub and mirror, to the floors, walls, and baseboards. Look up at your fan. It’s likely that needs to be cleaned as well.

Day 12. Today, we are showing our master bedroom some love. Start by stripping the bed of all linens, including the mattress cover. Throw them in the washing machine so it can work while we work. Next, take down your window treatments and blinds. Wash your blinds. Wash your window treatments once your bedding is done.

If there’s anything on your floor, or clutter on your dresser or nightstand, pick it up and put it away. We don’t want to clean around “stuff.” Once everything is picked up and organized, we’ll move on to dusting.

Dust your ceiling fan if you have one. Then dust the furniture, lamps, clocks, and decor. Wipe down walls, light switches, trim, and baseboards. Clean your light fixture, then wash the windows and mirrors. (My husband and I agreed not to have a television in our bedroom, but if you have one, now is the time to clean it. Don’t forget to clean your remote, too!)

Before making your bed, clean and flip your mattress. Very important step! Vacuum (be sure to move your furniture!) or sweep and mop if you have hardwood. Then, make your bed, taking the time to make it look nice!

Now let’s clean those closets! When you’re done, put your window treatments back up. You now have your own private retreat to relax in at the end of a long day.

Day 13. Moving on to bedroom #2… Since you’ve mastered the master bedroom, you’ll know what to do for the other bedrooms in your home!

Day 14. Bedrooms #3 & 4 are next. (If you don’t have a 3rd or 4th bedroom, you can catch up on anything you’ve missed, or take a well-deserved day off.)

Day 15. If Mt. Washmore has formed in your laundry room, today is the day to catch up. Wash, dry, fold or hang, put away, and repeat until Washmore is no more. Then, it’s time to clean, clean, clean! Laundry rooms can quickly become dusty, cluttered messes if you don’t take care of them. Toss old detergent and fabric softener containers, and clear away any clutter. I like everything to look pretty, so I use baskets to hide unpretty things and a glass container for my homemade laundry soap. I’m so blessed to have my grandma’s big wicker laundry basket, as well. It makes doing laundry more pleasant. Special even.

Let’s move on to the deep cleaning. By now, you are a pro at this! You know the drill… wiping down shelves, walls, light fixtures, etc. Just save the floor for last, because I have a couple projects for you to do first…cleaning your washer and dryer.

All done? Ok, NOW you can clean the baseboard and floors. {P.S. That homemade laundry detergent I mentioned…you can find it HERE. Check it out! I will never go back to my old favorite. It’s that awesome.}

Day 16. We are deep cleaning the craft room and/or office today, just as we’ve done in the other rooms of our homes. And it’s time to get our paper and craft clutter supplies under control. Remember your mantra: “A place for everything, and everything in its place.” It is the key to organization! Use baskets and decorative boxes whenever you can, and your home will not only be organized, but beautiful, too.

Day 17. Spend today in the basement, cleaning and organizing. For me, this means washing windows, dusting, cleaning walls, floors, and stairs, organizing shelves, and cleaning exercise equipment.

Day 18. Clean any additional areas of your house that haven’t been covered yet. If you don’t have any other rooms, take the time to go through the house and touch-up any areas that need it. Now would be a great time to have your carpeting professionally cleaned, as well!

Day 19. Decorate for spring. This is the fun part! I change out decor, floral arrangements and wreaths, blankets, candles, etc. My house is transformed from a cozy winter retreat to a light, fresh home that says “spring.”

Happy cleaning!

Love & Blessings,

Shandy

***********************

Be sure to visit Shandy’s personal blog Aprons ‘n Pearls for crafts, recipes, home keeping tips & more!

At Home with GCH – Organizing Your Fridge with Baskets

shandy's refrigerator

Is your refrigerator and freezer in need of a little TLC? Maybe you’re constantly throwing away food because you forgot it was there. Or perhaps you don’t have an organization system in place, so everyone ends up putting away items wherever they’ll fit, creating a messy looking fridge in the process. Or (whispering) maybe you know someone who has a science experiment growing in their fridge. (Not you. You would NEVER have moldy food in YOUR fridge. Right?) If you found yourself admitting to any of these things, then this is for you! {Or maybe you have a case of spring fever like me, and are getting a start on your spring cleaning and just want to freshen things up a bit after a cold, dreary winter.}

When I told my oldest daughter what I was blogging about today, she said, “I think we probably have the cutest fridge ever.” My youngest daughter agreed, “I love our fridge! It’s so cute!”

I’ll admit… we have a happy fridge. Like me, it loves the color aqua, and it appreciates that I am OCD enough to use labels and custom fridge mats/coasters/whatever you want to call them. You don’t have to label everything in your refrigerator, but it would love you for it if you did.

Ok, so you want your fridge looking fab? Here’s what you do:

  1. Toss any expired foods and science experiments.
  2. Take EVERYTHING out of your fridge. Put perishables in a cooler to keep cold.
  3. Clean the shelves, walls, and every nook & cranny.
  4. Group like items, and put each “set” of like items in a basket. {Read the FAQs and Helpful Hints to learn what I do.}
  5. Label the basket if you wish.
  6. Repeat steps 4 & 5 until finished.
  7. Repeat the above steps to organize your freezer.
  8. Do a happy dance, ’cause your fridge & freezer look awesome!

Frequently Asked Questions:

1. Q: Where did you get your baskets? A: Dollar Tree. Seriously. I bought 10 baskets for a buck each. Score!

2. Q: Where did you get those labels, and how do they hold up? A: I bought the labels at Staples. They’re from the Martha Stewart Home Office collection, and measure 1 3/4″ x 1 5/8″. They hold up very well – I “laminated” them. Why did I put quotations around ‘laminated’? Because I cheated. I don’t have a fancy schmancy laminator, so I used packing tape. I also used packing tape to affix the labels to the shelves and baskets.

3. Q: What on earth is a fridge mat/coaster/whatever you want to call it? A: Great question! I was perusing Pinterest (of course!) and came across a pin for this blog, and what did I do? Well, I ran right out to the store to buy plastic placemats to make my fridge look cute, too! (Ok, a lot of stores. Eight to be exact! I couldn’t find many places that sell them, and the ones that did didn’t have a pattern or color that I liked, so I ended up getting them at Walmart for $2 each.) They serve double duty, by the way. Not only do they liven the fridge up a bit, but they make clean-up a breeze! And they are easy to make: 1. Take the shelves out of the refrigerator. 2. Trace each piece on a placemat. 3. Cut out. 4. Set it in place. 5. Put shelves back. 6. Smile! {I like these so much, I’m doing the big shelves in my fridge next!}

fridge collage 2

4. Q: What “categories” did you use for your baskets and shelves? A: I’m happy to answer this. I’ll start on the top shelf and work my way down, then over to the shelves in the door.

  • milk & other beverages (This label is on the interior wall to the left of our milk.)
  • dips & condiment packages (This basket lives on the top shelf and is home to sour cream, ranch dip, cream cheese, and all of the condiment packages we’ve collected from fast food places. Don’t judge.)
  • snacks (This is the basket where we keep individual size snacks, like pudding, applesauce, fruit cups, etc.)
  • sandwich kit (This is a basket filled with deli meat and cheese slices. I have a hubby & school-age daughter that I pack lunches for every morning. Grabbing baskets makes this so easy!)
  • meat (This is the drawer where we keep our ground beef, steaks, roasts, etc.)
  • veggies for lunches (for daughter’s and hubby’s lunches)
  • fruit for lunches (for daughter’s and hubby’s lunches)
  • dinner helpers (This basket is where we store our crescent rolls, and other items that help make up our dinner menu.)
  • cheese (This is the basket where we keep all of our shredded, block, string, and spreadable cheese, and hubby’s cheese curds. We used to live in Wisconsin. Can you tell?)
  • fruit (Our fruit drawer has a bowl in it to separate the citrus & apples from the other fruit.)
  • veggies (This drawer is where we keep our refrigerator-loving veggies.)
  • butter
  • condiments
  • jams/jellies & salad dressing
  • juice
  • pop

…and in our freezer:

  • breakfast foods (basket)
  • frozen veggies (basket)
  • crock pot meals (basket)
  • meat (slide-out bin)
  • juice (shelf in door)
  • cold packs (shelf in door)
  • ice cream (shelf in door)
  • canned goods (shelf in door)

fridge collage 3

Helpful Hints:

As soon as I get home from the grocery store, I spend 30-60 minutes (it’s well worth it to save time later!) doing the following….

1. Produce is washed and put in different containers. If it’s fruit or veggies for weekday lunches, they get portioned, put into individual baggies, and put in the appropriate basket. If it’s not for lunch, it gets washed and stored in the fruit and veggie drawers.

2. Deli meats get taken out of their packaging, put into baggies, and get placed in the sandwich kit basket.

3. Outer packaging comes off of individually wrapped cheese slices, string cheese, butter, fruit cups, pudding cups, juice boxes, etc.

4. Anything else that needs to be portioned gets portioned, put in a baggie or container, and put away…chips, trail mix, large packages of ground beef that need to get divided in half/thirds, etc.

5. Pasta, cereal, flour, sugar, etc. get put into the appropriate containers in the pantry or baking cabinet.

This really does save time in the following days and weeks! 

I’d love to hear if you’re going to put some of these ideas to use in your home! Also, feel free to share pictures of your new and improved fridge with me! Just send me a message at the email address below!

Love & Blessings,

Shandy

***********************

Be sure to visit Shandy’s personal blog Aprons ‘n Pearls for crafts, recipes, home keeping tips & more!

If you have any questions, just ask in the comment section, or send me an email at:

shandy@girlfriendscoffeehour.com

At Home with GCH – How Clean is Your Purse?

how clean is your purse

Did you know your purse may be harboring a dangerous cocktail of viruses and bacteria such as e-coli, salmonella, staph, and others I don’t even want to say? Think about the places you put your purse: on the floor of the car, in the child’s seat of a shopping cart, on the bathroom floor or counter, on the counter at the checkout register, on the floor at the restaurant, on the floor at the movie theatre… all of which are dirty, germy places. Then what do you do? You pick it up and carry it around with you, setting it on tables, your kitchen counter, your couch, and your bed, transferring all of the creepy crawlies you’ve picked up along the way right into your home. It’s a recipe for trouble.

Today, I am issuing a challenge to you: Clean your purse, inside & out. (For extra credit, clean all of your purses.)

To clean your purse:

  1. Empty the contents of your purse and wallet. Throw away old receipts, shopping lists, wrappers, pens that don’t work, and anything else you no longer need.
  2. Check the website of your purse’s manufacturer to educate yourself on any special care instructions. When cleaning my Miche purse, I went to www.michebag.com, and learned to wipe it down with a damp cloth. I use a baby wipe to clean mine. Whatever I’ve picked up along the way will then go right in the trash, rather than in my laundry room.
  3. Sanitize it, especially the bottom and handles. I use a disinfecting wipe for this. (Keep special care instructions in mind so you don’t damage it.) In a pinch, I have put hand sanitizer on a paper towel and wiped the handles, then the bottom of the purse.
  4. Turn your purse upside down and shake it out. To pick up any debris that may still be inside, wrap tape around your fingers, sticky side up, and press your fingers onto the fabric.
  5. To clean the fabric on the inside of your purse, mix warm water with a little bit of vinegar (or a couple drops of baby wash or mild dish soap) and wipe the fabric with a rag dampened with the water/vinegar mixture. Once the fabric dries, the vinegar smell goes away.
  6. Using the same method you used to clean the outside of your purse, clean your wallet.
  7. Now you can start putting things back into your purse and wallet, wiping down every item as you go with a baby wipe or damp rag. I even wipe down my credit/debit cards. Over the top? Not really. Think about how many germy hands touch those, and they’re never cleaned! Be selective in what you put back, and try to organize everything. A place for everything, and everything in its place. A purse organizer works well for this!

A few extra tips:

  • Buy a purse hanger to keep your purse off the floor when at restaurants, or for when there’s not a hook on the door in public restrooms.
  • Take 2 seconds to wipe the bottom of your purse with a disinfecting wipe any time you’ve had to put it somewhere germy. I always keep hand sanitizer and a baggie of disinfecting or baby wipes in my purse.
  • Take care to store your purses the proper way. Do not hang them. Instead, stuff each one with tissue paper, and store them upright.
  • Apply what you’ve learned here and protect your children by cleaning their backpacks or school bags. Same thing for briefcases and carry-on luggage.

How many purses do you have? Do you clean at least the bottom of your purse on a daily basis, or have you never really given it much thought? Share with the class and leave a comment below!

Love & Blessings,

Shandy

***********************

Be sure to visit Shandy’s personal blog Aprons ‘n Pearls for crafts, recipes, homekeeping tips & more!

If you have any questions, just ask in the comment section, or send me an email at:

shandy@girlfriendscoffeehour.com

At Home with GCH: Getting Clever with Coffee Filters

coffee_filters_aprons-n-pearls

I’m not a coffee drinker, so why is it that a couple hundred coffee filters took up residence in my pantry? Because they are versatile and awesome, that’s why. I’ve had a few people ask me to share how I use coffee filters in my home, so today, I’m doing just that. By the time you’re done browsing this list, you’re going to want to run to the nearest store and buy a bunch for your home. Just do your checkbook a favor… buy the cheap, basket style ones. No need to be fancy 😉 I buy mine at the store where everything is a dollar.

Here are the top 15 ways I use coffee filters in my home:

  1. Cleaning glass. This is my favorite use for coffee filters. Cheaper than paper towels, super absorbent, ink-free, lint-free… and they leave a streak-free shine! I’m telling you – this is exciting stuff! Go try it. On your windows, glass doors, glass tables, mirrors, china cabinet… I’ll wait!
  2. Wasn’t that fun? Guess what else you can clean with them? Your TV and computer screens!
  3. …and your faucets!
  4. …and your appliances. Yep, stainless steel, too!
  5. Crafts. About a gazillion of them. Wreaths, butterflies, leaves, snowflakes… you name it, you can use a coffee filter to make it. Pinterest says so. Back in my days as a daycare teacher, I let the kids go crazy with coffee filters and markers. The possibilities are endless.
  6. Potted plants. Put a coffee filter at the bottom of your pot, and the dirt won’t fall out of the bottom.
  7. Have you ever opened a bottle of wine, only to discover bits of the cork fell in? Pour the wine through the coffee filter, and no more cork! You can use this for other beverages that need filtering, too. I don’t like pulp in my orange juice, but if my hubby brings home the wrong kind… no worries! Use a filter. Can’t find your tea ball? That’s ok! Put the loose tea in a filter, tie it with string, and you’re all set.
  8. Microwave splatter stopper. Place a filter on top of your plate, and you can rest knowing you won’t have to clean up splatters.
  9. Grease soaker-upper. Out of paper towel, but have a hankerin’ for some bacon or fries? I have two words for you: coffee. filter. (By the way, I also use them to soak up the grease on my pizza. Yes, I have been told I’m strange for doing that. Thank you for asking.)
  10. Clean your sunglasses. No explanation needed.
  11. Popcorn pouch (& other snacks, too!) Perfect size for your kids to hold their popcorn in, and it helps soak up the buttery (but yummy!) mess. Also works great for hot dogs and tacos.
  12. Wannabe bento boxes. This is another one I do a lot! If I’m out of sandwich baggies, or am just going through a phase where I don’t feel like buying them, I use coffee filters to separate my daughter’s food for her school lunch. I put two or three filters in a reusable plastic container, and assemble her lunch – sandwich in one, carrots in the next, and grapes in the other. Works GREAT.
  13. I have two daughters who do their nails every other day. We run out of cotton balls. A lot. So what can they use to remove nail polish? Paper towel doesn’t work. Toilet paper doesn’t work. The next best thing? Coffee filters.
  14. Shine your shoes! They say your shoes say a lot about who you are. Keep them looking great with coffee filters and a little shoe polish.
  15. Oil blotters. You can pay quite a bit of money for oil blotters (those little sheets that you can press onto your face mid-day to absorb oil.) Coffee filters are so much cheaper, especially when you may use several a day in the summer, and they work just as well.

Do you have any clever ways you use coffee filters? Share with the class and leave a comment below!

Love & Blessings,

Shandy

***********************

Be sure to visit Shandy’s personal blog Aprons ‘n Pearls for crafts, recipes, home keeping tips & more!

If you have any questions, just ask below in the comment section, or send me an email at: shandy@girlfriendscoffeehour.com

At Home with GCH – Household Binder, Part 2

hb1

Last week, I gave you a tour of my household binder. (If you missed it, just click HERE.) This week, I’m giving you another peek into my binder, and am sharing my daily cleaning routine. Let’s get started!

I want to share a secret with you. It is life-changing, and is what has helped me more than anything else in keeping a clean home. FlyLady. If you have never heard of the FlyLady before, do yourself a favor and get acquainted. Just click on “Get Started” at the top of the FlyLady’s page. (By the way, making a household binder is one of the steps to get started! She calls it a “control journal”.) You will see on my daily routines, that one of the first things I do in the morning is check the Launch Pad. This is the foundation of my whole system. Another wonderful tool that has been valuable to our family is Cozi. You may have heard of it. It is a very popular web-based calendar and organizer. We’ve been using it for a long time, and last year, we switched to FlyLady’s Cozi. (They partnered up! Genius!) So between FlyLady’s Cozi (there’s an app!) and my household binder, even the most domestically challenged person can get their house clean and organized!

Let’s take a look at my daily cleaning routines.

cleaning routines

You’ll notice that each day is dedicated to a certain set of tasks…

Monday: Zone Cleaning, Menu & Blog Day 

Tuesday: About Town Day

Wednesday: Just the Basics Day

Thursday: Weekly Home Blessing Day

Friday: Paperwork & Clean Out Day

Saturdays & Sundays are my days to relax, so I only do the basics – cooking, cleaning up after meals, loading the dishwasher, etc.

If you click on the picture above (then click on the one that pops up) you will see what I do every Wednesday. Don’t let the amount of the words on the page overwhelm you! I have almost everything I do in a day on these charts. I am not a slave to my house. 😉 In fact, I find plenty of time in the day for hobbies, catching up with my friends, watching a show on television, playing games with my family, etc. The chart just lays everything out for me and keeps me on task. And should I get sick, my girls can look in my binder and see what needs to be done any given day!

Let’s take a closer look at Wednesday.

You’ll see that after I’m dressed and have my daughter fed and off to school, I check my binder, and then I check  FlyLady’s Launch Pad. The Launch Pad tells me what “zone” I’m cleaning that week (this week it is the master bedroom) and it also gives me a “mission.” For example, this Wednesday’s mission is to dust off the tops of the door jambs and windows. Easy peasy! So on Wednesday mornings, I do my everyday tasks like laundry & dishes, and then after lunch I get my cleaning done.

To see each day’s detailed list, click HERE.

And as promised, here’s another peek into my binder:

hb3

On the left is “My Monthly Bill Planner” from the “Finances” section of my binder. In the left column, I write down everything that is due each month. Then in the boxes, I write down what day each bill is due (if it’s always on the same day) and simply check it off once it’s been paid. If the payment is the same every month, I also write that in the left column.

In the middle is a picture of my beautiful daughter, Gabriella. I made a cute printable for each family member and slipped each one into a sheet protector. These act as the dividers in our “Family” section. Behind each person’s picture is important information that pertains to them. So for Gabbie, her medical, school, and cheerleading information is in her own dedicated section of the binder. This makes life so much easier!

On the right is my “Weekly Menu Planner” from the “Menu Planning” section of my binder. I do meal planning on Mondays, and each day’s breakfast, lunch, and dinner is written down on this chart. There’s a section for snacks on the far right of the chart, but I don’t police what everyone munches on when they want a snack. I simply write a variety of things at the top that I need to plan on having in the pantry.

That wraps up our household binder. I know some of you have started making yours, and others are updating theirs. I’m so glad this has been a help! It’s also fun to see what others have done with theirs as it may give us new ideas!

I’ve really enjoyed the comments that you’ve been emailing me! If you have any questions, or would like to know how I manage something in particular that hasn’t been covered, just ask away in the comments below, or send me an email.

You’re welcome to share a picture of your binder with me as well!

Love & Blessings,

Shandy

Be sure to visit Shandy’s personal blog Aprons ‘n Pearls for crafts, recipes, homekeeping tips & more!

__________________

If you would to send a private email to Shandy in regards to this blog, please email her at Shandy@GirlfriendsCoffeeHour.com


GCH: What’s on Your Plate? – Tex-Mex Casserole

tex

Tex-Mex is one of my favorite kinds of food. It’s typically easy to throw together, delicious, and is hearty enough to satisfy the Mr. (Who happens to give this two thumbs up!)

Ingredients:

  • 1 lb. ground chuck
  • 1 bag frozen corn
  • 1 bag Southern style hashbrowns (the cubed potatoes)
  • 1/2 lb. Velveeta, cut into large cubes
  • 1 pkg. Taco Bell Taco Seasoning Mix
  • 1/2 c. water
  • 1 bottle Taco Bell Mild Restaurant Sauce

Directions:

  1. Preheat oven to 350 degrees F.
  2. Cook ground chuck in a large pot. (I use a 6 qt. pot.) Cook until done, but do not allow to overcook. Drain meat.
  3. Add Velveeta, water, and taco seasoning mix to the pot.  Heat on medium, stirring occasionally, and allow cheese to melt a bit. (About 5 minutes.)
  4. Add corn and potatoes to the pot. Mix well. Allow to cook for 3 or 4 minutes.
  5. Add 1/3 c. mild sauce to pot. Mix well.
  6. Remove from heat and transfer to a 9×13 baking dish.
  7. Cover baking dish with aluminum foil and bake for 15 minutes.
  8. Remove foil, stir, and return to oven to bake for an additional 15 minutes (until it is heated through.)
  9. Drizzle with mild sauce and serve.

Notes:

  • To make this stretch for another person or for the hubby’s lunch the following day, I add an additional pound of ground chuck to the recipe. It bulks it up a bit without sacrificing the taste or having to double ingredients.

Praise God! Let’s eat!

Shandy

Be sure to visit Shandy’s personal blog Aprons ‘n Pearls for recipes, crafts, homekeeping tips & more!

GCH: What’s on Your Plate? – Norwegian Fattigman “Poor Man’s Cookie”

fattigman

A few weeks ago, I posted a delicious recipe for Scandinavian Spritz and talked about the “syv slag kaker til Jul,” the seven cookies of Christmas. (You can click HERE to go to that post.) I am back this week with a second, and my favorite, Norwegian Christmas cookie… fattigman!

Fattigman is an ages-old Norwegian cookie that translates to “Poor Man,” and was named so either because purchasing all of these ingredients would’ve cost someone in the old country quite a bit of money, leaving them “poor,” or because sugar was so expensive in Norway that even a poor man (or woman) could afford to make these, since there isn’t much sugar used in these cookies. I’ll let you decide which version of the story you like better, but I grew up hearing the first version, and I’m sticking to it 😉

The recipe(s) for fattigman was brought to America by Norwegian immigrants in the 1800’s… my family included. Christmas just isn’t Christmas without these on the table, and they quickly disappear once put out! They’re traditionally rolled out, then cut using a fattigman roller. My grandmother, however, rolled them out and cut them in triangles, so that’s how we’ve always made them… no special cutter required! I hope you enjoy them as much as we do!

Ingredients:

  • 3 eggs, beaten
  • 4 T. heavy whipping cream
  • 3 T. powdered sugar
  • 1/2 tsp. ground cardamom
  • 1 T. brandy (optional)
  • 1/2 tsp. grated lemon rind
  • 1 1/2 – 2 c. flour
  • lard for deep frying

Directions:

  1. Mix all ingredients together, stirring in flour until dough becomes thick enough to knead. Dough will be slightly rubbery.
  2. Chill in the refrigerator for a few hours.
  3. On a floured cutting board, roll out dough (small pieces at a time) to 1/8″ thick.
  4. Cut in triangles.
  5. Fry in lard, which has been heated to approximately 350 degrees (F.) Dough will rise to the top. Turn dough over with tongs and fry to a very light golden brown.
  6. fattigman fryingRemove from lard and place on a cookie sheet covered in paper towels.
  7. Generously sprinkle both sides of cookies with powdered sugar.
  8. Store in airtight container on counter or in pantry.

Notes:

  • This goes much faster with 2 people making the fattigman. One person to roll out and cut cookies, and one person to fry them.
  • The cookies are very fragile (and VERY yummy!)

Praise God! Let’s eat!

Shandy

Be sure to visit Shandy’s personal blog Aprons ‘n Pearls for recipes, crafts, homekeeping tips & more!

Saturdays with Shandy: Christmas Edition! Last Minute Gifts for Your Girls

Christmas is a few short days away! If you’re in need of some easy, inexpensive, handmade gifts for the girls in your life – whether little or all grown-up! – then you’ve come to the right place! This round-up includes nine awesome gifts that any girl would love to get!

*Note: You can find all nine ideas on our “Saturdays with Shandy” board on Pinterest!

Did someone say scrapbook paper?!?!

paper crafts

  1. The adorable DIY Dry Erase Board from Leah Marie V is so cute, and so useful! The shabby chic DIY flowers give it an extra feminine touch. You can use this for a hundred different things, and customize it with scrapbook paper that fits the style of the person you’re creating it for. This would be great to leave notes for your family, or to jot down what you need to pick up at the grocery store!
  2. The Scrapbook Clipboard from KaeliElyse would be a great gift for any girl on your list, and would come in handy on a daily basis! Just like the dry erase board, you can customize this with your choice of scrapbook paper!
  3. Aren’t these pens super fun? I found them at Chocolate on My Cranium! You can make these to match the clipboard! Or make all three a matching set! What a great gift that would be!

What girl doesn’t love hair accessories and nail polish?!

beauty

  1. This Headband Organizer from Lyssa Beth (tutorial found at Make It My Own) would be great for any girl with a love of hair accessories! The best part? You can put all kinds of barrettes, ponytail holders, bobby pins, and clips in the inside! I am definitely making this for my daughter!
  2. How cute is this play on words?! For Your Mistle Toes! Such a creative idea from Carissa Miss, and she has a free printable!
  3. Make those ugly bobby pins cute with this tutorial from Colour Me Everywhere! A simple, inexpensive, and fantastic stocking stuffer!

And the last three fabulous gift ideas…

gift ideas

  1. How amazing are these Coffee Cozies from The Sitting Tree?! I can think of at least a dozen people I could give these to, and I know they would be LOVED! I’m going to knit one for myself, too!
  2. Shhhh! Don’t tell my daughter, but she’s getting one of these Friendship Bracelet Kits from Tater Tots and Jello for Christmas! I loved making friendship bracelets as a kid, and now my daughter loves them, too!
  3. I received a personalized hand sanitizer bottle for Christmas one year, and I absolutely loved it! I can tell you these would be a big hit with your child’s teacher! You can also use soap bottles! Either way, put a classy monogram inside, and this would be a welcome gift for anyone’s home! Be sure to check out the tutorial at The Idea Room!

I have to go and get busy making all of these wonderful handmade gifts (and a few for myself!) I hope you found some of these ideas to be excellent as well! There’s nothing like handmade for the holidays! Thanks for joining us for Saturdays with Shandy: Christmas Edition! It’s been a lot of fun, and I can’t wait to get started on our next series!

Have yourself a merry little Christmas, and may you be blessed abundantly in the new year!

Love & {Christmas} Blessings,

Shandy

Be sure to visit Shandy’s personal blog Aprons ‘n Pearls for crafts, recipes, homekeeping tips & more!

GCH: What’s on Your Plate? – Rice Pudding

rice pudding

Rice pudding is one of those comfort foods that my family really enjoys throughout the year, but especially at Christmastime. One Norwegian tradition we keep in our home is to serve rice pudding on Christmas Eve. An almond is hidden in one person’s pudding, and the lucky person who gets it, gets a marzipan pig! (Much like the German tradition of hiding a pickle ornament in the Christmas tree – another tradition of ours!) It’s a fun way to create memories, and we get to enjoy eating this yummy dessert at the same time!

Ingredients:

  • 3 eggs, beaten
  • 2 cups whole milk
  • 1 1/2 cups cooked rice
  • 1/2 cup granulated sugar
  • 1 1/4 tsp. pure vanilla extract
  • 1/2 tsp. salt
  • a mixture of ground cinnamon and sugar
  • Reddi Whip or light cream (optional)

Directions:

  1. Preheat oven to 325 degrees (F.)
  2. Combine eggs, milk, rice, sugar, salt, and vanilla in a bowl and mix well.
  3. Bake in an 11×7 baking dish for 20 minutes.
  4. Remove from oven. Lightly sprinkle with cinnamon sugar. Stir well.
  5. Return to oven and bake for another 25 minutes.
  6. Remove from oven. Put into individual serving dishes. Chill well in the refrigerator.
  7. Before serving, sprinkle the top with cinnamon sugar. You may also top with Reddi Whip or a little bit of light cream.

Wishing you and yours a very Merry Christmas!

Praise God! Let’s eat!
Shandy

Be sure to visit Shandy’s personal blog Aprons ‘n Pearls for crafts, recipes, homekeeping tips & more!