April 26, 2024

Meal Planning 101 – Week 2 – Meal Planning Binder & Menu Planners


Hello!  Welcome to Week 2 of Meal Planning 101!  I’m glad you decided to come back and learn more about being successful in Meal Planning!  Meal Planning takes some effort, and that effort takes some organization.  Once you have a “system” in place, it’s just a matter of input from that point on!  So this week I want to talk about creating a Meal Planning Binder and Menu Planners.  This binder will help get you and keep you organized in your meal planning efforts.

My Meal Planning Binder is something that I look at least a couple of times a day!  I know… I get little nuts about it… but I am always looking for new recipes to add to my binder.  I love to try new recipes!  I have discovered some amazing meals by experimenting with my own created recipes, along with ones that I have been given by family, friends, and those I find right here by our “GCH:What’s on Your Plate?” page, and Pinterest.

Instead of giving you directions on how to make my own binder, I’m going to reference a couple of Pinterest links that will give you all kinds of binder ideas!  It’s really up to YOU how you want your binder to look and feel.

For my own binder, I include sections that include my Menu Planner for the Month, and for the Week, along with a Grocery list, Pantry/Freezer List, and a Recipes section.  I also keep a zippered pencil holder (like they use in school) to keep all my coupons in.  Personally, I am not a big coupon person!  I like them, but I do not go crazy with them!  I pick out a few that I know I will use, for products that I know we love and use on a regular basis!  You may be different than I am.  I have seen women who have coupon binders that are in 3-inch 3-ring binders, and it’s loaded with baseball card protector sheets that hold their coupons.  Way more effort than I want to put into my grocery shopping!  We’ll talk about this further in a later blog!

But before I forget, here are the Pinterest links to the Menu Planner binders: 

http://pinterest.com/search/pins/?q=Meal+Planner+Binders

http://pinterest.com/search/pins/?q=Menu+Planning+binders

.

Now, let’s start with the first things that will be placed inside your binder:  Monthly Menu, Weekly Menu, Freezer / Pantry List, Grocery List, and of course, your coupons.  But for now, let’s talk about your Menu Planner.

In looking through tons and tons of Pinterest links for the perfect Menu Planner, I stumbled across one located at: www.amybayliss.com.  She offers customizable Menu Planners such as the one below.  I love this because I can type this up on my computer and make it look nice and neat!  I can change it anytime I want, and create new meals each month.  Sometimes, I leave certain meals on the menu planner because they are some of our favorites!  So this is really a convenient planner for me to us.  You may choose the planner that allows you to write in the meals for the month, or the week.  Again, it’s just a personal preference.  There is no right or wrong way to do this!  It’s all about doing it, and then finding the system that works for YOU!

Monthly Menu Planner

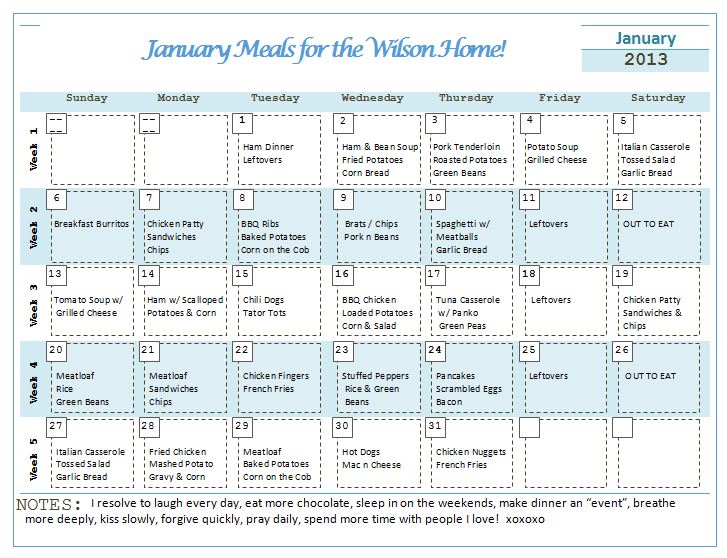
This exact form was found on: http://amybayliss.com/2011/08/planners-goals-calendars-church-and-ministry-sections-part-2/.   I just used the “Calendar” download.  You can change the name of the month, so you have a new form to use each month.  Amy’s site offers a lot of awesome free printables!

In my meal planning, I always start by making a list of what I have in my pantry and freezer.  That way I know what I have on hand, and what I will need to purchase.

My next step is to make a list of all of the meals that we love.  Each week, I also include a “Leftovers” night and I add this to my Menu Planner!  I hate to see food go to waste!  Nothing gripes me more than to have to throw something away just because I didn’t add it into a new meal!  So I plan at least one night a week for leftovers!  Some people don’t like leftovers…again, personal preference!

We also plan for at least two nights a month for going to a restaurant.  This might include our Date Night meal, or a meal out with friends; whichever one it happens to be, it gets put on my Menu Planner.  So what that means is that I have to plan ahead for these nights.  My husband has the craziest work schedule where he works 3 days on, and 3 days off.  So we never have a normal weekend like most couples do!  We take our weekends as we can get them!  So I take his work calendar and sit down and choose one night a month for our Date Night, and leave room for at least one more night for eating with friends.  Again…put it on your Menu Planner!!

Once I have my list of groceries on hand from my pantry and freezer, and I have written down all of my favorite meals, I start making my menu for the month!  My freezer, pantry, and favorite meals lists can just be updated as I go!  This is the first time-consuming activity that you will have, but once it’s done, it’s pretty easy to maintain!  We’re getting you closer to Menu Planning success!   Trust me, once you make your binder and a monthly menu, it will make your life so much easier for the remainder of the month!  No more planning for another 30 days!

After you have completed your Monthly Menu, your next step is to break down the Monthly menu into a Weekly menu.  Here is where you will see just seven days of menus.  Write out a Weekly menu for every week on our Monthly menu.  Once you do it, it’s done for the month, and for each week; then it’s just a matter of grabbing the next weeks form to see what’s on the menu.  You can even just use a simple piece of notebook paper to do this, if you wish.  You really don’t need any special forms, etc.  You’ll be glad you took the time at the beginning of the month to do this!  Trust me!

For Meal Planner forms, do a search on Pinterest for “free weekly meal planner printables”; there are many of them out there.  I use a lot of Amy’s forms from her site because they are customizable!  I just love the way she has formatted them, and makes it so easy for me to input my own information!  Again, you will want to search for forms that are going to work for YOU!  If they don’t work for YOU, you won’t keep up with it!  So find something that works for you and one that you enjoy working with!

Now that we have our meals planned for the month and week, it’s time to put together our Shopping List.  We’ll discuss our Shopping List and coupons next week.  You will store all of this inside your Menu Planning Binder, in the proper sections.

I hope you are enjoying this series.  If you want, please share a link to the Menu Planner that you use!  You never know if someone else will find your Menu Planner convenient for them, as well!

See you next week!

Christi

********************

A Virtuous Woman uses her time wisely. She works diligently to complete her daily tasks. She does not spend time dwelling on those things that do not please the Lord. (Proverbs 31: 13, Proverbs 31: 19, Proverbs 31: 27, Ecclesiastes 3, Proverbs 16: 9, Philippians 4:8)


If you were interested in checking out any of our online Bible studies, click HERE. Once we receive your registration, we will email you with further details.

If you would like to send a private message to Christi in regards to this blog, please email her at: Christi@girlfriendscoffeehour.com

GCH: What’s on Your Plate? Fish Tacos

 Fish Tacos

Ah, the humble fish stick.  When I was a kid, my favorite meal was fish sticks, macaroni and cheese, and whatever green vegetable was riding shotgun.  I still love fish sticks, and so do my kids.  And while they’re terrific with tartar sauce, sometimes it’s fun to take the familiar and shake it up.  And that leads us to – Baja-style Fish Tacos!

These tasty treats may be unfamiliar to you if you’ve never visited Southern California or farther down south, into the Pacific Coast of Mexico.  Fish tacos in Southern California are part of surf culture, the favorite food of stereotypically blonde, tan dudes with surfboards who say “gnarly” and wear shorts year round.  And while they’re pretty easy to find in my neighborhood, they probably aren’t in yours.  So make ’em yourself!

There are a few basic, mandatory components to the fish taco.  First is corn tortillas – save the flour tortillas for burrito night.  Next is the fish: regular fish sticks will work, as will the larger fillet-style pieces, but you definitely want the crunchy breading.  Also important are the cabbage and cilantro – regular old green cabbage, sliced as thinly as possible (but not shredded like in coleslaw), and plenty of leafy cilantro.  Last comes a big squeeze of lemon or lime.  I like the “crema” listed in this recipe, but you can also use regular tomato salsa too.  After these ingredients, you can add more to suit your taste – diced onion, avocado, even shredded cheese.

Are you ready to do this?  Cowabunga!

Fish Tacos

Ingredients:

  • 1 package fish sticks
  • 1 package small yellow or white corn tortillas
  • 1 small head cabbage
  • 1 bunch cilantro (use the rest to make the Fajitas Salad!)
  • 2 tablespoons mayonnaise
  • 2 tablespoons sour cream or plain yogurt
  • 1 large lemon or lime
  • 1/2 teaspoon ground cumin
  • salsa, avocado, cheese, green or red onion, or whatever else you like on your tacos

Directions:

  1. Bake the fish sticks according to the package directions.  While they are cooking, slice the cabbage as thin as possible.  If you have a food processor, you may want to try that.  Wash the cilantro and remove the tough stems.
  2. Prepare the crema:  Whisk together the mayo, sour cream, and the juice of half the lemon.  Stir in the cumin and refrigerate until ready to use.  If it’s too sour for you, add a dash of sugar.  You can also add tabasco or a little chipotle right to the crema.  Or, my favorite, if you have any leftover dressing from making the Fajitas Salad, use this in place of the crema!
  3. Wrap as many tortillas as you need in a damp dishtowel.  Place the dishtowel between two plates to seal it up, and microwave for 30 seconds.  This gets them hot, flexible and delicious!
  4. To assemble:  Lay out your tortilla (some people use two at a time, which keeps it from ripping or falling apart) and spoon a little crema on the bottom.  Top with fish sticks, sliced cabbage and plenty of cilantro.  Squeeze a little lemon on top, and add any other optional ingredients you like.

Explore, experiment, enjoy! — Dana

Please visit me at Frugal Girlmet for more unique recipes!

GCH: What’s on Your Plate? – SoupPalooza, Part Two

Soup-Palooza, Part Two

  • “Not from a Box, Nor from a Can” Chicken Broth
  • White Bean & Kale Soup with Chicken Sausage

Did you know that January is National Soup Month?  That is good news to one particular individual here in the Hayden household…my husband would eat soup e-v-e-r-y single day!  So this month I have committed to serving soup at one meal per day for the entire month (ummm, yeah…he’s a happy camper!).  And I am taking YOU along for the ride, too!

Here on our GCH:WoYP, where Monday’s are focused on healthy but oh-so-yummy! recipes, we will be promoting soup, soup, and soup for the next four weeks.  Each week we will explore the basics along with a delicious recipe for you to serve to your loved ones.

So, this week we are starting from scratch!  Homemade chicken broth.  Oh, yeah!  Now don’t be afraid, please…this is so simple, I promise!  One way to make this easy to fit into a busy schedule would be to start it as you are making your supper preparations.  Then the broth can simmer away, and you can finalize it after supper.  Just a thought!

This recipe makes a vat…well, not quite a vat…it makes 8+ quarts.  A quart of soup is the size of those aseptically sealed boxes from your grocery store (or approximately 2 cans).  Most soup recipes that feed 4-6 people require two quarts of broth.  Now you can have delicious, nutritious, chemical-free chicken broth handy right in your refrigerator or freezer!  Let’s get started!

“Not From a Can, Nor From a Box” Chicken Broth     

Makes 8+ quarts

1 8-9# ‘oven stuffer’ whole chicken, cut-up (or buy cut-up chicken)*
1 large sweet onion (Vidalia), rough chopped
4-5 stalks of celery WITH the leaves, cut in 3-4″ sized pieces
1/4# carrots (3-4 whole carrots, or ½ bag baby carrots), rough chopped
1 heaping tablespoon minced garlic
2 tablespoons whole peppercorns
1 teaspoon kosher salt

4-5 sprigs each of fresh thyme and dill, optional
9 quarts of water; I use filtered; use whatever you would drink 😉

Use the largest pot you own.**  I use a 12 quart-sized pot. You don’t want to fill your pot up to the top; this needs a little room to move around while it is boiling.

Carefully rinse the cut-up chicken (the better the chicken is rinsed…the less yuck floating around in your broth).  Then place the chicken pieces along with the vegetables, and the seasonings, into the pot and pour water over them all.  Cover pot and heat on high ‘til just coming to a boil; reduce heat and partially cover.  You want the soup to be gently boiling.  You can occasionally skim off the yucky stuff from the top of the broth.  Let everything simmer away for a half hour; remove breastmeat to cool.  Continue cooking an additional 45 minutes to 1 hour.  Remove pot from heat.  Take dark meat sections and add to breastmeat which has cooled.  You can strain your broth, if preferred; it all depends on just how clear you would like the broth to be.  CAREFULLY pour, or ladle, the broth along with the cooked veggies into storage containers, leaving enough room to add the chicken.  Cut up (or shred) the chicken into bite-size pieces; keep every last one of all the little bits!  Add back into the broth.

Let cool ‘til container is no longer HOT to the touch; refrigerate.  When thoroughly cooled, I would suggest discarding the layer of fat that will have solidified on the top of the container. This broth freezes very well.  I usually keep 2 quarts in the refrigerator (use within 1 week or so) and the rest in the freezer.

* Toss the wings in the trash…not even worth cooking.  I cut each of the breastmeat pieces in half; that way they don’t overcook.  You want tender meat in the end (but throw the bones into the pot, too).

**Should you not have a pot this size, or cannot beg or borrow one, just reduce all of the ingredients by half and proceed, ok?  Don’t let that stop you!

****************************************

Now, to actually USE that healthy but oh-so-yummy broth…

White Bean and Kale Soup with Chicken Sausage 

Makes 6 servings

IMG_0138

8 cups (2 quarts) chicken broth, divided
(1) 12 oz pkg italian chicken sausage, sliced diagonally ½” thick
2+ tablespoons olive oil
1 large sweet onion (Vidalia), sliced
1 heaping tablespoon minced garlic
½ cup white wine, or additional broth
2 cans cannellini (white kidney) beans, drained and rinsed
1 can great northern beans, drained and rinsed
1 bunch kale, stems and tough ribs removed, leaves roughly chopped
1 teaspoon kosher salt
1+1/2 teaspoon freshly ground pepper (I used lemon pepper)
½ cup Parmesan cheese, freshly grated if possible
1 lemon

Heat 1 tablespoon of olive oil in a large pot (4 quart) over medium heat. Add sausage slices and cook, stirring occasionally, until sausage is just starting to brown, about 5-6 minutes. Add onion slices and additional olive oil, if necessary.  Cook, stirring often, until onions and sausage are slightly browned, about 10 minutes more.  Reduce heat to low; stir in garlic and cook for 1 more minute.  Remove sausage, onions and garlic; set aside.  Pour wine into pot and scrape up brown bits stuck to the bottom. Let simmer for a minute or two.  Meanwhile, put 3 cups beans and 2 cups broth into a blender and purée ‘til smooth; set aside.  Add all of  the remaining broth to the liquid in pot; increase heat to medium and bring to a boil.  Add kale, reduce heat; cover and gently simmer, stirring a few times until kale is wilted and softened, about 5 minutes. Uncover, add remaining beans, bean puree, sausage and onion mixture; stir well.  Season to taste with salt and pepper.  Simmer gently until hot, about 5 minutes more.  Ladle into soup bowls; sprinkle with Parmesan cheese and a squeeze of lemon juice.

“This soup is delicious, hearty and satisfying while still light and fresh-tasting.  It definitely fits the healthy but oh-so-yummy comfort food category.”  (Comment from the hubby.)  🙂


If you would like to send a personal message to Coleen, in regards to this blog, please email her at: Coleen@girlfriendscoffeehour.com.

At Home with GCH – Meal Planning 101 – Week 1

Hello, and Welcome to Meal Planning 101!

When I first began Meal Planning, I had no idea how much this new technique in my life would make such a huge impact!  Meal Planning is now part of my every week routine!

For some people, when they think of meal planning, they thing it is too time consuming.  What they don’t realize is just how simple, and cost effective, meal planning is!  When meal planning is incorporated into your home routine, you will see yourself with more time, and money, on your hands!  Meal Planning is so worth every step!

In this new GCH series, we’ll cover the reasons why meal planning is so important; building a menu planner binder; finding recipes that your family loves; coupons; and more!  I will also be sharing some free printables that I have found online that I use in my own home!!  I will share some other websites that offer some amazing tips, as well!  I’m no expert in this field.  I can only share what I have learned along the way.  That’s why I don’t mind sharing other websites with you to help you learn even more about menu planning!  It really is something that we all need to incorporate into our routines!

Let’s start this new series today by going over the reasons of why meal planning is so important:

Top 5 reasons why Meal Planning is a must in your home:

  1. Menu Planning saves you time!

Who doesn’t need more time each day?  As busy moms who are running from here to there taking kids to school, activities, church functions, and more, we need to make sure that we manage our time to the best of our ability!  Menu Planning can help you manage your time more wisely in the kitchen!  We will show you how in the upcoming weeks of this series.

  1. Menu Planning saves you money!

Who doesn’t love more money in our pocketbooks!  How many times have you made dash to the grocery store for a loaf of bread and gallon of milk, and came home with over $100 in groceries you had not planned on spending?  Menu planning can help not only save money, but it can also help you stick to a budget better!  We will also cover some tips on using coupons with your grocery shopping! We will show you how in the upcoming weeks of this series!

  1. Menu Planning cuts back on waste!

Menu planning helps you buy just what you need, leaving less room for more leftovers that end up getting thrown out at the end of the week!  Again, we will show you how this cuts back on waste, as we continue with this series in the upcoming weeks.

  1. Menu Planning helps your family eat healthier!

This is a big one!  Menu Planning helps you stick with healthier meals by not being so stressed out at the end of a work day, there is no time to cook, and you end up heading out fast food!  Menu planning helps you keep healthier meals on the table!  We’ll show you how in the upcoming weeks of this series!

  1. Menu Planning adds more variety to your meals!

How many times have you heard “Not meatloaf AGAIN, Mom”?  Tired of cooking the same old thing over and over again?  Taking the time to plan your meals adds more variety to your meals, and leaves less room for boredom!  We’ll show you how in the upcoming weeks of this series!

So, are you ready to start learning how to plan your meals, save money, save time, and use coupons to get healthier meals at home?  I am very excited to share this series with you!  If you would like to share some of your own tips along the way, I would be happy to read them!  Be sure to share them in the comments section below!  The more we can help each other save time, money, and eat healthier, the better!!

Until next week,

Christi

GCH: What’s on Your Plate? Japchae (Korean Noodle Salad)

Japchae – (Korean Noodle Salad) by Dana KimJapchae - Korean Noodle Salad

Happy New Year!  Do you have any fun New Year traditions?  I think it’s fascinating to learn about different cultures, and traditions and foods are a wonderful insight into other people’s way of life.  For instance, my Mom used to make a pork roast with sauerkraut and mashed potatoes on New Year’s Day, as it is the Pennsylvania Dutch “good luck” food for the new year.  I never knew why, but a little research uncovered this bit of trivia:  Pigs root forward, while chickens and turkeys scratch backwards, so eating pork is a symbol of positivity and looking forward to the good things in life.  We always spend New Year’s Day with my Korean in-laws, so I am learning about Korean “good luck” food too!

Like many other Asian cultures, Koreans eat long noodles for good luck to symbolize a long life.  And my favorite Korean noodle dish is Japchae!  Pronounced “Jop Cheh”, it translates to “a mixture of vegetables”, and along with the noodles and a sesame dressing, that’s about it.  My mother-in-law always makes it with a little bit of beef in it, and that makes it even more filling and delicious.

The two things you’ll need to buy at the Korean store are the noodles and the mushrooms.  The noodles are called “dangmyeon” and are clear noodles, made from sweet potato starch.  They’re very pretty, but don’t have a lot of taste on their own.  (If you can’t find them, I suppose you could try this with another noodle – I won’t tell on you!)  The mushrooms are dried shiitake mushrooms.  They can be pricy in American stores, but in Asian markets, they are easy to find and inexpensive.

Japchae is served warm or at room temperature.  I like the leftovers for breakfast – I just warm it up in the microwave for 30 seconds.  May these noodles bring long life and good luck to you and your family in the New Year!

Japchae

Ingredients:

  • 4 ounces beef, sliced as thin as possible into small bite-sized strips
  • 6 cloves garlic, minced
  • 10 dried shiitake mushrooms
  • 2 bunches spinach, tough stems trimmed and washed well
  • 2 large carrots, peeled
  • 1 small onion, sliced very thin
  • 1/2 package sweet potato noodles, about 6 oz.
  • 2 tablespoons sesame oil, maybe a little more
  • 2 tablespoons soy sauce
  • 1 tablespoon sugar
  • 1 tablespoon sesame seeds

Directions:

  1. Prepare meat:  Heat sauté pan and add a tablespoon of sesame oil.  Add meat and 3 cloves minced garlic and cook until done.  Remove from heat to a very large mixing bowl, and add 1 tablespoon soy sauce.  Set aside.
  2. Prepare mushrooms:  Place mushrooms in a bowl and cover with boiling water.  Place a plate on top to keep the heat in.  Let the mushrooms steep and rehydrate for about half an hour.  When they are rehydrated and soft, slice thinly.
  3. Prepare spinach:  Boil a large pot of water, and get an ice bath ready.  Blanch the spinach for about 15-20 seconds.  Remove spinach to ice bath, but keep the water boiling on the stove for the noodles.  When the spinach is cool, squeeze out the water, but don’t crush the spinach.  Add to the bowl with the meat and stir to combine.
  4. Prepare noodles:  Put the noodles into the boiling water you used to cook the spinach in, then turn off the heat.  Leave the noodles in the pot for ten minutes, then drain, and add to the meat and spinach.  Toss to combine.
  5. Prepare carrots, onions and mushrooms:  Peel carrots and cut into 2-inch lengths, then slice as thinly as possible into match sticks.  Heat sauté pan, add 1 tablespoon sesame oil, and cook sliced carrots, sliced onion, the mushrooms, and the remaining garlic until the onions are soft.  Remove from heat and dump it all in the bowl with the meat and noodles.
  6. Sprinkle with sugar and remaining soy sauce and toss again to combine.  Shake on some sesame seeds and taste.  You may need a bit more soy sauce or a little more sesame oil.  What you are looking for:  balanced umami perfection!

Explore, experiment, enjoy! — Dana

Find more recipes from Dana, Korean and otherwise, at Frugal Girlmet!

GCH:What’s on Your Plate? – Velveeta Cheese Dip

Velveeta Cheese Dip

 Velveeta Cheese Dip

Ingredients:

16 oz of Velveeta Cheese – diced

1-10 oz can Pace Diced Tomatoes w/ Green Chilies (drained)


Directions:

Put all ingredients into a medium-size baking dish.

Cook in microwave for 2 minutes.  Stir.  Cook for another 2 minutes.  Stir.  Cook for 1 additional minute.

Remove from microwave and stir until you see that all Velveeta cheese has completely melted.  (About 1 minute)

Serve with your favorite Tortilla Chips.


If you are interested in learning more about Online Bible Studies, please click on the Sign-Up Here button in the Menu tab at the top of our website.  If you need further details, please email Christi@girlfriendscoffeehour.com.


GCH: What’s on Your Plate? – Crockpot Apple Oatmeal

photo 3

I love this recipe!  You can throw all the ingredients in the crock pot before you go to bed and when you wake up in the morning, breakfast is ready!  I made this Christmas Eve night and we woke up to a wonderful smelling house and had a delicious breakfast ready to go!  Because who wants to cook on Christmas morning?  This would also be perfect for Sunday mornings when you don’t want to cook before church.

What you need:

Two sliced apples (I used Golden Delicious)

2/3 cup brown sugar

1 tsp cinnamon

pinch of salt

2 tbsp butter

2 cups oatmeal

4 cups water

crockpot

Directions:

Throw the sliced apples, the brown sugar, cinnamon, salt, and butter in the bottom of the crockpot.  Then pour in the oatmeal and then the water on top.  DO NOT STIR.  Cook overnight 8-9 hours on low.  Makes about 4 servings.  Depending on your tastes, you may need to add more sugar or butter to your individual serving 🙂

That’s it!  Easy peasy… and delicious!

God is great, God is good… let us thank Him for our food!

<3 Shauna

PS – you can also find Shauna on her personal blog at www.workhomeplay.net.

GCH: What’s on Your Plate? – Norwegian Fattigman “Poor Man’s Cookie”

fattigman

A few weeks ago, I posted a delicious recipe for Scandinavian Spritz and talked about the “syv slag kaker til Jul,” the seven cookies of Christmas. (You can click HERE to go to that post.) I am back this week with a second, and my favorite, Norwegian Christmas cookie… fattigman!

Fattigman is an ages-old Norwegian cookie that translates to “Poor Man,” and was named so either because purchasing all of these ingredients would’ve cost someone in the old country quite a bit of money, leaving them “poor,” or because sugar was so expensive in Norway that even a poor man (or woman) could afford to make these, since there isn’t much sugar used in these cookies. I’ll let you decide which version of the story you like better, but I grew up hearing the first version, and I’m sticking to it 😉

The recipe(s) for fattigman was brought to America by Norwegian immigrants in the 1800’s… my family included. Christmas just isn’t Christmas without these on the table, and they quickly disappear once put out! They’re traditionally rolled out, then cut using a fattigman roller. My grandmother, however, rolled them out and cut them in triangles, so that’s how we’ve always made them… no special cutter required! I hope you enjoy them as much as we do!

Ingredients:

  • 3 eggs, beaten
  • 4 T. heavy whipping cream
  • 3 T. powdered sugar
  • 1/2 tsp. ground cardamom
  • 1 T. brandy (optional)
  • 1/2 tsp. grated lemon rind
  • 1 1/2 – 2 c. flour
  • lard for deep frying

Directions:

  1. Mix all ingredients together, stirring in flour until dough becomes thick enough to knead. Dough will be slightly rubbery.
  2. Chill in the refrigerator for a few hours.
  3. On a floured cutting board, roll out dough (small pieces at a time) to 1/8″ thick.
  4. Cut in triangles.
  5. Fry in lard, which has been heated to approximately 350 degrees (F.) Dough will rise to the top. Turn dough over with tongs and fry to a very light golden brown.
  6. fattigman fryingRemove from lard and place on a cookie sheet covered in paper towels.
  7. Generously sprinkle both sides of cookies with powdered sugar.
  8. Store in airtight container on counter or in pantry.

Notes:

  • This goes much faster with 2 people making the fattigman. One person to roll out and cut cookies, and one person to fry them.
  • The cookies are very fragile (and VERY yummy!)

Praise God! Let’s eat!

Shandy

Be sure to visit Shandy’s personal blog Aprons ‘n Pearls for recipes, crafts, homekeeping tips & more!

GCH:What’s on Your Plate? – Uncle Everett’s Coffee Cake

Note from my Aunt Phyllis:
Everett started making this, several years ago, when our family was small enough that one cake was enough to go around!! Now, he has to make two of them!! Every Christmas Eve, before noon, you can find Everett and I in the kitchen making this recipe.  We have this after Midnight mass, along with Pork Roast sandwiches for the family. Everett wouldn’t think it was Christmas if we didn’t fix a pork roast for breakfast!! That was the tradition in his family and we have continued it into ours.

I asked if my Aunt would mind if I shared her and Uncle Everett’s recipes here on our blog, and she said, “I would be honored!”  So here go…. Uncle Everett’s Coffee Cake!! 🙂  ENJOY!!

Uncle Everett’s Coffee Cake

Ingredients:

For the Dough:
2 pkgs–dry yeast
1/4 cup–warm water
1 cup–scalded milk
1/2 cup–shortening
2 teaspoons–salt
1/4 cup–sugar
2 well beaten–eggs
4 1/2 cups–flour
.
Honey Nut Filling:
1/2 cup honey
1/4 cup sugar
grated rind of 1 orange
1 Tablespoon orange juice
1 teaspoon–cinnamon
1/3 cup chopped raisins
1/3 cup chopped nuts
1 Tablespoon melted oleo
.
Glaze:
1/2 cup honey
1/2 cup sugar
1 Tablespoonmelted oleo
1 Tablespoon grated orange rind
.
Directions:
Dissolve yeast in warm water. Scald milk. Add the shortening, sugar and salt. Stir until the shortening is melted. Add the yeast mixture and the eggs. Beat well. Add flour and knead until smooth.(This is a very soft dough). Place in an oiled bowl and allow to double in bulk. Punch down and let rise for another 10 minutes. (Use a generous amount of flour when you roll this, as it is very sticky).
.
Divide the dough in two parts and roll each, to 1/2 inch thickness. Brush with melted oleo and cover with the Nut Filling. Roll like a jelly roll and slice in 1 inch slices. Arrange, in an oiled tube pan, in layers. Allow to rise until doubled. Bake at 350 degrees for 45–60 minutes. Cool in the pan. Remove and pour the heated glaze over the top and a bit on the sides.
.
Bon Appetit,
Christi


If you are interested in joining an Online Bible Study here at Girlfriends Coffee Hour, click HERE to check out what’s coming up in January of 2013!

GCH: What’s on Your Plate? – Rice Pudding

rice pudding

Rice pudding is one of those comfort foods that my family really enjoys throughout the year, but especially at Christmastime. One Norwegian tradition we keep in our home is to serve rice pudding on Christmas Eve. An almond is hidden in one person’s pudding, and the lucky person who gets it, gets a marzipan pig! (Much like the German tradition of hiding a pickle ornament in the Christmas tree – another tradition of ours!) It’s a fun way to create memories, and we get to enjoy eating this yummy dessert at the same time!

Ingredients:

  • 3 eggs, beaten
  • 2 cups whole milk
  • 1 1/2 cups cooked rice
  • 1/2 cup granulated sugar
  • 1 1/4 tsp. pure vanilla extract
  • 1/2 tsp. salt
  • a mixture of ground cinnamon and sugar
  • Reddi Whip or light cream (optional)

Directions:

  1. Preheat oven to 325 degrees (F.)
  2. Combine eggs, milk, rice, sugar, salt, and vanilla in a bowl and mix well.
  3. Bake in an 11×7 baking dish for 20 minutes.
  4. Remove from oven. Lightly sprinkle with cinnamon sugar. Stir well.
  5. Return to oven and bake for another 25 minutes.
  6. Remove from oven. Put into individual serving dishes. Chill well in the refrigerator.
  7. Before serving, sprinkle the top with cinnamon sugar. You may also top with Reddi Whip or a little bit of light cream.

Wishing you and yours a very Merry Christmas!

Praise God! Let’s eat!
Shandy

Be sure to visit Shandy’s personal blog Aprons ‘n Pearls for crafts, recipes, homekeeping tips & more!