April 18, 2024

Beef Stew…with a Mexican Twist

Perhaps Beef Stew sounds as if it would be complicated and difficult to make—just the opposite.  Simple, easy-peasy!  The key is slow-cooking.  You can either let it come together in a crockpot for a few hours or just as easily on the stovetop. Low heat and gentle, slow cooking gives the stew a roasted flavor, and ensures that the meat and veggies are fall-apart tender. And in addition, the liquids will come together into a thick, smooth gravy.  Yumm-O!

This time, instead of the usual stew, I added some salsa verde (yup, the green kind!), sweet potatoes, black beans, and Mexican seasonings.  And I baked some mini-corn muffins for you-know-who to indulge in! It was a great comfort food meal…since we still have frozen solid piles of snow and ice.  This meal fits well into our healthy but oh-so-yummy POV.  I like to make stews using a piece of bottom round steak from the butcher counter.  This cut doesn’t have much extra fat but still becomes tender due to the low heat and gentle simmering for 90 minutes or so.  Then load it up with lots of veggies…healthy and oh-so-yummy!  Enjoy!
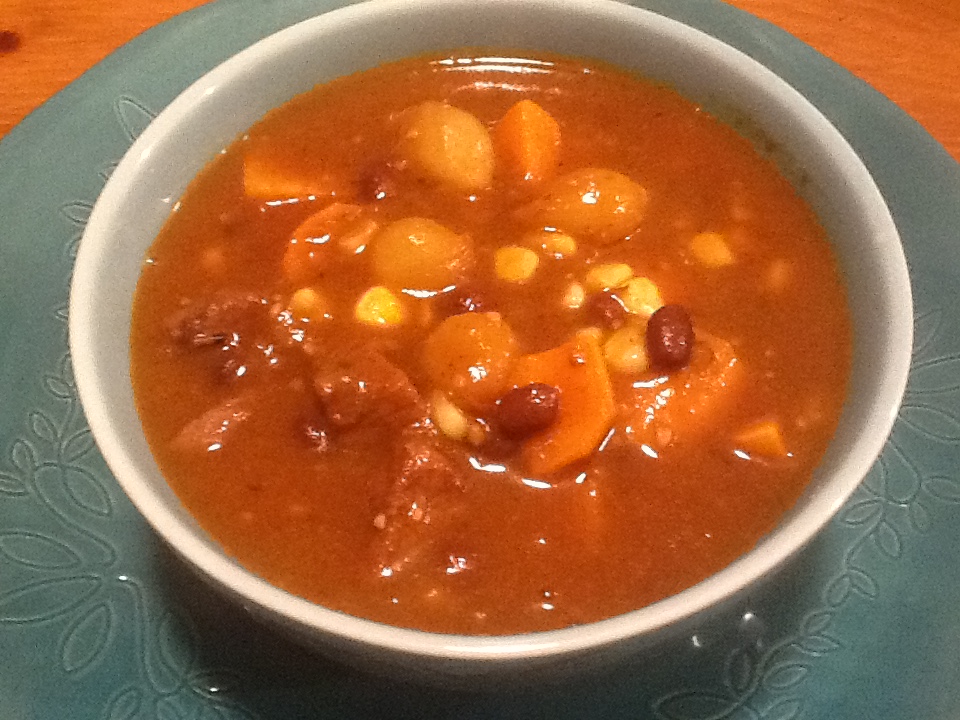
2015-02-24 19.46.38

 Mexican Beef Stew

ingredients:

2 tablespoons +/- olive or coconut oil
2 pounds beef stew meat, cut into bite-size chunks
2 tablespoons brown rice flour (optional)
1/2 teaspoon EACH sea salt, freshly ground pepper
3 tablespoons minced garlic (I use jarred)
1 cup dry red wine (or additional broth)
1 quart beef broth
1 cup water
1 jar (10-12 ounces) salsa verde
1 teaspoon +/- ground chipotle pepper
1 teaspoon dried thyme
3 medium sweet potatoes, peeled and chopped into bite-sized chunks
1/2 bag frozen pearl onions
1/2 # baby carrots, sliced in half length-wise
5 ounce can chopped green chilies (optional)
1 (15 ounce) can black beans, drained and rinsed
1 cup frozen sweet corn (optional)
additional sea salt and pepper

directions:

  • heat the oil in a large Dutch oven over medium heat
  • add the 1/2 teaspoon each of salt and pepper to the flour
  • dredge the meat in the flour mixture (if you eat grain free, you could skip this step)
  • brown the meat, working in 3-4 batches, just ‘til the cubes are lightly browned
  • remove meat from pot and set aside
  • lower heat and add garlic to pan drippings; stir constantly for about 1 minute ‘til fragrant
  • increase heat back to medium-high, stir in the wine, and scrape the bottom of the pan to loosen all the bits. allow to simmer ‘til liquid is reduced about half
  • add in the beef broth, the seasonings, and the browned meat cubes; stir well
  • lower heat to a simmer; cover and allow to cook for about an hour ‘til meat is getting tender
  • add in the sweet potatoes and carrots. raise heat, cover, and bring back to a simmer
  • cook for an additional 30 minutes ‘til potatoes are cooked through and the liquids have become a smooth, thick gravy
  • stir in the chopped chilies, black beans (and corn, if using); simmer ’til heated through
  • taste for seasoning
  • (if the ‘gravy’ needs any additional thickening, use 1 tablespoon of cornstarch with equal amount of cold water…stir ’til completely smooth; then pour into hot liquid (your stew) stirring constantly ’til liquid has thickened.  allow to boil for an additional minute.)

    ♥    ♥    ♥    ♥    ♥

    God loves you!  ♥  (Don’t ever forget that!)

    ♥  coleen

At Home with GCH – SoupPalooza Week 5

Here on our At Home with GCH  blog, Monday’s are usually focused on healthy but oh-so-yummy! recipes.  But this week, I get to visit with you on Thursday!  This past Monday, our Christi put forth a challenge that you just might want to take part in…check it out!

Christi’s Pantry/Freezer Challenge

We are continuing to celebrate soup, soup, and soup since this is National Soup Month!  Now this week—since SOME of us are gearing up for Super Bowl Sunday with all of the eating attached to the watching—we are making Cheese & Cider Soup, with a Spicy Popcorn topping as well as a hearty Black Bean and Sausage Soup.  These are my contributions to the “Soup”er  Bowl buffet!

Cheese & Cider Soup w/Spicy Popcorn2013-01-29 21.05.45

2 slices bacon, diced
1 medium onion, small dice
1 large Yukon Gold potato, peeled and cut into ¼-inch dice
1 medium carrot, minced
1 large Granny Smith apple, peeled and diced small
1 heaping teaspoon chopped garlic
2 tablespoons all-purpose flour
1+1/2 cups apple cider
3 cups chicken stock
1 cup filtered water
1 can (12 ounce) evaporated milk
Pinch cayenne pepper (add up to 1/8 teaspoon if you enjoy the heat!)
4 ounces sharp Cheddar cheese, shredded (I also use Gouda)
1 tablespoon minced fresh thyme leaves (if using dried, use 1 tsp)
Kosher salt and freshly ground black pepper, to taste

Fry the bacon in a large stockpot or Dutch oven over medium heat until crisp, 5-10 minutes. With a slotted spoon, transfer the bacon pieces to a paper towel-lined plate to drain, and set aside.

Add the onion to the bacon drippings and cook, stirring occasionally, until softened, about 4 minutes. Add the potato, carrot, apple, and garlic stirring continuously for about 1 minute, or until the garlic is fragrant.

Dust the flour across the vegetables and stir to coat the vegetables; cook for approximately 2 minutes until the mixture JUST begins to brown on the bottom of the pot.

Gradually whisk in the cider, water, and chicken stock; increase the heat to medium-high. Bring to a boil, then immediately reduce the heat to medium-low; simmer uncovered until the vegetables are cooked, approximately 30-40 minutes. Stir occasionally; you will see the liquid begin to thicken slightly.  When the potatoes yield to gentle pressure (done!), whisk in the evaporated milk and bring back to a very gentle simmer. Stir in the cayenne (if using) and the thyme, and then slowly add in the cheese stirring JUST until the cheese melts.  Remove from heat.  Carefully taste for additional seasoning, if necessary.  Ladle into bowls or mugs; serve immediately with Spicy Popcorn on the side.

Spicy Popcorn

In a small bowl, mix:
1/4 teaspoon kosher salt
1/4 teaspoon ground black pepper
1/4 teaspoon garlic powder
1/8-1/4 cup grated parmesan cheese

Simply prepare your popcorn in the manner you prefer (you will need about 2 cups).  As soon as it is done popping, IMMEDIATELY sprinkle 2 cups of popped popcorn with the seasoning mixture.  Stir gently.  Serve alongside your Cheddar & Cider Soup along with the bacon bits you prepared in the beginning.  Enjoy!

 _________________________

OK!  Onto our second soup this week, Black Bean and Sausage Soup.  This has a decidedly Mexican flavor so top it with some chopped avocado and red pepper…or a simple guacamole.

Black Bean and Sausage Soupsoup

1/2# Italian sausage meat, hot or sweet—your choice*
1 small onion
2 heaping tablespoons chopped garlic
1 (14-15 ounce) can diced tomatoes with juice
2 cups broth
2 cups filtered water
3 cans (14-15 ounce) black beans, drained and rinsed with warm water**
2 tbsp sun-dried tomatoes packed in oil, chopped and drained (optional)
1 teaspoon EACH: dried oregano, chili powder, cumin
1 teaspoon chipotle chili powder (optional)
1/8-1/4 teaspoon cayenne (optional)
Kosher salt & freshly ground black pepper
1 small red pepper, seeded and chopped small

Add a small amount of oil to stockpot; heat over medium-high and then saute the sausage meat and onion together for approximately 6-7 minutes.  Stir in chopped garlic and stir continuously for 1 minute.

Then add in tomatoes, broth, TWO (2) cans of the black beans, and all of the seasonings. Bring to a boil, reduce heat to medium-low and simmer, covered, for 30 minutes allowing for flavors to meld.

Remove from heat.  Take approximately 1 cup of the beans and tomatoes out of the soup and add to the reserved can of black beans.  Using a blender or an immersion blender, CAREFULLY puree, making as smooth as possible.  Add back into hot soup and stir well.  Ladle into bowls or mugs.  Serve immediately.

I like to serve this soup with the following toppings, letting everyone make their own choice of how to finish off their mug of soup:

  • chopped avocado
  • chopped red pepper, and/or tomato
  • chopped fresh cilantro
  • sour cream
  • shredded sharp cheddar
  • crushed tortilla chips

*I purchased ground Italian sausage meat OUT of the casings (looks like ground beef and is packaged the same).  However, if you already have sausage links on hand, you could just as easily remove the sausage from the casings and use that.

** reserve 1 can of black beans


God loves you!  ♥ (Don’t ever forget that!)

♥ coleen

_________________________________

If you would like to send a personal message to Coleen concerning this series, you may email her at:  Coleen@girlfriendscoffeehour.com

GCH: What’s on Your Plate? Fish Tacos

 Fish Tacos

Ah, the humble fish stick.  When I was a kid, my favorite meal was fish sticks, macaroni and cheese, and whatever green vegetable was riding shotgun.  I still love fish sticks, and so do my kids.  And while they’re terrific with tartar sauce, sometimes it’s fun to take the familiar and shake it up.  And that leads us to – Baja-style Fish Tacos!

These tasty treats may be unfamiliar to you if you’ve never visited Southern California or farther down south, into the Pacific Coast of Mexico.  Fish tacos in Southern California are part of surf culture, the favorite food of stereotypically blonde, tan dudes with surfboards who say “gnarly” and wear shorts year round.  And while they’re pretty easy to find in my neighborhood, they probably aren’t in yours.  So make ’em yourself!

There are a few basic, mandatory components to the fish taco.  First is corn tortillas – save the flour tortillas for burrito night.  Next is the fish: regular fish sticks will work, as will the larger fillet-style pieces, but you definitely want the crunchy breading.  Also important are the cabbage and cilantro – regular old green cabbage, sliced as thinly as possible (but not shredded like in coleslaw), and plenty of leafy cilantro.  Last comes a big squeeze of lemon or lime.  I like the “crema” listed in this recipe, but you can also use regular tomato salsa too.  After these ingredients, you can add more to suit your taste – diced onion, avocado, even shredded cheese.

Are you ready to do this?  Cowabunga!

Fish Tacos

Ingredients:

  • 1 package fish sticks
  • 1 package small yellow or white corn tortillas
  • 1 small head cabbage
  • 1 bunch cilantro (use the rest to make the Fajitas Salad!)
  • 2 tablespoons mayonnaise
  • 2 tablespoons sour cream or plain yogurt
  • 1 large lemon or lime
  • 1/2 teaspoon ground cumin
  • salsa, avocado, cheese, green or red onion, or whatever else you like on your tacos

Directions:

  1. Bake the fish sticks according to the package directions.  While they are cooking, slice the cabbage as thin as possible.  If you have a food processor, you may want to try that.  Wash the cilantro and remove the tough stems.
  2. Prepare the crema:  Whisk together the mayo, sour cream, and the juice of half the lemon.  Stir in the cumin and refrigerate until ready to use.  If it’s too sour for you, add a dash of sugar.  You can also add tabasco or a little chipotle right to the crema.  Or, my favorite, if you have any leftover dressing from making the Fajitas Salad, use this in place of the crema!
  3. Wrap as many tortillas as you need in a damp dishtowel.  Place the dishtowel between two plates to seal it up, and microwave for 30 seconds.  This gets them hot, flexible and delicious!
  4. To assemble:  Lay out your tortilla (some people use two at a time, which keeps it from ripping or falling apart) and spoon a little crema on the bottom.  Top with fish sticks, sliced cabbage and plenty of cilantro.  Squeeze a little lemon on top, and add any other optional ingredients you like.

Explore, experiment, enjoy! — Dana

Please visit me at Frugal Girlmet for more unique recipes!

GCH: What’s on Your Plate? – Tex-Mex Casserole

tex

Tex-Mex is one of my favorite kinds of food. It’s typically easy to throw together, delicious, and is hearty enough to satisfy the Mr. (Who happens to give this two thumbs up!)

Ingredients:

  • 1 lb. ground chuck
  • 1 bag frozen corn
  • 1 bag Southern style hashbrowns (the cubed potatoes)
  • 1/2 lb. Velveeta, cut into large cubes
  • 1 pkg. Taco Bell Taco Seasoning Mix
  • 1/2 c. water
  • 1 bottle Taco Bell Mild Restaurant Sauce

Directions:

  1. Preheat oven to 350 degrees F.
  2. Cook ground chuck in a large pot. (I use a 6 qt. pot.) Cook until done, but do not allow to overcook. Drain meat.
  3. Add Velveeta, water, and taco seasoning mix to the pot.  Heat on medium, stirring occasionally, and allow cheese to melt a bit. (About 5 minutes.)
  4. Add corn and potatoes to the pot. Mix well. Allow to cook for 3 or 4 minutes.
  5. Add 1/3 c. mild sauce to pot. Mix well.
  6. Remove from heat and transfer to a 9×13 baking dish.
  7. Cover baking dish with aluminum foil and bake for 15 minutes.
  8. Remove foil, stir, and return to oven to bake for an additional 15 minutes (until it is heated through.)
  9. Drizzle with mild sauce and serve.

Notes:

  • To make this stretch for another person or for the hubby’s lunch the following day, I add an additional pound of ground chuck to the recipe. It bulks it up a bit without sacrificing the taste or having to double ingredients.

Praise God! Let’s eat!

Shandy

Be sure to visit Shandy’s personal blog Aprons ‘n Pearls for recipes, crafts, homekeeping tips & more!

GCH: What’s on Your Plate? – Slow Cooker Korean Pot Roast AND Korean Tacos

Korean Tacos

There is a dish I love, called galbi jjim (pronounced “gal-bee jeem”) that consists of short ribs braised in a salty-sweet broth.  I only made it once, though, because it takes several hours of hands-on cooking.  There had to be a better way, I thought.  When it comes to long, slow cooking, nothing beats the crock pot, so I started there.  I quickly realized, however, that a large part of the dish – namely the bone – wasn’t adding anything to the finished crock pot recipe, so I switched tactics again.  Voila!  Korean Pot Roast!

You can eat this right out of the crock pot, with rice, kimchee, and banchan.  But since you’re cooking a two- to three-pound roast, you will likely have leftovers.  Ready for something really wild?  Why not try Korean tacos!  Here in Los Angeles, they are quite the rage, with several of the city’s hippest restaurants and food trucks putting their own spin on this fusion of Mexican and Korean.  I make my tacos pretty basic, but feel free to get wild with them!  Below are recipes for both the pot roast and the tacos.  Make the pot roast first, then you can have tacos the next day.  You culinary globe-trotter, you!

Slow Cooker Korean Pot Roast

Ingredients:

  • 2 tablespoons sesame oil
  • 2- to 3-pound beef chuck roast
  • 1/2 red or white onion, sliced thinly
  • 10 cloves garlic, peeled and smashed with the back of your knife
  • 3 tablespoons brown sugar
  • 1/2 cup apple juice
  • 1/4 cup soy sauce

Directions:

  1. Set crock pot to HIGH.  Pour in the sesame oil and swirl around the pot to coat.  Add roast and push down to fit.  Cover the roast with onion slices and garlic cloves, then sprinkle with brown sugar.  Pour apple juice and soy sauce over roast.
  2. Cover and cook on HIGH for 6-8 hours, depending on the size of your roast.  When done, you should be able to pull it apart with a fork.  Serve with steamed rice, kimchee, and banchans or vegetables of your choice.

Korean Tacos

Ingredients:

  • Leftover Korean pot roast
  • Corn tortillas
  • Cilantro
  • Thinly sliced red or white onions
  • 1 quantity sauce from the Dubu Buchim recipe, or salsa of choice
  • Optional ingredients:  chopped cabbage or lettuce, avocado, a squeeze of lemon or lime juice

Directions:

  1. In the microwave, reheat the pot roast.  Make sure it is thoroughly heated.  When you have it very hot, drain away any juices, but keep the onions and garlic, if there are any.
  2. Wrap corn tortillas in a damp dish towel and place between two plates.  Microwave for 30 seconds.  This gets them hot and steamy!
  3. To assemble:  fill tortilla with beef, then spoon over some of the Dubu Buchim sauce (or even just a smear of gochujang!)  Sprinkle with lots of chopped cilantro and onions, and whatever other optional taco ingredients you choose.

Explore, experiment, enjoy!

— Dana


Find more recipes from Dana, Korean and otherwise, at Frugal Girlmet!

GCH: What’s on Your Plate? Chicken (or Turkey!) Fajitas Salad

Happy Thanksgiving!  Chances are, if you live in America, right now you are either preparing the Thanksgiving turkey, eating it, or wrapping up the leftovers!  There are so many great ways to use up leftover turkey, but if you are burned out on your old standbys and are looking for something different, I have the solution to your big bird blahs!

There are two ingredients you may not have in your fridge right now that you need for this salad:  cilantro and chipotles in adobo.  Cilantro, that green leafy herb that imparts a fantastic flavor to many south-of-the-border dishes, should be easy to find in your grocery store.  Make sure you’re buying cilantro and not Italian parsley!  (Trust me, I’ve made this mistake!)  The chipotles in adobo will be in your “ethnic food” aisle at the grocery store.  They come in a small can, a little larger than a can of tomato paste.  These are smoked jalapeño peppers in a spicy red vinegar sauce.  Their smoky, rich taste is incomparable and irreplaceable in many Mexican dishes.  Once you taste them, you’ll never forget them!  They are not too spicy, but provide the perfect kick to everything they touch.  You only need one chipotle pepper in this recipe, so transfer the rest to a Tupperware container and stash them in your fridge – they last for a few months since they are already smoked and soaking in vinegar.  Blend one up and add to your next batch of chili!

Everything else should be easy to procure.  This recipe makes two large dinner salads, or 4 or 5 side salads.  I serve this with chips and salsa, but feel free to supplement with whatever other Thanksgiving leftovers you have handy.  Rolls or garlic bread would be welcome (but maybe save the pumpkin pie for later.)

Chicken (or Turkey!) Fajitas Salad

Ingredients:

  • 1 teaspoon cumin seeds
  • 1 chipotle pepper in adobo sauce (and about a teaspoon of the sauce)
  • 1 large clove garlic
  • 1/2 bunch cilantro (use the upper stems too, but discard the lower, tougher stems)
  • 1/2 cup mayonnaise
  • 1/2 cup plain yogurt or sour cream
  • juice of 1/2 lemon (or more … I like more!)
  • 1/2 teaspoon salt
  • 1/4 teaspoon sugar
  • 1/2 large onion, sliced into thin strips
  • 1/2 green bell pepper, sliced into thin strips
  • 1/2 red, yellow, or orange bell pepper, sliced into thin strips
  • 1 zucchini, sliced into thin strips
  • 1 1/2 cups cooked chicken or turkey, shredded
  • 1 avocado, sliced (optional)
  • 2 tablespoons salsa (optional)
  • large bag of salad greens – romaine is best, but regular old spring mix is fine too

Directions:

  1. Toast the cumin seeds over medium heat for a few minutes until they get a little darker and start smelling delicious.  When toasted, grind in food processor or pulverize in mortar and pestle.  (You could use pre-ground cumin, but please look into  buying the whole seeds!)
  2. With cumin in the food processor, add chipotle and a little adobo sauce, garlic, cilantro, mayonnaise, yogurt, lemon juice, salt and sugar.  Buzz to combine.  Taste for seasoning – too spicy?  Add more mayo or yogurt.  Too tart?  Add a pinch more sugar.  Put the dressing in the refrigerator while you cook the veggies.
  3. Add a little oil or butter to a large pan.  Add the sliced onions and sauté until golden, then add the peppers and zucchini.  Cook until hot and tasty (not for too long, don’t let them get mushy!)  If you have any leftovers, these are amazing mixed with scrambled eggs and a little cheese.
  4. To serve:  Lettuce on the bottom, top with hot veggies and shredded chicken or turkey, and dress liberally with the chipotle dressing.  Scatter some avocado over the top, dot with salsa and dig in!

Explore, experiment, enjoy! — Dana

Please visit me at Frugal Girlmet for more unique recipes!

GCH: What’s on Your Plate? The International Pantry

Most of the recipes on GCH: What’s on Your Plate are for delicious dishes that may not even require a trip to the store to make tonight.  That might not be the case with my contributions!  If you’ve always wanted to try a Mexican, Korean, or Indian recipe but didn’t know where to start, I’m here with a primer for some basic things to stock in your pantry and refrigerator.

The Korean Kitchen

I am biased:  I love Korean food!  There aren’t any complicated techniques to master (I’m looking at you, French bistro cuisine!) and it relies mostly on fresh vegetables and a few simple condiments.  I highly encourage you to find an Asian or Korean grocery store and try some recipes out.  Here’s what to buy to get you started.

Sesame Oil:  This dark, nutty oil is a base flavor in most Korean recipes.  Any brand is fine, and your neighborhood Safeway or Kroeger may stock it in the Asian aisle.

Soy Sauce:  You probably already have this.  Kikkoman is definitely in your grocery store right now!

Rice Vinegar: A delightfully sweet-tart vinegar that is fresh-tasting and light.  I use it often in salad dressings.

Garlic:  In James Clavell’s classic samurai novel Shogun, the Japanese guards refer to Koreans as “the garlic-eaters”.  They meant it as an insult, which is incomprehensible to me!  Garlic is very healthy for you, and is found in many cuisines around the world.  I mean, imagine Italian food without garlic!  I buy it whole because it’s cheaper that way, but if you don’t want the trouble of mincing it to order, feel free to buy a jar of minced garlic to live in your fridge.

Green Onions:  You know, just your basic green onions.  And unless you’re making dessert, you can almost guarantee a Korean recipe will call for minced green onions.  Thankfully, if you buy them in an Asian grocery, they are going to be shockingly cheap to purchase.  In fact, every Asian grocery store I have been in has fresher vegetables at better prices than the American grocery store.

Ginger:  A common flavor agent in Korean food.  Buy a whole “hand” of ginger, or buy minced ginger to go in your fridge.  Be sure to buy regular minced ginger, and not the pickled kind they serve with sushi.

Doenjang:  Pronounced “den jong”, this is fermented bean paste.  It’s basically a stronger, chunkier version of Japanese miso paste.  This flavors many soups and stews, and lends a meaty, salty savor.  It can live happily in your refrigerator for a good year – after all, it’s already fermented!  When you buy it, read the ingredients – make sure there are no added flavors, like anchovies, and that you’re getting just plain doenjang.  Most brands feature helpful illustrations to help us non-Koreans out!

Gochujang: Pronounced just how it looks, “go chu jong”, this red paste looks scarier than it is.  If you like Sriracha hot sauce, you’ll love gochujang.  It is hot, fruity, sweet, and complex.  Koreans love this fiery paste and will sometimes serve a side dish of whole green onions to dip in gochujang.  That’s a little hardcore for me, but in smaller amounts, it is a tasty and welcome splash of spice.  And to make it easier, doenjang is always sold in a little tan tub, and gochujang is always sold right next to it, in a little red tub.  Don’t worry, you can’t confuse them.

Kimchi:  The iconic dish is the Korean version of sauerkraut – pickled cabbage that will cure any cold!  There are also radish and cucumber versions.  Pick up a jar and see if you like it.  I love it, and I love the huge dose of Vitamin C it gives me.  Koreans eat kimchi and rice with every meal.

Rice:  This is not the Uncle Ben’s variety.  You’ll need short-grain, Japanese-style rice.  Two popular brands are Calrose and Shirakiku.  And yes, it’s supposed to be sticky!

Everything else for your Korean recipes will be vegetables or some meat.  Common vegetables used are zucchini, spinach, carrots, mushrooms, eggplant, cabbage, onion, and bean sprouts.  These should all be purchased fresh, of course, and for the most part, once you have the basic condiments, you can go to the regular grocery store for the other things you need.

Indian Ingredients

Indian food is a delightful way to explore different flavors, textures, and techniques.  It’s also a wonderful choice for vegetarians, or people looking to cut down on meat, since recipes using beans and vegetables abound.  Here are some basics to get you going.

Curry:  As I mentioned last week, curry comes in powder, paste, and sauce form – but I would avoid the sauces, since they are diluted, and you can’t control the salt, heat, or viscosity of the finished product.  Instead, go to your regular grocery store, and look in the spice aisle.  Last time I was there, I counted six different curry powders!  They are all similar, in that they probably contain turmeric, mustard, coriander, and cumin.  But they diverge there, and each has other spices – ginger, cayenne, cinnamon, allspice – in a different balance of flavors.  I recommend that you buy two different brands.  Open them, smell them, and see which you like better.  I have three right now – one is sweeter, one is more bitter, and one is hotter.  I use them in combination, or pick which one goes better with the recipe – the sweeter one for squash or carrots,  the hotter one for meat.  As for pastes, these are more specific and uniform – one brand’s Madras curry paste will be very similar to another brand’s.  I like Madras, as it’s a very balanced mix of sweet, bitter, spicy and hot.  It’s another condiment that doesn’t take up a lot of space in the fridge, lasts forever, and adds a unique kick to everything it mixes with.

Whole spices:  I can’t recommend whole spices highly enough!  Now just to be clear, I’m not a zealot:  please buy ground cinnamon and not sweat and curse over trying to grind down a cinnamon stick for your next batch of snicker doodles!  But if you did a taste-test of prepackaged ground cumin versus whole cumin  toasted and ground at home, you’d go kick that name-brand jar right out of your spice cabinet!  I always have whole cumin, mustard, and coriander seeds on hand.  Believe it or not, Mexican and Indian cuisines share a lot of flavors:  garlic, cumin, onion, peppers, and cilantro, just to name a few.  The cumin will certainly not go to waste if you do any kind of “international” cooking.

Rice:  Sorry, you can’t use Japanese / Korean / Chinese rice in Indian cooking!  But Indian, Thai, and other south Asian cuisines use the same rice: either basmati or Jasmine rice, and you can find both in white and brown varieties.

Everything else in Indian food should be purchased fresh.  Tomatoes, peppers, eggplant, zucchini, spinach,lentils, chickpeas, and green beans are all common ingredients.  Indians also make great use of chicken, so if you cut out red meat from your diet, check the multitude of chicken presentations.
Sorry this was so long.  I just got excited sharing the little bit of knowledge I have of what some people may consider non-traditional cooking.  Now get out there, and be a culinary adventurer!
Explore, experiment, and enjoy! — Dana
For more, visit me at Frugal Girlmet!