April 26, 2024

Bacon B.O.M.B. Jam

Bacon BOMB Jam

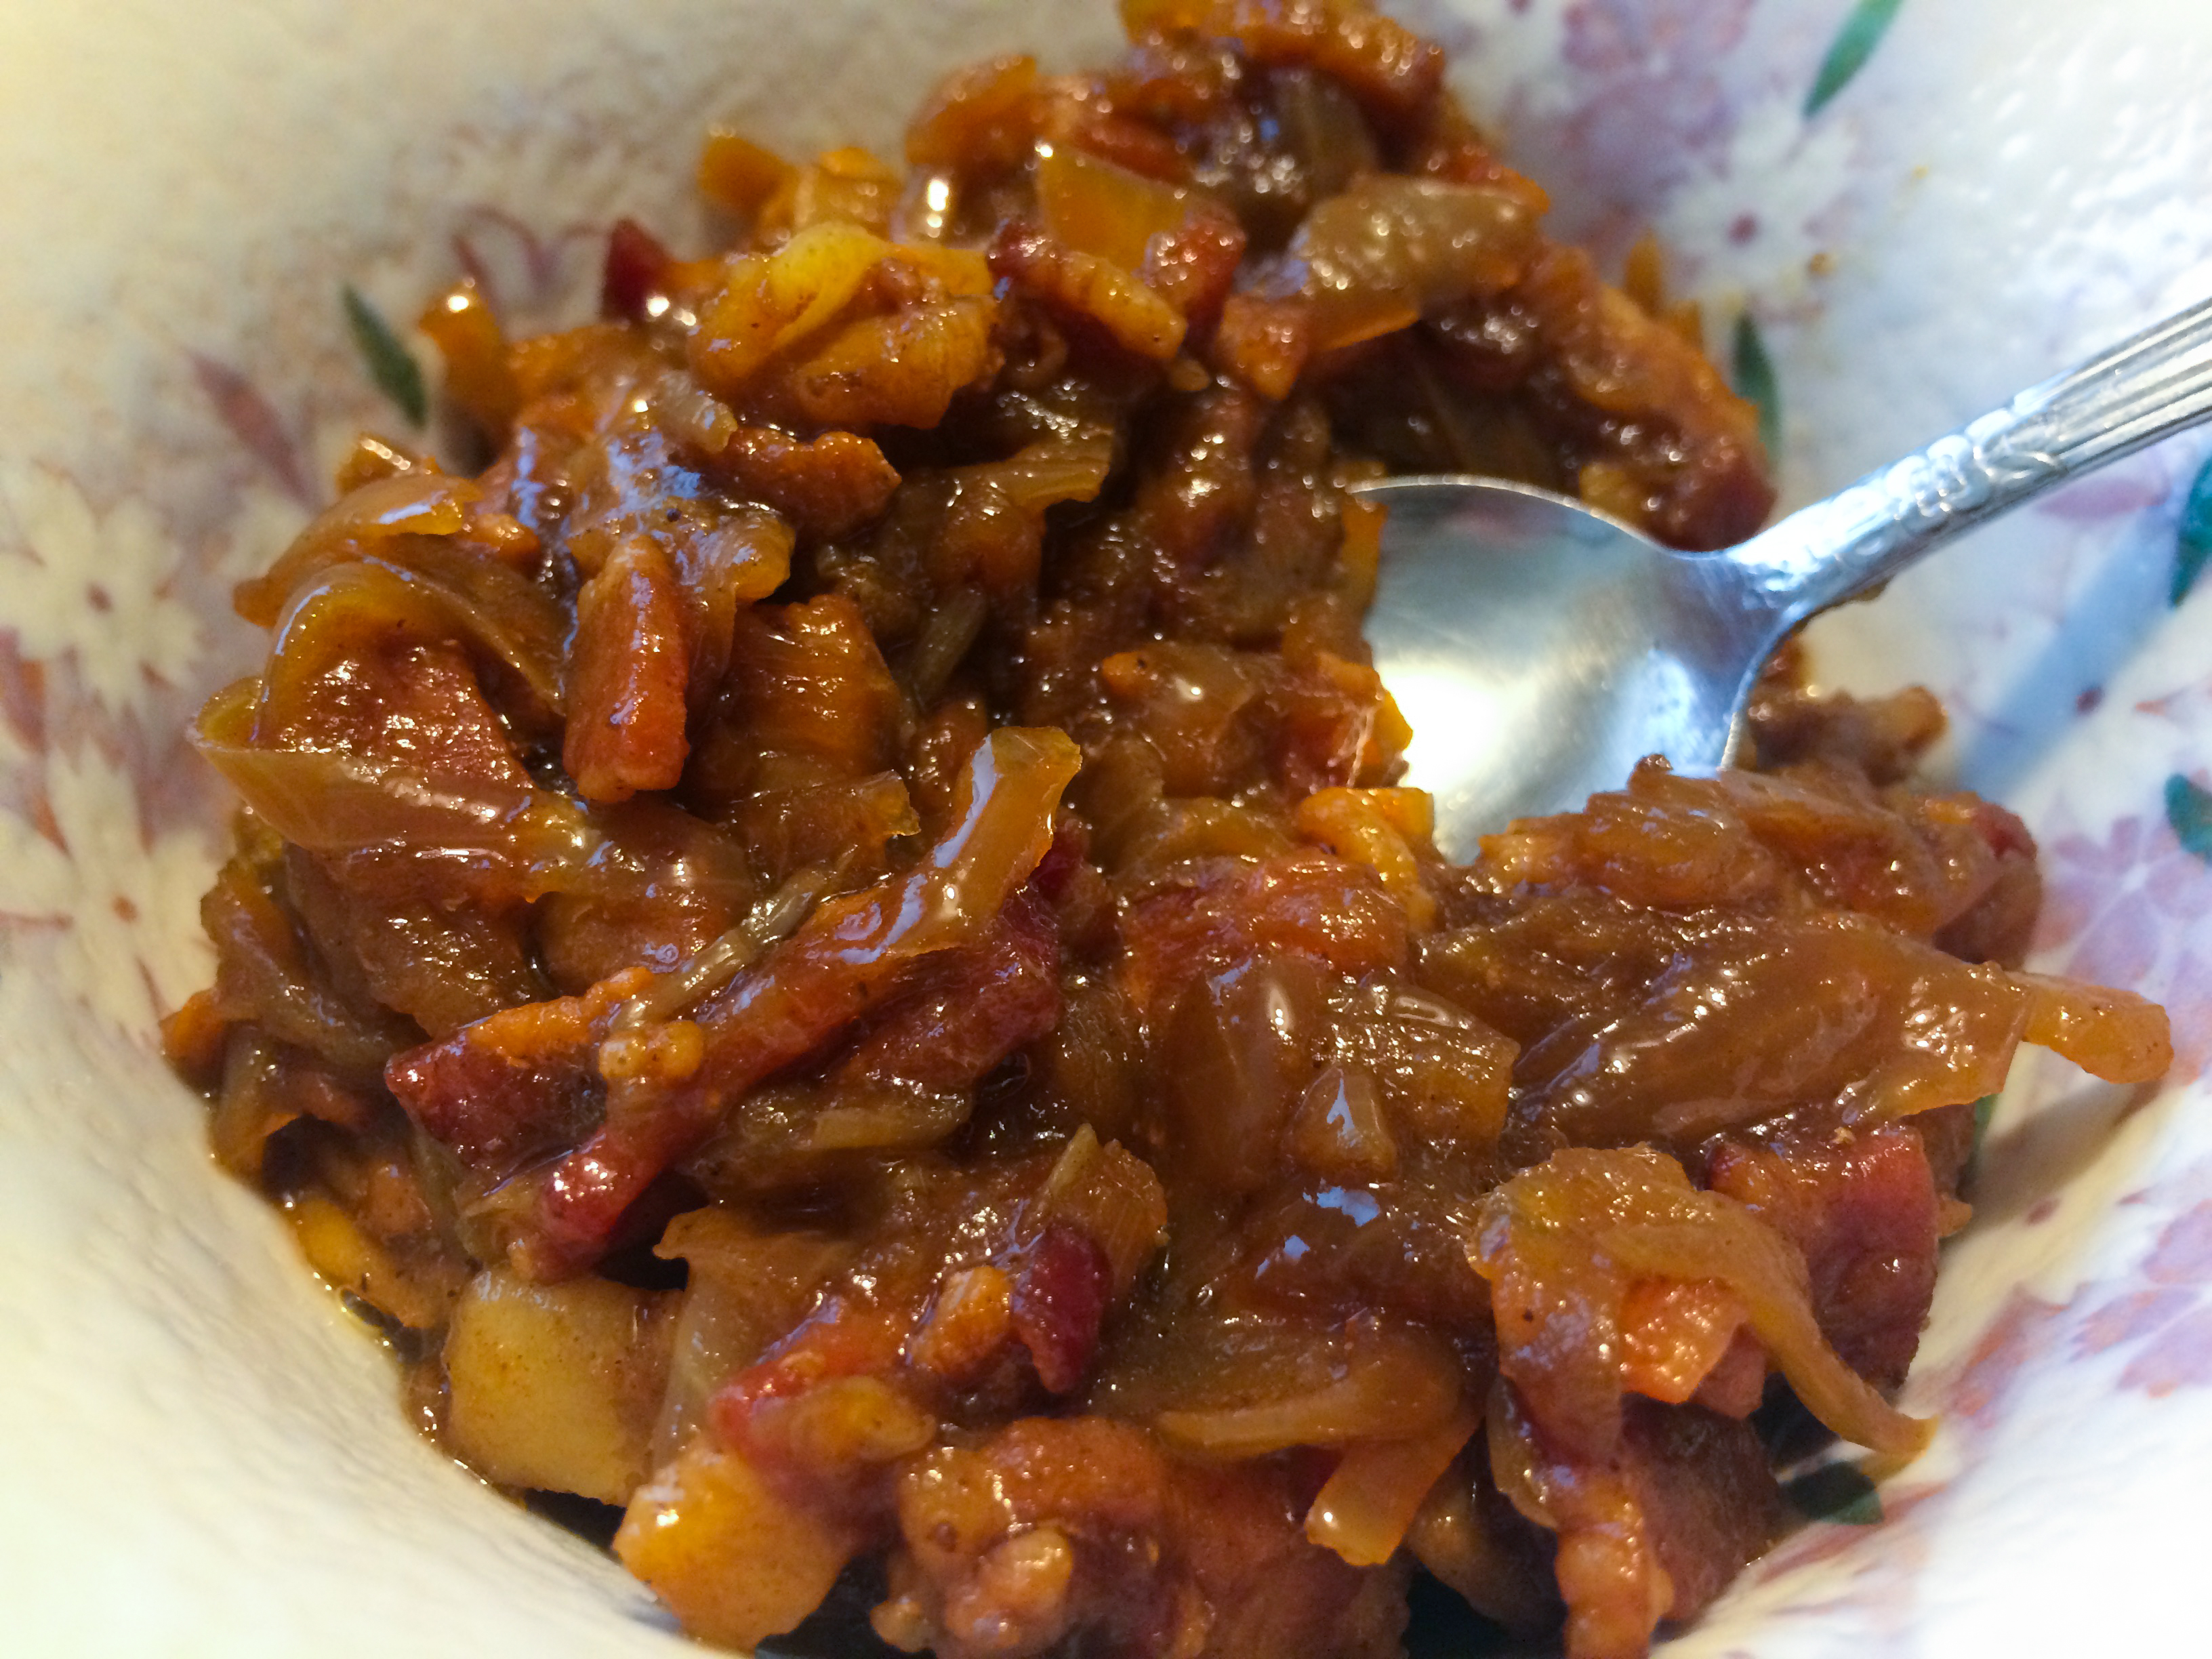
You read that correctly:  B.O.M.B.  This stuff will blow you away!  Bacon Onion Maple Bourbon Jam is an out of this world condiment you will want to smear on everything!

This is easy and amazing.  I ate some of this bacon jam on my baked salmon.  Next I’m going to try it on a cracker, maybe with a little goat cheese, or as part of an olive and cheese tray.  And I may just go off the rails and slather it on bread with cheddar and sliced apple and make the best grilled cheese sandwich I’ve ever had!  This recipe yields a cup and a half of jam.  Let’s see how long it lasts!

Bacon B.O.M.B. Jam

Ingredients

  • 3/4 pound bacon (I used 7 slices), diced
  • 2 large onions (try sweet onions, if you have them), sliced
  • 1/4 cup maple syrup
  • 1 tablespoon bourbon
  • 1/4 cup coffee (or use water if you like)

Directions:

  1. In a heavy pot with a lid, cook the bacon over medium heat.  You want all the fat to render, but you don’t want the bacon to get really crisp.  Remove the bacon from the pan, and pour out all but one tablespoon of bacon fat.  (I keep mine in a jar in the refrigerator, and use it to pan fry.)
  2. Add the sliced onions to the bacon fat in the pan.  Cover and cook on medium low for 15 minutes.  Stir, making sure nothing is burning, and cook another 10 minutes.
  3. Add the bacon, maple syrup, bourbon, and coffee; stir, making sure to scrape the bottom of the pan (use a wooden spoon).  Cover with the lid, cook another 10 minutes.
  4. Remove the lid and cook uncovered for 15 minutes.  I sort of mashed the jam with my wooden spoon to get a smoother consistency.  You can do that or you can leave it chunky.  You could even put it in a food processor and pulse a few times to get it even smoother.  Taste it and see how you like it.
  5. Refrigerate the leftovers and eat within a week.

Explore, experiment, enjoy! — Dana


To view even more of Dana’s unique recipes, you can visit her at Frugal Girlmet!

Mondo Coconut Shrimp

Mondo Coconut Shrimp Resize

Yes, MONDO!  With four, count ’em, FOUR different coconut products, you too can make your favorite appetizer from that restaurant you go to with your girlfriends!  Mondo Coconut Shrimp are really quite easy to make, and, a fun and tasty appetizer for a party.

You’ll want to use BIG shrimp for this recipe—the larger the better.  I found  some 13-15 count shrimp on sale, and they worked really well.  If you are using smaller shrimp, decrease your cooking time so you don’t make these guys all tough and rubbery.  I coated these in both sweetened AND unsweetened coconut.  Feel free to use one or the other if you don’t have both.  I was going to make this recipe just with the unsweetened kind, but I found a cup of sweetened coconut in my freezer and decided to use it up – and I’m glad I did!

To be  honest, these are fantastic with just some salt sprinkled on top when they come off the stove.  I took a photo of them with a lemon slice, and found out they didn’t even need that to be delicious!  So make these for friends, or as part of a funky dinner, and go MONDO!

MONDO Coconut Shrimp

Ingredients:

  • 1 pound large shrimp, shelled and deveined
  • 3 eggs
  • 1 cup coconut flour
  • 1 cup sweetened shredded coconut
  • 1 cup unsweetened shredded coconut
  • 1 teaspoon curry powder
  • coconut oil, for frying
  • salt for serving

Directions:

  1. Set up a breading station.  In the first bowl, beat the 3 eggs with a tablespoon of water.  In the second bowl, pour in the coconut flour.  In the third bowl, mix together the two coconut shreds and the curry powder.
  2. Start breading:  Dip a shrimp into the egg, then the coconut flour, then back into the egg, and then the coconut shreds.  Place on a plate while you complete the breading.
  3. In a large non-stick frying pan, heat one heaping teaspoon of coconut oil over medium heat.  When  hot, carefully add the breaded shrimp.  You’ll probably have to do this in at least two batches.  Let them cook for about six minutes, then flip and cook again for another five minutes.  Watch your heat here – you want it medium to medium-low, so that the shrimp cooks evenly and the breading doesn’t burn before the shrimp are done.
  4. Remove cooked shrimp to a plate and immediately sprinkle with kosher or sea salt.  Add another teaspoon of coconut oil  to the pan, if necessary, and cook the next batch.  Serve hot!

I texted my husband a photo of the shrimp and he said, “Oooh, looks yummy!” so I saved him some.  Unfortunately, they aren’t as nice the second time around.  They still taste great, but you can’t get them crispy on the outside a second time.  That means Carpe Diem – Gather ye rosebuds while ye may – and eat your shrimp while they’re hot.

Explore, experiment, enjoy! — Dana


To view even more of Dana’s unique recipe, you can visit her at Frugal Girlmet!

Layered Greek Dip

Layered Greek DipThis month I am focusing on side dishes and things you can bring to your Thanksgiving table.  When my family gets together, we all commit to bringing a piece of the dinner puzzle:  whichever family member is hosting usually makes the main dish, and the other family members decide on who is going to make dessert, salad, vegetable, and appetizer.  My sister brought an appetizer called Layered Greek Dip – and I was hooked!

This dish is easy to put together and is healthy to boot!  Assemble it right before your guests come, or make ahead and covered in the fridge until you are ready to serve.  Offer a variety of dippers:  I like pita chips, tortilla chips, Triscuits (my favorite cracker of all time!) and veggies like carrot sticks and red pepper slices.  This will take the edge off people’s hunger long enough for you to finish up your last-minute dinner duties.  Offer some white wine with this appetizer and your guests may forget all about the main course!

I should have taken a photo of my sister’s dish when she  made it, but it slipped my mind, and before I remembered, we had all smeared it all over the plate and eaten half of it!  I made it again this morning, so the photo is of a “personal-sized” serving.  And you know what?  It makes a yummy, unusual breakfast too!  I used sundried tomatoes because I didn’t have any cherry tomatoes (and I don’t care for them anyway.)  Try it and let me know if you love it like I do!


Layered Greek Dip

Serves 8 as an appetizer

Ingredients:

  • 8 ounce container of hummus (or make your own!)
  • 4 ounces crumbled Feta cheese
  • 6 ounce container of plain Greek yogurt
  • 1 small cucumber, peeled, seeded and chopped
  • 4 ounces cherry tomatoes, cut in half
  • 4 ounces Kalamata olives (or other black olives)
  • 2 green onions, diced
  • handful of parsley, minced

Directions:

  1. On a large plate, spread out the hummus.  Cover with a layer of Feta, then cover that with the Greek yogurt.  Arrange the cucumber, tomatoes, and olives over the top in any way you find aesthetically pleasing.  Sprinkle with green onion and parsley.  Serve with chips or veggie sticks.  Keep refrigerated until ready to eat.


Explore, experiment, enjoy! — Dana


To view even more of Dana’s unique recipe, you can visit her at Frugal Girlmet!

Homemade Ricotta

Homemade Ricotta Resized

When I was in high school, 25 years ago, I thought the funniest movies in the world were Monty Python movies.  Yes, I was one of those nerds who could rattle off quotes from all the movies (in the intervening years, my skills have gotten rusty, but I still have a few).  One of my favorite scenes in the movie “The Life of Brian” was when a group of people are listening to the Sermon on the Mount.  Unfortunately, they are way, way at the back of the crowd and can’t hear well. When Jesus says, “Blessed are the peacemakers,” the crowd in back misinterpret it as “Blessed are the cheese makers.”  So when I came across this recipe for Homemade Ricotta, I immediately started giggling.  I want to be a blessed cheese maker, and you can be too!

You already have the ingredients you need.  Use whole milk, or else the ricotta won’t set up.  One lemon, a little salt, and a tablespoon of white vinegar – what could be easier?  You’ll also need a thermometer.  I have a candy thermometer that clips to the side of the pan, but you could use a meat thermometer, or one of those fancy infrared ones too!  The only equipment you might need to buy is cheesecloth.  I found it at my regular grocery store, and have used it before in making Homemade Coconut Milk.

Ricotta is one of those amazing ingredients that can be used in either sweet or savory recipes.  In the following two weeks, I’ll have recipes that use fresh ricotta in a zucchini “lasagna” (with no noodles!), and in a dessert with fresh summer fruit.  Until then, you can serve fresh ricotta as an appetizer, spread on thin slices of bread, with either cracked pepper and minced herbs, or with a light drizzle of honey and crushed walnuts.  Ready?  Let’s make some cheese!

Homemade Ricotta  (Makes one cup of ricotta)

Ingredients:

  • 4 cups whole milk
  • 1/2 teaspoon salt
  • 1 tablespoon lemon juice
  • 1 tablespoon white vinegar (you may need more, but I didn’t)

Directions:

  1. In a pot, heat milk and salt over medium-high heat.  Stir occasionally to make sure it’s not burning on the bottom.
  2. Prepare your utensils:  Line a mesh sieve with a double-layer of cheesecloth.  If you want to save the whey, place the sieve over a large bowl.  (I saved my whey – next week I’ll show you how I used it.)
  3. When the temperature of the milk reaches 185*F, turn off the heat and pour in the lemon juice and vinegar.  Stir gently.  You just made what Little Bo Peep was eating – curds and whey!  Let it sit for about ten minutes, and stir again.  If you see any milk in your pot that hasn’t curdled, you can add another teaspoon of vinegar, stir, and let sit another ten minutes.  Mine didn’t need any extra and separated easily.
  4. Pour the curds and whey into the cheesecloth-lined sieve.  The whey, the yellowish liquid, will end up in the bowl.  Let cool and refrigerate for later use.  Let the cheese curds, aka your lovely homemade ricotta, drain in the cheesecloth.  If you want it soft and moist, let it drain for about ten minutes.  This is good for spreading on bread, or in dessert applications.  I let mine drain for much longer – about half an hour – because I was baking it in a “lasagna” and didn’t want extra water in the casserole.
  5. This keeps for about 5 days, refrigerated.  I challenge you to make it last more than a few hours!

Explore, experiment, enjoy! — Dana


To view even more of Dana’s unique recipe, you can visit her at Frugal Girlmet!

Bacon-Wrapped Figs

Fresh Figs

Ah summer!  You bring us such a variety of delectable little fruits and veggies, some that are only in season and available for a few weeks!  Figs are one of those little gifts from God.  I saw them at my farmer’s market two weeks ago, and Sunday I bought a basket.  Tender little nuggets of sweet pink flesh, hidden under an unassuming brown skin, figs are a sweet treat!  If you’ve only ever had them in Fig Newton form, try this recipe for Bacon-Wrapped Figs!

Simple ingredients, simple preparation – so easy!  Look for figs that are a little soft, but not squishy.  These little bites are sweet and salty and kind of rich, so you don’t need to eat a dozen to feel satisfied.  Try them with a green salad for a light lunch, or with some sparkling wine as an appetizer.


Bite-sized bacon goodness!

Bite-sized bacon goodness!

Bacon-Wrapped Figs

Ingredients:

  • 6 ripe figs
  • 6 slices bacon
  • 6 teaspoons cream cheese
  • fresh-ground black pepper
  • optional: honey

Directions:

  1. Preheat oven to 400*F.  Line a baking sheet with aluminum foil.  
  2. Rinse off figs and pat dry.  With a knife, trim off the little stem nub at the top and slice in half lengthwise, so you have 12 halves.  Cut the bacon in half so you have 12 short pieces.
  3. To assemble:  Place half a teaspoon of cream cheese on top of each fig half.  Season with a grind or two of black pepper.  If you want them sweeter, add a drop of honey on top of the cream cheese.  I didn’t use honey and mine were delicious, but it’s up to you how sweet you want them.  Wrap each cream cheese-topped fig in bacon.  I wrapped them so the open end is underneath the fig, but some had the open end on top and it didn’t unravel.  You could use toothpicks if you are worried they won’t stay wrapped in the oven, but mine were fine without.  Lay the bacon-fig bundles on the baking sheet.
  4. Bake for 20 minutes.  Turn off the oven and let them figs rest for 5 more minutes in the oven.  Take them out and serve hot.  Watch your fingers!


Explore, experiment, enjoy! — Dana


To view even more of Dana’s unique recipe, you can visit her at Frugal Girlmet!

GCH:What’s on Your Plate? – Velveeta Cheese Dip

Velveeta Cheese Dip

 Velveeta Cheese Dip

Ingredients:

16 oz of Velveeta Cheese – diced

1-10 oz can Pace Diced Tomatoes w/ Green Chilies (drained)


Directions:

Put all ingredients into a medium-size baking dish.

Cook in microwave for 2 minutes.  Stir.  Cook for another 2 minutes.  Stir.  Cook for 1 additional minute.

Remove from microwave and stir until you see that all Velveeta cheese has completely melted.  (About 1 minute)

Serve with your favorite Tortilla Chips.


If you are interested in learning more about Online Bible Studies, please click on the Sign-Up Here button in the Menu tab at the top of our website.  If you need further details, please email Christi@girlfriendscoffeehour.com.