March 28, 2024

Cobb Salad with Homemade Bleu Cheese Dressing

Cobb Salad with Homemade Bleu Cheese Dressing

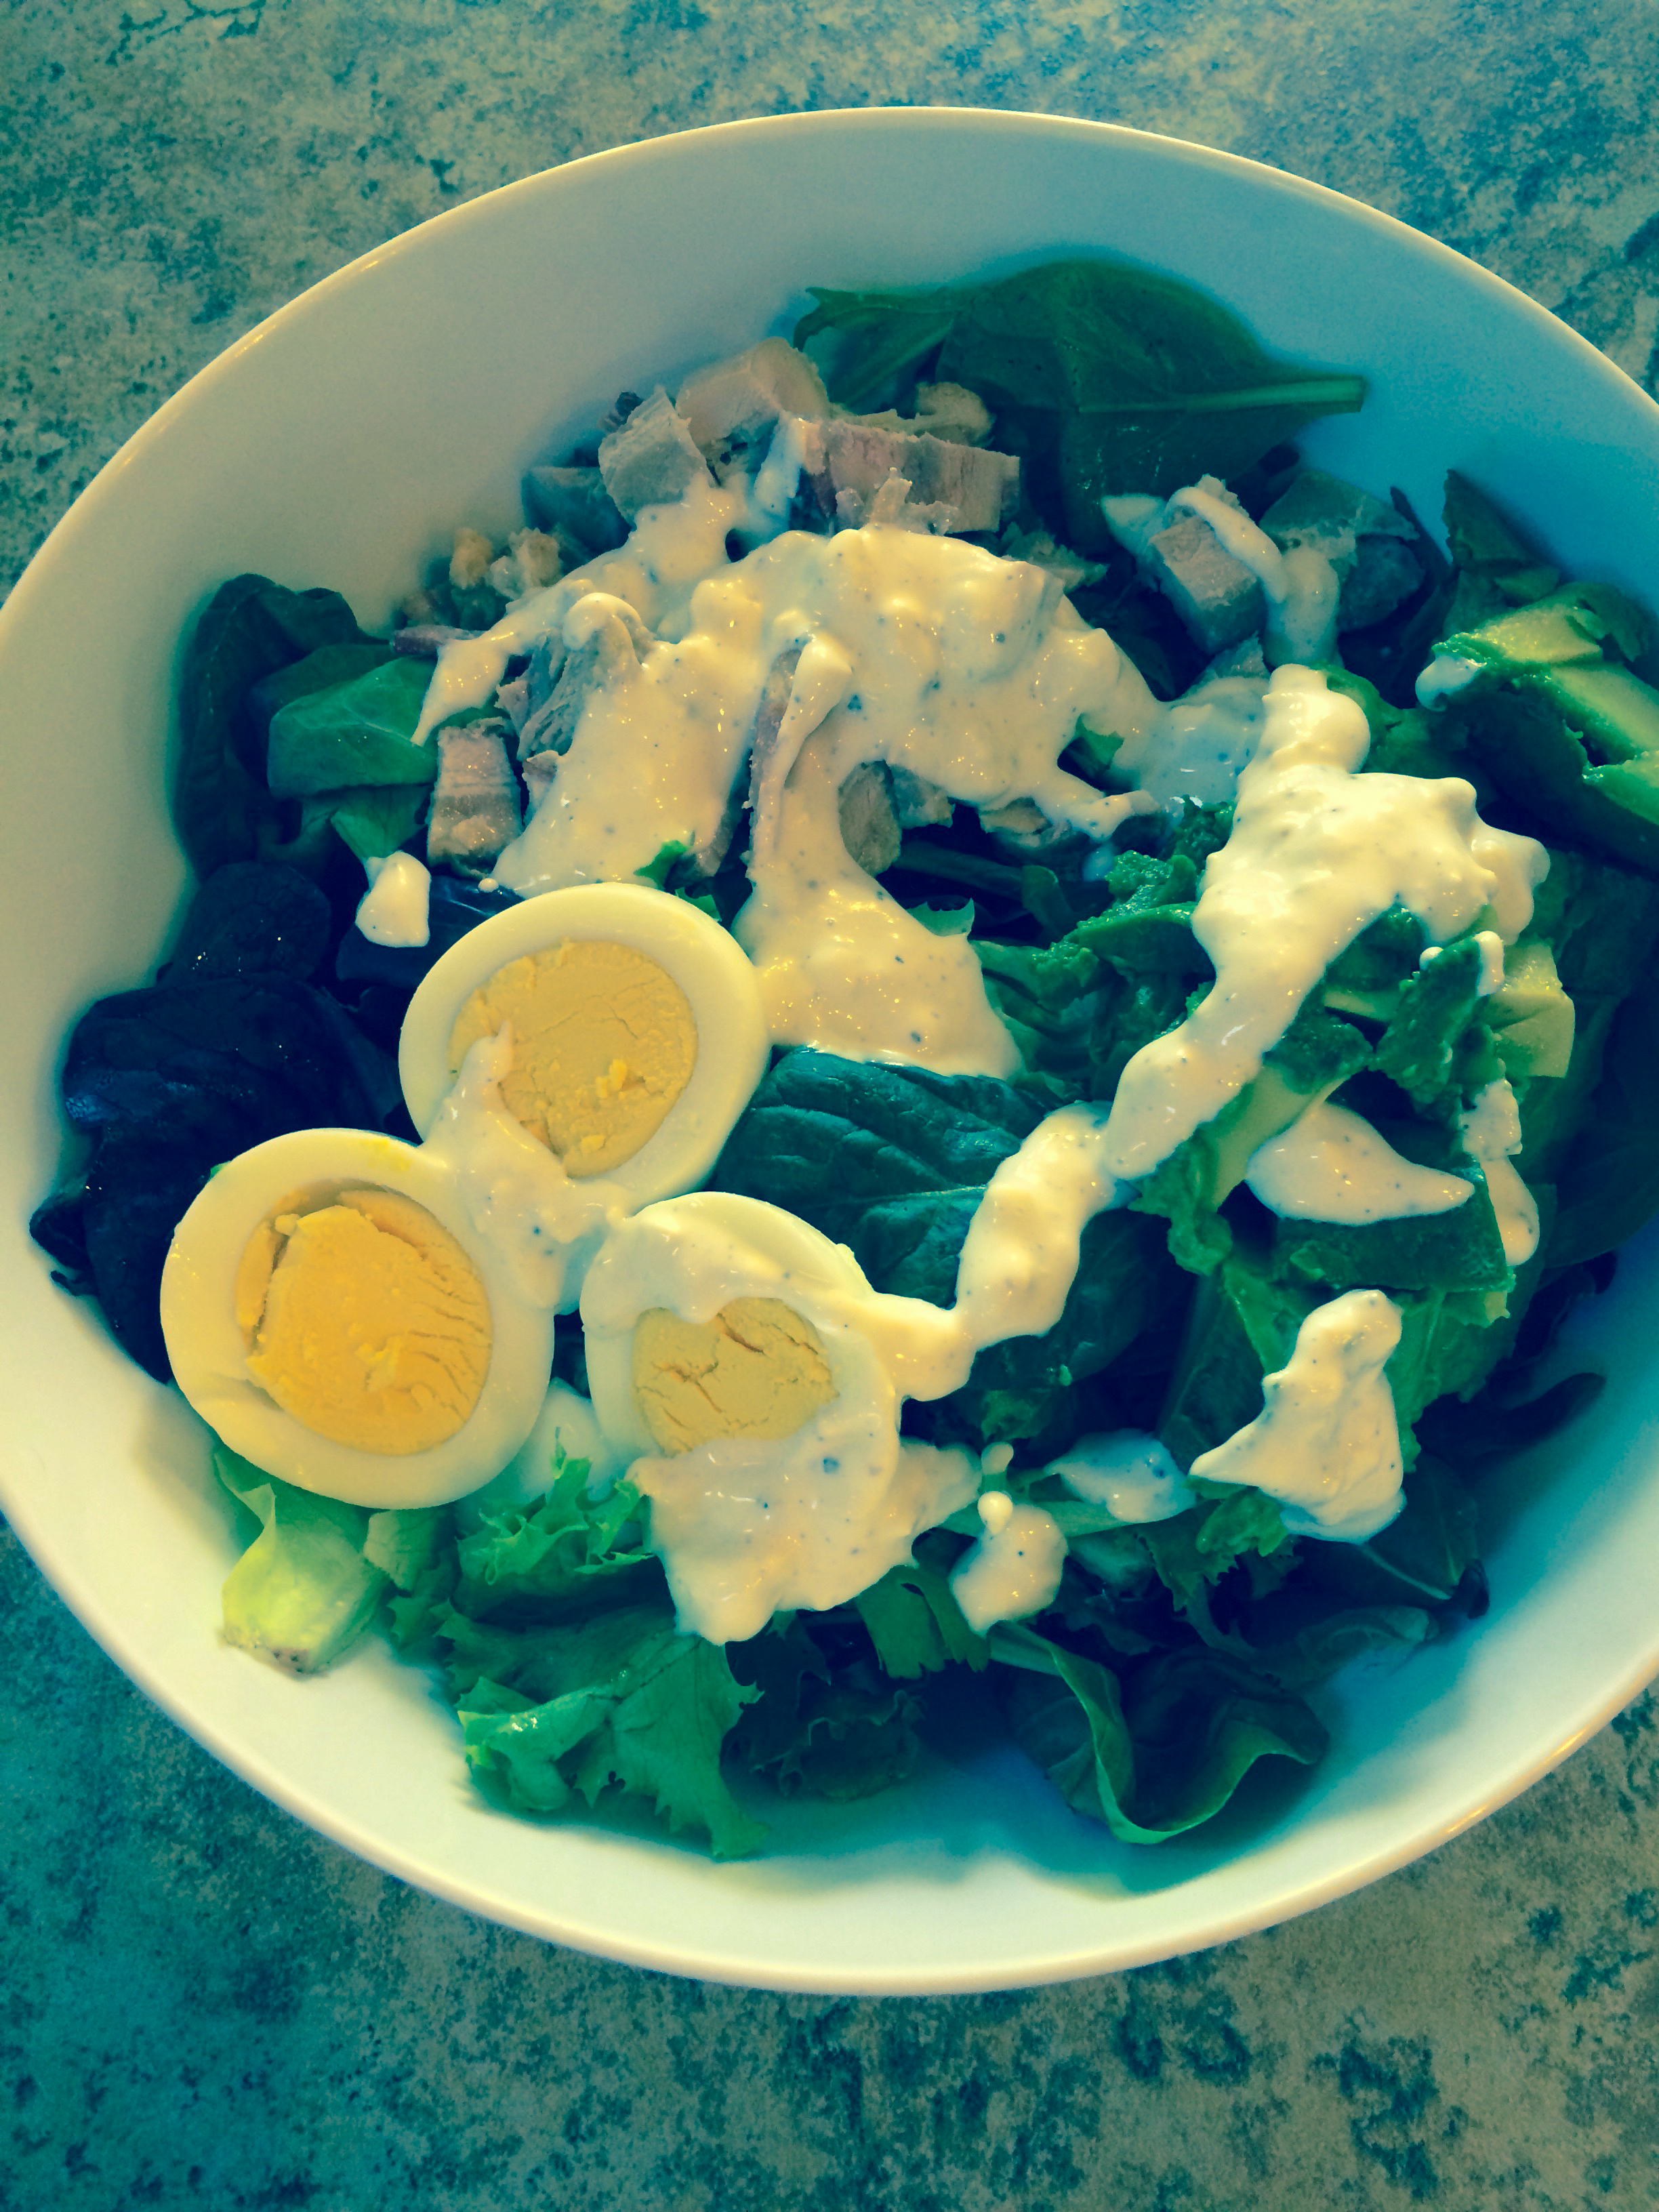
I think you guys know how much I love a big salad for dinner.  One of my favorites is this Cobb Salad with Homemade Bleu Cheese Dressing, because it’s got so many different components.  So satisfying!

Of course you can use store-bought dressing, but I decided to make my own.  You can really control how salty, how creamy, how peppery it is when you make it yourself – plus there are no binders, stabilizers, thickeners, et cetera like there are in bottled dressing.  (How else do you think they make that stuff shelf-stable?)  This is a basic recipe; feel free to jazz it up with a little lemon juice, hot sauce, or Worcestershire sauce to take it to the next level.  You can also add more veggies to the salad or change up the protein.  Have at it!

Cobb Salad with Homemade Bleu Cheese Dressing

Ingredients (for 2 servings):

  • 1/2 cup crumbled bleu cheese or gorgonzola
  • 1/4 cup mayonnaise
  • 1/2 cup plain yogurt
  • 1/4 cup whole milk
  • lots of ground pepper
  • washed salad greens, any kind
  • 2 hardboiled eggs, sliced
  • 1 avocado, diced
  • 1 large chicken breast (or use two chicken thighs), cooked and diced
  • 2 (or more!) slices bacon, cooked crisp
  • sliced or cherry tomatoes (would be great, but I don’t like raw tomatoes)

Directions:

  1. In a mixing bowl, stir together the bleu cheese, mayo, yogurt, and milk.  Grind in lots of black pepper.  Let chill in the fridge until you are ready to eat.  (Do it a day before and get an even better-tasting dressing!)
  2. In two large salad bowls, divide the washed salad greens.  Into each bowl, add a sliced egg, half of the avocado, the diced chicken, and some bacon crumbles.  Drizzle with dressing and serve.

Explore, experiment, enjoy! — Dana


To view even more of Dana’s unique recipe, you can visit her at Frugal Girlmet

Lunch for One: Baked Potato with Broccoli and Cheese

Broccoli Cheese Potato

There are many reasons you’d want to have a stash of “table for one” recipes:  You could be a stay-at-home mom (or work-from-home mom, like me) and you don’t want hot dogs or buttered noodles or whatever it is your toddler will deign to consume this week; it could be you live alone and don’t need to make a recipe that serves 6; or it could be a case where the other people around you want something else, and you need a dish you can whip up quickly just for you.   Whatever the case, this Baked Potato with Broccoli and Cheese feeds one person perfectly!

I cooked both the potato and the broccoli in the microwave.  You could use leftover baked potatoes; you could also use frozen broccoli instead of fresh.  The important thing is the cheese sauce!  No Velveeta here – just regular ingredients you have around your house come together in 4 minutes for a creamy, healthy sauce.  I had a little Boursin cheese leftover – about an ounce – or you could use goat cheese or even cream cheese if you don’t have Boursin.  If you have none of those and are just using grated cheese, add about a quarter cup more cheese, plus a hefty shake of garlic salt or garlic powder.

Lunch for One:  Baked Potato with Broccoli and Cheese

Ingredients:

  • 1 potato (any kind – I like Yukon Gold)
  • 1 small head of broccoli (or use about 8 ounces frozen broccoli)
  • 2 tablespoon butter
  • 1 tablespoon flour
  • 1/2 cup milk
  • 1/2 cup shredded cheese
  • 1 ounce Boursin or goat cheese (or use cream cheese, plus garlic powder, salt and pepper)

Directions:

  1. Chop the broccoli into smallish pieces, and microwave until steamed.  Not too crisp, but definitely not mushy.  Set aside.
  2. Microwave the potato.  I poked holes in the potato with a fork, wrapped it in a wet dishcloth, and microwaved until soft and pliable.  Set aside.
  3. In a pan, melt the butter and add the flour over medium-low heat.  Stir together (this is a roux) for about 2 minutes.
  4. Add the milk and stir until it blends into the sauce and starts to thicken.  Add the cheeses (and spices if using) and stir until hot and melted.
  5. Stir the broccoli into the cheese sauce.  Split the potato in half and smother with broccoli and cheese.

Explore, experiment, enjoy! — Dana


To view even more of Dana’s unique recipe, you can visit her at Frugal Girlmet!

Italian Vegetable Cheese Soup

Italian Vegetable Cheese Soup


I remember my Mom made a version of this dish probably 25 years ago, and it was FANTASTIC.  It was one of those things that was so rich and luxurious that the memory stayed with me for a quarter century!  I asked my sister, who is now in possession of my mother’s recipe box, to find the recipe, but to no avail.  After some hunting online, I think I found something close.  As is my modus operandi, I tweaked it and made it my own, and now I’m sharing with you:  Italian Vegetable Cheese Soup!

It’s a very simple recipe, and of course, I always encourage you to make it how you and your family will like it best.  Feel free to add more vegetables to the soup.  This recipe is pretty basic, but please keep the zucchini, lots of onions and garlic, and the garbanzo beans.  I guess you could sub in another bean – Great Northerns would work – but I like the firm texture of dried garbanzos that have been cooked just to al dente.  Do NOT skip the wine in this recipe.  You only need half a cup, but it adds so much flavor.  As for the cheese, I used a combination of cream cheese, goat cheese, and a very sharp white cheddar.  You use what you like – maybe some Asiago would be nice, and Fontina would definitely be delicious.

This is not diet food, but a small bowl will fill you up, so it’s okay!  Eat this for lunch with a green salad and enjoy!

Italian Vegetable Cheese Soup

Ingredients:

  • 1/2 pound dried garbanzo beans (or use one can of garbanzos)
  • 2 onions, diced
  • 1/2 stick butter
  • 6 cloves garlic, minced
  • 2 zucchini, sliced into half-moons
  • 1 can crushed or diced tomatoes (I used fire-roasted with peppers, and it added a welcome spicy kick!)
  • 1 teaspoon dried Italian herbs (or use a combo of dried oregano and basil)
  • 1/2 cup white wine
  • 1/2 cup whole milk
  • 4 ounces cream cheese
  • 1 ounce goat cheese (or more!)
  • 2 ounces sharp cheddar or other cheese (parmesan, mozzarella, fontina, gouda, asiago…)

Directions:

  1. If you are using dried garbanzos, pour them into a pot, cover with a  few inches of water, and simmer for about an hour.  If you are using canned, skip to step 2.
  2. In a large pot, cook the onions in the butter for about five minutes until soft.  Add the zucchini and garlic and cook for another 3 minutes.  Drain the water from the beans and add to the vegetables.
  3. Add in the can of tomatoes and the dried Italian herbs.  Add the wine, cover the pot and let simmer for 5 minutes.
  4. Add the milk and cheeses. Stir to combine and cover, over medium low heat.  Let simmer for five minutes, then stir again.  Don’t let the cheese stick to the bottom of the soup!
  5. I like it thick, but you can thin this out more with either milk or wine.  Serve hot!

Explore, experiment, enjoy! — Dana


To view even more of Dana’s unique recipes, you can visit her at Frugal Girlmet!


Zucchini Lasagna

Zucchini Lasagna Resize


This recipe came about, as many do, in my house:  I start with an ingredient and brainstorm what in the world I’m going to do with it.  I had a bag of summer squash from the farmer’s market – it was so inexpensive, I couldn’t pass it up.  But aside from making zucchini bread, I couldn’t think of how to use it.  That was when I stumbled upon a recipe for Homemade Ricotta, and it came to me:  Zucchini Lasagna!

The zucchini stands in for traditional noodles in this recipe, so if you are following a low-carb diet, or if you are avoiding gluten, you’re in luck!  If you are making ricotta, drain and squeeze it to keep any extra liquid out of the casserole.  Nobody likes a soggy lasagna!  Feel free to saute and add other veggies or herbs to the lasagna, too – baby spinach, bell peppers, black olives, or fresh basil would all be lovely!

This is a small casserole, so we ate it with a big salad for dinner.  You can easily double or quadruple this recipe to serve more people.  Hope you like it!

Zucchini Lasagna

Ingredients:

  • 1 or 2 zucchinis or other summer squash, about 3/4 pound
  • cooking spray
  • 1/2 pound sausage
  • 1/2 small onion
  • 1 clove garlic
  • 1 can diced tomatoes, drained (I used fire-roasted canned tomatoes)
  • 1/2 teaspoon Italian herbs, or oregano
  • salt and pepper
  • 1 cup Homemade Ricotta, or store-bought
  • 1 cup shredded mozzarella cheese

Directions:

  1. Preheat oven to 400*F.  Line a baking sheet with aluminum foil and spray lightly with cooking spray.  Chop the zucchini into thin coins – about 1/8″-thick.  Lay out on the baking sheet and bake for about 8 minutes.  They don’t need to be cooked through at all – you just want to dry them out a little bit.  Remember, no one likes a soggy lasagna!
  2. While the zucchini is drying out, dice the onion, and mince the clove of garlic.  In a large pan, brown the sausage with the onion and garlic.  Drain any fat that accumulates.  Add in the drained tomatoes, oregano, and salt and pepper, and heat through.
  3. In a casserole dish, spray a little cooking spray so nothing sticks.  Layer half the zucchini slices to cover the bottom of the casserole dish.  Spread half the ricotta over the zucchini, then spread half the sausage mixture over the ricotta.  Repeat with the rest of the zucchini, then ricotta, then sausage.  Cover with the shredded mozzarella.
  4. Cover with a lid or aluminum foil, and bake for 20 minutes.  Remove lid and bake for another ten minutes, until the cheese is golden and melty.

Explore, experiment, enjoy! — Dana


To view even more of Dana’s unique recipe, you can visit her at Frugal Girlmet!

Roasted Plums with Homemade Ricotta


baked plums w ricotta

Last week I posted a recipe for Homemade Ricotta.  Did you try it at your house?  Did it totally blow your mind?  Now that you know how to be a Blessed Cheese Maker, here’s an idea for what to do with your ricotta:  Roasted Plums with Homemade Ricotta!

Plums will only be around for a few more weeks before autumn rolls in and we have to say goodbye to summer fruit.  You can use any other stone fruit here – peaches or nectarines would be just as yummy.  You can also play around with the toasted nuts you use.  I had almonds on hand, but you can try pistachios, hazelnuts, or even walnuts.  My older daughter is allergic to all nuts, so she goes without, and you can too, if nuts aren’t your thing.  Add a shake of cinnamon and a drizzle of honey and you have a nutritious, not-t00-sweet dessert!


baked plums_

Roasted Plums with Homemade Ricotta

(serves 4)

Ingredients:

  • 4 plums
  • 1 teaspoon pumpkin pie spice or cinnamon
  • 2 teaspoons honey, plus more for serving
  • 1 cup Homemade Ricotta (or use store-bought)
  • 1/4 cup crushed almonds, or other nuts, or cookies (amaretti would be super!)

Directions:

  1. Preheat oven to 400*F.  Wash the plums, then cut in half and remove the stones.  Place all plum halves, cut-side up, on a foil-lined baking sheet.  Sprinkle with pumpkin pie spice or cinnamon, and drizzle with 2 teaspoons honey.  Bake for 20 minutes.
  2. Remove from oven.  When cool enough to handle, you can slip off the skins if you want.  I like the extra fiber they add, so they stay on at my house.  To serve:  Place 1/4 cup ricotta in a dish, along with two plum halves.  Top with crushed nuts and a shake of cinnamon.  Drizzle with a little honey.


Explore, experiment, enjoy! — Dana


To view even more of Dana’s unique recipe, you can visit her at Frugal Girlmet!

Homemade Ricotta

Homemade Ricotta Resized

When I was in high school, 25 years ago, I thought the funniest movies in the world were Monty Python movies.  Yes, I was one of those nerds who could rattle off quotes from all the movies (in the intervening years, my skills have gotten rusty, but I still have a few).  One of my favorite scenes in the movie “The Life of Brian” was when a group of people are listening to the Sermon on the Mount.  Unfortunately, they are way, way at the back of the crowd and can’t hear well. When Jesus says, “Blessed are the peacemakers,” the crowd in back misinterpret it as “Blessed are the cheese makers.”  So when I came across this recipe for Homemade Ricotta, I immediately started giggling.  I want to be a blessed cheese maker, and you can be too!

You already have the ingredients you need.  Use whole milk, or else the ricotta won’t set up.  One lemon, a little salt, and a tablespoon of white vinegar – what could be easier?  You’ll also need a thermometer.  I have a candy thermometer that clips to the side of the pan, but you could use a meat thermometer, or one of those fancy infrared ones too!  The only equipment you might need to buy is cheesecloth.  I found it at my regular grocery store, and have used it before in making Homemade Coconut Milk.

Ricotta is one of those amazing ingredients that can be used in either sweet or savory recipes.  In the following two weeks, I’ll have recipes that use fresh ricotta in a zucchini “lasagna” (with no noodles!), and in a dessert with fresh summer fruit.  Until then, you can serve fresh ricotta as an appetizer, spread on thin slices of bread, with either cracked pepper and minced herbs, or with a light drizzle of honey and crushed walnuts.  Ready?  Let’s make some cheese!

Homemade Ricotta  (Makes one cup of ricotta)

Ingredients:

  • 4 cups whole milk
  • 1/2 teaspoon salt
  • 1 tablespoon lemon juice
  • 1 tablespoon white vinegar (you may need more, but I didn’t)

Directions:

  1. In a pot, heat milk and salt over medium-high heat.  Stir occasionally to make sure it’s not burning on the bottom.
  2. Prepare your utensils:  Line a mesh sieve with a double-layer of cheesecloth.  If you want to save the whey, place the sieve over a large bowl.  (I saved my whey – next week I’ll show you how I used it.)
  3. When the temperature of the milk reaches 185*F, turn off the heat and pour in the lemon juice and vinegar.  Stir gently.  You just made what Little Bo Peep was eating – curds and whey!  Let it sit for about ten minutes, and stir again.  If you see any milk in your pot that hasn’t curdled, you can add another teaspoon of vinegar, stir, and let sit another ten minutes.  Mine didn’t need any extra and separated easily.
  4. Pour the curds and whey into the cheesecloth-lined sieve.  The whey, the yellowish liquid, will end up in the bowl.  Let cool and refrigerate for later use.  Let the cheese curds, aka your lovely homemade ricotta, drain in the cheesecloth.  If you want it soft and moist, let it drain for about ten minutes.  This is good for spreading on bread, or in dessert applications.  I let mine drain for much longer – about half an hour – because I was baking it in a “lasagna” and didn’t want extra water in the casserole.
  5. This keeps for about 5 days, refrigerated.  I challenge you to make it last more than a few hours!

Explore, experiment, enjoy! — Dana


To view even more of Dana’s unique recipe, you can visit her at Frugal Girlmet!

Homemade Coconut Flour, and Homemade Cheezits


Homemade Cheezits


So, you fell in love with coconut milk too, right?  It’s your end-all, be-all, new favorite thing? That’s okay if it’s not.  But if you have made it, or plan to, you will be left with a cheesecloth-wrapped ball of pulp.  Now, someone who didn’t know better might just chuck that in the trash.  But not us!  We are going to use the pulp to make Homemade Coconut Flour and, with that flour, we’re going to make Homemade Cheezits!

First, the tools you will need:  You’ll need a baking sheet, parchment paper, and a food processor or blender.  If you have a Silpat silicone baking liner, now is the time to use it.  And you’re in luck:  the ingredients are already in your house, right now!  Once you make (or purchase) coconut flour, you can whip these crackers up in minutes.  The good news is that they have no preservatives, artificial colors or flavors, or any unpronounceable chemicals – hooray!  They come out of the oven the perfect blend of crispy and  chewy, ready for snacking.  The bad news is, because they lack any of that lab-created stuff, they don’t stay crispy.  But that is easily remedied by a quick pass through a toaster oven.  Just a few minutes is enough to make these crackers crunchy again.

Ready to make some homemade, preservative-free snacks your family will love?  Let’s go!

Homemade Coconut Flour

Ingredients:

  • Pulp from 2 batches of coconut milk

Directions:

  1. Preheat oven to 250 F.  Cover a large baking sheet with parchment paper or a Silpat mat.  Spread out the coconut pulp, breaking up any lumps.  Toast the pulp until completely dry and powdery.  You really need to make sure all the moisture is removed.  This can take anywhere from one to two hours.  Stir occasionally to make sure the lumps are broken up and there are no hot-spots, and don’t let it burn!
  2. When the pulp is very dry, let it cool in the oven for another hour or so.  Transfer to a blender or food processor and blend for 5 minutes.  Depending on how powerful your blender is, you can get it pretty fine.  My food processor did a decent job, but the flour was not silky fine in texture.  That’s okay!  Get it as powdery in texture as your tools allow.


Homemade Coconut Flour


Homemade Cheezits

Ingredients:

  • 1/2 cup coconut flour
  • 1 egg
  • 2 tablespoons butter, softened
  • pinch salt
  • 1 1/2 cups shredded cheese (I used cheddar)

Directions:

  1. Preheat the oven to 400F.  In a food processor, blend all the ingredients together.  You will end up with a moist ball of dough.
  2. Line a baking sheet with parchment paper or Silpat liner.  Plop the ball of dough down on the liner, and cover with a piece of parchment paper.  Roll out the dough very thinly, to about 1/8″ thickness.  Try to make it even thickness all the way across – you can see my edges were a little thinner, and they got crispier than in the middle.  That’s fine, but you don’t want a huge variation in thickness.  Remove top sheet of parchment paper and bake for 8-10 minutes until starting to color.
  3. Remove from oven and score with a sharp knife.  You don’t need to go all the way through, because you don’t want to cut your liner or parchment paper.  Bake again for another 8-10 minutes until golden brown and starting to get crispy at the edges.
  4. When it’s cool enough to touch, cut all the way through the crackers, or just use your hands to break them at the perforations.  When cool, store crackers in sealed container.  To crisp, put them on a baking sheet in the toaster oven or regular oven for five minutes.

I think next time I make these, I’ll add a little paprika or garlic powder.  New flavor combinations are exciting!  My girls helped me make these, so here is a photo of them enjoying their handiwork:


B+L Homemade Cheezits


Explore, experiment, enjoy! — Dana


To view even more of Dana’s unique recipes, you can visit her at Frugal Girlmet!