How much of a recipe purist are you? When you make a recipe for the first time, do you follow the directions to the letter, or do you start right in with the alterations? When I make something for the first time, I like to be faithful to the source. When I eat the finished product is when I start making changes in my mind for next time—Needs more salt. Add cilantro and green onions. Use more yogurt and less mayo…. So the first time I made Tyler Florence’s recipe for Cornbread Stuffing, I really liked it…but I knew I wanted to change some things and make it my own. So here it is, just in time for your holiday parties: Cornbread Stuffing with Sage and Sausage!
This is a simple recipe that I make in two steps. First is the cornbread, and second are the rest of the ingredients. I even make the cornbread a day or two ahead—don’t worry if it’s a little stale, because you’ll be rehydrating it and baking it again. Use any kind of sausage you like. I make this with a one-pound log of plain old breakfast sausage, but you can try something spicier, smokier, or even get crazy and use chorizo! The other thing you will want is fresh sage. Use as much as you like – I use at least 3 tablespoons of minced fresh sage, but I think you could get crazy and use up to a quarter cup of it, if you really wanted it herb-y. If you buy a bunch of sage, use the rest in roast turkey or chicken recipes – they’re a natural match. (And I just saw this recipe that uses sage that looks amazing! Replace the dried sage in the recipe for double the amount of fresh sage.) For the cornbread, I always use Jiffy cornbread mix, because that’s what I grew up eating. If you have a brand of mix you like better, or you make cornbread from scratch, try that. The measurements might be a little different, but this recipe is really forgiving. Just adjust your wet ingredients to make sure you get the right finished consistency.
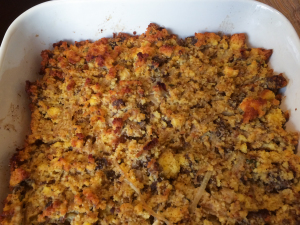
Cornbread Stuffing with Sage and Sausage
Ingredients:
- 4 boxes of Jiffy cornbread mix (or make your own cornbread)
- 1 pound sausage, any kind
- 3 onions, sliced into fine strings
- 3 tablespoons (or more!) of minced fresh sage
- 2 cups chicken or turkey stock
- 1 cup milk
- 4 eggs
- salt and pepper
- butter to grease the pans (or use a non-stick spray of your choice)
Directions:
- Bake the 4 boxes of cornbread mix according to the directions on the box. I didn’t bother with muffin tins and just made the whole batch in a 9″x13″ cake pan. Let cool. You can make the cornbread a day or two in advance.
- In a large pot, cook the sausage. If you are using links, slice into small half-moons. If you are using bulk sausage, cook and break it up with a spoon so you have little chunks. When cooked, remove from the pan to the largest mixing bowl you have. Do not drain the pan!
- While the sausage is cooking, cut the onions into skinny strings. Cook the onions in the fat rendered from the sausage (or add more butter or olive oil if there isn’t a lot in the pan.) Cook for about 15 minutes on medium, stirring so they don’t burn, until they are soft and caramel-colored. Remove the onions to the big mixing bowl.
- Using your hands, crumble the cornbread into the bowl with the onions and sausage. Add the minced sage and mix.
- In a smaller bowl, mix together the stock, milk, and eggs. Pour it over the cornbread mixture and fold to combine. Season the whole thing with salt and pepper.
- Turn the cornbread out into a large greased casserole dish and bake uncovered for about 25 minutes at 375*F. You’ll want to let it get a little crusty and brown on top.
Explore, experiment, enjoy! — Dana
To view even more of Dana’s unique recipe, you can visit her at Frugal Girlmet!