Ok, I will admit it…I DO NOT KNOW HOW TO SEW that good at all!!! But by golly, I’ve always wanted to learn! I only know how to sew a baby blanket, and that’s as good as it gets!! LOL So today, I ran across a pattern that looked so amazingly simple even I could do it!! And I did! 🙂
Now for you who are awesome seamstresses, you may think “Dinner Napkins/Placemats? Piece of cake!!” But for me, sewing does not come easily! It did for my grandmother and mother, but for some reason that creative gene has hidden itself in me, and is just now beginning to cause a stir in my heart; which I LOVE because I’ve always wanted to be creative like the two women in my life that I loved so very much! Their handiwork was simply amazing, and I’ve asked God, sort of secretly, in my heart for years to bless me with the ability to do some of the things that they did.
So when I say that is BIG for me to show my handiwork to you, it truly IS! I’m like a little girl at Christmastime just waiting for you to open my gift to you, and I can’t wait to see your expression when you see it! Yea, I know, I seem to get a little too excited at times!! My husband reminds me of that often! LOL
So without further adieu, here are the instructions to make your own Cloth Dinner Napkins/Placemats.
How to Make Cloth Dinner Napkins/Placemats
Items Needed:
Materials (to make 6 cloth napkins)
- 12 fat quarters of quilting cotton (a fat quarter is an 18″ x 22″ piece of fabric found in most fabric stores for as little as $1)
- scissors
- ruler
- chopstick
- sewing machine
- coordinating thread
- iron
Directions:
Step 1
The directions I found instructed me to cut each fat quarter into a square measuring 18 inches x 18 inches. Choose two fabrics that coordinate well with each other (I used just one piece of fabric) and place the two pieces of fabric right sides together. (For placemats as seen below, you will cut your fabric 11″ x 18″, and then follow all of the steps below.)
Step 2
Sew the squares together along the raw edges using a straight stitch and a 1/4 inch seam allowance, backstitch both at the beginning and at the end of the stitch to secure it. Make sure to leave a 3 inch opening along one side for turning the napkin right side out.
Step 3
Clip each corner to help give the napkin a nice pointed corner once turned right side out. Make sure not to clip the seam you just made!
Step 4
Turn the napkin right side out. Take a chopstick or other pointy-edged object and use it to help push out each corner to a nice point. This is really a must for tight corners. I used my fingers because I didn’t have any pointy object, and the corners turned out okay, but they could be better! My first time…we’ll get by!! 🙂
Step 5
Press the napkin with an iron, making sure to turn in the opening a 1/4 inch.
Step 6
Topstitch around the napkin by sewing a straight stitch and using an 1/8 inch seam allowance, backstitch at both the beginning and end of the stitch to secure it. Topstitching will give the napkin a nice flat decorative finish as well as closing up the opening used for turning the cloth napkin right side out.
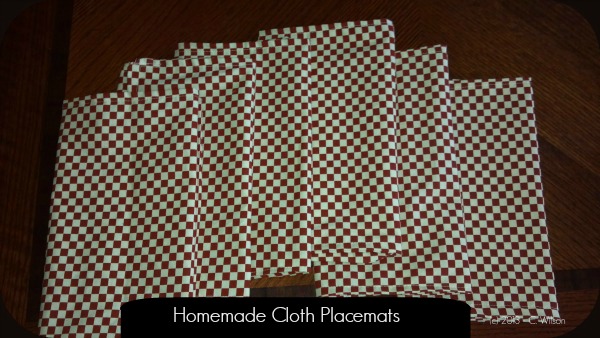
The total time it took me to make the six cloth placemats pictured below, including the cutting time, was a total of maybe an hour and a half! That made me even more excited because I began to think of some awesome Christmas gifts I can give to my kids this year!!
I hope you will give this simple pattern a try, and let me know how you did! 🙂
Enjoy your beautiful Cloth Dinner Napkins/Placemats!!


i love using cloth napkins! i will try this method for making some! thanks, christi <3
Hope you like them!!