March 28, 2024

At Home with GCH: Broccoli Bacon Salad


Broccoli Bacon Salad

Bacon!  Did that get your attention?  (My husband’s ears always perk up when he hears that word.)  This salad is a family favorite.  I love vegetables of every kind, but it’s nice to take a break from lettuce-based salads.  You probably have everything you need for this salad at home already.  If not, pick up some broccoli and let’s get to it!

Broccoli Bacon Salad

Ingredients:

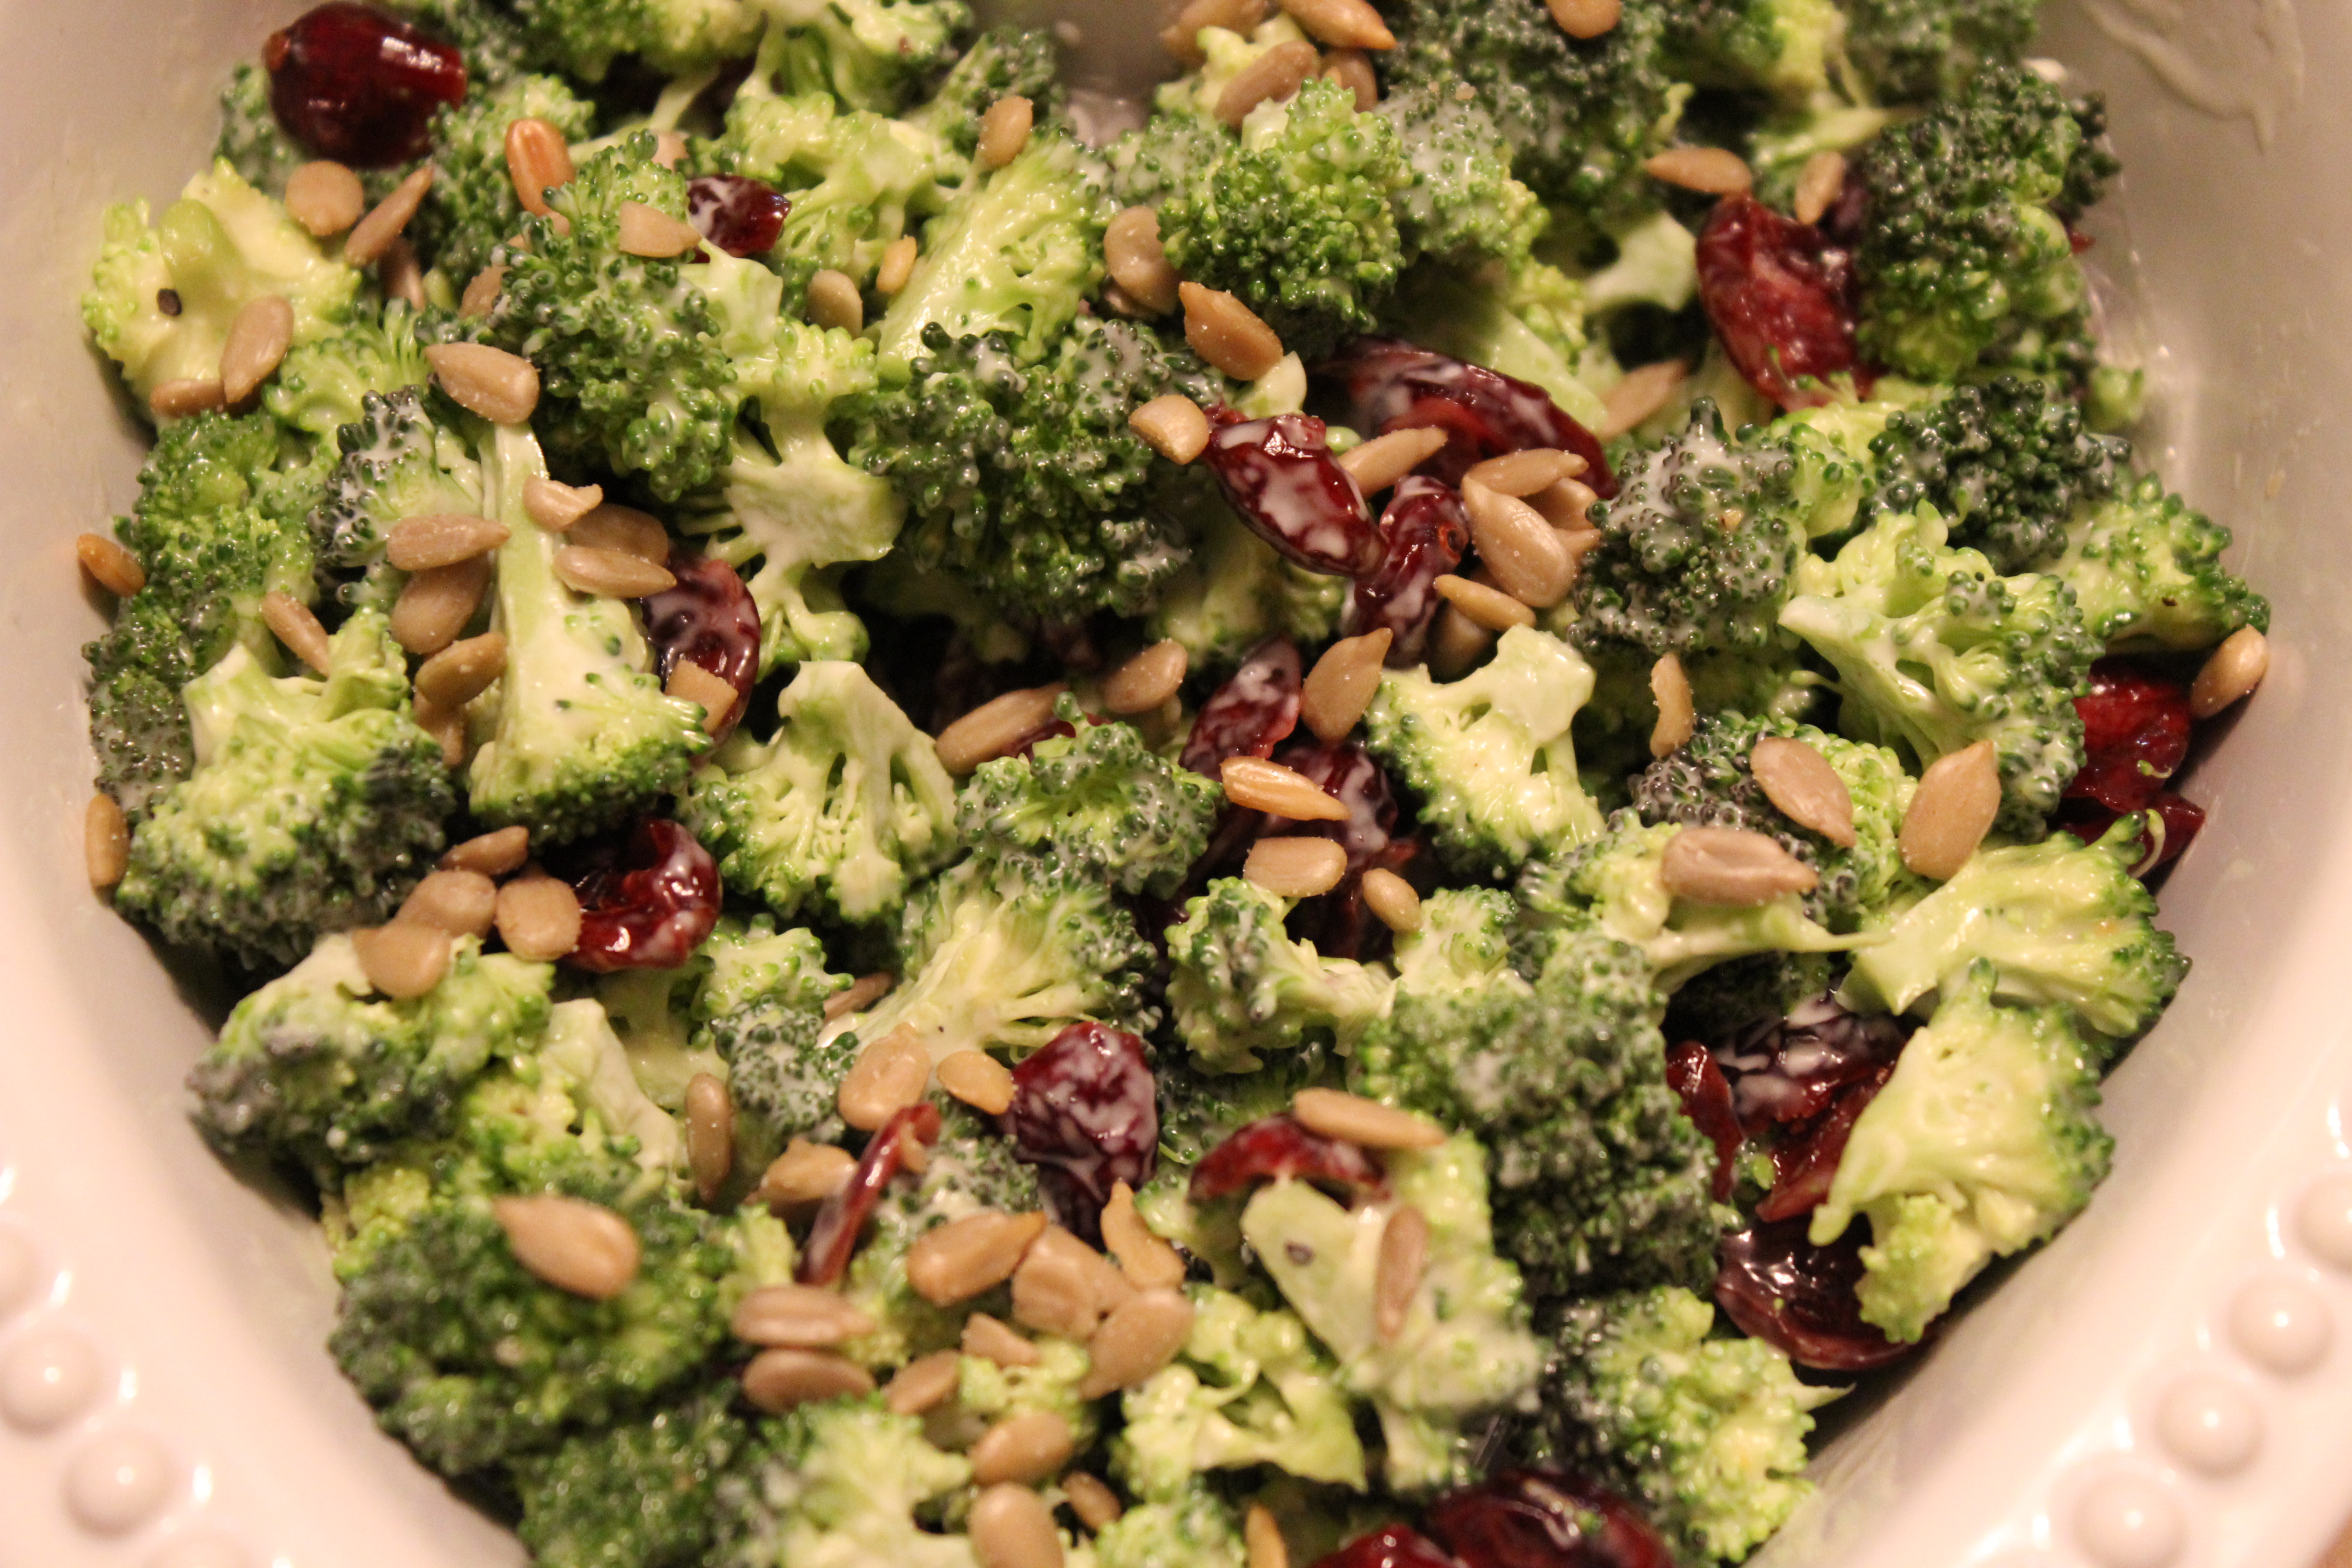
  • one pound small broccoli florets, about 7 cups
  • 1/4 cup minced red onion
  • 1/4 cup sunflower seeds
  • 1/4 cup raisins
  • 4 strips bacon
  • 3/4 cup mayonnaise
  • 1 teaspoon lemon juice or apple cider vinegar
  • 1 teaspoon sugar, honey, or other sweetener of choice
  • salt and pepper

Directions:

  1. In a large bowl, gently toss together the broccoli, onion, sunflower seeds, and raisins.
  2. Cook the bacon until done – I like it crunchy rather than chewy.  Drain and dice.  Add to the bowl and combine.
  3. Mix together the mayonnaise, lemon juice, sugar, and salt and pepper.  Pour over the broccoli mix and toss to combine.  Taste for seasoning – I usually add a little more lemon juice over the top.  Chill for an hour before serving.That’s it!  This salad is nice the next day, too, since the broccoli softens up a bit.


Explore, experiment, enjoy! — Dana


To view even more of Dana’s unique recipes, you can visit her at Frugal Girlmet!

At Home with GCH: Spring Salad Side Dishes

Here on our At Home with GCH blog, Mondays are always focused on healthy but oh-so-yummy! recipes.  This month we are spotlighting vegetarian dishes.  Each Monday will actually be a Meatless Monday!

So, I was talking with my dad about what to make for our family’s get-together on Easter Sunday.  Now, something you should know about us—every event is a food event. 😉  Is your family like that, too?  My contributions this year will be for dinnertime.  By request, I have been relegated the side dishes.  Two of them will be vegetarian salads: Broccoli-Craisin Salad and New Old-Fashioned Carrot Slaw.  Both fit into our healthy but-oh-so-yummy! category nicely!  Yes, there is a good amount of mayonnaise in the broccoli salad, but I think that you will find it balanced out by the rest of the healthy ingredients.  Plus this recipe provides 6-8 servings.  And in the carrot slaw, fat-free greek yogurt is substituted for the majority of the mayo that traditional ‘old-fashioned’ carrot slaw usually contains.  Enjoy!

Broccoli-Craisin SaladIMG_0196

dressing:
3/4 cup good mayonnaise
3 tablespoons honey
3 tablespoons white balsamic vinegar (red wine vinegar also yummy)
freshly ground pepper, to taste

salad:
3 heads broccoli crowns, cut up into small florets – no stems
1/2 cup finely chopped red onion
1/2 cup sunflower kernels/seeds
1 cup craisins (dried cranberries)

Combine dressing ingredients in a small bowl.  Mix together ‘til emulsified;  set aside.

In a salad bowl, toss all salad ingredients ‘til well distributed. Pour dressing over and stir ‘til everything is nicely coated.  Put completed salad into a storage container or bag and refrigerate for a minimum of 2 hours to meld the flavors together (overnight is optimum).

Notes:
The smaller you chop the florets, the nicer this salad will be.  Takes a little time…but so worth it!  I use less mayo than most recipes call for; feel free to add more if you desire. ALSO, for your meat-loving family members, you can add 2-3 slices of crumbled, crispy, cooked bacon; makes for a nice addition!

New Old-Fashioned Carrot SlawIMG_0200

dressing:
1 container lemon greek yogurt
2 teaspoons freshly squeezed lemon juice
2 tablespoons mayonnaise
freshly ground black pepper, to taste

salad:
2 cups julienned carrots *
1/2 cup fresh pineapple, cut in 1/2″ cubes
1/4 cup sliced or slivered almonds
1/4 cup golden raisins

Combine dressing ingredients together in a small bowl; set aside.

Mix all the salad ingredients together in a large bowl, and then pour on the dressing; mix together well.  Place in a storage container or bag; refrigerate for at least 2 hours or overnight so that the flavors can blend together.

Notes:
I buy bagged ‘matchstick’ carrots; usually available with the baby carrots in the produce section of your grocery store.

————————————————-

God loves you! (Don’t ever forget that!)

coleen

_________________________________

If you would like to send a personal message to Coleen concerning this series, you may email her at: Coleen@girlfriendscoffeehour.com, or leave a comment below.

At Home with GCH: Meatless Mondays – Broccoli & Garlic White Pizza

Here on our At Home with GCH blog, Mondays are always focused on healthy but oh-so-yummy! recipes.  This month we are spotlighting vegetarian dishes.  Each Monday will actually be a Meatless Monday!

One of my favorite veggies is BROCCOLI!  What is your favorite way of preparing broccoli?  Mine is simply steaming it!  A pinch of salt and a grind or two of pepper…yummy!  I have been known to forsake utensils and use my fingers to eat it, too. IMG_0178

This week’s recipe is for Broccoli-Garlic White Pizza…ever had it?  Oh, I do l-o-v-e  a yummy, tomato-y, cheesy traditional pizza—but—equally love pizza of this genre!  This recipe fits our healthy but oh so yummy! category because 1) it has lots of healthy, no fat, few caloried, full of nutrition broccoli, 2) there is a tiny bit of olive oil on it, and 3) the calories contributed by the cheeses total approximately 850 for the whole pie!  Now divide that by the 3-4 servings this pizza offers, and you’ve got healthy…check!  Yummy…check!

Also you will see that I don’t make my own dough…I stop by my favorite pizza shop and purchase 1 pound of their dough!  (I already know how good it is!)  And it only costs me…$1.  Here’s my only suggestion for baking your pizza: use a pizza stone.  They are relatively inexpensive ($8-15 range, I would say) and can be bought in just about any big box store or kitchen goods store.  Mine came from Pampered Chef.  If not using a pizza stone, you will need a round pizza pan, or a large enough baking sheet to handle the size of your crust.

OK!  Here we go!  Pizza Pizza!

Broccoli -Garlic White Pizza (serves 3-4)IMG_0174

1 (1#) package of pizza dough
2-3 tablespoons of flour to handle the dough
2-3 tablespoons of cornmeal
2 heads (no stems) of broccoli, chopped into florets (about 3 cups)
3+ tablespoons chopped garlic (I use the jarred variety)
15 ounce container of part-skim Ricotta cheese, let come to room temp
1+1/2 cup shredded cheese (Mozzarella, Provolone, Monterey jack—or a mixture)
3 tablespoons freshly grated Parmesan
1 tablespoon olive oil
salt, freshly ground pepper, to taste
Crushed red pepper flakes (optional)

Choose the pizza dough of your preference.  If making from scratch…you better get going! If  purchased from your local pizza shop, you are set to go!

If using a pizza stone, get it into the oven so that it can heat up!

Preheat the oven to 500.

Heat 2-3 cups water in a medium saucepan to boiling.  While the water is coming to a boil, fill a medium-sized mixing bowl with very cold water and a few ice cubes; set aside.  When the water in the saucepan comes to a boil, add the broccoli florets.  Cook for just 3-4 minutes, no longer; watch carefully. When the broccoli is ready, it will still be bright green and still crisp. It is better for it to be undercooked than overcooked. Remove from the heat and drain. Then immediately place the cooked broccoli into the ice water to stop the cooking process; then drain again. Blot the broccoli with a couple of paper towels. You don’t want to add wet broccoli onto your pizza crust!  Extra moisture = soggy crust!

When you are ready to shape the dough, put a couple of tablespoons of flour onto a large cutting board (or your scrupulously clean countertop). Coat the dough ball with flour all around. Flatten the ball into a disc. Then with your fingertips, work your way around the edges, stretching it all out as you go. You can also put your fist in the middle of the growing circle and raise it off of the board, letting the sides stretch down. Then work your fingers around the edge of the circle one more time.  I find it easier (safer) to keep my dough flat and just keep working it.*

When your crust is ready, sprinkle a little cornmeal onto a large cookie sheet.  You will use this to transfer the pizza onto the VERY HOT pizza stone.  Carefully slide the formed pizza crust onto the cookie sheet.

Spread the olive oil all over the pizza crust, even onto the rim.  Use just the 1 tablespoon; remember, extra moisture = soggy crust!

Add the ricotta onto the crust and using the back of a spoon, spread the ricotta evenly over the pizza. Then sprinkle the garlic all around.  Arrange the broccoli pieces over the surface evenly. Sprinkle with the Mozzarella and Parmesan. Season with salt and pepper.

Bake 10-15 minutes. Watch carefully. If the cheese starts to brown too quickly (before the crust has had a chance to brown), reduce the heat to 475 or so. When the cheese and the crust are just starting to brown, remove from the oven and let cool for 2 minutes. Then slice and serve immediately.

Another veggie topping we like on a white pizza is Caramelized Onions and Mushrooms.

Easy-peasy!IMG_0177

2 tablespoons olive oil
½ good sized onion, sliced thinly
6-7 medium to large Baby Bella mushrooms, cleaned and sliced

Place a medium-sized saute pan on medium heat; add olive oil. Add onions and mushrooms to pan, and cook until they are lightly caramelized, approximately 6-8 minutes.  Remove from heat; allow to cool slightly.

Then proceed with the above recipe adding the onion/mushroom mixture in place of the broccoli.  That’s all!

*There are lots of videos that you can watch to give you tons of tips and tricks how-to make a perfect pizza crust…check ‘em out!

————————————————-

God loves you!  ♥  (Don’t ever forget that!)

♥  coleen

_________________________________

If you would like to send a personal message to Coleen concerning this series,
you may email her at: Coleen@girlfriendscoffeehour.com, or leave a comment below.

GCH:What’s on Your Plate? – Roasted Winter Veggies & Broccoli Craisin Salad!

Thanksgiving week!  Oh boy…here we go!  Don’t you just love it?  I do.  My favorite foods on the table are always the side dishes.  So this week I am going to share two recipes.  Maybe one of them might even end up on your table this year!  Both of these recipes also fall into the healthy but oh-so-yummy category, too!

The first recipe is for Roasted Winter Veggies.  I love roasted veggies…the melange of colors, and textures, and flavors; the nicely caramelized bits; the few little pieces that hover just this side of burnt!  Making roasted veggies is a very forgiving recipe, too.  I have the veggies ready to go into the oven the moment the turkey comes out to rest and be carved.* There are a few basic ingredients; but then you can add and subtract to your heart’s content.

Ingredients:

1/3 cup olive oil

1 medium butternut squash, halved, seeded and peeled

1 large Vidalia onion, peeled

3 large Yukon Gold potatoes  (or 4-5 medium red potatoes), peeled

1 bag (12-16 ounces) carrot chips (or baby carrots)

1# brussel sprouts, trim end off and remove outer leaves (if large, cut in half)

1 small head of cauliflower, trimmed and cut into 1+1/2″ florets

12 ounce pkg Baby Bella mushrooms, stemmed and cleaned; cut into appropriate size

3 medium red beets, peeled (rinse your hands after handling the beets..unless you like a pink tint to your nails and fingers!)

1 tablespoon each: sea salt,  freshly ground pepper


Directions: Prep the veggies, washing anything that needs it. Place two really large low-sided roasting pans (sometimes called cookie sheets with sides) into the oven and preheat oven to 425. Cut everything into approximately 1+1/2″ pieces; don’t cut the veggies too small as all they will shrink a bit while roasting. Just try and have everything fairly close to the same size.

Place all the veggies, EXCEPT for the beets, into a really large bowl (or stockpot). Pour most of the oil over the veggies (add the rest if necessary), add salt &pepper, then gently mix together making sure to thoroughly coat each piece of veggie. Pour onto the heated pans. Then place the cut-up beets into the bowl stirring to coat, and add them to the veggies on the roasting pans. It is important that the veggies are not piled up on one another. You do not want them to steam but to roast.  They should be in a single layer. It might be very snug but they will shrink slightly as they roast.

Roast for 30-35 minutes ‘til the most dense veggies are done when poked with a fork.  I like to <attempt> to turn the veggies over after the first 15 minutes; that way more sides of each piece will caramelize; yum.  Be fairly quick during this turning process as you don’t want to leave the oven open very long!  Once you have determined that they are done, remove from oven.  Turn off the oven.   Carefully taste, adding additional salt and pepper (I always add more!) and place into your serving bowl.  <3

A few other things to keep in mind:

If you are preparing this recipe…and there is nothing else in the oven…follow the directions in the recipe.  HOWEVER, if you are making this on Thanksgiving Day: put the pans into the oven for about 10 minutes before you take the turkey out.  Then while the bird is resting, and being carved, and the gravy is being made, the veggies can be roasting. When the turkey is removed, bump the heat up to 425.  Fill the heated pans, and place them back into the oven.  Roast the veggies for approximately 30-35 minute, check that the densest veggies are done and, if so, remove the pans from the oven and turn off the oven.

At this point, if the meal is not ready to be brought to the table, place the veggies into a serving dish, and place back into the oven ‘til you are ready to go. Other veggies to consider: asparagus, broccoli, parsnips, sweet potatoes, fingerlings, fennel. Leftover roasted veggies?  (Hard to believe, but…) Use them as the key ingredients to roasted veggie lasagna, roasted veggie chowder, roasted veggie omelet or frittata, roasted veggie burritos…the list could go on and on.  These are particular dishes I have made.  How kind would you be to yourself but to have one of these chosen as a quick and easy meal to come home to after Christmas shopping-til-you-drop?

*  *  *  *  *  *  *  *  *  *

And here is the recipe for the second side dish: Broccoli-Craisin Salad.  This is a beautiful raw salad, a very healthy but oh-so-yummy addition to the side dish array on your Thanksgiving Day table.  It has a slightly smoky (from the bacon), slightly sweet (from the honey), slightly tart (from the vinegar), very mellow taste.  I have had MANY supposed broccoli haters be prompted to try just one tiny taste…only to find they enjoy it and come back for more!  We enjoy this salad all year long!  Hoping that your family enjoys it, too!

Ingredients:

2 heads broccoli crowns, cut into small florets*

1/2 pkg Craisins (dried cranberries)

6 slices bacon, cooked and crumbled

1/2 red onion, very thinly sliced

1/2 cup mayonnaise

1/2  cup sour cream

1/4 cup honey, warmed

2 tablespoons apple cider vinegar

1 cup sunflower seeds

freshly ground pepper


Directions:

In a small bowl, stir together mayonnaise, sour cream, honey, and vinegar; set aside. In a large bowl, combine first 4 ingredients. Take mayo mixture and pour over broccoli mixture, tossing gently to thoroughly coat. I pour the dressed mixture into a large zip-top bag to go into the fridge.  Every once in a while, give the bag a flip-over and a couple of squeezes to massage the yumminess all around!

Then when your meal is ready to go onto the table, just pour the salad out into a serving bowl.  Easy-peasy!

Should be prepared at least 4 hours beforehand, up to 8 hours or so. Just prior to serving, stir in the sunflower seeds and ground pepper to taste.

* The biggest hint I can offer to you for this salad is to cut the broccoli florets as small as you possibly can.  I consider it a labor of love and, oh, so worth it!  It is MUCH more palatable to have little florets in your mouth as you munch on this salad rather than a large hunk of broccoli!  Trust me!  You can do the chopping ahead of time, even a day or so, and simply store in the fridge. 😉

Honestly, I have been known to sit in front of the television while doing it! <3

Have a wonderful, thanks-filled Thanksgiving Day! May we each always remember how very much we have to be thankful for and give thanks to the One Who so perfectly and abundantly and graciously provides for our every need!

Psalms 30:12

To the end that my tongue and my heart and everything glorious within me may sing praise to You and not be silent. O Lord my God, I will give thanks to You forever. <3

God loves you!  and I do too.

Coleen <3