March 28, 2024

Summer Vegetable Curry

Summer Vegetable Curry resize

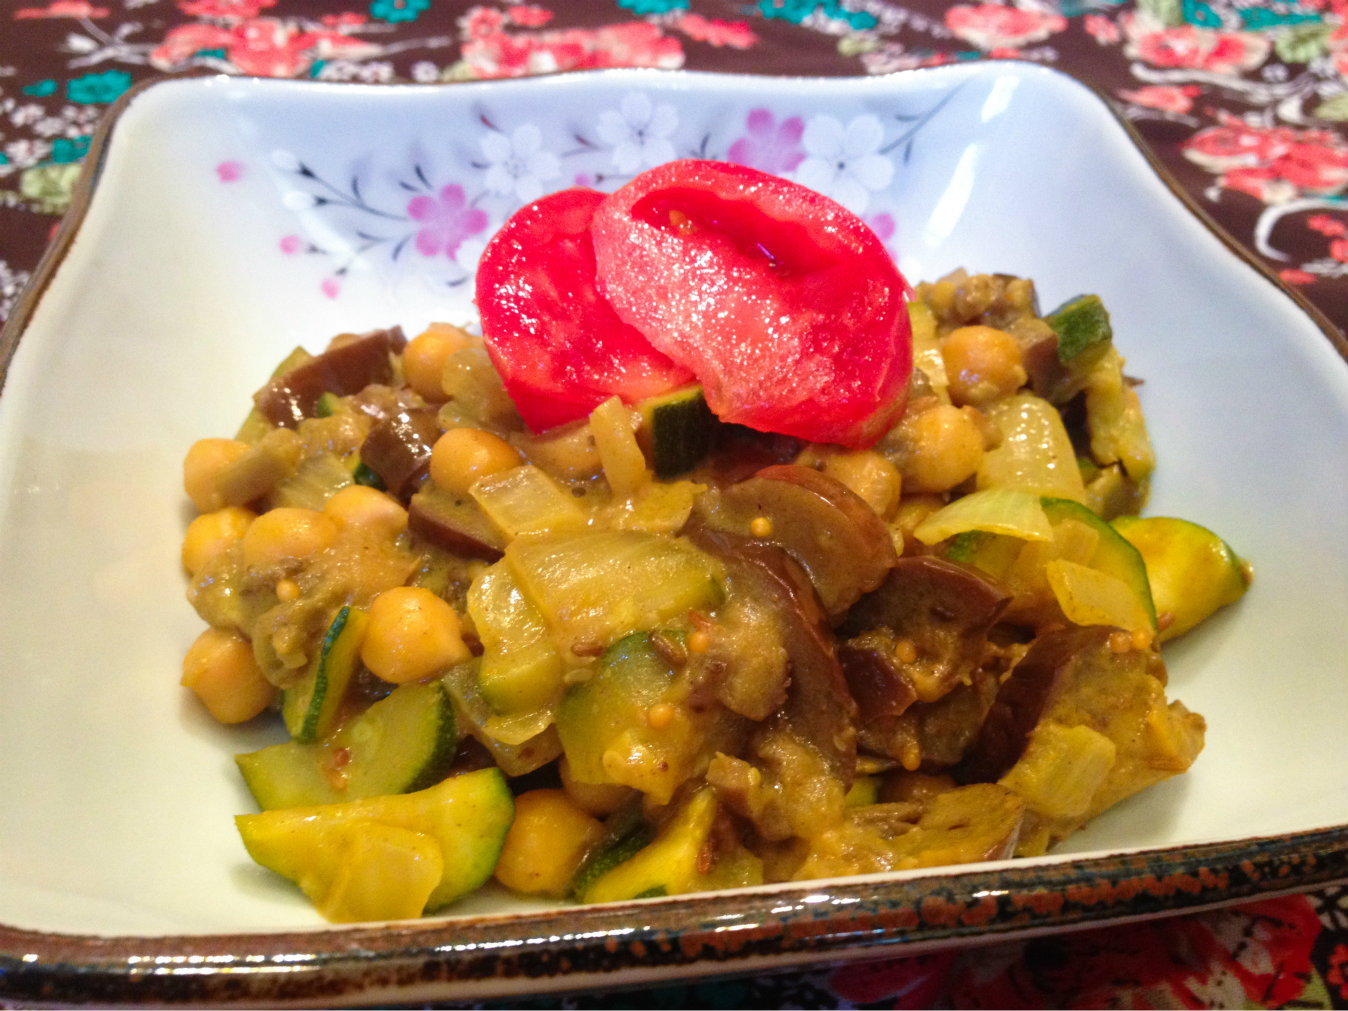
If you think about it, there is a lot of overlap between summer produce here in the United States, and what shows up on Indian food menus.  That’s because what grows where it’s hot there is also what grows in the summer here.  Lots of Indian dishes feature zucchini (also called courgettes), onions, eggplants, and tomatoes – all things coming into season now!  Why not try this Summer Vegetable Curry?

You really can’t mess this up or go wrong.  Don’t like garbanzo beans?  Use another bean, or switch them out for green peas or bite-sized green beans.  Like it spicy?  Add some chopped jalapeños or another chili of your choice.  Use whatever curry powder you have.  Out of coconut milk?  Use water or broth instead.  I didn’t have any cilantro, or I would have chopped up a few tablespoons to stir in right before serving.  See?  There is no wrong way.

For a vegetarian meal, double the amount of beans and serve over basmati rice.  Paleo?  Skip the beans altogether and serve this curry as a side dish to your favorite protein.  Ready?  Let’s go!

Summer Vegetable Curry

Ingredients:

  • 1 large onion
  • 2 tablespoons ghee, butter, or oil
  • 1 tablespoon mustard seeds
  • 1 tablespoon cumin seeds
  • 1 tablespoon curry powder (or more, to taste)
  • 1/2  can coconut milk
  • 2 skinny eggplants
  • 3 zucchinis
  • 1 can garbanzo beans or 1 cup of rehydrated and cooked dried garbanzos
  • cilantro, raw tomato, and rice (optional)  for serving

Directions:

  1. In a very large pot, heat the ghee or butter.  Chop the onion and add to the pot, along with the mustard and cumin seeds.  Fry on medium heat for about 5 minutes, until the onion becomes translucent.  Then add the curry powder and coconut milk and reduce heat.
  2. Cut the eggplants and zucchinis into thin half-moons.  Add to the pot, stir to mix, and cover.  Cook over low heat for about 25 minutes until the vegetables are soft, stirring occasionally to ensure nothing sticks to the bottom of the pot.
  3. Taste for seasoning – add salt or more curry powder if you like.  Stir in the garbanzos and heat through.
  4. Serve with chopped tomato and minced cilantro.  Serve over rice if you like.

This is definitely one of those recipes that is even better the next day, and it’s easy to reheat.  Have some for dinner tonight and save some for lunch tomorrow!

Explore, experiment, enjoy! — Dana


To view even more of Dana’s unique recipes, you can visit her at Frugal Girlmet!

Baked Beans

Baked Beans resize Happy Independence Day!  I’m hoping you are able to celebrate with family and friends today.  What’s on the menu? One of my guilty food pleasures is a right-off-the-grill hot dog.  I know, not the most gourmet of foods, or the healthiest, but everything in moderation, right? And what goes better with hot dogs than baked beans?  Now you could just open a can of baked beans and plop them in a saucepan, but where’s the fun in that? Make your own!

Once I decided to do just that, I found my Mom’s recipe for baked beans.  That poor note card has seen better days, but its hard-used appearance proves what a popular recipe it is.
Baked Beans Recipe Card Mom resize
 
I didn’t have any canned white beans in the pantry, but I did have a one-pound bag of dried white beans. They take more preparation than canned beans (obviously – canned beans come out ready for use) but are worth the effort.  First, dried beans are cheaper than their canned cousins, because once you soak and rehydrate them, they double in weight. (Put another way, when you buy canned beans, you are paying for water.)  Second, you are avoiding any salt, preservatives, or chemicals in the canned beans, not to mention the chance of BPA in the can itself.
 
Anyway, I soaked the beans the night before, but they double in size, so I only used half. (You could freeze the rehydrated beans in a Ziploc bag and thaw them when you have another recipe for them.)  I used my Mom’s recipe as a jumping off point, and they were just as delicious as hers were.  I realized they don’t need to bake in the oven and are great on the stovetop—that way you won’t have to heat up your kitchen on a hot summer day to make them.  These are easy, cheap to make, and will impress everyone who has them.  Hearty, smoky, and fantastic, these put those  gloopy canned baked beans to shame!

Baked Beans

Ingredients:
  • 1/2 pound dried white beans, soaked overnight in 6 cups water (or use 2 cans of white beans, reserving some of the canning liquid)
  • 5 slices bacon, diced 
  • 1 onion, diced
  • 3/4 cup ketchup
  • 1 tablespoon mustard
  • 1/4 cup BBQ sauce (optional, but I like the smokiness – you could also try a few dashes of liquid smoke)
  • 1/4 cup molasses
  • 1/4 cup dark brown sugar
Directions:
  1. If you are using canned beans, skip to Step 2.  If you are using dried beans: Drain the water from the beans you soaked overnight. Put the beans in a pot, cover with about 4 cups of water and a lid, and cook over medium heat for about 2 hours. You don’t want to cook off all the water, so check in on them every once in a while. When they’re done, save about a cup of the cooking water to use in the baked beans, in case you like them a little “saucier” than I do.  
  2. In a Dutch oven or very heavy-bottomed pot, fry the bacon. When it’s about halfway to crunchy, add the onion. When the bacon looks done, add the beans. Turn the heat down to low and stir everything together for a few minutes.
  3. Add the rest of the ingredients and stir to combine. Give it a taste and see if you need to adjust the seasonings. It likely won’t need salt, but you may like some pepper.
  4. Cover and cook on low heat for half an hour. Check the consistency – if it’s too thick, add some of the bean cooking water; too thin, take the lid off and let simmer.  Serve hot.
Explore, experiment, enjoy! — Dana


To view even more of Dana’s unique recipe, you can visit her at Frugal Girlmet!

Crunchy Chopped Salad


Crunchy Chopped Salad resize

I think this was originally a recipe from a South Beach Diet cookbook.  But I started making it so long ago, and have added and deleted ingredients over the years…so that I am not sure it’s the same one in the book.  That’s okay – it’s not about exact ingredients.  You can add or subtract as you like.  It’s about CRUNCH!  And that’s what you get in this Crunchy Chopped Salad!

I know that chips aren’t great for me.  I usually don’t crave them, and I make sure I don’t keep them in the house (because as a stay-at-home mom, you DO eat whatever is in the pantry!)  But sometimes you just get that urge for something kind of salty and crunchy.  I make this salad instead.  Is it the same?  Of course not!  (Otherwise I’d call it Doritos Salad!)  But this satisfying, fun-to-eat dish  scratches that itch for me, and maybe it will for you too.

If you need a break from lettuce, try this.  If you have lots of singleton vegetables in your crisper drawer, try this.  If you want something fresh and different for your next cookout, try this!

Crunchy Chopped Salad

(Serves four as a side dish)

Ingredients:

  • 6 baby carrots
  • 1 bunch radishes, trimmed
  • 3 stalks celery, trimmed
  • 2 Persian cucumbers, or one large cucumber
  • 1/2 red bell pepper
  • 1/2 yellow bell pepper
  • 2 green onions
  • 2 cloves garlic
  • juice of 1 lemon or lime
  • 2 or 3 drops of honey
  • salt and pepper
  • 1/4 to 1/3 cup olive oil
  • 2 avocados

Directions:

  1. Wash and trim all your veggies.  Cut them all into medium-small pieces.  This is up to you, but for example, I cut the peppers into 1/2″ square pieces.  The radishes, cucumbers, carrots, and celery all get sliced vertically, then cut into 1/4″ slices.  If you dice everything too small, you won’t get the crunchiness.  If you cut everything too large, you’ll only get one or two veggies on your spoon at a time.  Experiment and see what size you like best.  If you are using a large cucumber, you may want to peel off the waxy skin and scoop out the seeds.  I like Persians because they are thin-skinned and have very little squishy gel around the seeds.  Pile all your chopped veggies into a big bowl and toss.  Beautiful, right?
  2. In a little food processor, blend up your garlic, lemon juice, honey, salt and pepper, and 1/4 cup olive oil.  Taste and dilute with more oil if you like.
  3. To serve, dish the salad into a bowl and drizzle liberally with dressing.  For each serving, dice half of an avocado and place it on top (otherwise it gets smushed.)  Eat this salad with a big soup spoon so you get a little of each vegetable in every bite!

If you have leftovers, you can mix in a can of tuna the next day.  It’s wonderful!


Explore, experiment, enjoy! — Dana


To view even more of Dana’s unique recipe, you can visit her at Frugal Girlmet!

Chicken Satay with Spicy Peanut Sauce


Chicken Satay

Finally, summer is here!  That means lots of grilling at our house.  One of my favorite things to grill are skewers.  You can get so creative with what you thread on those sticks!  Veggie kabobs are a must, with juicy mushrooms, sweet-and-spicy onions, and bell peppers.  Keep the skewers close at hand for this easy recipe:  Chicken Satay with Spicy Peanut Sauce!

I use boneless, skinless chicken thighs here, although you could use skinless breasts instead. Everything else should be easy to procure.  These are best when they’ve had a chance to marinate for at least 2 hours, but don’t let the chicken marinate more than eight hours, or the chicken will start to break down.

If you have any leftover skewers, these mildly spiced chicken bites make a fantastic salad!  Just chop them up and toss with salad greens, lots of cucumber, and red or yellow bell pepper.  Make the peanut sauce into a salad dressing by buzzing in a blender with a little water or more oil. Delightful!

Chicken Satay with Spicy Peanut Sauce

Ingredients:

Chicken Satay:

  • 1 pound boneless, skinless chicken thighs
  • 1 cup plain yogurt
  • 1 teaspoon curry powder
  • 1 teaspoon fresh grated ginger (use powdered if you can’t find fresh)
  • 2 cloves garlic, minced
  • 2 tablespoon minced fresh cilantro
  • juice from 1/2 lemon or lime
  • wooden skewers, soaked in water for 30 minutes, or use metal skewers

Peanut Sauce:

  • 1/2 cup chunky peanut butter
  • 1/2 teaspoon soy sauce
  • 1 clove garlic
  • 3 tablespoon brown sugar
  • 1/2 teaspoon minced ginger
  • 1/2 teaspoon Sriracha or hot sauce of your choice
  • juice from 1/2 lemon or lime
  • 1 teaspoon coconut oil or olive oil
  • optional:  a few dashes of nam pla (Thai fish sauce)

Directions:

  1. Slice the chicken thighs into 1″-wide strips
  2. Mix together the rest of the chicken satay ingredients and stir in the chicken.  Cover and refrigerate for two hours (or longer, up to 8 hours).
  3. While the chicken is marinating, make the Spicy Peanut Sauce.  Place all the ingredients in a blender or food processor and blend until smooth.  Refrigerate until ready to serve.
  4. When the grill is hot, thread the marinated chicken onto the skewers.  Grill for 5-8 minutes per side.  Serve with Spicy Peanut Sauce and more chopped cilantro.


Explore, experiment, enjoy! — Dana


To view even more of Dana’s unique recipe, you can visit her at Frugal Girlmet!