May 19, 2024

Italian Vegetable Cheese Soup

Italian Vegetable Cheese Soup


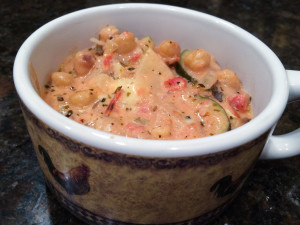
I remember my Mom made a version of this dish probably 25 years ago, and it was FANTASTIC.  It was one of those things that was so rich and luxurious that the memory stayed with me for a quarter century!  I asked my sister, who is now in possession of my mother’s recipe box, to find the recipe, but to no avail.  After some hunting online, I think I found something close.  As is my modus operandi, I tweaked it and made it my own, and now I’m sharing with you:  Italian Vegetable Cheese Soup!

It’s a very simple recipe, and of course, I always encourage you to make it how you and your family will like it best.  Feel free to add more vegetables to the soup.  This recipe is pretty basic, but please keep the zucchini, lots of onions and garlic, and the garbanzo beans.  I guess you could sub in another bean – Great Northerns would work – but I like the firm texture of dried garbanzos that have been cooked just to al dente.  Do NOT skip the wine in this recipe.  You only need half a cup, but it adds so much flavor.  As for the cheese, I used a combination of cream cheese, goat cheese, and a very sharp white cheddar.  You use what you like – maybe some Asiago would be nice, and Fontina would definitely be delicious.

This is not diet food, but a small bowl will fill you up, so it’s okay!  Eat this for lunch with a green salad and enjoy!

Italian Vegetable Cheese Soup

Ingredients:

  • 1/2 pound dried garbanzo beans (or use one can of garbanzos)
  • 2 onions, diced
  • 1/2 stick butter
  • 6 cloves garlic, minced
  • 2 zucchini, sliced into half-moons
  • 1 can crushed or diced tomatoes (I used fire-roasted with peppers, and it added a welcome spicy kick!)
  • 1 teaspoon dried Italian herbs (or use a combo of dried oregano and basil)
  • 1/2 cup white wine
  • 1/2 cup whole milk
  • 4 ounces cream cheese
  • 1 ounce goat cheese (or more!)
  • 2 ounces sharp cheddar or other cheese (parmesan, mozzarella, fontina, gouda, asiago…)

Directions:

  1. If you are using dried garbanzos, pour them into a pot, cover with a  few inches of water, and simmer for about an hour.  If you are using canned, skip to step 2.
  2. In a large pot, cook the onions in the butter for about five minutes until soft.  Add the zucchini and garlic and cook for another 3 minutes.  Drain the water from the beans and add to the vegetables.
  3. Add in the can of tomatoes and the dried Italian herbs.  Add the wine, cover the pot and let simmer for 5 minutes.
  4. Add the milk and cheeses. Stir to combine and cover, over medium low heat.  Let simmer for five minutes, then stir again.  Don’t let the cheese stick to the bottom of the soup!
  5. I like it thick, but you can thin this out more with either milk or wine.  Serve hot!

Explore, experiment, enjoy! — Dana


To view even more of Dana’s unique recipes, you can visit her at Frugal Girlmet!


Almond Joy Chocolate Bark

Almond Joy Chocolate Bark

What’s Valentine’s Day without some chocolate?  This is pretty healthy stuff though, so as long as you don’t eat the whole batch in one sitting, you can have a treat and not be naughty.  Almond Joy Chocolate Bark is the way to go!

I love dark chocolate and I use the darkest I can find in the grocery store.  Here I used a bag (11.5 oz) of 63% cacao Guittard chocolate chips, but feel free to use whatever dark chocolate you like.  I also used roasted, salted almonds because that little bit of salt really offsets the sweet and makes the flavors pop.  If you want a sweeter bark, you can use “Angel Flake” coconut that has sugar added.  I used unsweetened coconut flakes and it’s quite yummy!  I also used 2 tablespoons of coconut oil.  I like that it makes the chocolate a little smoother, and I think it tastes great too.  You can leave it out if you don’t have it.

Give some to your sweeties, treat your friends at work, or just nibble on this chocolate bark and enjoy some quiet time.  Happy Valentines Day!

Almond Joy Chocolate Bark

Ingredients:

  • 1 bag of semi-sweet chocolate chips (use the darkest chocolate you can find, with the highest percent of cacao)
  • 2 tablespoons coconut oil
  • 1 cup whole, roasted, salted almonds
  • 1/3 cup shredded, unsweetened coconut

Directions:

  1. In an oven-safe bowl, microwave the chocolate and coconut oil together for 30 seconds.  Stir very well with a rubber spatula, then microwave again.  Keep doing this until your chocolate and coconut oil are smooth and blended.  Mine took 3 blasts of 30 seconds each.
  2. Line an 8×8 baking pan with plastic wrap.  Pour in 1/3 of the melted chocolate and spread over the bottom of the pan.
  3. Spread the almonds over the chocolate layer and sprinkle with coconut.
  4. Pour the rest of the chocolate over the almonds and coconut and lightly spread to cover.  Put in the freezer for about 2 hours until solid.  Cut or break into 2″ pieces.

Explore, experiment, enjoy! — Dana


To view even more of Dana’s unique recipe, you can visit her at Frugal Girlmet!

Napa Cabbage with Peas and Prosciutto

Napa Cabbage with Peas and Prosciutto

Punxatawney Phil, that old son-of-a-gun, just declared there would be six more weeks of winter.  Growing up in Southern California, it didn’t mean much to me—maybe a day or two of drizzle, or a heavier jacket if the temperature dipped into the fifties at night.  Now that we’re in Texas, winter is FOR REAL!  There are no good farmer’s markets, no fresh produce for cheap.  So when it’s the dreary days of February and you can’t plant your garden yet, it’s time to make the most of what you have.  This recipe for Napa Cabbage with Peas and Prosciutto can’t bring spring, but it can warm up your belly!

I had half of a head of cabbage left after making a batch of Stuffed Cabbage Soup and needed a recipe for it.  If you haven’t searched through Epicurious.com, please do.  I used the search function to find recipes for Napa cabbage, stumbled onto this one, and tried it.  Fantastic!  I followed the instructions, except I replaced prosciutto with bacon.  Warm, smoky, sweet, and salty.  Try it tonight!

Napa Cabbage with Peas and Prosciutto (recipe courtesy Epicurious)

Ingredients:

  • 2 tablespoons olive oil
  • 1 cup frozen peas, thawed
  • 1 small napa cabbage, trimmed and sliced crosswise
  • 1 ounce prosciutto, chopped (I substituted 3 slices of bacon, minced, cooked, and drained)
  • 1 teaspoon freshly grated lemon zest
  • 1/2 teaspoon fresh lemon juice (or more, to taste)
  • 2 tablespoons freshly grated Parmesan cheese

Directions:

  1. In a large heavy skillet, heat oil over moderate heat until hot but not smoking. Add peas, cabbage, prosciutto, and zest and cook, stirring, 4 to 5 minutes, or until cabbage is wilted and tender.
  2. Remove skillet from heat and stir in lemon juice, Parmesan, and salt and pepper to taste.


Explore, experiment, enjoy! — Dana


To view even more of Dana’s unique recipe, you can visit her at Frugal Girlmet!

Veggie Burritos

veggie burrito

Despite what restaurants would have you believe, a burrito (or taco, for that matter) doesn’t have to be the same boring combo of meat, rice, and beans.  Believe it or not, you can make burritos or tacos with whatever you have.  I have a great cookbook by Rick Bayless, who despite his gringo name, is one of the preeminent Mexican chefs in America.  His book has recipes for mushroom tacos, squash tacos – you name it, you can make it into burrito or taco filling.  Following his lead, I steered clear of the meat-rice-beans set-up and created my own version of the Veggie Burrito!

Of course, you can use whatever veggies you like, and please feel free to add or subtract vegetables from my recipe.  This one features toothy black beans (instead of the heavy refried beans you usually find plastered to the inside of a tortilla), onions, chopped mushrooms and sautéed kale.  Then get crazy with the accoutrements:  salsa, cheese, diced avocado, sour cream (or Greek yogurt in my case).  Need something a little more filling?  Replace the boring rice with quinoa!  You get more protein that way.

If you have leftover veggie mix, you can just heat it up and serve with a fried egg on top for a healthy breakfast, or make a burrito bowl:  veggie mix, quinoa, avocado, salsa – basically everything but the tortilla!

Veggie Burritos (Makes 2 burritos)

Ingredients:

  • 2 tablespoons butter
  • 1/2 teaspoon salt
  • 1 small onion, chopped
  • 4 cups chopped kale, washed
  • 8 ounces mushrooms (white or cremini), sliced
  • 1 can black beans, drained
  • salt and pepper
  • 2 tortillas
  • salsa, grated cheese, sour cream or Greek yogurt, chopped avocado, cooked quinoa – your choice of any or all

Directions:

  1. In a large frying pan with a lid, add the butter, salt, and chopped onion.  Cook over medium for about five to ten minutes to get a little color.  Don’t let them burn!
  2. While the onions are cooking, prepare the kale – wash and spin it.  It doesn’t need to be dry, since a little water will help it steam and get tender.  Slice the mushrooms.
  3. Stir the washed kale into the onions in the frying pan and cover with a lid.  Cook for about 5 minutes.  Then remove the lid and add the mushrooms.  Cook for five to ten minutes, until most of the water has evaporated and the mushrooms are cooked through.  Add the black beans and stir for another minute.
  4. Put the two tortillas on a plate and cover with a damp dish towel.  Microwave for 30 seconds, then fill with a heaping scoop of the veggie mix.  Top with salsa, cheese, et cetera, and fold tortilla to close.

Explore, experiment, enjoy! — Dana


To view even more of Dana’s unique recipe, you can visit her at Frugal Girlmet!

GF Brownies

GF Brownies

Guilt-free?  Gluten-free?  Girl friends?  Yes, all the above!  As usual, I have taken a recipe, tweaked some things here and there for my family, and made a treat that’s gluten-free, nearly guilt-free, and sure to please all your girl friends!  Here are my GF Brownies!

The three ingredients you’ll need to shop for are coconut flour, almond flour, and coconut oil.  You know what?  You can even trade in the coconut oil, if it’s not your thing, for half a stick of butter.  Now just pick up some coconut and almond flours, use what you need, and store them indefinitely in the freezer.  Frugal!

These are fudgy but not pasty.  There’s a difference!  They’re chewy but they don’t become glue in your mouth.  Super easy.  Let’s go!

GF Brownies

Ingredients:

  • 1 cup dark chocolate chips – the higher the cacao percent, the better!  (These were 64%)
  • 1/4 cup coconut oil (or use butter)
  • 1/2 teaspoon cinnamon
  • 1/2 teaspoon vanilla extract
  • 1/2 teaspoon salt
  • 4 eggs
  • 1/2 cup maple syrup (or you could use brown sugar)
  • 1/2 cup almond flour
  • 2 tablespoons coconut flour
  • butter or coconut oil to grease the pan

Directions:

  1. Preheat the oven to 350*F.  Grease an 8×8 square pan.
  2. In a large pot, melt the chocolate chips and coconut oil together over medium-low heat, stirring constantly.  When the mixture is smooth, remove from heat.  Whisk in the cinnamon, vanilla, and salt.
  3. In a smaller bowl, beat the four eggs together.  Slowly whisk them into the chocolate mixture (make sure it’s cool enough so you don’t make scrambled eggs!)  Whisk in the maple syrup.
  4. A little at a time, whisk in the almond and coconut flours.  Whisk thoroughly, so you don’t have lumps.
  5. Pour the batter into the greased pan.  Bake at 350*F for 25-30 minutes.  Remove from the oven and cool for about an hour.  Slice into 16 squares (2×2 each).  Hide the pan from your kids!

Explore, experiment, enjoy! — Dana


To view even more of Dana’s unique recipe, you can visit her at Frugal Girlmet!

Stuffed Cabbage Soup

Stuffed Cabbage Soup

In the dead of winter, there’s nothing better than a hot bowl of soup.  With this Stuffed Cabbage Soup, you get all the flavors of a delicious, labor-intensive meal, without all the hard work!

I based this soup on a dish your Polish grandmother might make—called galumpkis—meat, rice and vegetables rolled up in soft cabbage leaves and baked in a savory tomato sauce.  Don’t have a Polish grandmother?  Never fear!  This soup comes together in half an hour and is very forgiving.  No green onions?  Garnish with dill!  Don’t eat rice?  Serve with a dollop of sour cream or Greek yogurt!  You can use ground beef, pork, or even turkey here.  Or do what I did and use leftover meatloaf or hamburgers.  See?  Easy!

Stuffed Cabbage Soup

Ingredients:

  • 2 cloves garlic, minced
  • 1 tablespoon olive oil or bacon fat
  • 4 cups thinly sliced cabbage
  • 2 cups chicken, beef, or vegetable stock
  •  2 cups water
  • 1 pound cooked ground beef (I used last night’s leftover meatloaf and broke it into small pieces)
  • 1/2 cup minced carrots
  • 1 15-ounce can of diced tomatoes
  • 1 teaspoon paprika
  • 1 teaspoon toasted and ground fennel seeds (or use ground fennel or anise)
  • 2 green onions, minced
  • rice, to serve

Directions:

  1. In a very large pot, sauté the minced garlic in the oil for one minute.  Add the sliced cabbage and stir.  Cook for about 5 minutes.
  2. Add the stock and the water.  Crumble the meat into the soup and add the carrots.  Stir to combine.
  3. Add the tomatoes, paprika, and ground fennel.  Turn the heat to medium-low and cover with a lid.  Cook for about 15 minutes.
  4. To serve:  Ladle soup into a big bowl.  Add a scoop of rice and sprinkle with minced green onions.  Eat hot!

Explore, experiment, enjoy! — Dana


To view even more of Dana’s unique recipe, you can visit her at Frugal Girlmet!


Polish Sandwich

Polish Sandwich

Ladies, I’m not proud of this entry.  I mean, I AM proud of it, because this sandwich is seriously delicious!  It’s my attempt at copycatting a recipe from a hot dog chain in Southern California called Der Wienerschnitzel.  It comes pretty close to the original Polish Sandwich, with melted Swiss cheese, snappy sauerkraut, and tart pickles.  I haven’t been to Wienerschnitzel in years, yet I still found myself craving one of these babies.  (Sometimes you just gotta scratch that itch.)

But seriously, I am going to eat better next year.  No—really!  Bread will become a special treat, sugar will become verboten, and my veggie uptake will increase!  So as we finish out this year, I decided to give in to the desire for a Polish Sandwich, as a farewell to some not-so-healthy habits.  These sandwiches easy to make, and so satisfying.  You can use hot dogs or any kind of Polish-type sausage you like.  Try yellow or spicy brown mustard.  Find some good rye bread and make this sandwich.  You’ll take one bite and say Danke!

Polish Sausage

For each sandwich you will need:

  • a 5-inch piece of Polish sausage, or hot dogs, cut in half lengthwise
  • pat of butter
  • 2 slices rye bread
  • 1 slice Swiss cheese
  • 1/4 – 1/2 cup Sauerkraut, warmed up
  • 1 large dill pickle, cut lengthwise into quarters
  • yellow or brown mustard

Directions:

  1. Cook sausage or hot dogs until done and hot all the way through.
  2. Meanwhile, in a large pan, heat the pat of butter.  Put both slices of rye bread down in the butter.  Top one slice of bread with the Swiss cheese.  Cook over low until the cheese melts and the bottoms of the bread are lightly toasted.
  3. To assemble:  Place the plain (non-cheese) slice of bread on the bottom and squirt with mustard.  Top with two halves of the sausage (or three halves of the hot dogs, cut side down.  In between the sausage, place as many of the quartered pickles as you like.  Cover the sausage and pickles with hot sauerkraut.  Top with cheese-y slice of rye bread.  Cut in half and eat hot.

Explore, experiment, enjoy! — Dana


To view even more of Dana’s unique recipe, you can visit her at Frugal Girlmet!

Cornbread Stuffing with Sage and Sausage


Cornbread Stuffing with Sage and Sausage

How much of a recipe purist are you?   When you make a recipe for the first time, do you follow the directions to the letter, or do you start right in with the alterations?   When I make something for the first time, I like to be faithful to the source.  When I eat the finished product is when I start making changes in my mind for next time—Needs more salt.  Add cilantro and green onions.  Use more yogurt and less mayo….  So the first time I made Tyler Florence’s recipe for Cornbread Stuffing, I really liked it…but I knew I wanted to change some things and make it my own.  So here it is, just in time for your holiday parties: Cornbread Stuffing with Sage and Sausage!

This is a simple recipe that I make in two steps.  First is the cornbread, and second are the rest of the ingredients.  I even make the cornbread a day or two ahead—don’t worry if it’s a little stale, because you’ll be rehydrating it and baking it again.  Use any kind of sausage you like.   I make this with a one-pound log of plain old breakfast sausage, but you can try something spicier, smokier, or even get crazy and use chorizo!   The other thing you will want is fresh sage.  Use as much as you like – I use at least 3 tablespoons of minced fresh sage, but I think you could get crazy and use up to a quarter cup of it, if you really wanted it herb-y.  If you buy a bunch of sage, use the rest in roast turkey or chicken recipes – they’re a natural match.  (And I just saw this recipe that uses sage that looks amazing!  Replace the dried sage in the recipe for double the amount of fresh sage.)  For the cornbread, I always use Jiffy cornbread mix, because that’s what I grew up eating.  If you have a brand of mix you like better, or you make cornbread from scratch, try that.  The measurements might be a little different, but this recipe is really forgiving.  Just adjust your wet ingredients to make sure you get the right finished consistency.

Cornbread Stuffing with Sage and Sausage

Ingredients:

  • 4 boxes of Jiffy cornbread mix (or make your own cornbread)
  • 1 pound sausage, any kind
  • 3 onions, sliced into fine strings
  • 3 tablespoons (or more!) of minced fresh sage
  • 2 cups chicken or turkey stock
  • 1 cup milk
  • 4 eggs
  • salt and pepper
  • butter to grease the pans (or use a non-stick spray of your choice)

Directions:

  1. Bake the 4 boxes of cornbread mix according to the directions on the box.  I didn’t bother with muffin tins and just made the whole batch in a 9″x13″ cake pan.  Let cool.  You can make the cornbread a day or two in advance.
  2.  In a large pot, cook the sausage.  If you are using links, slice into small half-moons.  If you are using bulk sausage, cook and break it up with a spoon so you have little chunks.  When cooked, remove from the pan to the largest mixing bowl you have.  Do not drain the pan!
  3. While the sausage is cooking, cut the onions into skinny strings.  Cook the onions in the fat rendered from the sausage (or add more butter or olive oil if there isn’t a lot in the pan.)  Cook for about 15 minutes on medium, stirring so they don’t burn, until they are soft and caramel-colored.  Remove the onions to the big mixing bowl.
  4. Using your hands, crumble the cornbread into the bowl with the onions and sausage.  Add the minced sage and mix.
  5.  In a smaller bowl, mix together the stock, milk, and eggs.  Pour it over the cornbread mixture and fold to combine.  Season the whole thing with salt and pepper.
  6. Turn the cornbread out into a large greased casserole dish and bake uncovered for about 25 minutes at 375*F.  You’ll want to let it get a little crusty and brown on top.

Explore, experiment, enjoy! — Dana


To view even more of Dana’s unique recipe, you can visit her at Frugal Girlmet!

Rosemary Chicken and Potatoes

Rosemary Chicken and Potatoes

Once again, I’m presenting a recipe so simple, I almost hesitate to call it a “recipe.”  This takes 5 minutes to put together, and is so quick and simple you’re going to laugh if you’re not making this already.  This one pot Rosemary Chicken and Potatoes is the best!

If you don’t have a big Le Creuset Dutch oven (or something similar; I’m not a stickler for name brands), it’s time to put it on the Christmas list.  This heavy enameled pot makes stews on the stove top as well as roasted meats and veggies in the oven a snap.   The tricks to this recipe are the fresh rosemary and the bone-in, skin-on chicken thighs.  The rosemary has to be fresh, because the oils that come out of the chopped leaves are what perfume the whole dish.  The chicken skin gets crispy and keeps the chicken moist.  Make sure that you don’t use too many thighs when you make this.  You want some space between the chicken pieces, so the air can circulate around them and crisp up the skin.

Ready for the easiest and tastiest one pot meal around?  Let’s go!

Rosemary Chicken and Potatoes

Ingredients:

  • 1 pound potatoes, any kind
  • 1 large  or 2 small onions
  • 1 1/2 – 2 pounds skin-on, bone-in chicken thighs (five thighs work best for us)
  • olive oil
  • salt and pepper
  • 1 large sprig of fresh rosemary

Directions:

  1. Preheat the oven to 375*F.  Wash the potatoes and cut into bite-sized chunks.  Cut the onion into large chunks.  Combine in the bottom of a large Dutch oven.
  2. Place the chicken thighs, skin side up, on top of the potatoes and onions.  Make sure there is space between the chicken pieces – you don’t want to crowd the pan too much.  Drizzle the whole pan—chicken pieces and down into the potatoes—with olive oil; use about 4 tablespoons.  Season the oiled chicken with salt and pepper.
  3. Strip the leaves from the rosemary and mince.  Sprinkle over the chicken and potatoes.
  4. Bake for one hour.  After an hour, set the temperature in the oven to 400*F, and cook for another 15-30 minutes, until the skin is golden and crispy.  Serve hot!

Explore, experiment, enjoy! — Dana


To view even more of Dana’s unique recipe, you can visit her at Frugal Girlmet!

Whole Wheat Ginger Snaps

Whole Wheat Ginger SnapsI saw Coleen’s post on Monday for her delicious-looking cupcakes, and I could almost taste them!  She used molasses, which got me thinking about that dark, almost smoky-sweet flavor.  I knew what I wanted – ginger snaps!  So I poked around online, found a recipe I liked, modified it for my house, and voila:  Whole Wheat Ginger Snaps!

These go great with milk for the kids, or coffee for grown-ups.  Heck, get a double dose of spicy and have these cookies with a chai latte!  There are plenty of pantry staple spices here, but the two kickers are molasses and candied ginger.  Check in the dried fruit section of the store.  I keep my candied ginger in the freezer – it will keep indefinitely (and if it’s out of sight, I won’t eat the whole bag in one sitting!)  I like to have it in the house because a big bite of it can calm a nauseous tummy.

If you have a cookie exchange this season, wow them with these boldly flavored cookies.  Your friends will thank you!

Whole Wheat Ginger Snaps

Ingredients:

  • 1 3/4 cups whole wheat flour
  • 2 teaspoons baking soda
  • 2 teaspoons ground ginger
  • 1 teaspoon cinnamon
  • 1 teaspoon salt
  • 1/2 teaspoon nutmeg
  • 1/2 teaspoon garam masala (or use 1/4 teaspoon ground cloves and 1/4 teaspoon finely ground pepper)
  • 1 cup packed brown sugar
  • 1 1/4 sticks butter, room temperature
  • 1 egg, room temperature
  • 1/4 cup molasses
  • 1/2 cup candied ginger, minced

Directions:

  1. First, put the butter in a large bowl and let it come to room temperature.  Put the egg next to it.
  2. In a medium bowl, mix together the flour with the baking soda, ground ginger, cinnamon, salt, nutmeg, and garam masala.
  3. In a large bowl, cream the butter with the brown sugar.  Mix in the egg and molasses.  Add in the minced candied ginger.
  4. A little at a time, mix the flour mixture into the butter mixture.  Refrigerate for one hour.
  5. Preheat the oven to 350*F.  On a Silpat liner or parchment paper, scoop out teaspoon-sized balls of cookie dough.  These will spread out, so give them some room.  I used a melon baller and it worked well.  Bake for 13 minutes.
  6. Let cool on the cookie sheet for a minute, then remove to a wire cooling rack.
  7. Don’t let the kids see these before dinner or you will be pestered until it’s time for dessert.

Explore, experiment, enjoy! — Dana


To view even more of Dana’s unique recipe, you can visit her at Frugal Girlmet!