November 15, 2024

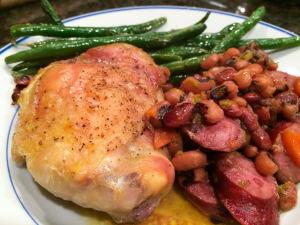
Southern Cassoulet

Southern Cassoulet

I know, it’s a weird title – French and Southern food together?  But this dish makes sense once you eat it.  Black-eyed peas are a good luck food for the New Year in the South, so why not dress it up a little with this interpretation of a French classic?  I present to you:  Southern Cassoulet!

Authentic cassoulet can take several days to prepare, and involves making a duck confit.  Too expensive and time consuming for me!  Chicken thighs sub in nicely.  Cook the black-eyed peas during the day (or use canned).  To make this even quicker, use two cans of white Northern beans.  I used just plain smoked sausage, but try out a pound of whatever kind of sausage you like.  Did you get a big Le Creuset pot for Christmas?  Now’s your chance to put your new enameled Dutch oven to the test!

Southern Cassoulet

Ingredients:

  • 1 pound dried black-eyed peas (or use two cans of other beans)
  • 1 pound smoked sausage, sliced
  • 2 large carrots, chopped
  • 3  stalks celery, chopped (use the leaves too)
  • 20 whole cloves of garlic (optional, but I thought they were delicious)
  • 1 large sprig of rosemary, minced (or use 1 teaspoon dried rosemary)
  • 4-6 large chicken thighs, skin on, bone in
  • 3 teaspoons olive oil
  • salt and pepper to taste

Directions:

  1. Cook the beans in plenty of water until tender.  This can take two hours or so.  If you are using canned beans, skip ahead.
  2. In a very large enameled Dutch oven, cook the sausage.  Add the carrot, celery, garlic cloves, and rosemary.  Add a little olive oil if things start to stick.  Saute over medium heat for 10 minutes until the vegetables are soft.
  3. Take the pot off the heat.  Drain the beans and add them to the sausage and vegetables, and stir to combine.  Season with salt and pepper.  On top of the bean mixture, place the chicken thighs, skin-side up.  Season with salt and pepper, and drizzle with the olive oil.
  4. Bake at 400*F for at least an hour, or until the chicken is cooked through with crispy skin.
  5. Good luck and have a Happy New Year!

Explore, experiment, enjoy! — Dana


To view even more of Dana’s unique recipe, you can visit her at Frugal Girlmet!
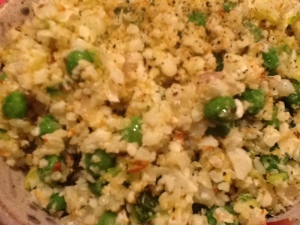
Cauliflower ‘Rice’ and Veggies

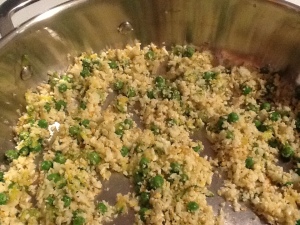
Here’s a tasty and oh-so-good for you dish!  This is great as a side dish or as the basis for a stir-fry or a curry. Try it even with a sunnyside egg perched on top! I have prepared this as a vegan dish; it is low-carb, dairy-free, nut-freegluten-free, and of course, refined sugar-free! Cauliflower Rice fits so nicely into our healthy-but-oh-so-yummy POV. Click here  to check out these nutritional facts about cauliflower.

There are so many ways to prepare cauliflower (or not…eaten raw is good, too). During the past few months, I have been trying different methods of making cauliflower ‘rice’ (boiled, microwaved, sauteed) but we like it this way—roasted—the best!  Here are a few of my reasons for saying so:

  • it is easy-peasy (first and maybe most important!)
  • roasting adds to the flavor
  • very little added fat

I have read numerous recipes that suggest you can freeze the cauliflower ‘rice’ after it is cooked.  I would love to tell you this works great but we never have any leftovers. 🙁 But I am purposefully going to try it…wouldn’t it be great to have some to pull out of the freezer in July!?!

And experiment, please; this dish is very accommodating of other veggies you might have in your ‘fridge; load it up as you desire.  I would love to hear how you made this dish ‘your own!’

2014-11-09 20.25.20

Cauliflower ‘Rice’ with Veggies

ingredients:

2 tablespoons coconut oil (or olive oil or butter)
1 large head cauliflower
sea salt, freshly ground pepper (I used lemon-pepper-salt blend)
2-3 tablespoons coconut oil (or olive oil or butter)
1 sweet onion
2 small zucchini
1/2# asparagus (or broccoli)
1 cup frozen peas, defrosted
1/2 small lemon (optional)
directions:

  • preheat oven to 425
  • line a baking sheet (with a short rim) with parchment paper
  • break the head of cauliflower into florets cutting off large stems (save for soup!)
  • place the florets in the bowl of your food processor pulse until it breaks down and resembles pieces of rice (this should take, perhaps, 20 or so ‘pulses’) NOTE: if you have a really large head of cauliflower, do it in two batches to avoid overcrowding
  • pour the ‘riced’ cauliflower into a large bowl; sprinkle with seasonings
  • pour the melted coconut oil over top and quickly toss with two spatulas ‘til the rice is thoroughly coated with the oil
  • spread out in a single layer on the lined baking sheet; roast for 20-25 minutes ‘til tender and just beginning to get a few browned spots
  • remove from oven and set aside

while the cauliflower is roasting…

  • heat your largest saute pan and heat the fat of your choice
  • chop the onion and add to the pan; saute for 5-6 minutes over medium-high heat
  • prep the rest of veggies while the onion is cooking:2014-11-09 20.21.44
    -shred the zucchini
    -thinly slice (on the diagonal is pretty) the asparagus
    -zest the lemon; set aside
  • when onions are just starting to get a bit brown, add in the asparagus slices…cook for 4-5 minutes; then add in the shredded zucchini and cook for an additional 4-5 minutes ‘til all veggies are slightly tender. remove pan from heat
  • add the roasted cauliflower ‘rice’ to the other veggies; gently stir together
  • taste for additional seasoning, and squeeze the lemon juice over top (if using)
  • pour into a large serving bowl
  • enjoy!

   ♥      ♥      ♥      ♥      ♥ 

God loves you!   ♥  (Don’t ever forget that!)

♥  coleen

Polish Sandwich

Polish Sandwich

Ladies, I’m not proud of this entry.  I mean, I AM proud of it, because this sandwich is seriously delicious!  It’s my attempt at copycatting a recipe from a hot dog chain in Southern California called Der Wienerschnitzel.  It comes pretty close to the original Polish Sandwich, with melted Swiss cheese, snappy sauerkraut, and tart pickles.  I haven’t been to Wienerschnitzel in years, yet I still found myself craving one of these babies.  (Sometimes you just gotta scratch that itch.)

But seriously, I am going to eat better next year.  No—really!  Bread will become a special treat, sugar will become verboten, and my veggie uptake will increase!  So as we finish out this year, I decided to give in to the desire for a Polish Sandwich, as a farewell to some not-so-healthy habits.  These sandwiches easy to make, and so satisfying.  You can use hot dogs or any kind of Polish-type sausage you like.  Try yellow or spicy brown mustard.  Find some good rye bread and make this sandwich.  You’ll take one bite and say Danke!

Polish Sausage

For each sandwich you will need:

  • a 5-inch piece of Polish sausage, or hot dogs, cut in half lengthwise
  • pat of butter
  • 2 slices rye bread
  • 1 slice Swiss cheese
  • 1/4 – 1/2 cup Sauerkraut, warmed up
  • 1 large dill pickle, cut lengthwise into quarters
  • yellow or brown mustard

Directions:

  1. Cook sausage or hot dogs until done and hot all the way through.
  2. Meanwhile, in a large pan, heat the pat of butter.  Put both slices of rye bread down in the butter.  Top one slice of bread with the Swiss cheese.  Cook over low until the cheese melts and the bottoms of the bread are lightly toasted.
  3. To assemble:  Place the plain (non-cheese) slice of bread on the bottom and squirt with mustard.  Top with two halves of the sausage (or three halves of the hot dogs, cut side down.  In between the sausage, place as many of the quartered pickles as you like.  Cover the sausage and pickles with hot sauerkraut.  Top with cheese-y slice of rye bread.  Cut in half and eat hot.

Explore, experiment, enjoy! — Dana


To view even more of Dana’s unique recipe, you can visit her at Frugal Girlmet!
Christmas Morning Breakfast

♪♬♪ It’s the most wonderful time of the year! ♪♬♪ Here we are…approaching Christmas Day!  Still many tasks to accomplish here!  How are you doing with your lists?  Lots of items checked off?  I am getting there…

  • game for the grandkids✔
  • Robert’s birthday card
  • gift for upstairs neighbor ???
  • a few additional stocking stuffers
  • waiting for 3 packages to arrive ✔✔

and groceries for:

  • Robert’s birthday dinner ✔
  • Christmas Eve with MKEKLR ✔
  • Christmas morning ✔
  • Aldi list

But amidst all of these details, what joy is ours as we contemplate just HOW MUCH God Almighty loves us!  He cared SO MUCH for us that He sent His precious Son to the earth to be born as a human and to live amongst men.  Ultimately, to sacrifice Him to redeem and save us so we could be called His children!  Hallelujah…what a Savior!

I pray for you (and me, too), my friends, that we will keep our priorities in order.  Even if there were no Christmas tree decorated with glittery ornaments and special momentos…if there were no carols to sing…if there were not piles of beautifully wrapped presents under the tree…we would still have MUCH to be singing God’s praises and thanking Him for as we remember the reason for the seasonJesus our Savior.

For unto you is born this day
in the city of David a Savior,
which is Christ the Lord.
Glory to God in the highest,
and on earth peace, good will toward men.
Luke 2:11,14

 *    ♥  ~  ✝  ~  ★    *

Here’s our menu for a simple Christmas morning breakfast:
fruit salad
mini quiche
spicy Thai tea

The best part about this breakfast will be that it can all be prepared ahead of time!  When we are ready to eat, just pop some mini-quiche into the toaster oven to reheat, dish out some of the fruit salad, and pour beverages; love it!  Oh!…there is one important tip to success with these mini-quiche: the fillings (veggies and meat) should be cut up fairly small.   Whenever I make this recipe, i quadruple (yes, i DO!) the ingredients.  These little two-bite quiches freeze beautifully.  Enjoy!

2014-12-21 21.01.42

Mini Quiche (makes one dozen)

egg filling:

3 large eggs
1/2 cup milk (I used coconut milk)
1/4 teaspoon kosher salt, freshly ground black pepper

  • whisk these 4 ingredients together, thoroughly blending the eggs
  • pour into a container with a spout (for ease in filling muffin tin) and set aside

Spinach&Swiss with Bacon

1/2 cup frozen chopped spinach, defrosted
2 slices bacon, cooked and crumbled
4 tablespoons chopped onion
1+ tablespoons dried dill or tarragon
1/2-3/4 cup finely grated Swiss cheese

place spinach in colander, allow to defrost, and then squeeze dry (with your hands); set aside preheat oven to 375
grease with melted butter (or spray with cooking spray) your mini muffin tin; be thorough
cook bacon, cool, and crumble
saute onion in a bit of the bacon drippings until soft
when done, mix with spinach and herbs; let mixture cool
evenly distribute the veggies, the bacon, and the cheese among the muffin cups; these should be at least 1/2 full
then carefully pour the prepared Egg Filling mixture into each muffin cup. fill almost full but do not overfill!
bake for approximately 12-15 minutes until the eggs puff and are lightly golden brown
remove from oven; let sit for 10 minutes, then carefully remove from muffin tin. if you have thoroughly greased your muffin tin in preparation, this shouldn’t be too hard. I used a small, flexible spatula—but a teaspoon or small knife will do—and just run it around the edge of each quiche to loosen. serve immediately.

Broccoli-Cheddar with Ham

4 tablespoons chopped onion
1/2 cup chopped broccoli (cooked and cooled; I used frozen)
1/2 cup cooked ham, chopped small
1+ tablespoons dried crushed rosemary or marjoram
1/2-3/4 cup of finely grated sharp Cheddar
coconut or olive oil

preheat oven to 375
grease with melted butter (or spray with cooking spray) your mini muffin tin; be thorough
cook ham cubes for 2-3 minutes, set aside to cool
saute onion in a bit of olive oil until soft
when done, mix with broccoli and herbs; let mixture cool
evenly distribute the veggies, the ham, and the cheese among the muffin cups; these should be at least 1/2 full
then carefully pour the prepared Egg Filling mixture into each muffin cup. fill almost full but do not overfill!
bake for approximately 12-15 minutes until the eggs puff and are lightly golden brown
remove from oven; let sit for 10 minutes, then carefully remove from muffin tin. if you have thoroughly greased your muffin tin in preparation, this shouldn’t be too hard. I used a small, flexible spatula—but a teaspoon or small knife will do—and just run it around the edge of each quiche to loosen. serve immediately.

filling variations (choose one from each category)

veggies: (1/2 cup) of either sauteed mushrooms, peppers, seeded tomatoes, zucchini, butternut squash (this is a great way to use up bits of leftover veggies in your ‘frig!)
cheese: (1/2-3/4 cup) of your favorite Cheddar, Monterey Jack, goat cheese, Gruyere, Parmesan, Fontina, Provolone, Gouda
herbs: (1+ tablespoon) of your favorite: parsley, chives, tarragon, basil, dill, rosemary, marjoram
meat: (1/2-3/4 cup) finely chopped ham, cooked&crumbled bacon or breakfast sausage, prosciutto

♥  ♥  ♥  ♥  ♥

God loves you! (Don’t ever forget that!)
Merry Christmas to you and yours!  ♥ coleen

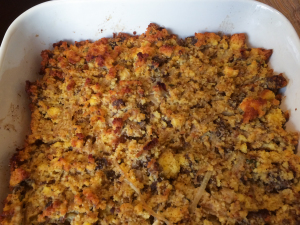
Cornbread Stuffing with Sage and Sausage


Cornbread Stuffing with Sage and Sausage

How much of a recipe purist are you?   When you make a recipe for the first time, do you follow the directions to the letter, or do you start right in with the alterations?   When I make something for the first time, I like to be faithful to the source.  When I eat the finished product is when I start making changes in my mind for next time—Needs more salt.  Add cilantro and green onions.  Use more yogurt and less mayo….  So the first time I made Tyler Florence’s recipe for Cornbread Stuffing, I really liked it…but I knew I wanted to change some things and make it my own.  So here it is, just in time for your holiday parties: Cornbread Stuffing with Sage and Sausage!

This is a simple recipe that I make in two steps.  First is the cornbread, and second are the rest of the ingredients.  I even make the cornbread a day or two ahead—don’t worry if it’s a little stale, because you’ll be rehydrating it and baking it again.  Use any kind of sausage you like.   I make this with a one-pound log of plain old breakfast sausage, but you can try something spicier, smokier, or even get crazy and use chorizo!   The other thing you will want is fresh sage.  Use as much as you like – I use at least 3 tablespoons of minced fresh sage, but I think you could get crazy and use up to a quarter cup of it, if you really wanted it herb-y.  If you buy a bunch of sage, use the rest in roast turkey or chicken recipes – they’re a natural match.  (And I just saw this recipe that uses sage that looks amazing!  Replace the dried sage in the recipe for double the amount of fresh sage.)  For the cornbread, I always use Jiffy cornbread mix, because that’s what I grew up eating.  If you have a brand of mix you like better, or you make cornbread from scratch, try that.  The measurements might be a little different, but this recipe is really forgiving.  Just adjust your wet ingredients to make sure you get the right finished consistency.

Cornbread Stuffing with Sage and Sausage

Ingredients:

  • 4 boxes of Jiffy cornbread mix (or make your own cornbread)
  • 1 pound sausage, any kind
  • 3 onions, sliced into fine strings
  • 3 tablespoons (or more!) of minced fresh sage
  • 2 cups chicken or turkey stock
  • 1 cup milk
  • 4 eggs
  • salt and pepper
  • butter to grease the pans (or use a non-stick spray of your choice)

Directions:

  1. Bake the 4 boxes of cornbread mix according to the directions on the box.  I didn’t bother with muffin tins and just made the whole batch in a 9″x13″ cake pan.  Let cool.  You can make the cornbread a day or two in advance.
  2.  In a large pot, cook the sausage.  If you are using links, slice into small half-moons.  If you are using bulk sausage, cook and break it up with a spoon so you have little chunks.  When cooked, remove from the pan to the largest mixing bowl you have.  Do not drain the pan!
  3. While the sausage is cooking, cut the onions into skinny strings.  Cook the onions in the fat rendered from the sausage (or add more butter or olive oil if there isn’t a lot in the pan.)  Cook for about 15 minutes on medium, stirring so they don’t burn, until they are soft and caramel-colored.  Remove the onions to the big mixing bowl.
  4. Using your hands, crumble the cornbread into the bowl with the onions and sausage.  Add the minced sage and mix.
  5.  In a smaller bowl, mix together the stock, milk, and eggs.  Pour it over the cornbread mixture and fold to combine.  Season the whole thing with salt and pepper.
  6. Turn the cornbread out into a large greased casserole dish and bake uncovered for about 25 minutes at 375*F.  You’ll want to let it get a little crusty and brown on top.

Explore, experiment, enjoy! — Dana


To view even more of Dana’s unique recipe, you can visit her at Frugal Girlmet!
Thumbprint Cookies

It is the season for cookie baskets and cookie exchanges. How many dozen cookies have you made already? How about you, Coleen…(you ask?) Ummmm, zero….well, ‘til these! (I know, I know…better get on it!) Yup, part of my plan for this week. Here’s what I am hoping to accomplish.   I would LOVE to hear what varieties you are making for your loved ones this year!!!

2014-12-14 19.53.53

Mexican Wedding Cookies (Snowballs)
Gingerbread Hearts
Pignoli Cookies (here’s my recipe)
Chocolate Chip Oatmeal
Italian Almond Cookies (Robert’s constant request-here’s my recipe)
Spritz (my all-time, hands-down, yes, please! favorite)

But these are where I started. I just love thumbprint cookies! Most of you know that I bake/cook gluten-free. These also are paleo, dairy-free, and refined sugar-free. (Hope that is helpful to a few of you!) And all of that helps to keep these within my healthy but oh-so-yummy POV!  Enjoy!

Thumbprint Cookies

ingredients:2014-12-14 21.36.14
1/3 cup arrowroot flour
1/3 cup almond flour
1/3 cup coconut flour, sifted
1/4 teaspoon sea salt
5 tablespoons coconut sugar**
1 tablespoon water
1/4 cup coconut oil, melted
1/2 teaspoon vanilla extract
1 egg, room temperature
all-fruit marmalade or jam (I used ginger/orange and raspberry)
1 egg white beaten with 1 tablespoon water, for egg wash
1/2 cup finely chopped nuts (I used walnuts)

directions:

  • preheat oven to 350
  • line baking sheet with parchment paper
  • in a large bowl, whisk together dry ingredients (first 5)
  • in mixer bowl, combine the wet ingredients (next 4) for 1 minute
  • add the dry ingredients to the wet ingredients and combine with mixer
  • take tablespoon-sized balls of dough and quickly roll into a ball
  • dip into egg wash and then run through chopped nuts
  • place on lined baking sheet about 1″ apart
  • make an good-sized indentation with your thumb (or a wooden spoon handle)—but don’t poke through the bottom
  • fill the indentation with about 1/2 teaspoon marmalade/jam
  • bake for approximately 15 minutes ‘til just lightly browned; remove from oven
  • carefully transfer to a cooling rack
    makes 15 to 20 cookies

** NOTE: these are on the not-so-very-sweet side…you may want to add additional sugar!

 ♥  ♥  ♥  ♥  ♥

God loves you!  ♥  (Don’t ever forget that!)

♥  coleen

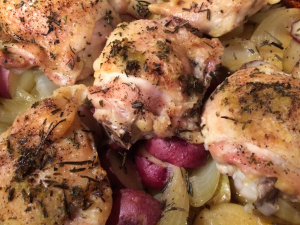
Rosemary Chicken and Potatoes

Rosemary Chicken and Potatoes

Once again, I’m presenting a recipe so simple, I almost hesitate to call it a “recipe.”  This takes 5 minutes to put together, and is so quick and simple you’re going to laugh if you’re not making this already.  This one pot Rosemary Chicken and Potatoes is the best!

If you don’t have a big Le Creuset Dutch oven (or something similar; I’m not a stickler for name brands), it’s time to put it on the Christmas list.  This heavy enameled pot makes stews on the stove top as well as roasted meats and veggies in the oven a snap.   The tricks to this recipe are the fresh rosemary and the bone-in, skin-on chicken thighs.  The rosemary has to be fresh, because the oils that come out of the chopped leaves are what perfume the whole dish.  The chicken skin gets crispy and keeps the chicken moist.  Make sure that you don’t use too many thighs when you make this.  You want some space between the chicken pieces, so the air can circulate around them and crisp up the skin.

Ready for the easiest and tastiest one pot meal around?  Let’s go!

Rosemary Chicken and Potatoes

Ingredients:

  • 1 pound potatoes, any kind
  • 1 large  or 2 small onions
  • 1 1/2 – 2 pounds skin-on, bone-in chicken thighs (five thighs work best for us)
  • olive oil
  • salt and pepper
  • 1 large sprig of fresh rosemary

Directions:

  1. Preheat the oven to 375*F.  Wash the potatoes and cut into bite-sized chunks.  Cut the onion into large chunks.  Combine in the bottom of a large Dutch oven.
  2. Place the chicken thighs, skin side up, on top of the potatoes and onions.  Make sure there is space between the chicken pieces – you don’t want to crowd the pan too much.  Drizzle the whole pan—chicken pieces and down into the potatoes—with olive oil; use about 4 tablespoons.  Season the oiled chicken with salt and pepper.
  3. Strip the leaves from the rosemary and mince.  Sprinkle over the chicken and potatoes.
  4. Bake for one hour.  After an hour, set the temperature in the oven to 400*F, and cook for another 15-30 minutes, until the skin is golden and crispy.  Serve hot!

Explore, experiment, enjoy! — Dana


To view even more of Dana’s unique recipe, you can visit her at Frugal Girlmet!

Squash Fries

Yup!  You certainly read that correctly!   FRIES!  Check ’em out!

2014-12-07 21.38.18

And they were DEEEE-licious!  OK, so i have to tell you…my sister’s boyfriend, Mark, made a version of these for us when we went up to visit at his lakeside home in the fall.  They were so yummy!  And I have been meaning to make a batch but just hadn’t gotten around to it.  So when I asked Robert to pick from these squash in our pantry…I really didn’t think this would be his choice.  (I really thought he was going to ask for the pumpkin with stew baked in it.)

2014-12-07 20.45.53

Now, you probably have heard me mention once or twice (or more!) how much I love Butternut squash… 😉  But these Delicata squash are a very close contender in my estimation.

Delicata are smaller than most other winter squashes. Their skin is also much thinner (think like a baked apple skin).  Making them super-easy to clean and cut—no peeling involved!   These fries fit so well into our healthy but oh-so-yummy POV, don’t you think?  Here is some additional nutritional info about Delicata squash.

Now, remember do NOT peel these Delicata squash…the skin is totally edible!!!  I hope you will give them a try.  Enjoy!

Squash Fries

ingredients:2014-12-07 20.54.51

2-3 Delicata squash
2 tablespoons extra-virgin olive oil  (I use ‘cold-pressed’)
1 tablespoon sea salt
1 teaspoon lemon-pepper seasoning, freshly ground
additional salt & lemon-pepper

directions:

  • preheat oven to 425
  • line a baking sheet with parchment paper *
  • wash and dry the squash
  • cut the ends off
  • cut each of the squash in half lengthwise
  • scrape out the seeds
  • slice into 1/2″ thick slices (half-moon shape)
  • use a large bowl, and toss the sliced squash, the oil and seasonings together
    NOTE: you probably won’t need all of the oil; use just enough. I used only 1+1/2 tablespoons
  • pour the seasoned squash pieces onto the lined baking sheet; place in oven
  • bake for 15 minutes; flip each piece over
  • bake for an additional 6-8 minutes ‘til squash is tender and nicely caramelized
  • remove from oven, and season liberally to taste
  • serve immediately

* of course, you can use foil as an alternative but they will be a bit greasier

 ♥   ♥   ♥   ♥   ♥

God loves you!  ♥  (Don’t ever forget that!)

♥  coleen

Whole Wheat Ginger Snaps

Whole Wheat Ginger SnapsI saw Coleen’s post on Monday for her delicious-looking cupcakes, and I could almost taste them!  She used molasses, which got me thinking about that dark, almost smoky-sweet flavor.  I knew what I wanted – ginger snaps!  So I poked around online, found a recipe I liked, modified it for my house, and voila:  Whole Wheat Ginger Snaps!

These go great with milk for the kids, or coffee for grown-ups.  Heck, get a double dose of spicy and have these cookies with a chai latte!  There are plenty of pantry staple spices here, but the two kickers are molasses and candied ginger.  Check in the dried fruit section of the store.  I keep my candied ginger in the freezer – it will keep indefinitely (and if it’s out of sight, I won’t eat the whole bag in one sitting!)  I like to have it in the house because a big bite of it can calm a nauseous tummy.

If you have a cookie exchange this season, wow them with these boldly flavored cookies.  Your friends will thank you!

Whole Wheat Ginger Snaps

Ingredients:

  • 1 3/4 cups whole wheat flour
  • 2 teaspoons baking soda
  • 2 teaspoons ground ginger
  • 1 teaspoon cinnamon
  • 1 teaspoon salt
  • 1/2 teaspoon nutmeg
  • 1/2 teaspoon garam masala (or use 1/4 teaspoon ground cloves and 1/4 teaspoon finely ground pepper)
  • 1 cup packed brown sugar
  • 1 1/4 sticks butter, room temperature
  • 1 egg, room temperature
  • 1/4 cup molasses
  • 1/2 cup candied ginger, minced

Directions:

  1. First, put the butter in a large bowl and let it come to room temperature.  Put the egg next to it.
  2. In a medium bowl, mix together the flour with the baking soda, ground ginger, cinnamon, salt, nutmeg, and garam masala.
  3. In a large bowl, cream the butter with the brown sugar.  Mix in the egg and molasses.  Add in the minced candied ginger.
  4. A little at a time, mix the flour mixture into the butter mixture.  Refrigerate for one hour.
  5. Preheat the oven to 350*F.  On a Silpat liner or parchment paper, scoop out teaspoon-sized balls of cookie dough.  These will spread out, so give them some room.  I used a melon baller and it worked well.  Bake for 13 minutes.
  6. Let cool on the cookie sheet for a minute, then remove to a wire cooling rack.
  7. Don’t let the kids see these before dinner or you will be pestered until it’s time for dessert.

Explore, experiment, enjoy! — Dana


To view even more of Dana’s unique recipe, you can visit her at Frugal Girlmet!


Mini Gingerbread Cupcakes

2014-11-30 20.38.40

For our family’s Thanksgiving Feast (as the grandchildren call it!), we always divvy up all of the different dishes that make up our spread.  This year I was happy to prepare a side dish (Quinoa Veggie Salad w/ Orange Vinaigrette), the beverages (one <adult> choice of which was Apple Cider Sangria), and a dessert…these spicy-sweet Gingerbread Mini-Cupcakes. Oh, they were so darling! And just the perfect mouthful (and I mean FULL).  <Of course you certainly could make these in a standard cupcake size, too!>

2014-11-27 13.11.15

For those of you who are just beginning to follow the path of gluten-free baking, try this recipe.  When I first made these cupcakes, I used a ‘gf all-purpose flour blend.’ You can pick up a box in the gluten-free section of almost any grocery store. However, if you have a pantry filled with jars of different gluten-free flours, I used 1/2 cup brown rice flour, 1/4 cup tapioca flour, 1/4 cup potato starch, 1/4 cup hazelnut flour).  Note that these are dairy-free if you prepare them with coconut oil…and of course no whipped cream!

This is a quick recipe to pull together…and only takes 10-12 minutes to bake. We enjoyed ours with Spiced Whipped Cream (see the recipe from last week’s blogpost here).  But they would be equally yummy with a cream cheese frosting or a simple buttercream frosting, too.  Enjoy!

2014-11-29 22.51.34

Mini Gingerbread Cupcakes

ingredients:
1+1/4 cup gluten-free all purpose flour blend **
1+1/2 teaspoon ground ginger
1 teaspoon cinnamon
1/4 teaspoon ground cloves
1/2 teaspoon ground allspice
1/4 teaspoon salt
4T butter, room temperature (I used coconut oil)
1/2 cup brown sugar
1/2 cup molasses
1 egg, room temperature
1 teaspoon baking soda
1/2 cup boiling water

directions:

  • set out the butter (or coconut oil) and egg to come to room temperature
  • fill muffin/cupcake tins with liners (mini = 30; regular = 12)
  • preheat oven to 350
  • mix flour(s) and spices together in a small bowl
  • with mixer, cream together butter (or coconut oil) and sugar
  • add egg, then molasses; beating ‘til nice and creamy
  • microwave the water in a measuring cup ‘til boiling; remove and <carefully> stir in the baking soda; set aside
  • add the dry ingredients to the mixer bowl, and blend for about 1 minute ‘til it all comes together
  • continue to blend while pouring in the water; beat for an additional minute or so (batter will seem thin but it very quickly thickens up)
  • fill lined cupcake tins about 3/4 full with batter
  • bake minis for 10-12 minutes (regular for 20 minutes), or ‘til firm to the touch and slightly browned
  • take pan from oven and immediately remove cupcakes to a cooling rack
  • once completely cool, frost as desired

 ♥   ♥   ♥   ♥   ♥

God loves you!  ♥  (Don’t ever forget that!)

♥  coleen