April 19, 2024

Southern Cassoulet

Southern Cassoulet

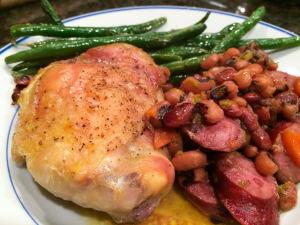
I know, it’s a weird title – French and Southern food together?  But this dish makes sense once you eat it.  Black-eyed peas are a good luck food for the New Year in the South, so why not dress it up a little with this interpretation of a French classic?  I present to you:  Southern Cassoulet!

Authentic cassoulet can take several days to prepare, and involves making a duck confit.  Too expensive and time consuming for me!  Chicken thighs sub in nicely.  Cook the black-eyed peas during the day (or use canned).  To make this even quicker, use two cans of white Northern beans.  I used just plain smoked sausage, but try out a pound of whatever kind of sausage you like.  Did you get a big Le Creuset pot for Christmas?  Now’s your chance to put your new enameled Dutch oven to the test!

Southern Cassoulet

Ingredients:

  • 1 pound dried black-eyed peas (or use two cans of other beans)
  • 1 pound smoked sausage, sliced
  • 2 large carrots, chopped
  • 3  stalks celery, chopped (use the leaves too)
  • 20 whole cloves of garlic (optional, but I thought they were delicious)
  • 1 large sprig of rosemary, minced (or use 1 teaspoon dried rosemary)
  • 4-6 large chicken thighs, skin on, bone in
  • 3 teaspoons olive oil
  • salt and pepper to taste

Directions:

  1. Cook the beans in plenty of water until tender.  This can take two hours or so.  If you are using canned beans, skip ahead.
  2. In a very large enameled Dutch oven, cook the sausage.  Add the carrot, celery, garlic cloves, and rosemary.  Add a little olive oil if things start to stick.  Saute over medium heat for 10 minutes until the vegetables are soft.
  3. Take the pot off the heat.  Drain the beans and add them to the sausage and vegetables, and stir to combine.  Season with salt and pepper.  On top of the bean mixture, place the chicken thighs, skin-side up.  Season with salt and pepper, and drizzle with the olive oil.
  4. Bake at 400*F for at least an hour, or until the chicken is cooked through with crispy skin.
  5. Good luck and have a Happy New Year!

Explore, experiment, enjoy! — Dana


To view even more of Dana’s unique recipe, you can visit her at Frugal Girlmet!
GCH: What’s on Your Plate? – Biscuits & Gravy

Southern Breakfast with Biscuits & Gravy… mmmm mmmm good!

Today I’m sharing my recipes for biscuits and gravy, a Southern staple.  Any Southern girl who’s worth her salt has a good recipe for biscuits & gravy in her back pocket… everybody’s recipe is different and everybody thinks theirs is the best one 😉  Well I’m no different…. These are actually my dad’s recipes.  He loved to cook and had several of his own signature dishes.  Most every Saturday morning while I was growing up, I would awaken to the smell of bacon.  Mom and I would walk into the dining room to see a breakfast buffet set up on the table, including biscuits, gravy, scrambled eggs, hash browns, sausage, and bacon.  He even made the hash browns from scratch!  I’m not that good, I use store-bought hash browns and I usually persuade my husband to make our scrambled eggs since his always turns out better than mine!

Let’s get started!


Biscuits


The Biscuits

Ingredients:

2 cups self-rising flour

5 tablespoons butter

2/3 cup milk

You’ll also need extra flour for your counter top and extra butter to butter the tops when they come out of the oven.

You’ll also need:

Bowl

Large spoon

Cookie sheet

Biscuit cutter or cookie cutter


Instructions:

First, mix the flour and butter together in a bowl, using your fingers to work the butter into the flour.  This will take a few minutes, so you can use this time to pray and thank God for butter 🙂 When it looks like little peas in the bowl, it’s done.  I have to admit, I hate getting all that mess under my fingernails, so I use a latex glove for this part.  I’m not crazy, my mother had me tested.

Next, add the milk and mix it in.  Then dump the mixture out on a floured surface and sprinkle flour on the top, then press it out with your hands until it’s about ¼ inch thick.  We like big, thick biscuits, so I leave mine thicker than this, it’s up to you.  Also, instead of messing up my counter top with all that flour, I use a very large baking sheet as my surface.  Then I can just take the baking sheet to the trash can and dump all the excess flour and eliminate all that mess on the counters!

Cut out the biscuits (you can use a cookie cutter or do what I do, I use a large drinking glass to cut them out) and place them on a cookie sheet.  No need to grease the cookie sheet, there’s plenty of butter in the biscuits to keep them from sticking.   Now you’ll notice in my photo above, one of the biscuits is quite large.  That’s what we always called the “pone”.  This happens when you get to the end of cutting out your biscuits and you have about enough dough left for one or one and a half biscuits.  Don’t bother pressing it out and cutting it again, just mash all the dough pieces up good with your fingers and flatten it out, then put it on the cookie sheet.  The pone is always the most desired biscuit of the bunch since it’s a little larger…. I always give this to my husband 🙂

Bake in a preheated oven at 450 degrees for about 12 minutes.  When the biscuits are finished baking, remove from oven and butter the tops.  If you make small-ish biscuits, this recipe will make 10-12.  But I like big biscuits, and I cannot lie  – (sorry I couldn’t resist!! LOL) so I only get about 6 biscuits from this recipe.  You can double it up if you want to make more.


Now for….

Gravy


The Gravy

Ingredients:

1 cup milk

1 ½ cups water

½ cup oil (or bacon / sausage grease if you prefer)

½ cup self-rising flour

½ teaspoon salt

Pepper to taste

You’ll also need:

Bowl

10-inch skillet

Whisk

Instructions:

Before you begin, mix the milk and water in a bowl and set aside for later.  Then put the oil in your skillet and turn the burner on high.  When the oil is hot, add the flour and salt (and pepper if desired.  I always wait until it’s done to add pepper and more salt, but it’s up to you).  Stir constantly with your whisk until it’s as brown as you want.  I like brown gravy, so in order to get a good, brown gravy as my result, I have to let my flour and oil get pretty brown because after you add the milk and water, it gets a few shades lighter.  Just make sure you don’t let the flour and oil burn.  Burnt gravy doesn’t taste good, just a FYI 😉

When the flour and oil mixture have browned enough for your taste, quickly pour the milk and water mixture into the skillet and whisk rapidly.  Reduce the heat and continue stirring with your whisk to get all the lumps out.  When it gets to the thickness you want, take it off the heat.  My rule of thumb is to stick a spoon in the gravy and hold it over the skillet.  You want the gravy to cling to the spoon and slowly drip off back into the pan.  If it immediately drips off the spoon, it’s too thin.  If it clings to the spoon and doesn’t want to drip off at all, then it’s too thick and you need to add a little water to it.

Now you want to finish the rest of the fixin’s for your breakfast buffet…. Scrambled eggs, bacon (we like turkey bacon best), sausage, hash browns, or whatever else your little heart desires.  Pile it all on a plate, thank God for it, and enjoy.  I hope your family will enjoy this little taste of the South as much as mine does!

God is great, God is good, let us thank Him for our food!

<3 Shauna

_____________
You can also find Shauna on her personal blog, www.workhomeplay.net.