May 18, 2024

Mondo Coconut Shrimp

Mondo Coconut Shrimp Resize

Yes, MONDO!  With four, count ’em, FOUR different coconut products, you too can make your favorite appetizer from that restaurant you go to with your girlfriends!  Mondo Coconut Shrimp are really quite easy to make, and, a fun and tasty appetizer for a party.

You’ll want to use BIG shrimp for this recipe—the larger the better.  I found  some 13-15 count shrimp on sale, and they worked really well.  If you are using smaller shrimp, decrease your cooking time so you don’t make these guys all tough and rubbery.  I coated these in both sweetened AND unsweetened coconut.  Feel free to use one or the other if you don’t have both.  I was going to make this recipe just with the unsweetened kind, but I found a cup of sweetened coconut in my freezer and decided to use it up – and I’m glad I did!

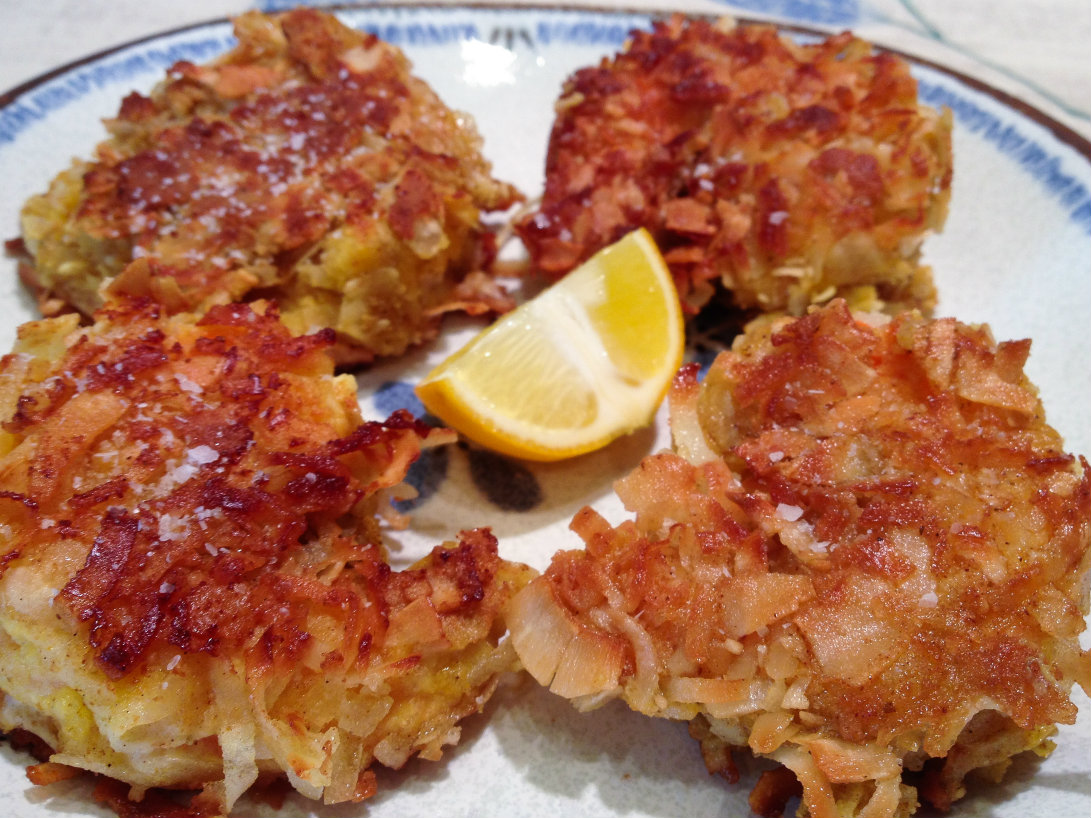
To be  honest, these are fantastic with just some salt sprinkled on top when they come off the stove.  I took a photo of them with a lemon slice, and found out they didn’t even need that to be delicious!  So make these for friends, or as part of a funky dinner, and go MONDO!

MONDO Coconut Shrimp

Ingredients:

  • 1 pound large shrimp, shelled and deveined
  • 3 eggs
  • 1 cup coconut flour
  • 1 cup sweetened shredded coconut
  • 1 cup unsweetened shredded coconut
  • 1 teaspoon curry powder
  • coconut oil, for frying
  • salt for serving

Directions:

  1. Set up a breading station.  In the first bowl, beat the 3 eggs with a tablespoon of water.  In the second bowl, pour in the coconut flour.  In the third bowl, mix together the two coconut shreds and the curry powder.
  2. Start breading:  Dip a shrimp into the egg, then the coconut flour, then back into the egg, and then the coconut shreds.  Place on a plate while you complete the breading.
  3. In a large non-stick frying pan, heat one heaping teaspoon of coconut oil over medium heat.  When  hot, carefully add the breaded shrimp.  You’ll probably have to do this in at least two batches.  Let them cook for about six minutes, then flip and cook again for another five minutes.  Watch your heat here – you want it medium to medium-low, so that the shrimp cooks evenly and the breading doesn’t burn before the shrimp are done.
  4. Remove cooked shrimp to a plate and immediately sprinkle with kosher or sea salt.  Add another teaspoon of coconut oil  to the pan, if necessary, and cook the next batch.  Serve hot!

I texted my husband a photo of the shrimp and he said, “Oooh, looks yummy!” so I saved him some.  Unfortunately, they aren’t as nice the second time around.  They still taste great, but you can’t get them crispy on the outside a second time.  That means Carpe Diem – Gather ye rosebuds while ye may – and eat your shrimp while they’re hot.

Explore, experiment, enjoy! — Dana


To view even more of Dana’s unique recipe, you can visit her at Frugal Girlmet!

Crustless Kale Quiche

Crustless Kale Quiche Resize

Talk about a tongue twister!  It’s worth the effort to say, and the little bit to make, because this Crustless Kale Quiche hits the spot.

I’ve only made this once … and I’ve already eaten almost half of it.  The kale adds a little bitterness and chew to what would otherwise be a run-of-the-mill spinach pie.  Nutmeg, currants, and pepitas add an almost sweet, Middle Eastern flavor profile.  The three eggs are just enough to combine the ingredients without becoming heavy or custardy like a regular spinach quiche.  Don’t get me wrong – a traditional spinach and swiss cheese quiche is wonderful, but this one is lighter, with an unexpected combination of flavors that will have you craving it again.

I ate this hot, and I ate it cold, cut right out of the fridge.  I ate this with a big slab of goat cheese on top and I ate it plain.  I’m going to eat more of it with dinner tonight and see if I can’t discover some new way to enjoy it.  If you want your greens, with a little extra zing, try this instead of a salad tonight!

Crustless Kale Quiche

Ingredients:

  • 1 pound bag of frozen chopped spinach
  • 1 large bunch of kale
  • 3/4 cup pepitas (or try pine nuts or sunflower seeds)
  • 1 tablespoon coconut oil (or butter) plus more for greasing the pie plate
  • 1 teaspoon chopped garlic (about 2 cloves)
  • 1/2 cup currants or raisins (next time I’m trying golden raisins!)
  • 1/8 teaspoon ground nutmeg
  • 1/2 teaspoon salt
  • 3 eggs
  • Goat cheese, to serve, if desired

Directions:

  1. Wash the kale and remove from the stem, tearing it into smaller-than-bite-sized pieces.  Saute on medium heat in a large pot with a lid.  Don’t add any extra water or oil – just the damp kale by itself.  Stir occasionally until it gets soft, about 15 minutes.  When it appears soft and has reduced in volume, pour in the bag of frozen spinach.  Stir to combine and replace the lid.  Cook on medium-low for another five minutes until the spinach is thawed.  Remove from the heat and let cool.
  2. Preheat the oven to 350*F.  While the spinach and kale are cooling, heat the coconut oil over medium and add the pepitas.  Stir frequently for 5 minutes, then add the garlic and currants.  Stir for another 3 minutes.
  3. Squeeze out as much water from the kale mixture as possible, then dump it into a large bowl.  Pour over the pepita mixture and combine.  Add nutmeg and salt.
  4. Beat 3 eggs well and mix into kale mixture.  Grease a pie plate, then fill with the kale mixture.  Smooth it down so you have a flat top.  Bake for 35 minutes or until not wet in the middle.  Serve warm or cold, with goat cheese or without.

Explore, experiment, enjoy! — Dana


To view even more of Dana’s unique recipe, you can visit her at Frugal Girlmet!

Chocolate-Covered Strawberries

Chocolate-Covered Strawberries Resize

Nothing says Valentine’s Day like Chocolate-Covered Strawberries!  Surprise your sweetie – or sweeties, because my kids went cuckoo for these!  If you can get your hands on some nice strawberries (and I know it’s still very much winter in some places, but go with me on this), you can make these for dessert and watch their eyes light up!

My trick here is to use a teaspoon of coconut oil in the chocolate.  It keeps the chocolate from becoming brittle and adds the lightest hint of tropical flavor.  Instead of shattering when you bite into it, this chocolate holds tight to the strawberry so you can eat every last bite.  No worries if you don’t have coconut oil.  You can go without and just use the chocolate, but you will definitely want to make sure your berries are blemish-free and thoroughly dried.

Ready to make your loved ones’ hearts go pitter-pat?  Bring out these healthy and gorgeous treats tonight!

Chocolate-Covered Strawberries

Ingredients:

  • 18 strawberries
  • 1 cup semisweet chocolate chips
  • 1 teaspoon coconut oil

Directions:

  1. Wash the strawberries and dry very carefully.  Pull up the stem leaves so they point up; otherwise you’ll get them covered in chocolate!  Make sure you don’t have any open, weepy spots on the berries, or the chocolate won’t stick.
  2. In a small but deep bowl, microwave the chocolate chips and coconut oil for 30 seconds at a time, and stir after each 30 seconds.  It took three 30-second bursts to get everything melted and smooth.
  3. Line a baking sheet or tray with parchment paper.  Holding onto the stem of the berry, dip in chocolate and place on the parchment paper.  When all berries are dipped, place the tray in the fridge (or freezer if you are short on time!)  Serve cold.

I had a little leftover chocolate in my bowl.  I dipped cashews and banana pieces in there to get every last drop.  My 2 year-old’s chocolate mustache was a sight to behold!

Explore, experiment, enjoy! — Dana


To view even more of Dana’s unique recipe, you can visit her at Frugal Girlmet!


Double Mushroom Pot Roast (Crock Pot)

Double Mushroom Pot Roast resize

I feel like I should apologize for the photo. It’s very…brown.  There’s really no good way to photograph this recipe.  It’s not glamorous.  But it is the easiest and most delicious thing that has ever come out of my Crock Pot!  I present to you:  Double Mushroom Pot Roast!

The secret ingredient is dried mushrooms.  I use dried shiitake mushrooms, because they’re cheap and plentiful at my Korean market.  You can try this with whatever dried mushrooms you can find.  I use a big handful, about 6 or 7 big mushrooms.  For the second dose of mushrooms, regular button mushrooms or creminis will do the trick.  Use whatever large beef roast you like.  Chuck roast is always a favorite, and for this one, I used something called a “seven bone roast” that was also flavorful.

If you want your house to smell amazing when you walk in the door after work or errands, make this in the morning and revel at how easy and delicious it is that night.

Double Mushroom Pot Roast (Crock Pot)

Ingredients:

  • 1 large beef roast, preferably chuck, about 3 pounds
  • 1 onion, sliced
  • handful of dried mushrooms
  • 8 ounces fresh button or cremini mushrooms, sliced
  • 2 tablespoons cornstarch
  • salt and pepper

Directions:

  1. In a very large Crock Pot, drop in the sliced onions and dried mushrooms.  Set to LOW and the timer for 8-10 hours.
  2. In a large pan, brown the roast on each side.  When browned, place on top of mushrooms and onion, season with salt and pepper, and cover.
  3. After 8 hours, remove the roast from the Crock Pot to a large serving platter or bowl.  In  a large pan, cook the button (or cremini) mushrooms and spoon a bit of the juice from the Crock Pot over them to keep them from sticking.
  4. When the mushrooms are done, pour them over the roast.  In the same pan, pour in the contents of the Crock Pot – the juice, onions and mushrooms.  Cook for 5 minutes on medium to reduce a bit.
  5. Mix the cornstarch with 1/4 cup of water and mix to blend.  Pour this mixture into the pan and stir into the onion mixture.  Stir frequently to prevent the gravy from sticking to the pan.  When thickened, about 5 to 10 minutes, pour over the roast and serve.  Season heavily with salt and pepper.


Explore, experiment, enjoy!
 — Dana


To view even more of Dana’s unique recipe, you can visit her at Frugal Girlmet!


Cabbage and Pineapple Slaw

Cabbage and Pineapple Slaw Resize

Don’t let the monochromatic appearance fool you – this salad packs a tasty punch!  Winter veggies come together with fruit, nuts, and a light yogurt dressing in this recipe for Cabbage and Pineapple Slaw.

Cabbage is not a glamorous vegetable.  In fact you can probably buy a giant head of it today for less than a dollar.  Nutritionally it’s a powerhouse, though, and you probably could stand to eat more of what it’s offering!  Sliced very fine (or grated if you prefer), it’s a perfect foil for crunchy apples, chewy raisins, and whatever nuts you like.  I used sunflower seeds, but try almonds, hazelnuts, pecans or walnuts.  I think walnuts would make it taste even more like a healthier version of Waldorf Salad (a childhood favorite of mine.)  The star of the show, and what lifts this recipe above other coleslaws, is pineapple.  Fresh pineapple, minced, would be glorious, but I used a half a can of crushed pineapple and it was delicious.  Save the rest of the pineapple for smoothies, or to dress up cottage cheese.

Since we’re still knee-deep in winter, and Soup Month is going strong, try this salad paired with a spicy soup.  I think it would be great with Chinese Hot and Sour Soup, or any chili recipe, to quell the heat.  Let me know how you like it!

Cabbage and Pineapple Slaw

Ingredients:

  • 1/2 head green cabbage, sliced very fine or grated
  • 1 small apple, diced
  • 1 green onion, minced
  • about 1 cup crushed or minced pineapple
  • 1/2 cup raisins or other dried fruit (cranberries or cherries would be yummy!)
  • 1/2 cup nuts or sunflower seeds
  • 1 heaping tablespoon mayonnaise
  • 2 heaping tablespoons plain yogurt
  • juice of 1 lemon
  • juice of 1 clementine orange
  • 1/4 teaspoon salt, or to taste

Directions:

  1. In a very large mixing bowl (or a very large Tupperware container with a lid, my preferred method), mix together the cabbage, apple, onion, pineapple, raisins, and nuts.
  2. In a small container with a lid, shake together the mayo, yogurt, lemon and orange juices, and salt.  Taste to see if you want any more salt or lemon.
  3. Pour dressing over cabbage mixture and shake or toss to combine.  Refrigerate until ready to serve.

Explore, experiment, enjoy! — Dana


To view even more of Dana’s unique recipe, you can visit her at Frugal Girlmet!


Spinach Salad with Warm Bacon Dressing

Spinach Salad with Warm Bacon Dressing Resize

Continuing with the theme of National Soup Month, I have another salad to pair with a lovely, hot bowl of soup.  With crunchy bacon, creamy hardboiled eggs, and a sweet-and-sour vinaigrette, this recipe for Spinach Salad with Warm Bacon Dressing is perfect for a cold day.

To make sure you get lovely hardboiled eggs (and not greenish, sulfury yolks), go easy on your eggs.  Put them in a pot of water that covers the eggs by an inch.  Bring to a boil – and as soon as it boils, take it off the stove, put a lid on the pot, and set a timer for 14 minutes.  When the timer rings, drain off the hot water and cover with ice and cold water.  Let the eggs cool, then peel.

I used rice vinegar; but you can try red or white wine vinegar, or apple cider vinegar.  This recipe makes two large salads.  Try it with soup, stew, chili, or just some bread and butter.

Spinach Salad with Warm Bacon Dressing

Ingredients:

  • 1 large bunch very fresh spinach (or a bag of baby spinach) rinsed very well and spun dry
  • 6 slices bacon
  • 2 tablespoons rice vinegar (or other vinegar)
  • 1 tablespoon (or more, if you like) honey
  • 1 tablespoon Dijon mustard
  • 1/2 onion, sliced, or diced, very thin
  • 4 hardboiled eggs

Directions:

  1. Wash and dry the spinach very well.  (Gritty sandy spinach is horrible!)  Divide into two large bowls and set aside.
  2. Fry the bacon in a large pan until crispy.  Remove to a paper towel-lined plate to cool.  Measure out 1/4 cup of the bacon fat, discard any leftover, and return the 1/4 cup of fat to the pan.
  3. Heat the bacon fat, and with a wooden spoon or silicon spatula, stir in the vinegar, mustard, and honey.  Add the onion and cook until the onion begins to soften, about 5 minutes.
  4. Peel and quarter the eggs and divide between the two salad bowls.  Crumble the bacon and add to the spinach.  Pour the hot dressing over the spinach and toss.  Season with fresh cracked pepper, if desired, and serve warm.

Explore, experiment, enjoy! — Dana


To view even more of Dana’s unique recipe, you can visit her at Frugal Girlmet!


Chinese Chicken Salad

Chinese Chicken Salad Resize

As Coleen pointed out in her post on Monday, this is National Soup Month!  She will be sharing some of her favorite soups with us.  And what makes a better meal than soup and salad?   One of my favorite salads is Chinese Chicken Salad!

This is perfect for winter, because all of the ingredients are in season now.  Instead of canned mandarin oranges, you can probably find fresh ones now – I’ve got Clementines and Satsumas left and right at my grocery store.  Red cabbage and carrots are always around, as are green onions.  For the base, I used Napa cabbage, but if you don’t have that, you can use any kind of lettuce you like, or really finely chopped green cabbage.  I cooked some extra chicken breasts last night so I could chop them up cold and throw them over the salad, but you can use whatever chicken you like – roasted, store-bought rotisserie, or even breaded chicken nuggets!

This recipe serves two as part of a lunch or dinner menu.  Try this salad with any soup you like, or paired up with a sandwich, wrap, or pasta dish.  Filling, nutritious and delicious – and it won’t break any of your New Year’s resolutions!

Chinese Chicken Salad

Ingredients:

  • 1 small head Napa cabbage, or romaine lettuce
  • 1/2 head small red cabbage
  • 2 carrots
  • 2 or 3 green onions
  • 2 mandarin oranges
  • 2 cooked chicken breasts, or 3 cups chopped cooked chicken
  • 2 tablespoons sesame oil
  • 2 tablespoons rice vinegar
  • 1 tablespoon sesame seeds
  • salt and pepper to taste

Directions:

  1. Chop the Napa cabbage into inch-wide strips.  Finely slice the red cabbage.  Place both in a salad spinner and rinse under cold water, then spin dry.
  2. Cut the carrots into matchsticks.  Finely slice the green onions.  Peel the oranges and remove as much of the white pith as possible.  Separate into segments.  Dice or thinly slice the chicken breasts.
  3. To assemble:  In two very large bowls, mix together the cabbages, carrots, and onions.  Arrange the oranges and chicken breasts on top.  Drizzle each salad with one tablespoon each of sesame oil and rice vinegar, and sprinkle the sesame seeds, salt, and pepper on top.

Explore, experiment, enjoy! — Dana


To view even more of Dana’s unique recipe, you can visit her at Frugal Girlmet!

Korean Green Onion Salad – Pa Muchim

Pa Muchim Resize

Korean Green Onion Salad, or Pa Muchim (pronounced “pah moo cheem”) is a staple at Korean BBQ restaurants and homes alike.  It is frequently paired with pork belly or other fatty meats, as a counterbalance to all the rich flavors and textures.  I find it spicy and weirdly refreshing!

Yes, this salad has a lot of green onion in it.  So much so that you should probably share it with whoever you’re going to be hanging out with that day.  I wouldn’t eat a big plate of this and then go out on a first date!  Cutting the green onions into long strips can be a little tricky.  If it’s not working out for you or you get frustrated, you can just turn the onion on a bias and cut long diagonal slices – they don’t have to be strips cut lengthwise.  Red leaf lettuce is most commonly used, but you can try green leaf or romaine too.  As for the dried red pepper, just use one of those little packets of crushed red pepper that always comes with a pizza delivery!

Next time you grill or fry something rich and delicious, pair it with this spicy and cleansing salad.  (And for more motivation, check out how healthy green onions are for you!)

Korean Green Onion Salad (Pa Muchim)

Ingredients:

  • 1 bunch green onions (anywhere from 4 to 8 onions)
  • 1 head red leaf lettuce
  • 2 teaspoons soy sauce
  • 1 teaspoon sugar
  • 2 teaspoons rice vinegar (or you can substitute apple cider vinegar)
  • 2 teaspoons sesame oil
  • 1/2 teaspoon crushed red pepper flakes (optional, but try it if you have them!)
  • 2 tablespoons toasted sesame seeds

Directions:

  1. Slice onions lengthwise into thin strips, or you can cut them on a very severe bias into long ovals.  Put the onions into a bowl of ice water and let soak for fifteen minutes.  This crisps them, and also removes some of the sliminess from the insides.
  2. While the onions are soaking, wash the lettuce and cut it into bite-sized strips.  If your lettuce is a little limp, soak it in ice water too!
  3. Make the dressing:  combine soy sauce, sugar and rice vinegar in a small Tupperware cup with a lid.  Shake well to combine.  Add sesame oil and red pepper flakes and shake again.
  4. Drain the lettuce and onions, dry them if you can:  Either roll up in a dish towel, or spin in a salad spinner.  Combine lettuce and onions in a large bowl, toss with dressing, and sprinkle with sesame seeds.  Serve immediately.

Explore, experiment, enjoy! — Dana


To view even more of Dana’s unique recipe, you can visit her at Frugal Girlmet!

Zoe’s Crockpot Chicken

Zoe's Crockpot Chicken resize

This past weekend, I invited my best friend and her family up to our house for dinner.  Instead of trying to make a meatloaf large enough to feed eight people, I decided to use my two crockpots to save time and effort in my prep.  In the one, a mushroom pot roast.  In the other, I made a lightly curried pot of chicken thighs.  I wasn’t sure if my friends’ kids would like it – they’re eight and ten years old, and I didn’t know if it would be a hit.  Ten year-old Zoe took one bite and her face lit up.  “Mama,” she excitedly told my friend, “you have to ask Dana for this recipe so you can make it at home!”  I have to tell you, I’ve never been so proud of a recipe in all my life!  This, then, will be called Zoe’s Crockpot Chicken.

You can use one or two pounds of boneless, skinless chicken thighs.  If you use one pound, you’ll have more sauce, and will probably want to serve this over rice or noodles.  If you use two pounds, like I did this time, it’s a thicker stew and doesn’t need anything under it – but jasmine rice would certainly be delicious.  Use any store-bought curry powder you like.  I have two, and the one I used this time was just a $4 jar from Trader Joe’s – nothing fancy.  I also used half a head of cauliflower, diced.  It doesn’t add much to the flavor, but it adds nutrition and body to the sauce.  I like to garnish with a big dollop of plain yogurt, and if you have cilantro, sprinkle some of that on top.  If you need a quick chicken dish that promises to please grown-ups and kids alike, check this one out.

Zoe’s Crockpot Chicken

Ingredients:

  • 1 large onion, sliced fine
  • 1 or 2 pounds chicken thighs
  • 2 tablespoons curry powder
  • 1/2 teaspoon salt
  • 15 ounce can of diced tomatoes (I like fire-roasted)
  • plain yogurt and cilantro to garnish, optional
  • rice or noodles, optional

Directions:

  1. Place the sliced onions on the bottom of the crock pot.  Layer the chicken thighs on top.  Season well with curry powder and salt.  Open the can of tomatoes and dump on top.
  2. Cover and cook on high for 4 hours or low for 6 hours.  When ready to serve, shred the chicken with a fork and mix all the ingredients.  Serve on top of optional rice, garnish with optional yogurt and cilantro, and enjoy!

Explore, experiment, enjoy! — Dana


To view even more of Dana’s unique recipe, you can visit her at Frugal Girlmet!

Monkey Bites (Banana Chocolate Chip Cookies)


monkey bite cookies

Christmas cookies are a tradition at my house – and yours too, I’m sure.  My Dad lives for Tollhouse chocolate chip cookies.  My favorites are peanut butter, with or without jam thumbprints and crushed walnuts.  When I worked outside the home, I made dozens of cookies each year for Christmas, sharing them with co-workers and other friends and family.  Now that I am home with my girls, I have to be much more careful – I can’t have all those cookies around, since I don’t have anywhere reliable to offload them, and I DON’T want to eat them all myself!  So I am committed to striking a balance between festivity and nutrition.  Enter:  Monkey Bites!

These cookies have all the flavor (and more!) of your typical chocolate chip cookie, but instead of being filled with flour and sugar, you get bananas and oats.  These are soft cookies, and I keep them in the fridge when I’m done.  But the best part of Monkey Bites is that they use three of these:

overripe banana

So if you are looking for a healthier chocolate chip cookie (or you have a few squishy bananas to contend with), try these Monkey Bites.  And feel free to customize:  butterscotch or peanut butter chips would be delicious, or add dried cranberries or cherries to pair nicely with the chocolate chips.  The sky is the limit!

Monkey Bites

Ingredients:

  • 3 overripe bananas
  • 2 cups oats
  • 3 tablespoons coconut oil or butter
  • 1 teaspoon vanilla extract
  • 1/2 teaspoon cinnamon
  • 3/4 cup (or about half a bag) of chocolate chips
  • 1/2 cup shredded unsweetened coconut

Directions:

  1. Preheat oven to 375*F.  Lightly grease a cookie sheet or use a Silpat liner.
  2. In a large bowl, mash bananas with a fork.  Stir in the rest of the ingredients, mixing well.
  3. Using a spoon and fork, scoop up a largish tablespoon of cookie dough and place on baking sheet.  You’re going to have to mold it into shape, because these don’t spread.  Mine are about 2″ in diameter and about 1/4″ high.  Try to make them a uniform size so they bake evenly.
  4. Bake for 15-20 minutes.  You want them to be firm, and the chocolate chips should be starting to melt.  These are soft cookies but you don’t want them squishy.  Let cool on baking sheet for 10 minutes, then store covered in the fridge.  You can put them in a toaster oven to warm them and crisp them up a little.

Explore, experiment, enjoy! — Dana


To view even more of Dana’s unique recipe, you can visit her at Frugal Girlmet!