December 23, 2024

Decorative Floral Arrangements for the Home

Amy1
One of my favorite things to do is make different crafts with silk flowers. Today, I will show you how to create a flower arrangement in a decorative vase. It is really simple,  and makes your home beautiful!

Items needed:
Vase (any type)
Silk flowers (any variety)
Eucalyptus
Styrofoam craft ball or block (size proportionate to the vase you choose)
Wire pliers

Directions:
Insert the Styrofoam ball into the bottom of the vase. You may have to trim the Styrofoam so it will fit into the vase.

Begin arranging the silk flower stems anyway you like by inserting the stem into the Styrofoam. If the stems are too long, cut the stems with the wire pliers before inserting it into the vase.

Insert the eucalyptus in between the flowers.

Continue to arrange the flowers until you like the final product.

Amy2

Have fun and happy crafting,

Amy 🙂
What IS homeschooling, anyway?

www.girlfriendscoffeehour.com What IS homeschooling, anyway? #homeschool

Now that you know my story, and how our family came to homeschooling, you may be asking yourself this question.

What IS homeschooling, anyway?

Trust me, anyone who has ever considered taking this faith leap has asked themselves that question! The answer can be simple or quite complicated, and it depends on many things.

Are you new to homeschooling?

How many children are you homeschooling?

In which state are you living?

Is this a permanent decision, year-by-year, or definitely temporary?

What is your teaching and learning style?

What is your child’s learning style?

Does your child have a great interest in a certain topic or activity?

The definition

Are you ready for the basic, simple definition of homeschooling?

Homeschooling is the educating of a child by his or her parents.

Ready for the more complicated answer?

Homeschooling is:

Reading, baking, singing, playing, writing, building, creating, resting, thinking, gardening, swinging, digging, swimming, changing, committing, adjusting, listening, praying, following, obeying….to name just a few verbs. Notice how it is an active, living thing?

I posed this question in a couple Facebook groups of which I’m a part, as well. Below are some of the answers I received from mamas who are currently in the trenches of homeschooling!

“A learning lifestyle” ~ Inger from Hiding the Peas

taking personal responsibility for their [your child’s] educational outcome” ~ Amber from Adventure Hollow

“Living and learning WITH your children.” ~ Heather from Upside Down Homeschooling

“We think of homeschooling as learning together as a family, doing our best to equip and prepare our children for what God calls them to in career, family, and Great Commission.” ~ Tauna Meyer from Proverbial Homemaker

“Homeschooling is a lifestyle. It is not school at home, but rather a way we choose to live our life.” ~ Stephanie from Multi Taskin’ Mom

It is simply choosing to raise our children ourselves.” Cindy from Get Along Home

“It’s doing life together! Pouring the love of Jesus into them every moment and making him the center of all we do! “~ Jennifer from Godly Glimpses

“Homeschooling is the gift of nurturing relationships with your children, crafting learning opportunities to meet their needs, and blending life and learning together. ~ Anne from learning table

An opportunity for parents to be at the helm of providing intellectual, moral, social and spiritual instruction to their children by choosing to guide them through learning outside of traditional public, private and charter schools. ~ Martianne from Training Happy Hearts

“Homeschooling is about discipling our children the same way Jesus discipled his apostles — by being with them every day, talking with them, teaching, training, and setting the example.” ~ Marcy from Ben and Me

Here are some quotes from a few unschoolers, too:

“….my definition of homeschooling has grown over the years. I believe it is the original design for families. Children learn naturally from their parents through daily interaction, guidance, participation in the community in meaningful ways, and working through issues.” ~ Aadel from These Temporary Tents

“For our family, homeschooling is not defined as what we do. It’s just that we keep our kids home from school. I actually had a “Yes!” moment recently as I was flipping through David Guterson’s “Family Matters” and that he had written something very similar to the above sentiment. I had finally found something that made sense. What unites all homeschoolers, regardless of their educational philosophy, is that they have traded in the ideal of public education to keep their kids home and to educate them in a way that seems natural and makes sense to them. Homeschooling is about choosing something different for your family.” ~ Rebecca from Raven Threads

“I believe that parents owe it to our children to step out of that world and seek first, God and then seek freedom. Freedom to think for themselves without fear of rejection, freedom to learn the world outside the textbooks, freedom to feel the world…not just read about it. Freedom to become discovers again! ~ Margret

Tabitha, over at Meet Penny, also helped me out by polling her readers. Here are some of the answers she received:

“A method of educating the whole child.”

“Homeschooling is a lifestyle.”

“Homeschooling is providing my children with the best education I can for them to become happy, intelligent adults.”

“I am heart-schooling!”

Personally, I love that last one.

I may need to begin describing our homeschool that way. After all, it is the reason I began homeschooling. To capture their hearts, direct them toward Him!

Did these quotes give you a good picture of what homeschooling is? Of what it can be?

I look forward to digging deeper next week with Why would ANYONE choose to homeschool? I hope you’ll join me!


Personalized Coffee Mugs

Here at Girlfriends Coffee Hour, we are all about coffee!!  So, today’s blog gives us an interesting and fun way to decorate our coffee mugs!

Items needed:

Solid color coffee mug (make sure it is microwave safe)
Bic(TM) marker(s)

Directions:

Think of an idea that you would like to write on the mug—a word, a picture, a Bible verse, a prayer, etc.  For my coffee mug, I wrote “Dear God, please make me harmless as a dove.  Amen!” I also drew a picture of a dove and decorated the bottom of the mug with hearts, the handle with polka dots and I drew a cross under the handle.

Use your BIC marker(s) to decorate the mug any way you would like.  I used a silver marker on a black coffee mug. The color choices are endless.

Bake it in the oven at 350 degrees for 30 minutes. This will keep the marker from coming off.

Let cool, wash and enjoy!

mugs

Have fun and Be Creative 🙂

Amy

How to Make a Decorative Swag

Today, At Home w/ GCH would like to introduce you to our newest blogger, Amy Boyd!  Amy will be sharing some of her craft and DIY projects with us, each Wednesday.  I hope you enjoy her segment and will share your comments with her!

And now…. here’s Amy!!

_______________________________________


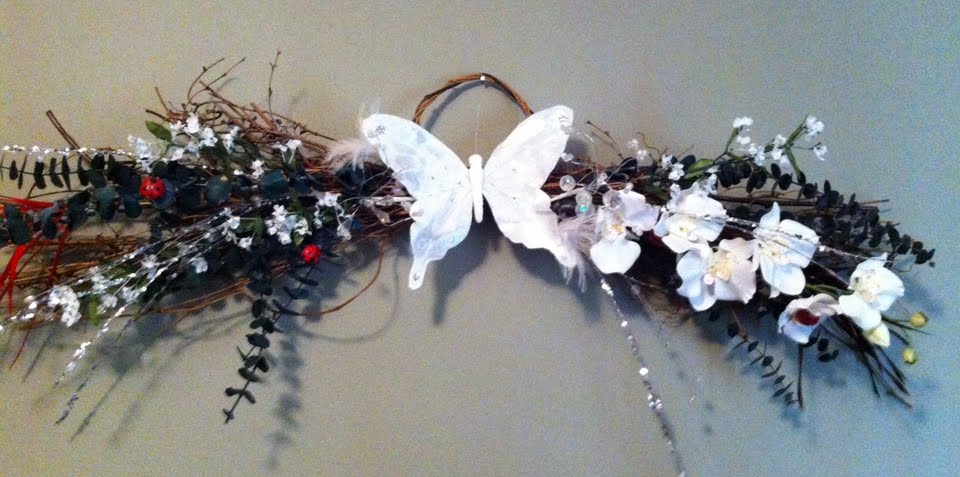
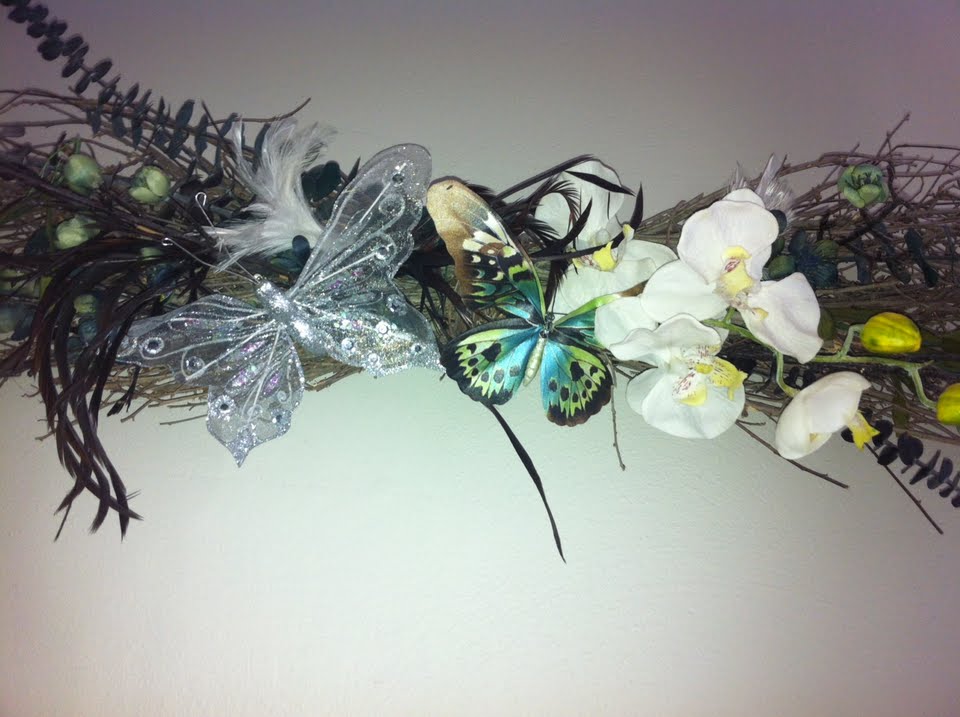
Today, I would like to teach you how to make a decorative swag, as shown below.

Swags_Pic1


My favorite place to shop for these items is Hobby Lobby. Other places like Garden Ridge, Trees and Trends, and Walmart would have these items as well. Typically, I spend about $20 to $40 on a project like this. I always have some materials left over, so I definitely save them and use them at a later date.

The size of your swag will depend on the location where you would like to hang it. They come in various sizes. The ones I have completed and have shown below are about 2 feet long. I have found some swags that have a handle at the top which makes for easy hanging.

The types of flowers, adornments, and fillers that you choose for this project is simply a reflection of your own personal taste; find something pleasing to your eye and that will match the décor of the room. Since the swag I chose is brown, I tend to gravitate to lighter colors that will stand out. I myself love butterflies. Every time I see one, I think God is reminding me how beautiful life is and how much there is to be happy about.

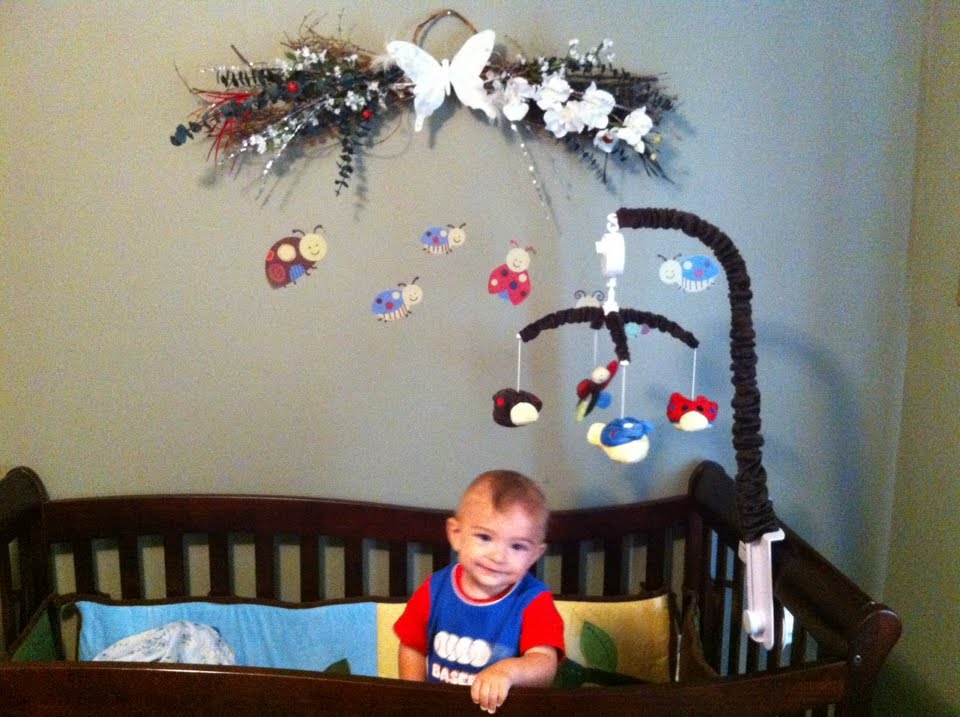
When my son Asher was born, I would sit on the couch and feed him and I had the first swag shown below hanging above our couch. He would stare at it and smile and coo almost every time he looked at it.

Swags_Pic2

So, I made one for his room as well. I tried to make it similar since he liked the other one so much. I found some tiny ladybugs to use for his swag, which matched his bedroom perfectly.

Swags_Pic3

A lot of times, the silk flowers come in bunches or on very long stems so it is necessary to cut them apart or to cut off part of their stem with wire pliers. They need to be about half the size of the swag. Then, I begin sticking the flower stems on each side of the swag. You can cut off a piece of floral wire and wrap around the stem to make it stay in a certain place. There is a middle knot that separates each side of the swag. I typically do not glue on the flowers and eucalyptus because they stay in place pretty easily. The butterflies I used have clips on them so I just clip it in place.  I did hot glue the ladybugs right onto one of the stems.

A hot glue gun is easy to use.  Just insert a hot glue stick and plug it in. Always put the hot glue gun on a piece of newspaper or a paper towel because the glue will leak out. You just pull the trigger on the glue gun to squeeze out a small amount that will be used to glue the pieces together.


Items needed:

1 Grapevine Swag

3 Different types of Silk Flowers

2 -6 Adornments like butterflies, lady bugs, sea shells, crosses, etc.

5-6 long pieces of Eucalyptus

2-4 Fillers such as feathers, beads, baby’s breath, etc.

Wire pliers

Floral Wire

Hot Glue Gun

Hot Glue Sticks


Directions:

Basically, you will arrange the materials until you are satisfied with the way it looks. There is no right or wrong way when it comes to making your own crafts.  I’d love to see your pictures if you give it a try.


Have Fun & Craft away!


Amy 🙂


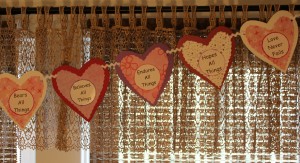
At Home with GCH: Happy Hearts Day Garland

cropped1

Raise your hand, please, if you like to decorate for (as we call it around here) Happy Hearts Day!  Uh-huh…I thought so!  Today I have a cute decoration for you to craft!  I have totally fallen in love with buntings (aka garland or banners)!  They can be made with almost any type of fabric or felt or scrapbook paper or wallpaper or ____!  The list goes on & on!  They can be made teeny-tiny and used as a cake topper; or really long and used for party decorations; or, my favorite, in a medium size and used to hang almost anywhere in your home.  The next time you have 2-3 hours to fritter away, <I know, I know…who does?> run away to Pinterest and you can find oodles and oodles of options, examples, and ideas!

Today, the bunting I’ve made is inexpensive, fairly quick, easily adaptable, and you can totally personalize it!   I needed 16 hearts to write out my chosen wording; if you don’t need as many to “say” your phrase, adjust the quantity of paper. You choose your color scheme…then your coordinating papers…then ribbon to match and maybe some different colored markers. Check it out!

Supplies and Tools

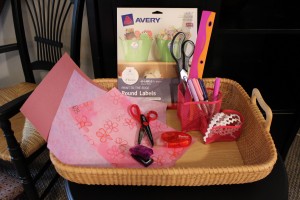
(4) sheets 12″x12″ solid color scrapbook cardstockIMG_0148
(4) sheets 12″x12″ patterned scrapbook paper (coordinating colors)

(1) piece of 8-1/2×11 copy/printer paper
4 yards 1/4″ ribbon
printer labels (I used 2″round; you could use 2×4″)
colored permanent markers (brands like Sharpie or Bic Mark It)
hole punch
scissors
decorative edge scissors (like this)
adhesive tape runner (like this)

Instructions
1.  Cut the piece of copy paper down into a 6″x6″ square.  Fold in ½ (3″x6″) and then draw the outline of one side of a heart using most of the piece of paper.  Cut out along your line.  Unfold  the paper; voila! a heart!  This will be your template.
2.  Cut all 8 sheets of scrapbook paper into 6″x6″ squares (cut in half, and then, in half again).

3.  Using the paper template and a pencil, trace onto each of the heavier-weight squares…16 in all.  Cut out along traced line.  Set aside.

4.  Now take the paper template, fold along the original crease mark, and cut off about ½” all around.  This will reduce the overall size of your template.

5.  Then, using the slightly smaller template and a pencil, trace onto each of the remaining 16 pieces of lighter-weight scrapbook papers.  Use the decorative edge scissors to cut out these hearts.

Almost ready to assemble!

6.  For the labels… Choose what you would like to write on your bunting.  As you can see, I am featuring the words of a section of 1st Corinthians 13.  You could simply put ‘I LOVE YOU!’  You can either write on them by hand (with the permanent markers) OR employ the use of your favorite wordprocessing program.  (That’s what I did!  You can achieve a very finished look with not much effort!  And lots of fun!) Use the directions included with the printer labels.

Almost done!

7.  Now to assemble: fiddle around with your cardstock hearts and paper hearts pairing them up to your satisfaction.

8.  Then, using the adhesive tape runner, slide 3 or 4 lines of ‘tape’ onto the back of the lighter-weight paper hearts and affix to the front of the heavier-weight hearts.  Pretty, hmmm?  Continue until all are put into pairs.

9.  Then attach the labels to the very front of your beautiful hearts.

10.   Now take the hole punch, and punch a hole or two onto each ‘shoulder’ or bump of the hearts.

11.  Lay out the hearts in the proper order to complete your chosen phrase.  Take one end of  the ribbon, and using about 6″ tie off a loop.  This is how you will hang your finished bunting.  Beginning with your FINAL word or letter, hold the non-looped end of the ribbon, and thread the ribbon through the holes punched on each heart, keeping the ribbon along the backside of the heart.  (Try it…as you manipulate the ribbon, you will see how easy this goes.)  When you get all of your hearts threaded onto the ribbon, lay your bunting out on a flat surface and space out the hearts so there is just 1″, or so, of ribbon between each heart.  Finally, tie off a loop at the end using about 6″ of ribbon.

Done! 

Now it is up to you to find the perfect spot to hang your HAPPY HEARTS DAY bunting…and enjoy!

cropped2

God loves you!   ♥  (Don’t ever forget that!)

♥  coleen

_________________________________

If you would like to send a personal message to Coleen concerning this series, you may email her at: Coleen@girlfriendscoffeehour.com

Saturdays with Shandy: Christmas Edition! Last Minute Gifts for Your Girls

Christmas is a few short days away! If you’re in need of some easy, inexpensive, handmade gifts for the girls in your life – whether little or all grown-up! – then you’ve come to the right place! This round-up includes nine awesome gifts that any girl would love to get!

*Note: You can find all nine ideas on our “Saturdays with Shandy” board on Pinterest!

Did someone say scrapbook paper?!?!

paper crafts

  1. The adorable DIY Dry Erase Board from Leah Marie V is so cute, and so useful! The shabby chic DIY flowers give it an extra feminine touch. You can use this for a hundred different things, and customize it with scrapbook paper that fits the style of the person you’re creating it for. This would be great to leave notes for your family, or to jot down what you need to pick up at the grocery store!
  2. The Scrapbook Clipboard from KaeliElyse would be a great gift for any girl on your list, and would come in handy on a daily basis! Just like the dry erase board, you can customize this with your choice of scrapbook paper!
  3. Aren’t these pens super fun? I found them at Chocolate on My Cranium! You can make these to match the clipboard! Or make all three a matching set! What a great gift that would be!

What girl doesn’t love hair accessories and nail polish?!

beauty

  1. This Headband Organizer from Lyssa Beth (tutorial found at Make It My Own) would be great for any girl with a love of hair accessories! The best part? You can put all kinds of barrettes, ponytail holders, bobby pins, and clips in the inside! I am definitely making this for my daughter!
  2. How cute is this play on words?! For Your Mistle Toes! Such a creative idea from Carissa Miss, and she has a free printable!
  3. Make those ugly bobby pins cute with this tutorial from Colour Me Everywhere! A simple, inexpensive, and fantastic stocking stuffer!

And the last three fabulous gift ideas…

gift ideas

  1. How amazing are these Coffee Cozies from The Sitting Tree?! I can think of at least a dozen people I could give these to, and I know they would be LOVED! I’m going to knit one for myself, too!
  2. Shhhh! Don’t tell my daughter, but she’s getting one of these Friendship Bracelet Kits from Tater Tots and Jello for Christmas! I loved making friendship bracelets as a kid, and now my daughter loves them, too!
  3. I received a personalized hand sanitizer bottle for Christmas one year, and I absolutely loved it! I can tell you these would be a big hit with your child’s teacher! You can also use soap bottles! Either way, put a classy monogram inside, and this would be a welcome gift for anyone’s home! Be sure to check out the tutorial at The Idea Room!

I have to go and get busy making all of these wonderful handmade gifts (and a few for myself!) I hope you found some of these ideas to be excellent as well! There’s nothing like handmade for the holidays! Thanks for joining us for Saturdays with Shandy: Christmas Edition! It’s been a lot of fun, and I can’t wait to get started on our next series!

Have yourself a merry little Christmas, and may you be blessed abundantly in the new year!

Love & {Christmas} Blessings,

Shandy

Be sure to visit Shandy’s personal blog Aprons ‘n Pearls for crafts, recipes, homekeeping tips & more!

Saturdays with Shandy: Christmas Edition! Prim Christmas Stitcheries

Hand embroidery, particularly primitive hand stitching,  is one of the easiest craft projects there are. It’s very forgiving, and is meant to be imperfect. It’s also very rewarding, because in a very short time, you can create something beautiful for your home, or to give as a gift. You can really take creative license with hand embroidery, and there are many different styles you can create… everything from modern to vintage to primitive designs (like we’re doing today!) and anything from pictures to quotes to stitching names and words in your own handwriting!

Believe me when I tell you that even someone who has no craft experience can do this! I wasn’t taught any specific technique when venturing into prim stitcheries, but instead taught myself. I saw a pricey stitchery in a catalog, looked at it and thought, “I can do this!” I went to the craft store and bought some inexpensive materials, then I just sat down and started stitching – knotted the end of the embroidery floss and began running the threaded needle under and over until my project was complete!

I like to put my stitcheries in frames when complete. I buy inexpensive black picture frames, and use sandpaper to distress them. Usually, I remove the glass so the fabric is exposed (like the one on the left) but there is one stitchery I made (shown on the right) where I created a “photo mat” by folding the muslin and tea-staining the middle darker than the border.

stitcheries

I also create “labels” to affix to stackable boxes (another project I like to do!) or to attach as tags on gifts.

labels

At Christmastime, I display many stitcheries… ornaments, table runners, magnets, framed pieces…  there’s nothing like a handmade Christmas!

have yourself a merry little christmas

I hope this has given you some ideas of your own! Or maybe you’ve seen something here you’d like to create! Start with something simple if you’ve never made a stitchery before.

{Last week, we learned how to make “tea-stained” fabric in preparation for this week’s project. If you missed it, you can find the tutorial HERE.}

Round up the following supplies:

  • muslin
  • embroidery floss
  • embroidery needle
  • embroidery hoop
  • scissors
  • sharpened pencil

Basic directions:

  1. To get started, lightly sketch your design onto the muslin with the pencil. You’ll be stitching over the pencil marks, so don’t worry that they’ll show.
  2. Then, place the fabric into the embroidery hoop so that the area where you are starting is in the middle of the hoop and taut.
  3. Thread the color of embroidery floss you’re working with first through your needle and knot it at the end.
  4. Starting on the backside of your fabric, use simple back stitching to complete your project. (Our very own Shauna did a post on embroidery a while back, and shared THIS picture with us to give us a visual on how to back-stitch. You come up from underneath the fabric on the odd numbers, and go back down through the top on the even numbers. Piece of cake!) *See notes below.
  5. When complete, or to change colors, knot your embroidery floss (which must now be on the back of your fabric) and cut off the ends.
  • Note: Space evenly and pull gently, but not allowing the embroidery floss to be loose… you want it to be snug on the fabric, but not so tight that it’s wrinkling or puckering the fabric.
  • Note: On curved lines, you may need to make the stitches a bit smaller so the curve forms nicely.

Happy stitching!

Love & Blessings,

Shandy

Be sure to visit Shandy’s personal blog Aprons ‘n Pearls for crafts, recipes, homekeeping tips & more!


Our next Women’s Online Bible Study,

“Crazy Love,” by Francis Chan,

begins January 6, 2013.

To sign up for this Online Bible Study, click HERE and follow the instructions. You will also be given a link to where you can purchase the book for this Bible study. We’re looking forward to learning about this “Crazy Love” with you!

Saturdays with Shandy: Christmas Edition! “Tea-Stained” Fabric

This week and next is a two-part project. This week I am teaching you how to make the  “tea-stained” fabric that you will need for next week’s Prim Christmas Stitcheries. This is one of my favorite craft projects to do. It’s easy, smells wonderful for years, and looks beautiful.

simplify

What You Will Need:

  • muslin fabric (I dye 1 yard at a time)
  • cheap instant coffee
  • cheap imitation vanilla extract
  • cinnamon
  • large pot
  • large cookie sheet

Directions:

  1. Fill a large pot with water (approx. 5 cups) and heat on the stove to boiling.
  2. Remove from heat and add 1/3 c. vanilla extract, 2 cups of instant coffee, and 1/4 c. cinnamon to the water.
  3. Put the fabric in the pot and let sit for an hour.
  4. If you want a “grubbier” textured fabric, you can rub cinnamon directly into the fabric as well, after you take it out of the pot.
  5. Gently wring out, then hang to dry, or place fabric on a large cookie sheet and bake on low heat (200 degrees F) for a few minutes. You will need to stand by and watch the fabric so it doesn’t burn. This is my preferred method, and it makes for a slightly stiffer fabric as well.

Tips:

  • You can make more stained fabric with the remaining mixture, or put it in a container and refrigerate to reuse later.
  • This fabric is wonderful for all sorts of craft projects, especially for those like me who love primitive country decor.
  • I buy my coffee, cinnamon, and vanilla at dollar stores. No need to spend money on good ingredients!
  • I never pay full price for fabric! The popular craft stores have apps with 40% off coupons!
  • I also dye embroidery floss to give it a muted or aged look, and just put it on a plate to dry. Works well for lace, too!
  • Use for craft fabric only, and not for garments, as it will at least partly wash out.
  • I once dyed a shower curtain in the bathtub using the mixture, leaving it in for a few hours, and it came out beautifully. I just hung it to dry! When it came time to wash it, I washed it in COLD water, and it preserved some (but not all) color.

This opens up a whole new world of crafting. Have fun with it! The possibilities are endless!

Love & Blessings,

Shandy

Be sure to visit Shandy’s personal blog Aprons ‘n Pearls for crafts, recipes, homekeeping tips & more!

Saturdays with Shandy: Christmas Edition! Cinnamon Applesauce Ornaments

ornaments2

I have such fun decorating our family’s Christmas trees. Yes, TREES. Plural. We have our big tree that is beautifully decorated in our front room, and we have two smaller trees… a Norwegian and Swedish tree in our dining room, and our kitchen tree, decorated with miniature kitchen utensils and cinnamon applesauce ornaments – which I am going to teach you how to make today! They are very simple, last for years, and make the house smell wonderful! And who doesn’t love a spicy aroma wafting from the kitchen this time of year? It just shouts Christmas! By the way, kids of all ages will have fun joining you in the kitchen to make these, so let them help, and make some memories together!

ornaments

Here’s what you may need to pick up at the store if you don’t have them on hand:

Applesauce. Cinnamon. Cookie Cutters. Material Scraps or Twine.

Easy, right? Let’s get started!

Directions,  adapted from McCormick.com:

  • Preheat oven to 200° F.
  • In a bowl, mix together 3/4 c. applesauce and 1 cup + 3 T. cinnamon until well incorporated and smooth.
  • Sprinkle cinnamon on a cutting board, and roll out dough to 1/3″ thickness.
  • Cut out with small cookie cutters.
  • Carefully place cut outs on an unprepared cookie sheet.
  • Using a straw, poke a hole at the top of each ornament, as shown in the picture at the top.
  • Bake in oven for 2-1/2 hours, until hard. I kept mine in for an additional 15 minutes.
  • Cool on a wire rack.
  • Cut or tear strips of muslin, homespun, or twine for each ornament. I used coffee-stained muslin. Mmmm, smells delicious!
  • Place a strip through the hole of each ornament and knot at the top.
  • Hang on tree!
  • These will last for years if stored carefully in an airtight container!
  • Note: even though these are made with just applesauce and cinnamon, they are not edible. Trust me 😉

Here is a picture of my kitchen tree. It’s a work in progress… needs primitive grungy lights, another strand of red beads, and a few more handmade ornaments yet, but I wanted to give you a peek at what I do with my applesauce cinnamon ornaments!

kitchen tree

Love & {Christmas} Blessings,

Shandy

Be sure to visit Shandy’s personal blog Aprons ‘n Pearls for crafts, recipes, homekeeping tips & more!

Saturdays with Shandy: Christmas Edition! All That Glitters…

I just LOVE glitter. I love the way it sparkles, and I especially love the way it shimmers in the light. And Christmas lights? Even better! I found three fun and simple Christmas crafts that are not only beautiful, but they won’t break the bank either! Time to get our glitter on, girls!

*Note: You can find all three projects pinned on our “Saturdays with Shandy” board on Pinterest!

Shopping list:

  • Glitter in your choice of colors (I love the Martha Stewart glitter from Michael’s!)
  • Clear ornaments
  • Pledge Floor Care Finish
  • Faux fruit (I like using all pears as shown in the picture. Check your local dollar store!)
  • Glue
  • Small brush to apply glue
  • Clothespins
  • Double-stick tape

You’ll also need:

  • Scissors
  • Workspace covered with newspaper

Ornaments – You can find the tutorial at Plum Adorable. I will be making several of these! They would make wonderful gifts as well!

Fruit – You can see the picture at Iowa Girl Eats. This is a very easy craft. Simply brush with glue, sprinkle with glitter, and let dry! Then display them in a bowl or basket, and you have a classy centerpiece! Mine are going to be done in a champagne colored glitter. Very classy, indeed!

Clothespins – You can find the tutorial at Posh Little Designs. Use these to hang Christmas cards from garland on a mantel or bannister, or from ribbon or twine. I’ll be using these (all in gold!) to hang the cards I get this year from the garland on our bannister. It’s going to be beautiful!

When do you start decorating for Christmas? I always get my decorating done the day after Thanksgiving, and everything stays up until the end of January. What colors will you be using for your glittery projects? I’d love to see how they turn out, so if you belong to our facebook group, feel free to share pictures of your creations with us!

Love & Blessings,

Shandy

Be sure to visit Shandy’s personal blog Aprons ‘n Pearls for crafts, recipes, homekeeping tips & more!