April 25, 2024

3 Keys to Increasing Communication with Your Children About How and What They Would Like to Learn

Welcome to the fifth and final week in this series on Organizing Your Homeschool for a Brand New Year.  I’m excited to share with you today about communicating with your children regarding learning methods and topics!

3 Keys to Increasing Communication with Your Children About How and What They Would Like to Learn www.GirlfriendsCoffeeHour.com #organization #communication

For a while after we began homeschooling, we followed a packaged curriculum and really enjoyed it. In fact, even though we don’t currently use a full packaged curriculum, I do have a favorite and may go back to it with my littlest two girls in the fall. I have such fond memories of our learning time with our books from Heart of Dakota Publishing!

When my 4th child was born, we began to move away from the full package of curriculum. I needed my children to work more independently at that time. My children were also getting a bit older and they had expressed the desire to begin learning about their individual interests more, as well. This is the plan I came up with to meet their needs.
3 Keys to Increasing Communication with Your Children About How and What They Would Like to Learn www.GirlfriendsCoffeeHour.com #organization #communication

3 Keys to Increasing Communication with Your Children About How and What They Would Like to Learn

  1. Talk with each of your children about what he or she is interested in learning more about. Keep in mind that these things may be academic in nature, but could also include topics such as cooking, art, beadwork, photography, writing a novel, and more. The sky is the limit! You will be able to find a way to incorporate almost any topic of interest into your learning day.
  2. Take your children to the library, the local bookstore, or used curriculum sales to search for books and/or curriculum that covers their topics of interest. Alternatively, you may also peruse catalogs at home or get online together to search curriculum or other learning web sites and blogs for the perfect learning tools for your family.
  3. Once you have your materials in hand, help your child to come up with a schedule or workable plan for using them to learn as much as possible about the topics he chose.

That’s it. Try using these keys in your homeschool, see how they work for you, and please do come back here and share with me how it’s going!

Do you have tips for increasing communication with your homeschooled child? Please do share in the comments below!

4 Steps to Strewing for Education

Are you ready for Week 4 of Organizing Your Homeschool for a Brand New Year? This week we will discuss the term ‘strewing‘ and talk about how this may work for your home and learning lifestyle.

4 Steps to Strewing for Education www.GirlfriendsCoffeehour.com #homeschool #organization #strewing

Strewing is a word you may hear more often tossed around in unschooling or child-led learning circles. Sandra Dodd defines it as “leaving material of interest around for our children to discover.”  Aadel Bussinger offers an ebook called The Art of Strewing and it is filled with many wonderful ideas!  Aadel also offers many articles on strewing in different circumstances over at These Temporary Tents.

4 Steps to Strewing for Education

  1. Know your child.
  2. Choose items based on what you know about your child’s interests.
  3. Place the chosen item somewhere it can be easily found, or simply tell your child that you found xyz and thought they might be interested.
  4. Leave your expectations behind. It could be that your child is not interested in the game, art supplies, movie, etc. right now. However, they often will pick it up a day, weeks, or months later. The ‘art’ is in being able to allow that exploration on their own timetable.

So what does strewing look like in a child-led learning environment?

  • An exploration table with just one item or related set of items where your child may explore, engage in imaginary play, and generally learn more about these items with all of his or her senses!
  • Books left on the coffee table for children (and adults!) to pick up at their leisure to read or gaze at pictures until their hearts are content.
  • Chalk and construction paper placed where little ones will find it and create drawings and experiment with color as much or as little as they choose.
4 Steps to Strewing for Education www.GirlfriendsCoffeeHour.com #strewing #homeschool #organization

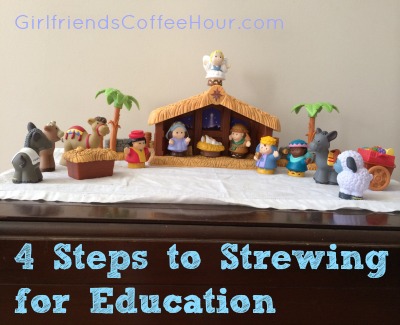
We set this out over the holidays and our girls spent many hours playing with Joseph, Mary, and baby Jesus. I plan to set out a new toy, or otherwise fun-to-explore item, for them to enjoy every couple of weeks, or perhaps monthly.

  • An impromptu trip to the park or for a walk around the neighborhood to examine the newly fallen snow or the changing colors of the leaves.
  • A new game laid out and ready to be played with the family.
  • Watching an entire Netflix series about airplanes, World War II, dragons, and more, simply because that is what your child is ‘into’ at the time.

There are many more—and different—scenarios that could be described. The above are just a few of the scenes that have played out in my home, a few ways that I have found to easily strew and pique the interest of my children.

If you do more research via the above-linked sites, or if you get Aadel’s book, you will learn much more about what strewing looks like and glean many wonderful ideas for implementing this idea in your own homes.

Do you have ideas for strewing or encouraging child-led learning? Please share your thoughts and tips below!

5 Ways to Prepare a Homeschool Schedule

Welcome to Part 3 our series, Organizing Your Homeschool for a Brand New Year! I’m so glad you are here, and I hope to help you learn more about scheduling this week with some tips from me, as well as a few links and recommended resources for your homeschool.

5 Ways to Prepare a Homeschool Schedule www.GirlfriendsCoffeeHour.com #organization #homeschoolorganization

In Part 1 of this series we discussed decluttering and in Part 2 we talked about getting rid of curriculum. If you missed either post, be sure to go back and read them before tackling this third step.

After decluttering and getting rid of ‘extra’ curriculum and other unneeded items, in my home it is then time for creating a schedule of sorts.

I have talked before about our unschooling tendencies; our desire to be more child-led in our learning pursuits. Still, we do have a bit of a routine that we follow.

5 Ways to Prepare a Homeschool Schedule www.GirlfriendsCoffeeHour.com #homeschoolorganization #organization

Currently we have a large marker board that is located just above my desk near the kitchen. On it are written all of the chores for each child; our weekly menu along with our Dinner Time (6:30), for easy reference when a child invariably asks “what’s for dinner” at 5 p.m. each day; and a current quote or Bible verse which we are trying to live by. Our routine is not written on the board, as everyone already knows what it is. It goes something like this:

  • wake/shower/dress
  • eat breakfast/complete kitchen chores
  • feed pets
  • complete other assigned chores
  • begin any assigned lessons
  • check ongoing chores (such as trash, wiping down table, washing dishes) at key times throughout the day, such as after breakfast, after lunch, and before dinner
  • be sure all chores are complete BEFORE asking for computer/iPad/video game time

This looks great written out, but please know we do not have it all down pat. We have great days, and some are not as great, as far as staying on task goes. We are a work in progress, much like the rest of you.

Are you looking for tips for creating a schedule or routine for your homeschool? Keep reading.

5 Ways to Prepare a Homeschool Schedule

  1. Routine A routine is simply an order of doing things, much like the list I shared above. Decide what needs to be done, list it out, and then instruct your children to follow it in order. For me, this works well, because I have a list to follow but without times listed I do not feel overwhelmed or stressed if we do not finish ‘on time’.
  2. Time Schedule This method is exactly what it says; creating a schedule that lists out exactly what needs to be done and during which timeframes. This may be your preferred method if you do not get stressed trying to be on time or if you need a little nudge to improve punctuality in either yourself or your children.
  3. By curriculum program Using your curriculum exactly as written, following the provided schedule, and sticking to the suggested hours of instruction for each day. This method works for many and if it is what you and your children prefer, I say go for it!
  4. By subject You may choose to have your child complete assignments or learning pursuits by subject. Simply choose one subject per day to study. Perhaps Mondays will be science, Tuesdays will consist of art projects, and so on down the list. This could be a fun way to spend your days, learning about any given subject for hours at a time, never needing to stop to move on to the next subject.
  5. Wing it  Study whatever you want, however you want, anyplace you want, and for as long as you want. No pressure. We use this method a bit, but I am hoping to get to the point where I am completely comfortable and confident enough to wholly embrace it!

Need to see more samples and resources to help you to determine what will work for you? Check out these posts from some of my blogging friends!

Why a Daily Schedule Doesn’t Work for Me ( What We Do Instead) Sarah Mueller

Extra Freebie – Curriculum Planner Sandra Modersohn

Homeschooling Plans, Charts, and Ideas Tonia Lyons

Do you have tips and tricks for scheduling your homeschool day? Please share in the comments! And be sure to visit again next week for Part 4 of this series, Organizing Your Homeschool for a Brand New Year!


Six Steps to Ridding Your Shelves of Extra Homeschool Curriculum

Six Steps to Ridding Your Shelves of Extra Homeschool Curriculum www.GirlfriendsCoffeeHour.com #homeschool #organizing

Welcome back to part 2 of Organizing Your Homeschool for a Brand New Year! This week we will tackle what to do with your extra curriculum and other items that were not cleared out last week.

Ridding Your Shelves of Extra Homeschool Curriculum www.GirlfriendsCoffeeHour.com #organization #homeschool

Six Steps to Ridding Your Shelves of Extra Homeschool Curriculum 

  1. Determine which items you want to sell and which you would like to donate.
  2. List items on Ebay, hold a garage sale, find a local consignment shop or sale to participate in, or post them on Facebook or your blog as For Sale. Or collect your items all year and participate in your local homeschool curriculum sale at the end of the school year. Often, there are several taking place in any area.
  3. Take boxes and bags of the items you will not try to sell to your local Goodwill, or donate to a church or neighborhood family you know that could use extra clothing, toys, and books. There may be a local shelter or daycare that needs what you have.
  4. Check with local churches if you do not know of anyone in need. My church has a section on their web site for posting items needed or items being offered for sale or donation.
  5. Post a notice in your local homeschool group’s forum or in any Facebook groups you may be a part of (if allowed) about items you would like to donate to homeschool families. I often hear of or from people looking for free or low-cost items because they don’t want to spend a lot before trying, or they just don’t have the extra money to spend at the time. You have the opportunity to be a huge blessing to another homeschooling family by donating your gently used books.
  6. Another possibility is to offer your books and homeschool curriculum for loan or rent. I do not know the ins and outs of this myself, but I feel sure you could do a little research to find out more. Many families simply do not have room to store curriculum permanently, or perhaps they just don’t care to. This could be a workable solution for you and them!

Do you have more suggestions for clearing off your homeschool shelves? Please share in the comments. If you missed Part 1 of this series, please be sure to visit Organizing Your Homeschool for a Brand New Year


*   *   *   *   *   *   *   *   *   *

Interested in joining us for our next Online Bible Study that starts on January 13, 2014?   Click HERE for more details!

7 Ways to Stay Focused as You Work Towards the Goal of Decluttering

Each year, as we enter the new year, many of us begin to set goals or make resolutions. Personally, I don’t make resolutions. I choose a few goals and try to meet those throughout the year. For me, changing the wording helps with that feeling of less-than that often comes when I don’t meet the goal. This way, I still have the rest of the year to succeed!

This month I will be writing a series of posts for At Home w/ GCH that discuss getting our homeschools organized for the new year. With this series, I am hoping to help many of you, as well of myself, as we focus on just one task each week. Feel free to take more than one week to complete each task, though. It will probably take longer than that for me here, since I am also in the midst of homeschooling and working each day, too!

7 Ways to Stay Focused as You Work Towards the Goal of Decluttering www.GirlfriendsCoffeeHour.com #organization #homeschool

This week our task is decluttering. I am sorry to say that my home is often cluttered. The job of decluttering seems to be a constant work in progress, and can very easily get me overwhelmed if I don’t focus.

7 Ways to Stay Focused as You Work Towards the Goal of Decluttering www.GirlfriendsCoffeeHour.com #organization #homeschool

7 Ways to Stay Focused as You Work Towards the Goal of Decluttering

  1. Set a timer and work for a specific amount of time, then take a break. You will be impressed with how much you actually accomplish in that concentrated amount of time.
  2. Start with one small space. A desk, a drawer, a shelf. Simply beginning is half the battle.
  3. Throw away extraneous papers that are lying around.
  4. File bills, pay stubs, and other important documents.
  5. Purchase plastic or cloth bins to use as storage (found at places like Target, Walmart, or Goodwill and other thrift stores).
  6. Sort toys and books into ‘like’ piles and place them in bins together. This simple step helps so much when it is time for you and your children to clean up!
  7. Label the bins according to the item—blocks, books, Mr. Potato Head, cars, etc.

Do you have tips and tricks for decluttering? Please leave your suggestions in the comments section below! Be sure to check Organizing Your Homeschool for a Brand New Year  for other posts as we move forward with this organizational series throughout the month of January.

Discipling Our Children at Home

Over the last several months, the teaching team at our church has been speaking about discipleship. They have taught us what a disciple is, which is basically a student; what it looks like to disciple others, which is to bring friends and family along with us on our journey with Jesus; how time, talent, and treasure are all a part of being a disciple (giving); and so much more! If you are interested in hearing the messages in this series, please listen here.

Discipling Our Children at Home www.GirlfriendsCoffeeHour.com #goandmake #homeschool #discipleship

As we began this series, and moved forward each week, I wondered whether I was discipling anyone. I am a disciple myself, a follower of Christ, and I am striving to lean in and follow Him even more carefully as the weeks and months go on. I do write for a few blogs as a contributor and on my own blog, and those could be considered a way of discipling. I pray that what I write encourages someone along their faith-walk at some point. But I kept asking myself, who am I discipling? How can I disciple someone?

Then it dawned on me.

Those I am discipling every day are my children.

You may think that is an odd realization since, as a mom in her 8th year of homeschooling, I am with my children all day, every day. Still, it took me a while. I guess I was looking outward, towards a church ministry area or leading a bible study in my neighborhood, as many of my friends and acquaintances are doing. However, in this season of my life, while I am busy homeschooling and raising my five children from ages 3 to 16, I have limited opportunities to disciple those outside of my own home. But what a ripe-for-the-harvest ‘field’ I have right here before me! Once I realized this, I was even able to encourage another friend who was asking the same questions that I had been asking.

Homeschooling. This is our ‘discipleship program’! What a blessing it is to be able to be home, to learn together, to stop academics as needed to teach biblical principles and to correct behavior, to discipline, and to disciple, as we walk the homeschooling journey together with our children.

I want to encourage you, homeschool mama, as you move through each day and especially in this holiday season—do not compare yourselves to others. God has given you very specific duties to carry out with your own children! Perhaps you can fit in some volunteer hours at church or in a shelter in your area, or in some other setting where you are able to disciple others. Maybe you were able to participate in the Christmas cookie exchange, hang hundreds of tiny lights on the exterior of your home, and bake holiday breads for 10 days straight in preparation for the local holiday bake sale.

If you cannot and did not, please do not despair.

God has you in this season right now to pour into your children. On the days when it seems too difficult, and you feel like you have nothing left, lean further into Him. He will give you the strength, the wisdom, His words to pour into and speak over your children, and to lead them just a bit closer to Him each day!

Do you have any suggestions for discipling our children? I would love to hear them, so please leave a comment below!

Christmas Crafts and Coloring Fun with Preschoolers

As we near Christmas Day, our family has finally begun to decorate our home a bit. We spent some time over the weekend putting up wreaths and digging out our ornaments in preparation for decorating our tree. One part of the excitement of Christmas for my 3 and 4 year olds has been the opportunity to make their own ornaments and decorate their own little personal tree for their room. Now, I have never considered myself to be a crafty kind of mom. However, I do what I must for my little girls, so we pulled out construction paper, scissors, plain white paper, crayons, and began creating!

Christmas Crafts and Coloring Fun with Preschoolers www.GirlfriendsCoffeeHour.com #christmascrafts

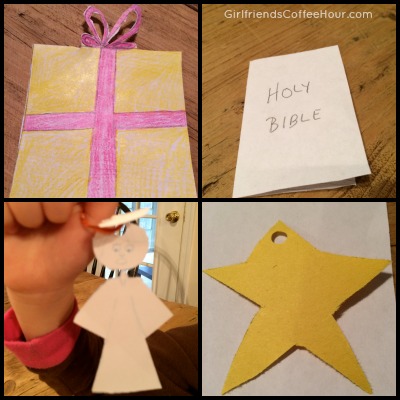
What we came up with was fairly simple.

  1. The gift you see above was simply a square with my feeble attempts at drawing a bow on top. If you are that crafty mom, then I am sure you could use pretty craft papers and cutting tools to make a much more beautiful gift than this one, but I think you at least get the idea. My children were very pleased with the result, and my 3 year old, especially, was thrilled to see “a little present” on their tree when she entered the bedroom.
  2. Next you can see that I made a tiny Holy Bible. It would have been nicer if I had used black construction paper and perhaps cut out tiny letters in gold to spell out the title. However, I was making use of the scraps we had leftover from the project immediately preceding this activity, so we ended up with a very plain Bible for the tree.
  3. This sweet little angel is the ornament of which I am most proud. I have never claimed to be an artist, but as I began to sketch, it wasn’t as difficult as I had expected. I basically drew a head attached to a choir robe, then attached one more circle up top to act as the halo (bend so it will ‘hover’ over the angel’s head). Maybe you could be a bit more creative? Use yellow construction paper or some sort of ribbon to create a pretty halo or spend some time coloring the hair. For me, just getting it done was the priority, because my little ones were more interested in hanging the items on their tree than in how ‘prettied up’ they were. I have hopes that, as the years pass, we can continue making ornaments and get a bit more elaborate with our creations. We shall see. I may become that crafty mom yet!
  4. The last ornament is a yellow star. My 3 year old adores the color yellow and stars, so this is obviously her favorite kind of ornament. I drew a 5-point star. Some of you may be able to simply cut one out of the construction paper but my attempt at that did not turn out well. A fun addition to this would be some gold glitter glue. Then your star will sparkle when any sort of light hits it!

For all of the ornaments we created, I used a simple single hole punch to create a hole at the top, and then used bread ties as hangers. That was my 4 year old’s idea. Brilliant!

Christmas Crafts and Coloring Fun with Preschoolers www.GirlfriendsCoffeeHour.com #christmascrafts

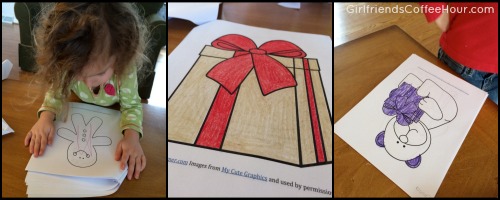
Another activity we have enjoyed is coloring together. I have always loved this particular activity, and I have made a point to sit down with all of my children at times to be a part of this bit of fun with them. Since it is the Christmas season, we have been coloring Christmas-themed pages that I created. I’ve listed those below for you, as well as a few free printables from others, in case you would like to do the same with your own children (many can also be used with older children!).

FREE Christmas Coloring Pages

Free 12 Days of Christmas Pack

FREE Printable Writing Prompt

Free Nativity PreK-K Printable Pack (Limited Time)

FREE Copy Work~ Sing Unto the Lord!

FREE Christmas PreK/K pack {Updated and Expanded}

Need more ideas for making this season fun and meaningful for your preschool children?

  • take a field trip to a Christmas tree farm
  • pick up Christmas-themed books from the local bookstore or library (try One December Night, brand new on Amazon and written by a friend of mine!)
  • bake sugar cookies and decorate (and eat!) them together
  • help your child pick out gifts for siblings or his other parent/grandparents and wrap them together
  • read the Christmas story from the Bible, discussing together how Jesus is the TRUE Gift of Christmas

Are you a crafty mom? What kinds of fun and meaningful activities do you do during this season with your children?  Please share in the comments! 


Easy Dairy-Free Pumpkin Pie Oatmeal Bars

When I was baking recently, I made two pumpkin pies for my family. I tend to forget that there is always a little batter left over until I am in the midst of pie-making! When I discovered this yet again, I began to think about what I could do with the leftovers. I ended up preparing 4 mini gluten-free pumpkin pies. I simply placed the leftover batter atop some leftover oatmeal from that morning, then baked in the oven.

They turned out pretty tasty, and I was inspired to consider other delights I could create using my pumpkin pie mixture. The result is this recipe for Easy Dairy-Free Pumpkin Pie Oatmeal Bars. I hope you enjoy them as much as we did!

Easy Dairy-Free Pumpkin Oatmeal Bars www.girlfriendscoffeehour.com #dairyfree

Recipe for Easy Dairy-Free Pumpkin Pie Oatmeal Bars

  • Prepare Libby’s Famous Pumpkin Pie mixture. (I did substitute almond milk for the evaporated milk due to dairy sensitivities in our family.) Or, if you have your own delicious pumpkin pie mixture, prepare that!
  • Add 3 cups of Old Fashioned Oats to the mixture and stir well.
  • Coat rectangular cookie sheet with about 2 tablespoons of oil.
  • Measure out 5 cups of your mixture onto the cookie sheet.
  • Spread evenly on pan.
  • Bak in oven at 375 degrees for about 30 minutes, or until golden and slightly crisp around the edges.
  • Let cool for about 10 mintues, then cut into squares.
  • Serve warm, or allow to cool completely before serving.

These bars make a lovely dessert when served with a dollop of (dairy free) ice cream on the side.  Also delicious with a bit of almond milk poured over top for breakfast!

Do you make a lot of homemade items?  Do your get your kids into the kitchen with you to bake?  Do you make cooking a part of your homeschooling?  Tell us how this works in your family!  Leave a comment below.

What Does Thankfulness Mean to You?

Today is Thanksgiving Day in the United States. Children are out of school for a few days, many people do not have to go to work (though some do), and most of us spend at least some portion of the day with extended family members. As we are in the midst of this celebration, it is a really good thing to stop and consider what it is we are celebrating.

What does thankfulness mean to you? www.girlfriendscoffeehour.com #homeschool #thanksgiving

We all know a bit about the first Thanksgiving and how the settlers joined with the natives to enjoy a meal together. That is something to celebrate. It was how those settlers survived and how our country found its beginning! But shouldn’t we be celebrating something more?

Bible verses about thankfulness

Psalms 95: 2-3  says Let us come before him with thanksgiving and extol him with music and song.  For the LORD is the great God, the great King above all gods.

1 Timothy 4: 4-5 For everything God created is good, and nothing is to be rejected if it is received with thanksgiving,  because it is consecrated by the word of God and prayer.

Our God is great, and above all other gods. His Creation is good! We are to receive it with Thanksgiving, as it has been consecrated by Him.

What does thankfulness mean to you?

I asked some of my friends what thankfulness means to them. Here are some of the things they had to say.

Crystal says, “To me, thankfulness is about choosing to focus on our blessings and not our troubles. It’s a way of life.” Get these free printable gratitude cards to use with your children.

Stephanie offers two of her favorite quotes from others.

“If you never learned the lesson of thankfulness, begin now. Sum up your mercies; see what provision God has made for your happiness, what opportunities for your usefulness, and what advantages for your success.” ~Ida S. Taylor

“Not what we say about our blessings, but how we use them, is the true measure of our thanksgiving. “ ~ W. T. Purkiser

Learn more about Stephanie’s thoughts on thankfulness via  her post 30 Quotes About Thanksgiving and Gratitude.

Michelle is thankful for,”The closeness in my family and the dogs that drive me crazy.” Be sure to head over to visit with Michelle and read Thanksgiving Grace.

Pattis says, “A cheerful heart is good medicine, and sometimes the best medicine for a complaining spirit is speaking thanks.” Read her entire post, When the Complaining Creeps Back In.

For me, thankfulness is walked out in how I react to my children and family. It is in the way I serve others. Am I thankful for the opportunity I have to teach my children to be thankful through my actions? Am I serving with a thankful heart?

Here are some quotes from others that I found online.

O Lord, that lends me life, lend me a heart replete with thankfulness.
~ William Shakespeare

We ought to give thanks for all fortune: if it is “good,” because is it good, if “bad” because it works in us patience, humility, and the contempt of this world and the hope of our eternal country.
~ C. S. Lewis

No people on earth have more cause to be thankful than ours, and this is said reverently, in no spirit of boastfulness in our own strength, but with the gratitude to the Giver of good who has blessed us.
~ Theodore Roosevelt

Thankfulness Resources & Activities

Encouraging an Attitude of Gratitude

Last Minute Thanksgiving Fun with the Kids

one thousand gifts, about being thankful, gratitude, Eucharisteo. Ann gives a wonderful new perspective in her book; a practical view of how to remain on our knees and thank God, even through the most difficult things in our lives.

What is it that you are thankful for? Share in the comments!


Encouraging Thankfulness in Our Children

Encouraging Thankfulness in Our Children www.girlfriendscoffeehour.com #thankfulness #homeschool

Thanksgiving is quickly approaching, and many of us plan themed studies for our homeschool during this time. We take care to teach our children about our country’s history, and also encourage them to appreciate our freedoms. Being thankful for what we have, and for who God made each of us to be, is the key to gaining that appreciation.

Today I wanted to share with you some resources that you may want to use in your homeschool that will help to foster an attitude of thanksgiving, as well as a few scriptures upon which to meditate.

Resources for Cultivating Thankfulness

FREE Thanksgiving Coloring Sheets

Thanksgiving Printables: Preschool Handwriting Worksheet

“I am thankful for” Free Thanksgiving Printable

Thankful Turkey Box Tutorial

Gratitude Rolls: Special Food Tradition

Encourage Thankfulness with Scripture

O give thanks to the Lord, call on His name; make known His doings among the peoples! 1 Chronicles 16: 8

I will give to the Lord the thanks due to His rightness and justice, and I will sing praise to the name of the Lord Most High. Psalm 7: 17

At all times and for everything giving thanks in the name of our Lord Jesus Christ to God the Father. Ephesians 5: 20

Do not fret or have any anxiety about anything, but in every circumstance and in everything, by prayer and petition (definite requests), with thanksgiving, continue to make your wants known to God. Philippians 4: 6

For everything God has created is good, and nothing is to be thrown away or refused if it is received with thanksgiving. 1 Timothy 4: 4

You may choose to memorize some of these verses with your children as a family. Perhaps each of you could choose a favorite among these verses, commit them to memory, and then recite them for one another on Thanksgiving Day. Another idea is to have your child use one, or several, of these verses as copy work each day leading up to Thanksgiving, and even beyond.

Did you find these resources helpful? Do you have other tips for encouraging thankfulness in our children? Please do share in the comments!

Are you a blogger? We invite you to add your thankfulness posts to our linky party below!