January 14, 2025

At Home with GCH: Meal Planning Week 3


Shopping Tips & Coupons

One of the first things I do when it comes to Menu Planning is check my local grocery ads.  I have two grocery stores here in my hometown, and two Walmart stores within 15 miles of where I live.  I also have two other grocery stores I shop that are about 30 miles from where I live.  Which store I shop at depends on which store has the best deals.

At first, when I started shopping this way, I thought it was nuts to drive 30 miles out of the way to buy just a few items on sale.  But let me say this first.  I don’t drive out of my way unless it is a REALLY good sale!  Why do I do it this way?  One reason is because I am married to a penny-pincher husband.  I say that with much love!! 🙂 He will shop for weeks on end before he will purchase something.  He has turned me into a penny-pincher, too!  But, I also recognize that my time is valuable, too!  So if I’m only going to save 15-cents on one item, I refuse to drive 30 miles out of my way to save just 15-cents!  To do that, makes no sense at all.  So it has to be one really good sale before I will drive out of my way.

When I grocery shop, I will always shop the outer edge of the grocery store first.  That is where you will find the best foods for you and your family; vegetables, fruits, grains, and etc.  The inside aisles of the grocery stores are more for canned goods, and processed foods.

I have learned over the years that most times it makes more sense to cook from scratch.  It is definitely healthier for you and your family.  Processed foods were created to help you save time in the kitchen, yes.  But, when you really truly look at it, processed foods are not good for you, if you truly knew what was being used in those foods!  So, another tip I can give you is to cook from scratch when possible!  Make the time to cook this way, to offer healthier meals for your family.  Most times, cooking from scratch doesn’t take any longer than cooking from a box of processed food!  You will love it because you know you are taking good care of your family!

Another tip when grocery shopping is to look at the price per unit.  You will be amazed at how much money you can save if you compare unit prices!!  This is something I learned from my husband.  I used to be the one that would go in the grocery store, and just grab and run.  I was always in a hurry!  I just wanted to get in and out of the store, get home, get it cooked, and get it on the table.  I was not price-conscious in any way!  But, after I learned how to do this, and began to see just how much money I was saving by doing this, I don’t shop any other way now!

The next tip I will share is the benefit of using coupons.  Coupons can save you tons of money, and you don’t have to be a Coupon Queen to make that happen!

I am the first to admit that I am not a Coupon Queen.  I find them time consuming, and I always seem to forget them when I head to the store!  BUT, what I mean by this statement is that I am not a Coupon Queen like you see on the reality shows!  I just do not have the time to put into couponing like these ladies do.  But, I DO use coupons.

When I clip coupons, I only clip ones that I know I will use.  I don’t stockpile grocery items in my garage or in closets in my home!  I use the coupons for food, or items that I know I will use within the next couple of weeks.

There is a lot to learn about using coupons.  Much of it can be found on the Internet if you do a search for Coupon 101.

Here are some tips that I have learned along the way:

  • Where do I find coupons?
    • Magazines
    • Newspapers
    • Internet
    • Coupons Groups on Facebook
    • Friends/Family
    • Direct from Manufacturer
    • Weekly Grocery Store ads
    • Tear pads located in the stores
    • Peel-off’s located on the product
    • Free Samples from manufacturer
  • Keeping your coupons organized
    • 3-ring binder with baseball card holders (Wal-mart, etc)
    • Coupon caddy (Dollar store)
    • Some women use what is called a Couponizer (www.couponizer.com)
  •  Categories to include in your Coupon-holder
  • Baby
  • Bakery (I put all breads, rolls, etc here)
  • Baking
  • Canned/Boxed Items
  • Beverages
  • Condiments
  • Meat/Produce
  • Dairy /Refrigerated
  • Frozen
  • Household (things such as batteries, light bulbs, etc)
  • Laundry / Cleaning Products / Dishwashing
  • Medicine
  • Paper/Plastic (includes disposable dinnerware to toilet tissue)
  • Hair Care
  • Oral Care
  • Soap/Body Wash
  • Personal Care (Shampoo, Deodorant, Beauty, Feminine Care)
  • Snacks
  • Retail Outlets
  • How to Use Your Coupons: (Again, there is so much to learn about coupons.  I am just going to cover the basics here, today.)
    • One Per Rule – Means the coupon can be used by one customer only.  You are a customer; your husband is a customer; your daughter is a customer.  J  So remember, if you need more than one of an item, ring it up as individual customers!
    • Per Transaction:  Means the coupon can only be used for that transaction, for that shopping trip.  You are restricted by the number of times you can use that particular coupon in that shopping trip.
    • BOGO:  Buy One – Get One FREE.  Buy one item at regular cost get a second item of the same price, free.  Most manufacturers will put a limit on how many items can be purchased.
    • Expiration Dates:  You must redeem coupons by midnight by a certain date before it is no longer valid.


Next, I want to take you through the steps of using a Shopping List.

A shopping list is a must if you want to save money with Meal Planning!  There is no way around this!  A list is your lifesaver when shopping.  Never leave home without it!

How many times have you gone to the grocery store to buy a gallon of milk, only to come home with over $100 in groceries?!?!  It used to happen to me all the time!  Why?  Because I didn’t plan ahead!  My lack of planning cost me extra money every time I go to the store without a list!  So the BEST advice I can give you is to never ever shop without a list and to STICK TO YOUR LIST!

As we learned last week, we must first plan out our meals; checking food pantry and freezer to see what you have on hand first.  This is a definite must before going grocery shopping.  I used to always go to the grocery store, without my list, and pick up things that I just knew I was out of, only to find that I had that exact item on hand once I arrived home!  Grrrr!!  More money that I did not need to spend on that trip!

God calls us to be good stewards of what He has provided for us, and each time we shop without planning ahead, we are disobeying God’s command to be good stewards of His provisions.

So here is my first rule:  ALWAYS SHOP WITH A LIST & STICK TO THE LIST!

First check your pantry and freezer.  Next plan your meals for the month, and then break it down to a weekly menu.  Then decide what groceries you need to prepare the meals on your Menu Planner for that week.  What you don’t have on hand is what will go on your list.

I have some favorite grocery lists that I have found on the Internet.  I would like to share those links with you, so you can choose which one works best for you.  These sites offer FREE printables.  Remember, just a simple piece of notebook paper will work, too!

This will give you a good start.  You can find more by doing an Internet search.

I will conclude this week’s blog here.  Just remember …. TIME IS MONEYMake time to save moneyPlan ahead to save moneyUse coupons to save money!  Never shop without a list!

Next week, we will talk about food preparation.  I will share some tips for preparing your meals ahead of time to save time, and money!  I hope you are enjoying this series, so far!  If you have questions, please feel free to post them below.  I will be happy to answer them myself, or find the answer for you!

Until next week,

Christi


A Virtuous Woman plans ahead before making purchases and spends money wisely. She is careful to purchase quality items which her family needs. (Proverbs 31: 14, Proverbs 31: 16, Proverbs 31: 18, 1 Timothy 6: 10, Ephesians 5: 23, Deuteronomy 14: 22, Numbers 18: 26)


If you would like to send Christi a personal email in regards to this blog, please email her at: Christi@girlfriendscoffeehour.com
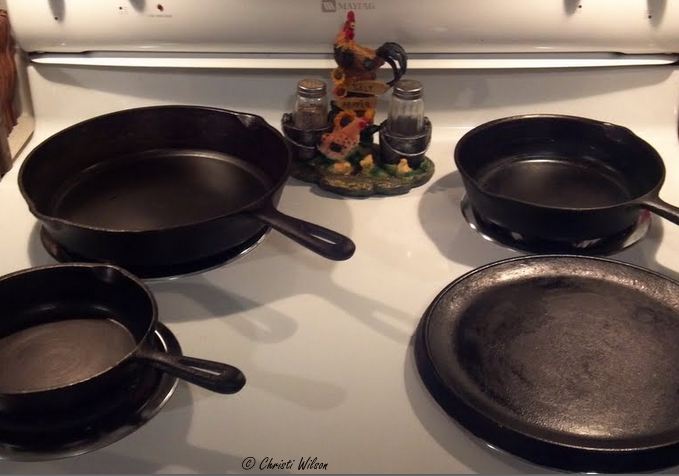
At Home with GCH: Cooking and Caring for Cast Iron

Cast Iron


I must admit that I until I met my husband, I never used cast iron; nor did I like it!  It was heavy, awkward, and everything I cooked in it was burnt to a crisp!  It was hard for me to clean afterward, too.  I’m definitely no expert in cooking with, or cleaning cast iron, but I have learned a few things over the years from my husband, who I call the Cast Iron Guru! 🙂

After a few lessons in the proper way to cook in and care for cast iron, I have to say today that it’s one of my favorite pieces of cookware!  So I would like to share some tips about cast iron that I have learned along the way!  You can find many other tips on the Internet, but these tips are just a few that I practice in my own kitchen.

  •  Cast iron needs to be seasoned before you used it.  The best way to season cast iron is with canola oil, and then bake it in a warm oven—around 300 degrees, for 2 hours.  Put the cast iron cookware in the oven and let it heat up – with the oven.  To season, you will rub canola oil all over the pan, both inside and out.  Place it upside down on a cookie sheet, and place in the oven.  Once you remove it from the oven, wipe the inside of the pan out once again, using paper towels.  BE CAREFUL! It will be HOT once it comes out of the oven!  A properly seasoned cast iron will develop a non-stick surface, and make cooking in cast iron so much more enjoyable!
  • To remove light rust from cast iron, rub a combination of salt and oil over the areas of rust until the rust is gone.  Once the rust is removed, you will need to re-season your cast iron.  If the rust is pretty set in and deep into the cast iron, you will want to begin by scraping the rust off with a stiff wire brush.  Scrape off all of the loose rust— anything that will come off of the pan.  (You can also use a cordless drill with a wire brush attachment to remove the rust if it is really bad!)  Next, put your cast iron in another container that will allow the cast iron to fit flat in the bottom of the container.  Cover it with a 1:1 solution of water and white vinegar.  Make sure you cover your mouth and nose when doing this step, or do this step outside.  The vinegar will help remove the rust the rest of the way.  Then you will season the cast iron as you directed above. (Some people suggest you use an oven cleaner for a deeply rusted cast iron.  I DO NOT recommend using harsh chemicals on cast iron. All natural products are the only way to go, in my opinion!)
  •  When cleaning cast iron, never use soap, an SOS pad, or stainless steel.  Always use a strong-bristle brush and water.  As soon as cast iron is cleaned, put the skillet on the stove burner, and heat it up in order to evaporate the moisture.  As soon as the water has evaporated, once again, rub the inside of the cast iron with canola oil to season.
  • Never try to cool your cast iron by putting it in cold water; doing so could cause the cast iron to crack!
  • Never cook any acidic ingredients, like tomatoes or tomato sauce, in cast iron.  It can damage the seasoned surface, and cause a metallic taste in your food.
  • Never start cooking with cast iron on a high-heat.  Start with low heat, and gradually increase as needed. If you are going to bake with cast iron, use an older piece of cast iron cookware, and keep the newer cast iron for frying and sautéing.
  • Sometimes cast iron will get a gunky, sticky feel to it.  The best way to remove this gunky, sticky mess is to put the cast iron cookware on the stove,; adding a couple of quarts of water.  Bring to a boil.  Wash in hot water, using a strong nylon brush.  Once you have washed the cast iron, you will heat it up again on the stove until the moisture has evaporated.  Remove from the stove and with a thick glove on, season with canola oil, once again.

Cast iron can be great cookware to cook with.  It does take some extra special care, but once you get the hang of it, you won’t want to use any other kind of cookware; take good care of it and it will stick around for years!  My father actually still has the cast iron skillet that his mother used to cook with.  It’s 60+ years old!!  It’s thinned down over the years, but he’s still able to cook with it!!

So, don’t be afraid to try cast iron.  It’s not only a great piece of cookware; it’s a great workout tool, too, because of its weight!! LOL

Now that your cast iron is all seasoned and nice and clean, it’s time to make a batch of cornbread in it!! 🙂  I LOVE Cornbread made in my cast iron skillet!  I just use a box of Jiffy Cornbread mix.  Mix milk and eggs into the cornbread mix, and pour it into the cast iron skillet, and follow directions on the package for baking!  Oh Yummmm….

Enjoy!

Christi Wilson


If you are interested in sending Christi a private email, you may email her at: Christi@girlfriendscoffeehour.com
Meal Planning 101 – Week 2 – Meal Planning Binder & Menu Planners


Hello!  Welcome to Week 2 of Meal Planning 101!  I’m glad you decided to come back and learn more about being successful in Meal Planning!  Meal Planning takes some effort, and that effort takes some organization.  Once you have a “system” in place, it’s just a matter of input from that point on!  So this week I want to talk about creating a Meal Planning Binder and Menu Planners.  This binder will help get you and keep you organized in your meal planning efforts.

My Meal Planning Binder is something that I look at least a couple of times a day!  I know… I get little nuts about it… but I am always looking for new recipes to add to my binder.  I love to try new recipes!  I have discovered some amazing meals by experimenting with my own created recipes, along with ones that I have been given by family, friends, and those I find right here by our “GCH:What’s on Your Plate?” page, and Pinterest.

Instead of giving you directions on how to make my own binder, I’m going to reference a couple of Pinterest links that will give you all kinds of binder ideas!  It’s really up to YOU how you want your binder to look and feel.

For my own binder, I include sections that include my Menu Planner for the Month, and for the Week, along with a Grocery list, Pantry/Freezer List, and a Recipes section.  I also keep a zippered pencil holder (like they use in school) to keep all my coupons in.  Personally, I am not a big coupon person!  I like them, but I do not go crazy with them!  I pick out a few that I know I will use, for products that I know we love and use on a regular basis!  You may be different than I am.  I have seen women who have coupon binders that are in 3-inch 3-ring binders, and it’s loaded with baseball card protector sheets that hold their coupons.  Way more effort than I want to put into my grocery shopping!  We’ll talk about this further in a later blog!

But before I forget, here are the Pinterest links to the Menu Planner binders: 

http://pinterest.com/search/pins/?q=Meal+Planner+Binders

http://pinterest.com/search/pins/?q=Menu+Planning+binders

.

Now, let’s start with the first things that will be placed inside your binder:  Monthly Menu, Weekly Menu, Freezer / Pantry List, Grocery List, and of course, your coupons.  But for now, let’s talk about your Menu Planner.

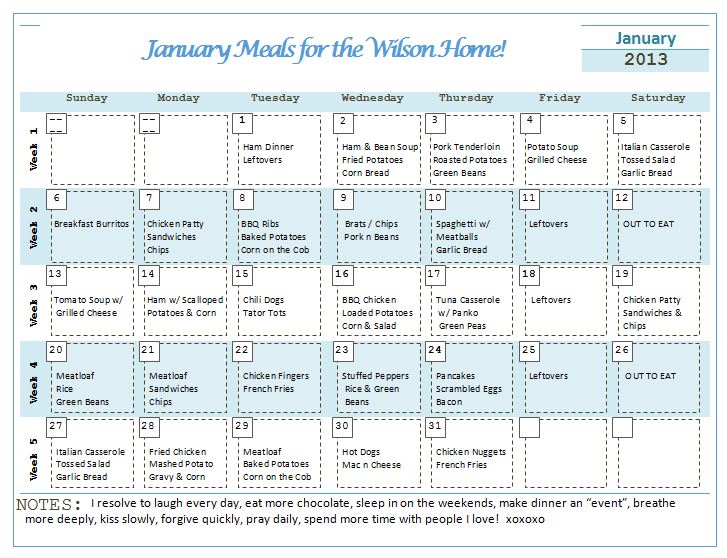
In looking through tons and tons of Pinterest links for the perfect Menu Planner, I stumbled across one located at: www.amybayliss.com.  She offers customizable Menu Planners such as the one below.  I love this because I can type this up on my computer and make it look nice and neat!  I can change it anytime I want, and create new meals each month.  Sometimes, I leave certain meals on the menu planner because they are some of our favorites!  So this is really a convenient planner for me to us.  You may choose the planner that allows you to write in the meals for the month, or the week.  Again, it’s just a personal preference.  There is no right or wrong way to do this!  It’s all about doing it, and then finding the system that works for YOU!

Monthly Menu Planner

This exact form was found on: http://amybayliss.com/2011/08/planners-goals-calendars-church-and-ministry-sections-part-2/.   I just used the “Calendar” download.  You can change the name of the month, so you have a new form to use each month.  Amy’s site offers a lot of awesome free printables!

In my meal planning, I always start by making a list of what I have in my pantry and freezer.  That way I know what I have on hand, and what I will need to purchase.

My next step is to make a list of all of the meals that we love.  Each week, I also include a “Leftovers” night and I add this to my Menu Planner!  I hate to see food go to waste!  Nothing gripes me more than to have to throw something away just because I didn’t add it into a new meal!  So I plan at least one night a week for leftovers!  Some people don’t like leftovers…again, personal preference!

We also plan for at least two nights a month for going to a restaurant.  This might include our Date Night meal, or a meal out with friends; whichever one it happens to be, it gets put on my Menu Planner.  So what that means is that I have to plan ahead for these nights.  My husband has the craziest work schedule where he works 3 days on, and 3 days off.  So we never have a normal weekend like most couples do!  We take our weekends as we can get them!  So I take his work calendar and sit down and choose one night a month for our Date Night, and leave room for at least one more night for eating with friends.  Again…put it on your Menu Planner!!

Once I have my list of groceries on hand from my pantry and freezer, and I have written down all of my favorite meals, I start making my menu for the month!  My freezer, pantry, and favorite meals lists can just be updated as I go!  This is the first time-consuming activity that you will have, but once it’s done, it’s pretty easy to maintain!  We’re getting you closer to Menu Planning success!   Trust me, once you make your binder and a monthly menu, it will make your life so much easier for the remainder of the month!  No more planning for another 30 days!

After you have completed your Monthly Menu, your next step is to break down the Monthly menu into a Weekly menu.  Here is where you will see just seven days of menus.  Write out a Weekly menu for every week on our Monthly menu.  Once you do it, it’s done for the month, and for each week; then it’s just a matter of grabbing the next weeks form to see what’s on the menu.  You can even just use a simple piece of notebook paper to do this, if you wish.  You really don’t need any special forms, etc.  You’ll be glad you took the time at the beginning of the month to do this!  Trust me!

For Meal Planner forms, do a search on Pinterest for “free weekly meal planner printables”; there are many of them out there.  I use a lot of Amy’s forms from her site because they are customizable!  I just love the way she has formatted them, and makes it so easy for me to input my own information!  Again, you will want to search for forms that are going to work for YOU!  If they don’t work for YOU, you won’t keep up with it!  So find something that works for you and one that you enjoy working with!

Now that we have our meals planned for the month and week, it’s time to put together our Shopping List.  We’ll discuss our Shopping List and coupons next week.  You will store all of this inside your Menu Planning Binder, in the proper sections.

I hope you are enjoying this series.  If you want, please share a link to the Menu Planner that you use!  You never know if someone else will find your Menu Planner convenient for them, as well!

See you next week!

Christi

********************

A Virtuous Woman uses her time wisely. She works diligently to complete her daily tasks. She does not spend time dwelling on those things that do not please the Lord. (Proverbs 31: 13, Proverbs 31: 19, Proverbs 31: 27, Ecclesiastes 3, Proverbs 16: 9, Philippians 4:8)


If you were interested in checking out any of our online Bible studies, click HERE. Once we receive your registration, we will email you with further details.

If you would like to send a private message to Christi in regards to this blog, please email her at: Christi@girlfriendscoffeehour.com

At Home with GCH – Meal Planning 101 – Week 1

Hello, and Welcome to Meal Planning 101!

When I first began Meal Planning, I had no idea how much this new technique in my life would make such a huge impact!  Meal Planning is now part of my every week routine!

For some people, when they think of meal planning, they thing it is too time consuming.  What they don’t realize is just how simple, and cost effective, meal planning is!  When meal planning is incorporated into your home routine, you will see yourself with more time, and money, on your hands!  Meal Planning is so worth every step!

In this new GCH series, we’ll cover the reasons why meal planning is so important; building a menu planner binder; finding recipes that your family loves; coupons; and more!  I will also be sharing some free printables that I have found online that I use in my own home!!  I will share some other websites that offer some amazing tips, as well!  I’m no expert in this field.  I can only share what I have learned along the way.  That’s why I don’t mind sharing other websites with you to help you learn even more about menu planning!  It really is something that we all need to incorporate into our routines!

Let’s start this new series today by going over the reasons of why meal planning is so important:

Top 5 reasons why Meal Planning is a must in your home:

  1. Menu Planning saves you time!

Who doesn’t need more time each day?  As busy moms who are running from here to there taking kids to school, activities, church functions, and more, we need to make sure that we manage our time to the best of our ability!  Menu Planning can help you manage your time more wisely in the kitchen!  We will show you how in the upcoming weeks of this series.

  1. Menu Planning saves you money!

Who doesn’t love more money in our pocketbooks!  How many times have you made dash to the grocery store for a loaf of bread and gallon of milk, and came home with over $100 in groceries you had not planned on spending?  Menu planning can help not only save money, but it can also help you stick to a budget better!  We will also cover some tips on using coupons with your grocery shopping! We will show you how in the upcoming weeks of this series!

  1. Menu Planning cuts back on waste!

Menu planning helps you buy just what you need, leaving less room for more leftovers that end up getting thrown out at the end of the week!  Again, we will show you how this cuts back on waste, as we continue with this series in the upcoming weeks.

  1. Menu Planning helps your family eat healthier!

This is a big one!  Menu Planning helps you stick with healthier meals by not being so stressed out at the end of a work day, there is no time to cook, and you end up heading out fast food!  Menu planning helps you keep healthier meals on the table!  We’ll show you how in the upcoming weeks of this series!

  1. Menu Planning adds more variety to your meals!

How many times have you heard “Not meatloaf AGAIN, Mom”?  Tired of cooking the same old thing over and over again?  Taking the time to plan your meals adds more variety to your meals, and leaves less room for boredom!  We’ll show you how in the upcoming weeks of this series!

So, are you ready to start learning how to plan your meals, save money, save time, and use coupons to get healthier meals at home?  I am very excited to share this series with you!  If you would like to share some of your own tips along the way, I would be happy to read them!  Be sure to share them in the comments section below!  The more we can help each other save time, money, and eat healthier, the better!!

Until next week,

Christi

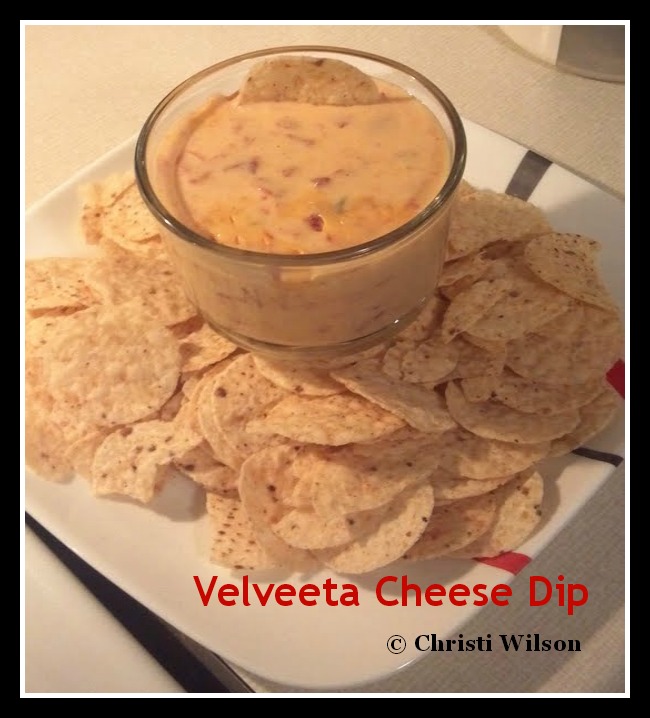
GCH:What’s on Your Plate? – Velveeta Cheese Dip

Velveeta Cheese Dip

 Velveeta Cheese Dip

Ingredients:

16 oz of Velveeta Cheese – diced

1-10 oz can Pace Diced Tomatoes w/ Green Chilies (drained)


Directions:

Put all ingredients into a medium-size baking dish.

Cook in microwave for 2 minutes.  Stir.  Cook for another 2 minutes.  Stir.  Cook for 1 additional minute.

Remove from microwave and stir until you see that all Velveeta cheese has completely melted.  (About 1 minute)

Serve with your favorite Tortilla Chips.


If you are interested in learning more about Online Bible Studies, please click on the Sign-Up Here button in the Menu tab at the top of our website.  If you need further details, please email Christi@girlfriendscoffeehour.com.


GCH:What’s on Your Plate? – Uncle Everett’s Coffee Cake

Note from my Aunt Phyllis:
Everett started making this, several years ago, when our family was small enough that one cake was enough to go around!! Now, he has to make two of them!! Every Christmas Eve, before noon, you can find Everett and I in the kitchen making this recipe.  We have this after Midnight mass, along with Pork Roast sandwiches for the family. Everett wouldn’t think it was Christmas if we didn’t fix a pork roast for breakfast!! That was the tradition in his family and we have continued it into ours.

I asked if my Aunt would mind if I shared her and Uncle Everett’s recipes here on our blog, and she said, “I would be honored!”  So here go…. Uncle Everett’s Coffee Cake!! 🙂  ENJOY!!

Uncle Everett’s Coffee Cake

Ingredients:

For the Dough:
2 pkgs–dry yeast
1/4 cup–warm water
1 cup–scalded milk
1/2 cup–shortening
2 teaspoons–salt
1/4 cup–sugar
2 well beaten–eggs
4 1/2 cups–flour
.
Honey Nut Filling:
1/2 cup honey
1/4 cup sugar
grated rind of 1 orange
1 Tablespoon orange juice
1 teaspoon–cinnamon
1/3 cup chopped raisins
1/3 cup chopped nuts
1 Tablespoon melted oleo
.
Glaze:
1/2 cup honey
1/2 cup sugar
1 Tablespoonmelted oleo
1 Tablespoon grated orange rind
.
Directions:
Dissolve yeast in warm water. Scald milk. Add the shortening, sugar and salt. Stir until the shortening is melted. Add the yeast mixture and the eggs. Beat well. Add flour and knead until smooth.(This is a very soft dough). Place in an oiled bowl and allow to double in bulk. Punch down and let rise for another 10 minutes. (Use a generous amount of flour when you roll this, as it is very sticky).
.
Divide the dough in two parts and roll each, to 1/2 inch thickness. Brush with melted oleo and cover with the Nut Filling. Roll like a jelly roll and slice in 1 inch slices. Arrange, in an oiled tube pan, in layers. Allow to rise until doubled. Bake at 350 degrees for 45–60 minutes. Cool in the pan. Remove and pour the heated glaze over the top and a bit on the sides.
.
Bon Appetit,
Christi


If you are interested in joining an Online Bible Study here at Girlfriends Coffee Hour, click HERE to check out what’s coming up in January of 2013!

Merry Christmas & Happy New Year from Girlfriends Coffee Hour

Merry Christmas

All of us here at Girlfriends Coffee Hour want to wish you and your loved ones a very Merry Christmas and Happy New Year!

We will be taking this week off to celebrate the holidays with our loved ones.  We will be praying for you, and your loved ones.  May the good Lord bless your time together, and bring His amazing grace, peace, and agape love into your homes!

We’ll be back again next Sunday with more news about our upcoming 2013 studies!  

Until then, God bless you & your loved ones!!

Christi, Megan, and the GCH Leadership Team

________________________________

A Daughter’s Worth: Week 12 – Living with Optimism

This is our last week with “A Daughter’s Worth” bible study.  I hope you have enjoyed this study, as much as we have!  Sometimes online Bible studies can be kind of pressing, especially when you have such a busy schedule.  But, one thing that I have learned is that putting God first and foremost, in all things, is an absolute necessity in order for everything else in my life to run smoothly.

The Word tells us to seek Him first and all things will be added unto us.  That means first thing every day, we should be making time for God.  We should be seeking God in our daily schedules, tests, extra-curricular activities, church functions, sports, and more.  If God hasn’t called us to it, we cannot expect Him to bless it.

This week, in Week 12 of A Daughter’s Worth, we will discuss “Living with Optimism” and what that means.  This may be the end of this study, but it’s a very important part of this book!  I hope you will take the time to read it, meditate on what you’ve read, and spend time with God.

Here is your schedule for the week:  

On Monday, Diane will discuss giving honor to God.

On Tuesday, Teresa will discuss recognizing the holiness of God.

On Wednesday, Jordan will discuss receiving happiness from God.

On Thursday, Tonya will discuss resting in the hope of God.

On Friday, Edwina  will discuss looking forward to Heaven with God.

And then to close the week off, Coleen will have a special message for us.  So be sure to stay tuned!

Be sure to check back soon because we will be announcing what’s next for GCH:decaf SOON!!!

Now a word from Miss Morgan:

Hey girls this is our last week, which is crazy; but this week we will be talking about how we should give God glory and that we should know the holiness that God has. God also will give us happiness, which we should learn to accept, and to always have the Joy of the Lord with us.

Lastly we will also be talking about resting in the hope of the Lord, and that we should always look forward to Heaven and living with God forever. It’s weird thinking this life will end, but we will live FOREVER in Heaven with God, which is amazing. I love you girls!!


Before Morgan and I close for today, I want to ask you if you know Jesus as your personal Lord and Savior?  If not, we invite you today to ask Him into your heart.  Please pray with us:

Lord Jesus, I come to You today and ask You to be my Lord and Savior.  I have learned who You are through this bible study Lord, and I want to know You personally.  So today, Lord, I confess the sins that I have in my heart, and I ask You to forgive me and cleanse me of all unrighteousness.  I ask You now to come into my life, as my personal Lord and Savior.  AMEN!

If you prayed this prayer with Morgan and I, would you send us an email?  We’d like to pray with you.  You can reach us at GCH_decaf@girlfriendscoffeehour.com.  

We love you, so does He!

Have a GREAT week everyone!

Morgan & Christi


GCH:What’s on Your Plate? – Chicken Corn Chowder

This recipe is so EASY & Delicious!  Be prepared for those hungry munchkins walking in the door, and yelling, “MOM!!!  What smells SO good?”  Top it off by adding some good ole Homemade Bread with it, and dinner is ready!  My kind of cooking!


Chicken Corn Chowder

Chicken Corn Chowder

Ingredients

1/2 tablespoon olive oil

1/2 onion, diced

1 carrot, diced

1 celery stalk, diced

1 garlic cloves, minced

2 boneless, skinless chicken breasts – cut into bite size pieces

2 pieces cooked bacon – crumbled

1 cup milk

1 tablespoons all-purpose flour

1 20-ounce package frozen corn, thawed

½ teaspoon dried cilantro

Chives to garnish

Instructions

 Using a lidded soup pot, place pot on stove over medium heat, and add olive oil.

 Stir in chopped onion, carrot, celery, and minced garlic. Cover pot with lid and cook for about 5 minutes.

 Add diced chicken breasts to vegetables. Add enough water to slightly cover all ingredients.

 Cover pot with lid and cook for about 20 minutes until chicken is done.  Stir occasionally.

 Remove lid from pot, and add bacon to the chowder.

 Combine milk and flour in a measuring cup and stir well. Add to chowder.

 Add package of frozen corn and dried cilantro to the chowder, and stir.

 Reduce heat to low, and simmer in covered pot for about 20 minutes. Stir occasionally.

 Serve in soup bowls.  Garnish with chives.

 Great served with Homemade Bread.

Serves 4
____________________________________
Bon Appetit,
Christi


If you are interested in joining one of our upcoming Online Bible Studies, beginning January 6, 2013, click on the “sign-up here” button at the top of our webpage to find out what’s coming up!

GCH: What’s on Your Plate? – Mexican Chicken Casserole

Before I share my recipe today, I would like to invite you to our Online Bible Study Sign-Up page.  This is where you will find all the information about our upcoming bible studies.  The Online Bible Studies begin Jan 6, 2013!  So it’s important to get signed up as soon as possible.

Our Women’s Online Bible Study Group will be reading “Crazy Love: Overwhelmed by a Relentless God” by Francis Chan.  This is an amazing book about God’s love for us!  My church did this study a few years ago, and it made a huge impact on my own life!  I know it will impact yours, as well!  God is love. Crazy, relentless, all-powerful love. Have you ever wondered if we’re missing it? It’s crazy, if you think about it. The God of the universe–the Creator of nitrogen and pine needles, galaxies and E-minor–loves us with a radical, unconditional, self-sacrificing love. And what is our typical response? We go to church, sing songs, and try not to cuss. Whether you’ve verbalized it yet or not…we all know somethings wrong. Does something deep inside your heart long to break free from the status quo? Are you hungry for an authentic faith that addresses the problems of our world with tangible, even radical, solutions? God is calling you to a passionate love relationship with Himself. Because the answer to religious complacency isn’t working harder at a list of do’s and don’ts–it’s falling in love with God. And once you encounter His love, as Francis Chan describes it, you will never be the same. Because when you’re wildly in love with someone, it changes everything.

Our Single Women’s Online Bible Study Group will be reading Captivating: Unveiling the Mystery of a Woman’s Soul” by John and Stasi Eldredge.  The message of Captivating is this: Your heart matters more than anything else in all creation. The desires you had as a little girl and the longings you still feel as a woman are telling you of the life God created you to live. He offers to come now as the Hero of your story, to rescue your heart and release you to live as a fully alive and feminine woman. A woman who is truly captivating.  

Our brand new GCH:Victorious Healing Online Bible Study Group will be reading “Life’s Healing Choices” by John Baker.   We’ve all been hurt by other people, we’ve hurt ourselves, and we’ve hurt others. And as a result, every single one of us ends up with some sort of hurthang-up, or habit. But the question we all face is, Where do we go from here?  Life’s Healing Choices offers freedom from our hurts, hang-ups, and habits through eight healing choices that promise true happiness and life transformation. Using the Beatitudes of Jesus as a foundation, Senior Pastor Rick Warren of Saddleback Church and John Baker, who is also a pastor at Saddleback, developed the eight choices shared in this book.  This is going to be an AMAZING study!!

You can sign up for one, or all three of these studies, by clicking HERE.  We look forward to studying the amazing books with you!

*********************

And now onto our amazing Mexican Chicken Casserole! Oh my goodness, this is so good!  I found this on www.SouthernPlate.com.  Christy Jordan is one of my favorite bloggers!  I have her cookbook “Southern Plate”, and it is filled with some amazing home-style recipes that will please any palate.  The recipe below is how I actually made this recipe.  Check out both recipes to see which one you and your family love!  Click on the recipe headline to be taken to the actual recipe.

Mexican Chicken Casserole


Ingredients:

4 cups of cooked, chopped chicken (about 4 to 5 breasts halves)
2 cups of instant brown rice
1 can cream of chicken soup
1 cup sour cream 
1 small can of minced green chilies
1/2 cup frozen diced onion
1 can Ro*Tel tomatoes
1/4 teaspoon cumin
1/2 teaspoon garlic powder
1 1/2 cups chicken broth
8 oz shredded cheddar cheese, divided
.
.
Instructions
  1. Combine all ingredients and half of cheddar cheese in a large bowl. Mix well.
  2. Turn out into a greased casserole dish and top with remaining cheese.
  3. Bake at 350 degrees F for 30 minutes, or until hot and bubbly.

**********

Bon appetite,

Christi