April 19, 2024

At Home with GCH: Appetizers Again – Mini Quiche

Here on our At Home with GCH blog, Monday’s are always focused on healthy but oh-so-yummy! recipes.  This month we are doing a series on appetizers…I love ‘em!!  How about you?   I would love for you to leave a comment below sharing with us YOUR favorite appetizer(s)!

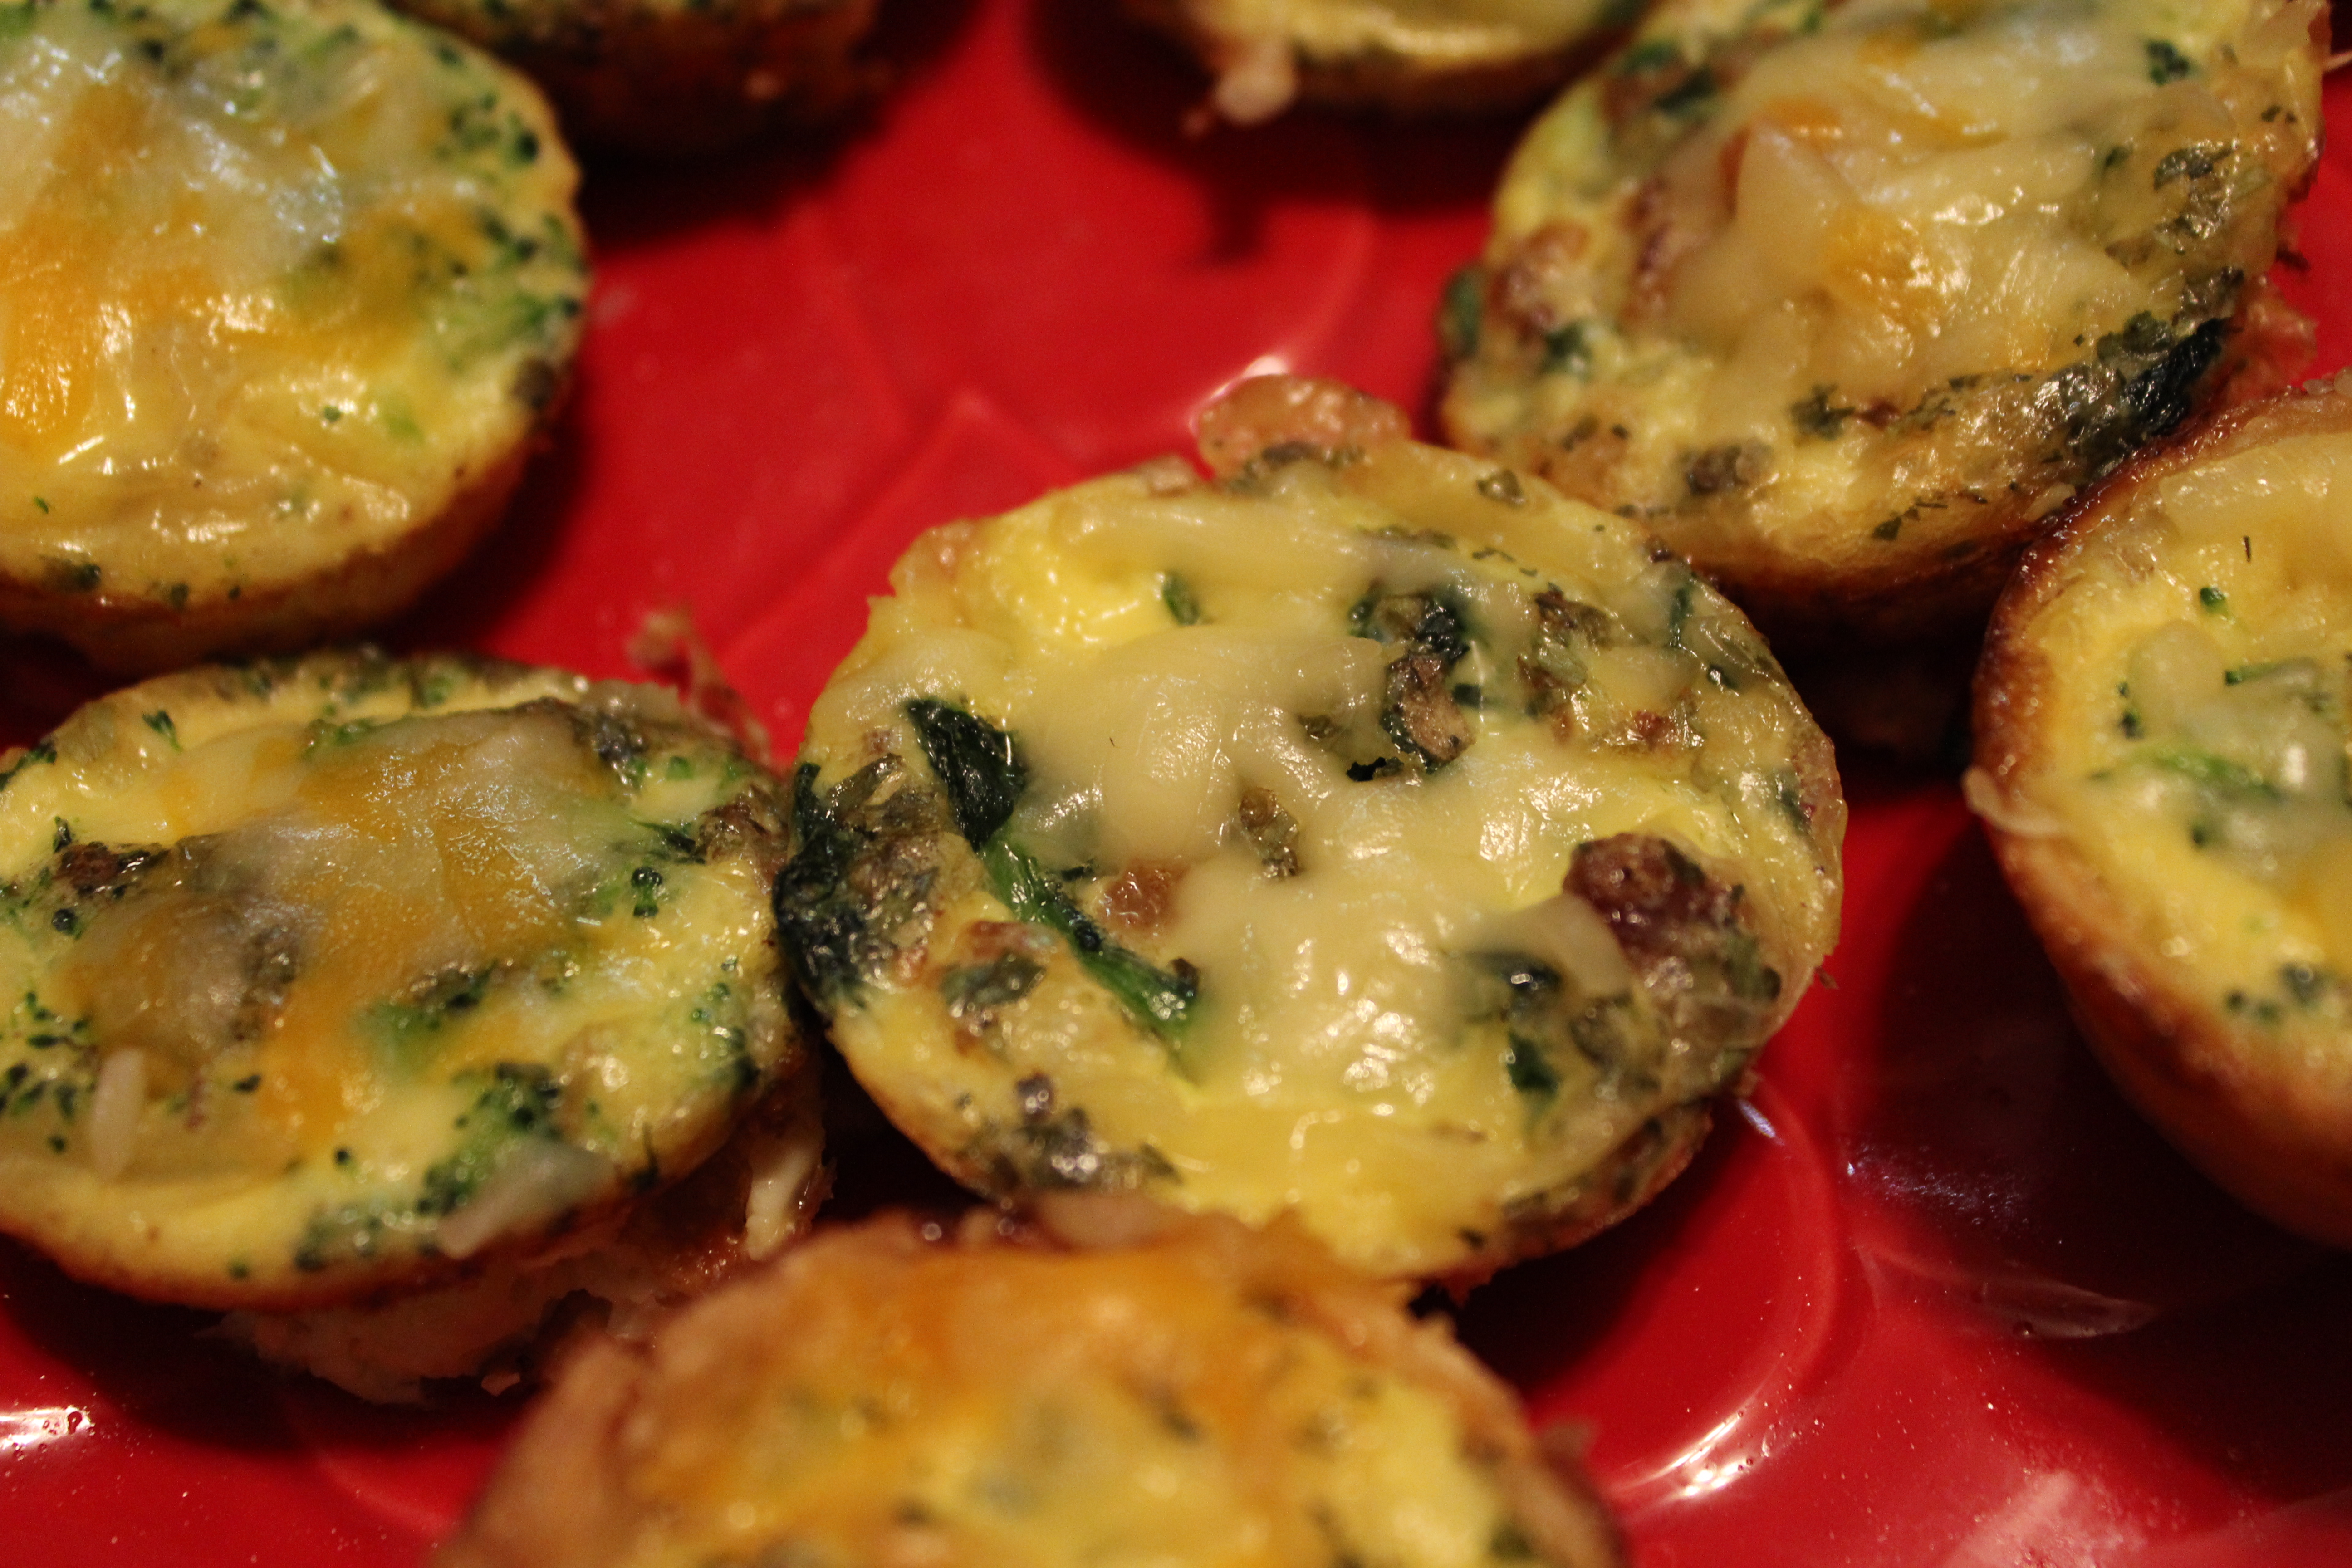
This week we are making bite-size crustless mini quiche; have you ever had them? Pop-‘em-in-your-mouth yumminess!  These little appetizers are excellent to make ahead of time and freeze, then pull out to warm for a quick breakfast.

I made two types: Spinach&Swiss with Bacon, and Broccoli-Cheddar with Ham.  I have given you the basics—for both types—and then a few suggestions for optional fillings.  Whether you do them crustless (low-fat, gluten-free) like these or wrapped in some yummy, flaky crust, these are delicious!  You can let your imagination and taste buds lead you to making a variety or two that your loved ones will enjoy!

And I would suggest doubling or quadrupling the recipe (as I did); these go fast!  My husband can eat almost the whole batch (one dozen mini quiche) by himself… I’m just sayin’!  🙂

IMG_0161

Mini Quiche (makes one dozen)

Egg Filling

3 large eggs
1/2 cup milk
1/4 teaspoon kosher salt, freshly ground black pepper

Whisk these 4 ingredients together, thoroughly blending the eggs.  Pour into a container with a spout (for ease in filling muffin tin) and set aside.

Spinach&Swiss with Bacon

1/2 cup frozen chopped spinach, defrosted
2 slices bacon, cooked and crumbled (option: packaged, cooked bacon)
4 tablespoons chopped onion
1+ tablespoons dried dill or tarragon (optional)
1/2-3/4 cup finely grated Swiss cheese

Preheat oven to 375.  Grease with melted butter (or spray with cooking spray) your mini muffin tin; be thorough.  Place spinach in colander, allow to defrost, and then squeeze dry (with your hands); set aside.  Cook bacon, cool, and crumble.  Saute onion in a bit of the bacon drippings until soft.  When done, mix with spinach and herbs.

Evenly distribute the veggies, the bacon, and the cheese among the muffin cups; these should be at least 1/2 full. Then carefully pour the prepared Egg Filling mixture into each muffin cup.  Fill almost full.  Bake @ 375 for approximately 12-15 minutes until the eggs puff and are lightly golden brown.  Remove from oven; let sit for 10 minutes, then carefully remove from muffin tin.  If you have thoroughly greased your muffin tin in preparation, this shouldn’t be too hard.  I used a small, flexible spatula—but a teaspoon or small knife will do—and just run it around the edge of each quiche to loosen.  Serve immediately.

Broccoli-Cheddar with Ham

4 tablespoons chopped onion
olive oil
1/2 cup frozen, chopped broccoli (cooked and cooled)
1/2 cup ham, chopped small
1+ tablespoons dried crushed rosemary or marjoram (optional)
1/2-3/4 cup of finely grated sharp Cheddar

Preheat oven to 375.  Grease with melted butter (or spray with cooking spray) your mini muffin tin; be thorough. Cook frozen broccoli in small saucepan, drain and cool; set aside.  Saute onion in a small amount of olive oil until soft; when done, mix with broccoli, and herbs.

Evenly distribute the veggies, the chopped ham, and the cheese among the muffin cups; these should be at least 1/2 full. Then carefully pour the prepared Egg Filling mixture into each muffin cup.  Fill almost full.  Bake @ 375 for 12-15 minutes until the eggs puff and are golden.  Remove from oven; let sit for 10 minutes, then carefully remove from muffin tin.  If you have thoroughly greased your muffin tin in preparation, this shouldn’t be too hard.  I used a small, flexible spatula—but a teaspoon or a small knife will do—and just run it around the edge of each quiche to loosen.  Serve immediately.

Filling Variations (choose one from each category)

  • Veggies:(1/2 cup) of either sauteed mushrooms, peppers, seeded tomatoes, zucchini, butternut squash
  • Cheese: (1/2-3/4 cup) of your favorite Cheddar, Monterey Jack, goat cheese, Gruyere, Parmesan, Fontina, Provolone, Gouda
  • Herbs: (1+ tablespoon) of your choice of parsley, chives, tarragon, basil, dill, rosemary,  marjoram
  • Meat: (1/2-3/4 cup) finely chopped ham, cooked&crumbled breakfast sausage or bacon

Crust Options  OK, should you want to make your mini quiche with a crust (oh yum!) you have options, too.  This is a little ditzy and time-consuming but well worth the effort for those that love crust!

After choosing (and preparing, if necessary) your option, cut out into approximately 2+1/2″ diameter rounds; I used a juice glass.  Gently fit into mini-muffin tin cups.  Bake @ 400 for 20 minutes or so ’til egg is puffed and crust is lovely and golden.  Allow to sit in the muffin tin for 2-3 minutes; remove to a cooling rack OR serve immediately.

God loves you!   ♥  (Don’t ever forget that!)

♥  coleen

_________________________________

If you would like to send a personal message to Coleen concerning this series, you may email her at: Coleen@girlfriendscoffeehour.com

At Home with GCH: Popcorn, Five Ways

Furikake Popcorn

Furikake Popcorn

I have an admission to make:  I have a popcorn addiction.  It would be physically impossible for me to see a movie in the theater without a big bucket of buttery, salty popcorn on my lap!  When I was pregnant with my second daughter, I was eating a bag of microwave popcorn everyday—until my husband started emailing me news reports of people contracting “popcorn lung” from chemicals used in microwave popcorn.  Undeterred, I now make it on the stovetop.  I’m down to a batch a week, and I’m okay with that.

If you can, look for organic popcorn.  Trader Joe’s has it and at a good price.  You’ll also need a large, heavy-bottomed non-stick pot with a lid, and some kind of oil.  I usually use regular vegetable oil.  You can try peanut oil—it has a high smoke point, so it can withstand high heat without burning or breaking down.  Even better is coconut oil, which I use for popcorn recipes that are on the sweet side.

The technique, if you haven’t made it the old-fashioned way in a long time, is simple.  Add the oil and three kernels of popcorn, heat over medium heat, covered with the pot lid.  When you hear or see the three kernels pop, you know your oil is ready, so add the rest of the popcorn.  Cover the pot and shake every 5 or 10 seconds to keep things moving.  Just like microwave popcorn, remove from the heat when you stop hearing popping.  Add your toppings immediately; cover and shake to distribute.

Usually just salt and butter are enough for me, but sometimes I like to experiment with new flavor combinations.  Here are some of my favorite discoveries.

===========

Best Kettle Corn

Ingredients:

  • 4 tablespoons coconut oil
  • 1/2 cup popcorn kernels
  • 1 tablespoon white sugar
  • salt to taste

Directions:

  1. Add coconut oil and 3 kernels of popcorn to the pot; heat over medium until the three kernels pop.  Add the rest of the popcorn and the tablespoon of sugar.  Cover, shaking frequently, until the popping stops.  Shake on salt to taste (not a lot) and serve.

===========

Furikake Popcorn

There is a Hawaiian treat called Hurricane Popcorn that includes furikake (a mixture of sesame seeds, shredded seaweed, and other flavors) bacon, and pineapple!  It sounded amazing, but I decided to dial it back and kept it simple.

Ingredients:

  • 4 tablespoons vegetable oil
  • 1/2 cup popcorn kernels
  • 2 tablespoons butter
  • 1 teaspoon soy sauce
  • 1/2 teaspoon sugar
  • 1-2 tablespoons furikake

Directions:

  1. Heat oil and 3 tester kernels of corn.  While waiting for the tester kernels to pop, combine butter, soy sauce, and sugar and heat in the microwave for 30 seconds, or until the butter melts.  Swirl to combine.
  2. When the tester kernels pop, add the rest of the popcorn and pop as directed.  When the popping stops, pour the butter mixture over the corn and sprinkle with furikake.  Cover, shake well to distribute, and serve.

===========

Truffle Popcorn

If your “date night” this month consists of you and your man snuggling on the sofa and watching a movie, this will fancy it up.  You might even want to change into your nicest sweatpants!  Truffle oil is not that expensive, and if you make mushroom risotto, truffle oil will take it from yummy to HOT DIGGITY DOG!

Ingredients:

  • 4 tablespoons vegetable oil
  • 1/2 cup popcorn kernels
  • 2 tablespoons truffle oil
  • 1 teaspoon truffle salt or regular salt

Directions:

  1. Pop as directed in above recipes.  When done, drizzle with truffle oil, shake on truffle salt, shake to coat, and sigh with delight.

===========

Easy Cheesey Popcorn

Cheese popcorn is my biggest weakness.  I found a shortcut.  I warn you, it’s not pretty.  But it is delicious.  This recipe came about because we’d bought a box of “Easy Mac” macaroni and cheese, and the kids didn’t like it.  Waste not, want not, I always say!

Ingredients:

  • 4 tablespoons vegetable oil
  • 1/2 cup popcorn kernels
  • 2 tablespoons butter
  • 1 packet cheese powder from a box of Kraft Mac and Cheese, or 2 packets from the individual Easy Mac servings
  • OR instead of cheese powder, you can use 2 teaspoons Nutritional Yeast – it has a mild, cheesy flavor, but it is vegan and full of vitamins and minerals.  It’s tasty, but not as tasty as Mac and Cheese powder.

Directions:

  1. Pop as directed in above recipes.  While the corn is popping, melt the butter in the microwave.  When popcorn is done, drizzle on butter and sprinkle on the cheese powder.  Shake well to distribute.  Wolf down popcorn, wash hands to get the orange color off, and eat broccoli for dinner.

===========

Pick your popcorn flavor!

Pick your popcorn flavor!

Indian Spiced Popcorn

Since you already have the garam masala powder in your pantry (from when you made the drumsticks last week, right?) here is another use for it.

Ingredients:

  • 4 tablespoons vegetable oil, or coconut oil (I like the coconut oil best—makes it taste more like Chai tea)
  • 1/2 cup popcorn kernels
  • 2 tablespoons butter
  • 1 teaspoon garam masala powder
  • 1/2 teaspoon sugar
  • 1/2 teaspoon salt

Directions:

  1. Add oil and 3 tester kernels to the pan over medium heat.  While waiting for the tester kernels to pop, heat the butter in the microwave to melt.  In a small bowl, stir together garam masala, sugar, and salt.
  2. Pop corn.  When done, drizzle butter over and shake garam masala powder onto popcorn.  Cover with the lid and shake to distribute.


Explore, experiment, enjoy! — Dana


To view even more of Dana’s unique recipe, you can visit her at Frugal Girlmet!


If you would like to contact Dana in regards to this blog, please email her at Dana@girlfriendscoffeehour.com

GCH:What’s on Your Plate? – Smokey Mountain Chicken

smoky mountain chicken

This is one of those oh so easy chicken recipes that my family loves. Gooey cheese, barbecue sauce and spices…who wouldn’t love it! The chicken comes out moist and flavorful every time. You can use any barbecue sauce , we prefer Sweet Baby Ray’s. And I have used thick sliced Colby Jack and Sharp Cheddar and they both are awesome. I actually prefer the Sharp Cheddar, but the kids prefer the Colby Jack. Easy weeknight meal that is good enough to serve guests.

*note- the recipe calls for chopped tomato as well as green onion for garnish. I forgot to buy a fresh tomato for this meal, so I skipped it. But on any other day, it would be on top!


Smokey Mountain Chicken

Ingredients:

4 skinless, boneless chicken breasts

12 slickes turkey bacon

1 tsp garlic powder

4 slices Colby Jack cheese

ground pepper to taste

1 tsp Italian-style seasoning

1 (18 ouce) bottle BBQ Sauce

1/8 cup chopped green onion, for garnish

1/4 cup chopped tomatoes, for garnish

Directions:
1. Preheat oven to 350-degrees F.
.
2. Place chicken breasts in a lightly greased 9 x 13-inch baking dish.  Season with pepper, garlic powder, and Italian seasoning to taste.  Baked seasoned chicken in the preheated over for 20 to 30 minutes or until cooked through and juices run clear.
.
3. When chicken is done, remove from oven and pour on BBQ sauce. Layer each breast w/ 3 slices of turkey bacon, then a slice of cheese.  Return to the oven and continue to bake for 5 more minutes or until cheese is melted.  Removed from oven and top w/ chopped green onions and tomatoes.
.
Happy Eating!
Liz

You can find more of Liz’s recipes over at www.fresh-plate.com!

GCH:What’s on Your Plate? – Cheesy Chicken and Rice with Bacon

Cheesy Chicken and Rice with Bacon

Cheesy Chicken and Rice with Bacon

What you need:

1/2 lb bacon (save 2 tbsp bacon grease), crumbled

4 tbsp butter

1/4 cup all purpose flour

1/2 teaspoon salt

1/4 teaspoon black pepper

1/4 teaspoon chili powder

1 1/2 cups chicken broth

1 1/2 cups shredded cheddar cheese

2 cups cooked, shredded chicken

4 cups cooked white rice

1 cup shredded cheddar cheese (for topping)

9×13 casserole dish

skillet for cooking bacon

medium saucepan

whisk

large spoon

Instructions:

Cook bacon, drain and set aside.  Reserve 2 tablespoons of bacon grease.  After bacon has cooled, crumble into pieces.

Place butter into a medium saucepan over medium heat.  Once melted, whisk in flour, pepper, salt, and chili powder until smooth and bubbly.  Slowly whisk in chicken broth.  Increase heat to high while whisking broth until thickened.  Reduce heat to low and stir in 1 1/2 cups of cheddar cheese.  Reduce heat to a simmer and set aside.

Put shredded chicken and cooked rice in a casserole dish and mix in the 2 tablespoons of reserved bacon grease.  Add cheese sauce, mix to combine all ingredients.  Top with 1 cup shredded cheddar cheese, then top with crumbled bacon.  Place under oven’s broiler for 3-5 minutes until cheese is melted.  Serve immediately.

Makes 4-6 servings.

God is great, God is good… let us thank Him for our food! 🙂

<3 Shauna

PS – you can also find Shauna on her personal website, www.workhomeplay.net

GCH:What’s on Your Plate? – Chicken Shepherd’s Pie with Parmesan Cauliflower Topping

Now that title’s a mouthful, hmmm?  Pun FULLY intended!  My husband loves Shepherd’s Pie—and any variation I can come up with!  And so I indulge him! 🙂  This recipe fits into our healthy but oh-so-yummy category in a couple of ways:

  • it is low-carb (with the absence of mashed potato topping)
  • it  is made with natural ingredients that you can pronounce (as the gravy is made from scratch)
  • it is low in fat/high in protein (using boneless chicken breast as the protein)

This recipe could easily be doubled and baked in an 11 x 13 baking dish.

Chicken Shepherd’s Pie with Parmesan-Cauliflower ToppingIMG_1310

Filling Ingredients:

4 tablespoons olive oil, divided
1# boneless chicken breast, pounded evenly, cut into 1″ cubes
1 sweet (vidalia-type) onion, chopped in pieces about 1/2 inch
4 ounces baby bella mushrooms, wiped clean sliced chunky
2 tablespoons chopped garlic in oil (from a jar)
16 ounce package frozen mixed veggies (your choice), set out to defrost

1 tablespoon butter
2 tablespoons flour
1/4 cup white wine (or broth)
1 + 1/4 cups chicken broth

Topping Ingredients:

1 medium-sized head of cauliflower, cored and chopped into small pieces
1/4 cup milk
1/2 cup finely grated parmesan cheese
salt and freshly ground black pepper to taste

1/3 cup shredded cheese (sharp cheddar, smoked gouda) *use a flavorful cheese

Instructions:

Preheat the oven to 375.  Bring a medium-sized pot of salted water to a boil. Chop cauliflower into small pieces and simmer ‘til  soft enough to mash easily (10-12 minutes). Drain cauliflower very well in colander; place back into pot and  use an immersion blender or hand beater to “mash” the cauliflower with the milk and Parmesan. Season very well with salt and pepper to taste.

While the cauliflower cooks, heat 2 tablespoons of olive oil in a large frying pan and saute the cut-up chicken adding the chopped garlic for the last minute (don’t let garlic burn).  Saute ’til just getting brown but don’t overcook.  Remove pan from stove; set aside cooked chicken.  Wipe frying pan with paper towels to remove bits. Then add 2 additional tablespoons olive oil; heat over medium, and saute chopped onions for 3 minutes.  Add chopped mushrooms and saute for 4-5 minutes more to caramelize.  Reduce heat to low; add 1 tablespoon butter, and sprinkle flour over the mushroom-onion mixture, stirring with a whisk.  Cook this mixture for 3 minutes occasionally scraping the pan.  Then gradually whisk in the wine ’til the mixture is smooth.  Gradually whisk in the  broth and your gravy will come together.  Gently simmer for 5 minutes.  Add back the cooked chicken and the defrosted veggies and heat together for 1-2 minutes.

Spread the chicken-vegetable-gravy mixture in the bottom of an 8 cup casserole dish.  Top with the cauliflower, and spread across the pan almost to the edges.  Bake for 20 minutes, and then top with the grated cheese.  Continuing baking another 10 minutes or so ’til bubbly.  If top is not lightly browned, can be carefully placed under broiler for 2-3 minutes.  Enjoy!

God loves you!  and I do too.  <3 Coleen

GCH:What’s on Your Plate? – Mac and Cheese

Coleen’s Mac & Cheese

Mac and Cheese.  C’mon, who does not like mac and cheese?  I read a poll, and Mac and Cheese was voted overwhelmingly as ‘favorite comfort food!’  Now I am hoping that your favorite version doesn’t come out of a blue box. 😉   But, if it does, perhaps you might try my version and see if it does not convince you to try it versus the blue box, in the future.

This version of Mac & Cheese has lots of veggies hidden in there.  Some of the pasta is made with pureed carrots and tomatoes, and there is butternut squash throughout the cheese sauce.  I love this because it makes the cheese sauce even more colorful causing the eaters to ‘think’ it is more cheesy!  Also, there is only 6 ounces of shredded cheese in the whole dish which helps to ‘healthify’ this recipe.

Have you ever made a white, or Bechamel, sauce?  Well, today you will!  It is very easy, and a great technique to add to your repertoire!  In a future post, I will share some recipes that need a white sauce and by then you will be a pro at making it!

The following recipe makes an abundantly filled 9×13 pan…enough to feed 6-8 hungry folks.  (or, if you have a husband who LOVES leftovers like mine, lunch for 2-3 days.)  This recipe is easily doubled, and I always make a double batch.  A menu suggestion: M&C, steamed broccoli, grilled ham steak.  a big, delicious salad is often our only accompaniment.

Macaroni:
1# box small macaroni (shells, penne)
12-oz box veggie pasta (I used penne made with carrots and tomato) *

Cheese Sauce:
1/2 small onion, diced
2 T butter
2 T flour
1 cup 2 percent milk
1 cup chicken or vegetable broth
2 (10-ounce) packages frozen pureed winter squash, thawed
1/2 cup part-skim ricotta cheese
4-oz sharp Cheddar, shredded (about 1+1/3 cup)
2-oz Monterey jack cheese, shredded (about 2/3 cup)
1 tsp salt, 1 tsp fresh ground pepper
1 tsp ground (dry) mustard

Topping:
2 slices stale bread, crumbled into fine crumbs
2 Tbsp freshly grated Parmesan cheese
1 tsp olive oil

Pre-heat your oven to 375.  Coat a 9 by 13-inch baking pan with small amount of  butter.  Bring a large pot of water to a boil; add 1 tsp of salt and the macaroni;  cook  according to package directions.  Drain in a colander and place back into the  cooled pot (this is where you will mix the macaroni and all that cheesy goodness together!)

Meanwhile, over medium heat, melt the butter in a medium saucepan, adding the  diced onion. Cook ‘til the onion is soft and translucent, approximately 5 minutes.  Then sprinkle the flour over the cooked onion and, using a whisk, stir constantly for  1 minute.  Adjust the heat to very low, and cook for 2-3 minutes to get the starchy taste out of the mixture.  Do not let the mixture brown.

Increase the heat back to  medium and immediately slowly pour in 1/4 cup or so of milk while whisking briskly.  Just keep stirring!  As this is absorbed, continue to slowly add the balance of the  milk in a steady stream, followed by the broth; stirring constantly as the liquid  becomes absorbed.  This will take about 3 minutes.  Adjust the heat lower again and  let this mixture simmer slowly for another 5  minutes, stirring occasionally.  (You  have now made a white sauce!! Congratulations!!!)

At this point, add in the thawed  butternut squash, stirring ‘til it is incorporated, allowing the mixture to come back  to a simmer.  Remove the saucepan from the heat.  Stir in the ricotta, and the  other cheeses, along with the ground mustard, salt & pepper.  Carefully taste (it’s hot!) the  cheese sauce, adjusting for seasoning.

Pour cheese mixture over the macaroni in the large pot and stir gently to combine.  Transfer the macaroni and cheese to the 9×13 baking dish and bake for 20 minutes.  Remove from oven.  Adjust the top rack in the oven to a higher position, and turn  the broiler on.  Combine bread crumbs, Parmesan cheese and oil in a small bowl.  Mix with your fingers; get a little messy!  Then sprinkle over the top of the cooked  mac and cheese.  Carefully place the baking dish back in the oven and broil for 3  minutes.  Keep your eye on it; you want the breadcrumbs to brown but not burn and  for some of the macaroni to get just a little crispy (my husband loves that part!).  Again, carefully remove from the oven…and you are ready to serve!

*here is a link to the type of veggie macaroni I used.  Check it out!

http://barilla.com/content/prodottobarilla/veggie-penne-freshly-pureed-tomatoes-and-carrots

God loves you…and I do, too! <3

Coleen


______________


Are you interested in joining us for one of our Women’s or Teens Online Bible Studies?  Click HERE for more details, and to sign up!