April 23, 2024

GF Sour Cream Chocolate Cupcakes w/ Frosting

Here on our At Home with GCH blog, Monday’s are always focused on healthy but oh-so-yummy! recipes.  This week’s recipe is for my husband.  (Actually, he is the guinea pig for all of my recipes.  Now he would tell you he is the ‘welcome recipient’ of the firstfruits of all my blog foods.)  So, we were at the store the other day, stocking up on a few gluten free flour varieties when he spotted one we don’t have in our pantry—quinoa flour.  That got my attention…but so did the price!  Oh. My.  But before I was done being aghast about the cost, he had spied a recipe on the back of the package for Sour Cream Chocolate Cupcakes.  Even though I nixed the purchase of the flour, I promised to still make the cupcakes.  Here we go!

2013-09-10 21.00.47

Sour Cream Chocolate Cupcakes

Ingredients:
1+1/2 cups gluten free flour blend *
1+1/2 teaspoons baking powder  2013-09-10 15.44.34
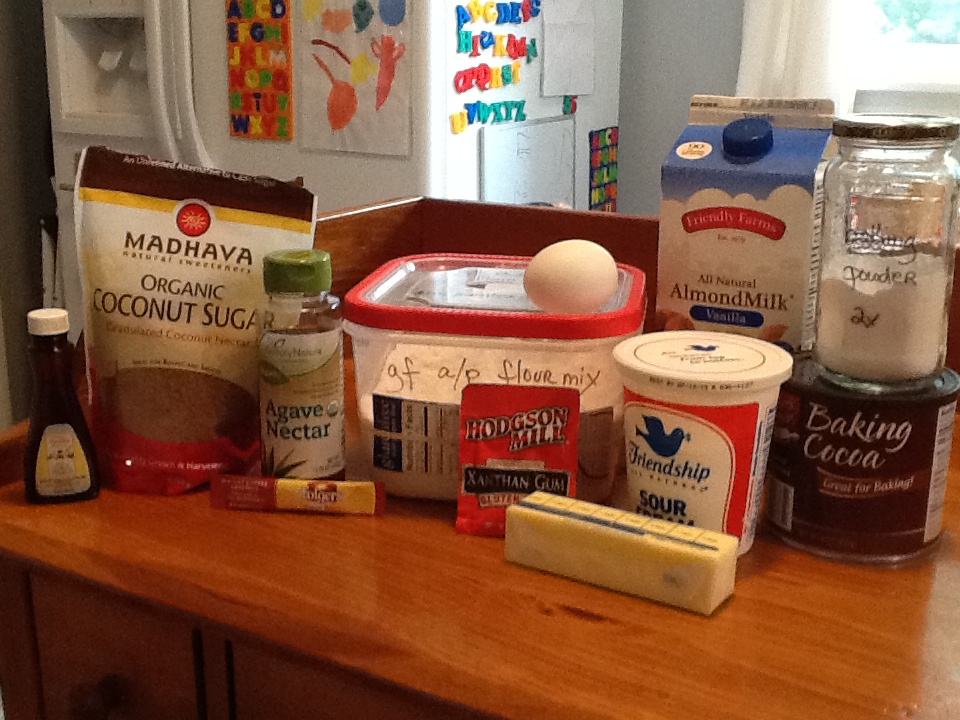
3/4 teaspoon instant coffee granules
1/2 teaspoon kosher salt
1 teaspoon ground cinnamon
1/2 teaspoon xanthan gum
1/2 cup warmed almond milk
1/2 cup cocoa powder
1/2 cup sour cream
6 tablespoons unsalted butter, room temperature
1/2 cup agave nectar
1/4 cup coconut (or palm) sugar
1 large egg
1 teaspoon vanilla extract

Directions:

  • Preheat oven to 325.
  • Line regular sized 12 cup muffin tin with liners.
  • In a medium sized bowl, whisk together the first six ingredients—the dry ingredients—and set aside.
  • In a small bowl, whisk together the warm milk and the cocoa powder.  Then stir in the sour cream; set aside.
  • Set up a stand mixer with the paddle attachment; add the butter and beat for 3 or 4 minutes on medium ‘til light and fluffy.
  • Beat in the agave nectar.  Add the coconut sugar, and beat ‘til light and fluffy again.
  • Add the egg and vanilla extract beating ‘til the egg is totally incorporated.
  • Stir in the sour cream/chocolate mixture.
  • Add the dry ingredients to the wet ingredients mixing on the slowest speed just ‘til they are thoroughly mixed together.
  • Divide the batter into the paper-lined muffin tin filling to about 3/4 full (this is a stiff batter).
  • Bake for 15-20 minutes ‘til tops spring back when lightly touched and toothpick comes out clean.
  • Cool for just 3 or 4 minutes in muffin tin then remove and set gently onto a wire rack to cool completely.

Chocolate Cream Cheese/Whipped Cream Frosting

Ingredients:
1 cup + 2 tablespoons heavy cream, cold
8 ounce package cream cheese, at room temperature
2 tablespoons agave nectar
1 teaspoon vanilla extract , pinch of kosher salt
4 tablespoons cocoa powder
1/2 cup powdered sugar

Directions:

  • Chill bowl and beaters in freezer for 10 minutes.
  • Beat 1 cup heavy cream in chilled bowl ‘til stiff peaks form.  Set aside.
  • In separate bowl, beat softened cream cheese along with agave nectar, vanilla , and salt for 3 minutes ‘til light.
  • Sift in the cocoa powder and the powdered sugar. Beat on low for 30-45 seconds ‘til smooth.
  • Add in the rest of the heavy cream and beat ‘til light and creamy.
  • Take 1/3 of the whipped heavy cream and mix in on lowest speed ‘til incorporated.
  • Remove bowl from stand mixer and fold in the rest of the whipped heavy cream ‘ til combined.
  • Pipe (or spread) onto top of cupcakes.  Enjoy!

♥  ♥  ♥  ♥  ♥

God loves you!  ♥  (Don’t ever forget that!)

♥  coleen

GCH:What’s on Your Plate? – Mac and Cheese

Coleen’s Mac & Cheese

Mac and Cheese.  C’mon, who does not like mac and cheese?  I read a poll, and Mac and Cheese was voted overwhelmingly as ‘favorite comfort food!’  Now I am hoping that your favorite version doesn’t come out of a blue box. 😉   But, if it does, perhaps you might try my version and see if it does not convince you to try it versus the blue box, in the future.

This version of Mac & Cheese has lots of veggies hidden in there.  Some of the pasta is made with pureed carrots and tomatoes, and there is butternut squash throughout the cheese sauce.  I love this because it makes the cheese sauce even more colorful causing the eaters to ‘think’ it is more cheesy!  Also, there is only 6 ounces of shredded cheese in the whole dish which helps to ‘healthify’ this recipe.

Have you ever made a white, or Bechamel, sauce?  Well, today you will!  It is very easy, and a great technique to add to your repertoire!  In a future post, I will share some recipes that need a white sauce and by then you will be a pro at making it!

The following recipe makes an abundantly filled 9×13 pan…enough to feed 6-8 hungry folks.  (or, if you have a husband who LOVES leftovers like mine, lunch for 2-3 days.)  This recipe is easily doubled, and I always make a double batch.  A menu suggestion: M&C, steamed broccoli, grilled ham steak.  a big, delicious salad is often our only accompaniment.

Macaroni:
1# box small macaroni (shells, penne)
12-oz box veggie pasta (I used penne made with carrots and tomato) *

Cheese Sauce:
1/2 small onion, diced
2 T butter
2 T flour
1 cup 2 percent milk
1 cup chicken or vegetable broth
2 (10-ounce) packages frozen pureed winter squash, thawed
1/2 cup part-skim ricotta cheese
4-oz sharp Cheddar, shredded (about 1+1/3 cup)
2-oz Monterey jack cheese, shredded (about 2/3 cup)
1 tsp salt, 1 tsp fresh ground pepper
1 tsp ground (dry) mustard

Topping:
2 slices stale bread, crumbled into fine crumbs
2 Tbsp freshly grated Parmesan cheese
1 tsp olive oil

Pre-heat your oven to 375.  Coat a 9 by 13-inch baking pan with small amount of  butter.  Bring a large pot of water to a boil; add 1 tsp of salt and the macaroni;  cook  according to package directions.  Drain in a colander and place back into the  cooled pot (this is where you will mix the macaroni and all that cheesy goodness together!)

Meanwhile, over medium heat, melt the butter in a medium saucepan, adding the  diced onion. Cook ‘til the onion is soft and translucent, approximately 5 minutes.  Then sprinkle the flour over the cooked onion and, using a whisk, stir constantly for  1 minute.  Adjust the heat to very low, and cook for 2-3 minutes to get the starchy taste out of the mixture.  Do not let the mixture brown.

Increase the heat back to  medium and immediately slowly pour in 1/4 cup or so of milk while whisking briskly.  Just keep stirring!  As this is absorbed, continue to slowly add the balance of the  milk in a steady stream, followed by the broth; stirring constantly as the liquid  becomes absorbed.  This will take about 3 minutes.  Adjust the heat lower again and  let this mixture simmer slowly for another 5  minutes, stirring occasionally.  (You  have now made a white sauce!! Congratulations!!!)

At this point, add in the thawed  butternut squash, stirring ‘til it is incorporated, allowing the mixture to come back  to a simmer.  Remove the saucepan from the heat.  Stir in the ricotta, and the  other cheeses, along with the ground mustard, salt & pepper.  Carefully taste (it’s hot!) the  cheese sauce, adjusting for seasoning.

Pour cheese mixture over the macaroni in the large pot and stir gently to combine.  Transfer the macaroni and cheese to the 9×13 baking dish and bake for 20 minutes.  Remove from oven.  Adjust the top rack in the oven to a higher position, and turn  the broiler on.  Combine bread crumbs, Parmesan cheese and oil in a small bowl.  Mix with your fingers; get a little messy!  Then sprinkle over the top of the cooked  mac and cheese.  Carefully place the baking dish back in the oven and broil for 3  minutes.  Keep your eye on it; you want the breadcrumbs to brown but not burn and  for some of the macaroni to get just a little crispy (my husband loves that part!).  Again, carefully remove from the oven…and you are ready to serve!

*here is a link to the type of veggie macaroni I used.  Check it out!

http://barilla.com/content/prodottobarilla/veggie-penne-freshly-pureed-tomatoes-and-carrots

God loves you…and I do, too! <3

Coleen


______________


Are you interested in joining us for one of our Women’s or Teens Online Bible Studies?  Click HERE for more details, and to sign up!