January 12, 2025

At Home with GCH: Pantry/Freezer Challenge UPDATE – Week 1

Nine women signed up to do the Pantry/Freezer Challenge with me during the month of February.  It’s not too late to join us, if you are interested!  Just email me below and I will add you to our Facebook group, where we share recipes, menus, encouragement, shopping tips, and more!

WEEK 1:

This first week was all about making an inventory list of everything that was in our pantry and freezer; making a menu for the month; creating a shopping list.  It was all about preparing for the month of creating great meals with just what is in your freezer or pantry!  It was all about finding great shopping discounts and buying the groceries needed at a deeper discount than we have before.  So, how did you do?
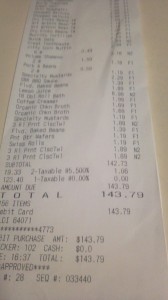
Receipt_Feb2012Last week, after I made my grocery list, I went shopping.  I went to Aldi which is one of my favorite discount grocery outlets.  I actually should have taken a picture of all the groceries I left with just to show you how much I got!  Our cart was overflowing! When we checked out, I told the cashier that if we had purchased the same goods at any other store, we would have spent an easy $200!!  But, I walked out of the store with spending only $143.79!!  I was thrilled to say the least!

The trip to Aldi didn’t include just food.  We also purchased Shampoo, Toiletries, Toilet Paper, and Paper Towels.  We stocked up on canned goods, cereal, and things like that.  I didn’t buy any meat, as our freezer is FULL of meat!  So there was no need to waste money on meat.  We did stock up on fresh produce, and we will replace that as needed during the month.  Milk and dairy products are also something that we will restock during the month.  Anything else that fits into our Pantry or Freezer…well, we won’t shop for those items.  We’ll eat just the meat and frozen meals that I cooked ahead and stored in our freezer, or what is in our pantry!

I’m off to a pretty good start!  I hope you are, too!  I’d love for you to share your journey with me in the comments section below!  Good or bad!  Let’s talk and see if you are off to a great start, or need a little bit of help.  Either way, I am here to help!

Some ask why I am doing this challenge.  The best reason I can give is because I want to be the best steward of God’s provisions as I can be!  I don’t want to be wasteful of anything He provides!  2 Peter 1:3a“God is very powerful because He is God. So He has given to us everything that we need to live always. ….”  If God truly has given me everything that I have, and I believe that He has, then it is my duty and responsibility to be wise with what He has given me.  Right?

I look forward to hearing how your first week went!  We will continue to check in with each other through the month of February.  Below you will find a list of the meals that were created during my first week.  I am only including the dinner meals, as I usually do not have lunch, and my breakfast is always a Green Smoothie! 🙂

February:

1st: Sausage Pizza

2nd: Roast Beef / Gravy / Potatoes / Corn / Bread

3rd: Spaghetti / Garlic Bread / Tossed Salad

4th: Baked Ham / Potatoes / Carrots

5th: Dinner out with friends

6th: Leftovers


Be sure to leave your comments below!  If you have any questions, please don’t hesitate to email me at Christi@GirlfriendsCoffeeHour.com.


Be Blessed!

Christi

At Home with GCH: Happy Hearts Day Garland

cropped1

Raise your hand, please, if you like to decorate for (as we call it around here) Happy Hearts Day!  Uh-huh…I thought so!  Today I have a cute decoration for you to craft!  I have totally fallen in love with buntings (aka garland or banners)!  They can be made with almost any type of fabric or felt or scrapbook paper or wallpaper or ____!  The list goes on & on!  They can be made teeny-tiny and used as a cake topper; or really long and used for party decorations; or, my favorite, in a medium size and used to hang almost anywhere in your home.  The next time you have 2-3 hours to fritter away, <I know, I know…who does?> run away to Pinterest and you can find oodles and oodles of options, examples, and ideas!

Today, the bunting I’ve made is inexpensive, fairly quick, easily adaptable, and you can totally personalize it!   I needed 16 hearts to write out my chosen wording; if you don’t need as many to “say” your phrase, adjust the quantity of paper. You choose your color scheme…then your coordinating papers…then ribbon to match and maybe some different colored markers. Check it out!

Supplies and Tools

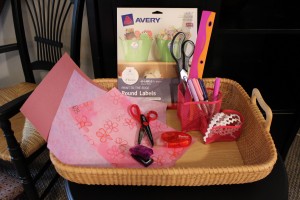
(4) sheets 12″x12″ solid color scrapbook cardstockIMG_0148
(4) sheets 12″x12″ patterned scrapbook paper (coordinating colors)

(1) piece of 8-1/2×11 copy/printer paper
4 yards 1/4″ ribbon
printer labels (I used 2″round; you could use 2×4″)
colored permanent markers (brands like Sharpie or Bic Mark It)
hole punch
scissors
decorative edge scissors (like this)
adhesive tape runner (like this)

Instructions
1.  Cut the piece of copy paper down into a 6″x6″ square.  Fold in ½ (3″x6″) and then draw the outline of one side of a heart using most of the piece of paper.  Cut out along your line.  Unfold  the paper; voila! a heart!  This will be your template.
2.  Cut all 8 sheets of scrapbook paper into 6″x6″ squares (cut in half, and then, in half again).

3.  Using the paper template and a pencil, trace onto each of the heavier-weight squares…16 in all.  Cut out along traced line.  Set aside.

4.  Now take the paper template, fold along the original crease mark, and cut off about ½” all around.  This will reduce the overall size of your template.

5.  Then, using the slightly smaller template and a pencil, trace onto each of the remaining 16 pieces of lighter-weight scrapbook papers.  Use the decorative edge scissors to cut out these hearts.

Almost ready to assemble!

6.  For the labels… Choose what you would like to write on your bunting.  As you can see, I am featuring the words of a section of 1st Corinthians 13.  You could simply put ‘I LOVE YOU!’  You can either write on them by hand (with the permanent markers) OR employ the use of your favorite wordprocessing program.  (That’s what I did!  You can achieve a very finished look with not much effort!  And lots of fun!) Use the directions included with the printer labels.

Almost done!

7.  Now to assemble: fiddle around with your cardstock hearts and paper hearts pairing them up to your satisfaction.

8.  Then, using the adhesive tape runner, slide 3 or 4 lines of ‘tape’ onto the back of the lighter-weight paper hearts and affix to the front of the heavier-weight hearts.  Pretty, hmmm?  Continue until all are put into pairs.

9.  Then attach the labels to the very front of your beautiful hearts.

10.   Now take the hole punch, and punch a hole or two onto each ‘shoulder’ or bump of the hearts.

11.  Lay out the hearts in the proper order to complete your chosen phrase.  Take one end of  the ribbon, and using about 6″ tie off a loop.  This is how you will hang your finished bunting.  Beginning with your FINAL word or letter, hold the non-looped end of the ribbon, and thread the ribbon through the holes punched on each heart, keeping the ribbon along the backside of the heart.  (Try it…as you manipulate the ribbon, you will see how easy this goes.)  When you get all of your hearts threaded onto the ribbon, lay your bunting out on a flat surface and space out the hearts so there is just 1″, or so, of ribbon between each heart.  Finally, tie off a loop at the end using about 6″ of ribbon.

Done! 

Now it is up to you to find the perfect spot to hang your HAPPY HEARTS DAY bunting…and enjoy!

cropped2

God loves you!   ♥  (Don’t ever forget that!)

♥  coleen

_________________________________

If you would like to send a personal message to Coleen concerning this series, you may email her at: Coleen@girlfriendscoffeehour.com

At Home with GCH – How Clean is Your Purse?

how clean is your purse

Did you know your purse may be harboring a dangerous cocktail of viruses and bacteria such as e-coli, salmonella, staph, and others I don’t even want to say? Think about the places you put your purse: on the floor of the car, in the child’s seat of a shopping cart, on the bathroom floor or counter, on the counter at the checkout register, on the floor at the restaurant, on the floor at the movie theatre… all of which are dirty, germy places. Then what do you do? You pick it up and carry it around with you, setting it on tables, your kitchen counter, your couch, and your bed, transferring all of the creepy crawlies you’ve picked up along the way right into your home. It’s a recipe for trouble.

Today, I am issuing a challenge to you: Clean your purse, inside & out. (For extra credit, clean all of your purses.)

To clean your purse:

  1. Empty the contents of your purse and wallet. Throw away old receipts, shopping lists, wrappers, pens that don’t work, and anything else you no longer need.
  2. Check the website of your purse’s manufacturer to educate yourself on any special care instructions. When cleaning my Miche purse, I went to www.michebag.com, and learned to wipe it down with a damp cloth. I use a baby wipe to clean mine. Whatever I’ve picked up along the way will then go right in the trash, rather than in my laundry room.
  3. Sanitize it, especially the bottom and handles. I use a disinfecting wipe for this. (Keep special care instructions in mind so you don’t damage it.) In a pinch, I have put hand sanitizer on a paper towel and wiped the handles, then the bottom of the purse.
  4. Turn your purse upside down and shake it out. To pick up any debris that may still be inside, wrap tape around your fingers, sticky side up, and press your fingers onto the fabric.
  5. To clean the fabric on the inside of your purse, mix warm water with a little bit of vinegar (or a couple drops of baby wash or mild dish soap) and wipe the fabric with a rag dampened with the water/vinegar mixture. Once the fabric dries, the vinegar smell goes away.
  6. Using the same method you used to clean the outside of your purse, clean your wallet.
  7. Now you can start putting things back into your purse and wallet, wiping down every item as you go with a baby wipe or damp rag. I even wipe down my credit/debit cards. Over the top? Not really. Think about how many germy hands touch those, and they’re never cleaned! Be selective in what you put back, and try to organize everything. A place for everything, and everything in its place. A purse organizer works well for this!

A few extra tips:

  • Buy a purse hanger to keep your purse off the floor when at restaurants, or for when there’s not a hook on the door in public restrooms.
  • Take 2 seconds to wipe the bottom of your purse with a disinfecting wipe any time you’ve had to put it somewhere germy. I always keep hand sanitizer and a baggie of disinfecting or baby wipes in my purse.
  • Take care to store your purses the proper way. Do not hang them. Instead, stuff each one with tissue paper, and store them upright.
  • Apply what you’ve learned here and protect your children by cleaning their backpacks or school bags. Same thing for briefcases and carry-on luggage.

How many purses do you have? Do you clean at least the bottom of your purse on a daily basis, or have you never really given it much thought? Share with the class and leave a comment below!

Love & Blessings,

Shandy

***********************

Be sure to visit Shandy’s personal blog Aprons ‘n Pearls for crafts, recipes, homekeeping tips & more!

If you have any questions, just ask in the comment section, or send me an email at:

shandy@girlfriendscoffeehour.com

At Home with GCH – Dips!

Here on our At Home with GCH  blog, Monday’s are always focused on healthy but oh-so-yummy! recipes. This month we are going to do a series of looks at appetizers.

I am here to confess: I love appetizers!  Whether you call them tapas, small bites, hors d’ouerves, antipasto, or simply appetizers; no matter what you call ‘em…I like ‘em!  My favorite type of casual get-together has appetizers as the food component.  Oftentimes, when hubby and I go out to eat I prefer a couple of appetizers over almost anything else offered on the menu.  So that’s me!  I would love for you to leave a comment below sharing with us YOUR favorite appetizer(s).

Now this week we are going to be making dips: two very different ones—one is chilled and one is warm! The first is homemade Lemon PineNut Hummus.  And our second recipe is for Spinach Artichoke Dip.  Remember we always endeavor to make our recipes as healthy as we can but keeping them oh-so-yummy.  The Lemon PineNut Hummus is relatively naturally healthy with chickpeas as the main protein.  Now the Spinach Artichoke Dip is notorious for being incredibly high in calories (mostly fat calories).  You will notice as you peruse the recipe that we have reduced the fat by using less cheese (but still enough; you’ll see!), and choosing Greek yogurt in place of most of the mayonnaise.

Lemony PineNut Hummus

2013-02-03 18.47.55

I toasted the pine nuts in a small skillet for 3 minutes before adding them to the food processor. The pine nuts give the hummus a rich, sweet flavor that is oh-so-yummy!

1 (15 ounce) can chickpeas, drained and rinsed
1 heaping Tablespoon chopped garlic (I use jarred)
1/4 cup filtered water

¾ cup pine nuts, lightly toasted (reserve 1/4 cup for garnish)
2 tablespoons of tahini
juice of 1 small lemon (try Mayer lemons, if you can find them)
1/4 cup unflavored Greek yogurt
2 tablespoons olive oil
pinch EACH of tarragon, thyme
dash of crushed red pepper (optional)
1 teaspoon salt, freshly ground black pepper
1 teaspoon dried parsley (plus more for garnish

In a food processor, blend the chickpeas, garlic, and water. Add ½ cup of the pine nuts.  Blend until very smooth.  Add tahini, lemon juice, yogurt, olive oil, herbs, and salt until the ingredients come together into a paste-like consistency.  Pour into a 2 cup serving bowl; garnish with any remaining parsley and 1/4 cup pine nuts.  Cover and refrigerate about an hour.  Serve with fresh veggies (carrot sticks, sliced red and yellow peppers, cucumber rounds, sliced radishes) and Pita’s (nice if toasted), or flatbread.

Warm Spinach Artichoke Dip

2013-02-03 18.50.00

2 (8.5 ounce) cans artichoke hearts packed in water (drained)
1 (10 ounce) package frozen chopped spinach (thawed and squeezed dry)
1/4 cup Vidalia onions, chopped
2 heaping tablespoons chopped garlic (I use jarred)
8 ounces unflavored Greek yogurt
½ cup mayonnaise
4 ounces part-skim shredded Mozzarella cheese, reserve
6 ounces freshly grated Parmesan cheese   Kosher salt, freshly ground black pepper

Remove chopped spinach from package, place in sieve or colander, and rinse gently with cold water, breaking up into chunks.  Let it defrost completely and then squeeze dry with your hands. (I try to remember to do this step earlier in the day.)

Preheat oven to 375.  Lightly grease or use olive oil cooking spray on a 1+1/2 – 2 quart baking dish; set aside.

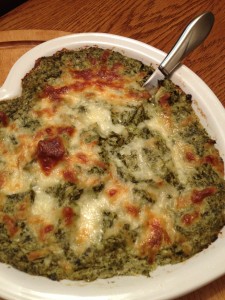
In a food processor, coarsely chop the artichokes along with the garlic and onions.  Add the dry spinach, yogurt and mayonnaise. Pulse a few times until all is incorporated together.  Pour into ovenproof bowl or baker, and stir in cheeses, salt, and pepper.  Sprinkle top with a pinch or two of additional cheese.  Bake for 20-25 minutes until hot and cheeses are melted.*  Serve immediately.  We like cubed pumpernickel bread or Italian/French bread cut on the diagonal into thin slices; or thin crispy chips (tortilla are great); or carrot sticks.

* You can also heat the dip in a small crockpot for 2-3 hours on low; just be sure it is hot and the cheeses are melted.

God loves you!   ♥  (Don’t ever forget that!)

♥  coleen

_________________________________

If you would like to send a personal message to Coleen concerning this series, you may email her at: Coleen@girlfriendscoffeehour.com

At Home with GCH: Greek Chicken Soup – Avgolemono

Avgolemono


If there is one unifying theme to At Home with GCH, I would say it’s stewardship.  To me, being a good steward means using my resources wisely and creatively.  The biggest challenge to being a good steward is being thrifty and cutting down on waste.  If you haven’t already, check out the post on the Great Freezer Challenge!  And then, check out this soup recipe!

My favorite tip for saving money in the kitchen is buying a whole chicken instead of pre-cut pieces.  You can easily get two meals out of one chicken, and for the same price you would pay for a package of chicken breasts!  For the first meal, you have endless choices; but then comes the challenge—once you’ve cut the legs and breasts off, or roasted the whole bird, what do you do with the carcass? Easy answer?  Soup!

This Greek recipe is called Avgolemono.  In Greek, “avgo” means “egg” and “lemono,” well you can probably guess what that one is!  This is a fresh-tasting soup, with a bright lemony flavor.  There’s also a lot of room to customize—you can add more vegetables beyond just the spinach (bell peppers, onions, zucchini), and you can choose what kind of starch you want in it.  I’ve seen recipes that call for cooked rice, or different shapes of pasta.  However, most will call for orzo, which is a small, rice-shaped pasta.  Or, if you are cutting out refined flours or grains, just don’t add it in!

This makes a great dinner, with a salad and some bread or a roasted sweet potato.

Greek Chicken Soup – Avgolemono

Ingredients:

  • 1 chicken carcass  (You can also use 2 bone-in chicken breasts)
  • 1 (10ounce) box of frozen spinach
  • 3/4 cup orzo
  • 2 bay leaves
  • 1/2 cup lemon juice
  • 2 eggs
  • salt and pepper

Directions:

  1. Put chicken carcass in a large pot with enough water to cover.  Cook until chicken is cooked through and falling off the bone.  Remove carcass to a large bowl to cool.  Strain broth and return to the pot.  
  2. When the chicken is cool enough to handle, remove the meat from the bone and shred or chop into small pieces.  You should have 2-3 cups of chicken.
  3. Return broth to the stove and heat on medium.  When it simmers, add the box of spinach (no need to thaw), along with the bay leaves and the chicken.  Now look at the consistency of your soup.  Do you like it really brothy?  You might want  to add more water.  Do you like your soup thicker, more like a stew?  Now is the time to raise the heat and reduce your broth.
  4. When you have your preferred consistency, add the orzo to the soup.  Cook on medium heat for about 8 minutes.
  5. In a bowl, whisk together the eggs with the lemon juice.  Slowly add a ladleful of your broth to the eggs and stir, to temper them, so they don’t seize up when you add them to the soup.  Turn the heat off.  Slowly stir the egg/lemon juice mixture into the soup. Keep stirring to make sure you don’t get any eggy clumps.  Season with salt and pepper.


Explore, experiment, enjoy! — Dana


Please visit me at Frugal Girlmet for more unique recipes!


If you would like to contact Dana in regards to this blog, please email her at Dana@girlfriendscoffeehour.com

At Home with GCH – SoupPalooza Week 5

Here on our At Home with GCH  blog, Monday’s are usually focused on healthy but oh-so-yummy! recipes.  But this week, I get to visit with you on Thursday!  This past Monday, our Christi put forth a challenge that you just might want to take part in…check it out!

Christi’s Pantry/Freezer Challenge

We are continuing to celebrate soup, soup, and soup since this is National Soup Month!  Now this week—since SOME of us are gearing up for Super Bowl Sunday with all of the eating attached to the watching—we are making Cheese & Cider Soup, with a Spicy Popcorn topping as well as a hearty Black Bean and Sausage Soup.  These are my contributions to the “Soup”er  Bowl buffet!

Cheese & Cider Soup w/Spicy Popcorn2013-01-29 21.05.45

2 slices bacon, diced
1 medium onion, small dice
1 large Yukon Gold potato, peeled and cut into ¼-inch dice
1 medium carrot, minced
1 large Granny Smith apple, peeled and diced small
1 heaping teaspoon chopped garlic
2 tablespoons all-purpose flour
1+1/2 cups apple cider
3 cups chicken stock
1 cup filtered water
1 can (12 ounce) evaporated milk
Pinch cayenne pepper (add up to 1/8 teaspoon if you enjoy the heat!)
4 ounces sharp Cheddar cheese, shredded (I also use Gouda)
1 tablespoon minced fresh thyme leaves (if using dried, use 1 tsp)
Kosher salt and freshly ground black pepper, to taste

Fry the bacon in a large stockpot or Dutch oven over medium heat until crisp, 5-10 minutes. With a slotted spoon, transfer the bacon pieces to a paper towel-lined plate to drain, and set aside.

Add the onion to the bacon drippings and cook, stirring occasionally, until softened, about 4 minutes. Add the potato, carrot, apple, and garlic stirring continuously for about 1 minute, or until the garlic is fragrant.

Dust the flour across the vegetables and stir to coat the vegetables; cook for approximately 2 minutes until the mixture JUST begins to brown on the bottom of the pot.

Gradually whisk in the cider, water, and chicken stock; increase the heat to medium-high. Bring to a boil, then immediately reduce the heat to medium-low; simmer uncovered until the vegetables are cooked, approximately 30-40 minutes. Stir occasionally; you will see the liquid begin to thicken slightly.  When the potatoes yield to gentle pressure (done!), whisk in the evaporated milk and bring back to a very gentle simmer. Stir in the cayenne (if using) and the thyme, and then slowly add in the cheese stirring JUST until the cheese melts.  Remove from heat.  Carefully taste for additional seasoning, if necessary.  Ladle into bowls or mugs; serve immediately with Spicy Popcorn on the side.

Spicy Popcorn

In a small bowl, mix:
1/4 teaspoon kosher salt
1/4 teaspoon ground black pepper
1/4 teaspoon garlic powder
1/8-1/4 cup grated parmesan cheese

Simply prepare your popcorn in the manner you prefer (you will need about 2 cups).  As soon as it is done popping, IMMEDIATELY sprinkle 2 cups of popped popcorn with the seasoning mixture.  Stir gently.  Serve alongside your Cheddar & Cider Soup along with the bacon bits you prepared in the beginning.  Enjoy!

 _________________________

OK!  Onto our second soup this week, Black Bean and Sausage Soup.  This has a decidedly Mexican flavor so top it with some chopped avocado and red pepper…or a simple guacamole.

Black Bean and Sausage Soupsoup

1/2# Italian sausage meat, hot or sweet—your choice*
1 small onion
2 heaping tablespoons chopped garlic
1 (14-15 ounce) can diced tomatoes with juice
2 cups broth
2 cups filtered water
3 cans (14-15 ounce) black beans, drained and rinsed with warm water**
2 tbsp sun-dried tomatoes packed in oil, chopped and drained (optional)
1 teaspoon EACH: dried oregano, chili powder, cumin
1 teaspoon chipotle chili powder (optional)
1/8-1/4 teaspoon cayenne (optional)
Kosher salt & freshly ground black pepper
1 small red pepper, seeded and chopped small

Add a small amount of oil to stockpot; heat over medium-high and then saute the sausage meat and onion together for approximately 6-7 minutes.  Stir in chopped garlic and stir continuously for 1 minute.

Then add in tomatoes, broth, TWO (2) cans of the black beans, and all of the seasonings. Bring to a boil, reduce heat to medium-low and simmer, covered, for 30 minutes allowing for flavors to meld.

Remove from heat.  Take approximately 1 cup of the beans and tomatoes out of the soup and add to the reserved can of black beans.  Using a blender or an immersion blender, CAREFULLY puree, making as smooth as possible.  Add back into hot soup and stir well.  Ladle into bowls or mugs.  Serve immediately.

I like to serve this soup with the following toppings, letting everyone make their own choice of how to finish off their mug of soup:

  • chopped avocado
  • chopped red pepper, and/or tomato
  • chopped fresh cilantro
  • sour cream
  • shredded sharp cheddar
  • crushed tortilla chips

*I purchased ground Italian sausage meat OUT of the casings (looks like ground beef and is packaged the same).  However, if you already have sausage links on hand, you could just as easily remove the sausage from the casings and use that.

** reserve 1 can of black beans


God loves you!  ♥ (Don’t ever forget that!)

♥ coleen

_________________________________

If you would like to send a personal message to Coleen concerning this series, you may email her at:  Coleen@girlfriendscoffeehour.com

At Home with GCH: Brownies

photo-15

Ah brownies!  When I was baking for a local deli in my area, brownies were without a doubt one of the most popular items I sold.  Until relatively recently, if I wanted to make brownies, I just went to the box mix.  It was easy and they had so many different varieties.  Well, if this sounds like you, I challenge you to take the plunge into making your brownies from scratch.  You won’t believe the difference until you do it for yourself!  It is still easy, and the possibilities are endless.

Today I am going to share my basic brownie recipe with you, and one of the variations I have come up with.  Remember, you can be as creative as you wish!

Basic Brownie Recipe:

½# (2 sticks) butter (I use salted)

4 ounces unsweetened chocolate

2 large eggs

1+½ cup sugar

1 teaspoon vanilla extract, pure is best

1 cup all-purpose flour

½ teaspoon kosher salt


Directions:

1. Preheat the oven to 350F.  Spray an 11 x 7 brownie pan (did you know they made actual brownie pans?  I didn’t!) with cooking spray, or butter and flour it if you prefer.

2. Using the microwave, melt the butter and chocolate.  Start with one minute, and then stir.  If it needs to melt more, heat using 30-second intervals, stirring between until the mixture is smooth.  Let stand. (You may also use a double boiler if you prefer.)

3. In the bowl of your mixer beat together the eggs, sugar, and vanilla on medium speed for about 2 minutes.  Reduce speed to low and add in the butter/chocolate mixture until combined.

4. In a separate bowl, combine the flour and salt.

5. Add the flour mixture to the chocolate mixture on low speed until just combined.  Do not overmix.   Scrape down the sides and mix a few times with a spatula by hand.

6. Pour the batter into the prepared pan.  Bake for 30 minutes on the center rack of the oven.  Cool completely in pan, then cut and enjoy.  From this size pan I usually get 8 nice sized brownies.

Variation:

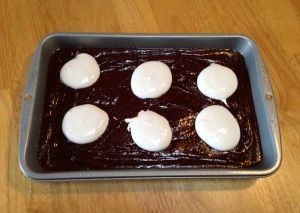
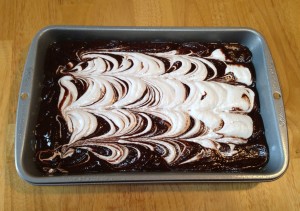
Marshmallow Brownies:  Use the recipe above.  After pouring the batter into the pan, take approximately 1 cup of marshmallow fluff and spoon 6 dollops evenly onto the batter.  Run a knife in a back and forth motion to create a marbled look.  Bake as normal.  NOTE: If the fluff is too sticky, place it in the microwave for 30 seconds, it will be easier to work with.

729762_10151670931293858_926636805_o    730321_10151670934483858_1563170371_o

Tell me your favorite brownie add-ins! Some of mine are:

Caramel

M & M’s

Mini Marshmallows

Walnuts

Mint chocolate chips

I would love to hear if you try this recipe out, and what creations you come up with!

________________________

If you would like to send Michelle an email in regards to this recipe, please email her at:  Michelle@GirlfriendsCoffeeHour.com


At Home with GCH: Getting Clever with Coffee Filters

coffee_filters_aprons-n-pearls

I’m not a coffee drinker, so why is it that a couple hundred coffee filters took up residence in my pantry? Because they are versatile and awesome, that’s why. I’ve had a few people ask me to share how I use coffee filters in my home, so today, I’m doing just that. By the time you’re done browsing this list, you’re going to want to run to the nearest store and buy a bunch for your home. Just do your checkbook a favor… buy the cheap, basket style ones. No need to be fancy 😉 I buy mine at the store where everything is a dollar.

Here are the top 15 ways I use coffee filters in my home:

  1. Cleaning glass. This is my favorite use for coffee filters. Cheaper than paper towels, super absorbent, ink-free, lint-free… and they leave a streak-free shine! I’m telling you – this is exciting stuff! Go try it. On your windows, glass doors, glass tables, mirrors, china cabinet… I’ll wait!
  2. Wasn’t that fun? Guess what else you can clean with them? Your TV and computer screens!
  3. …and your faucets!
  4. …and your appliances. Yep, stainless steel, too!
  5. Crafts. About a gazillion of them. Wreaths, butterflies, leaves, snowflakes… you name it, you can use a coffee filter to make it. Pinterest says so. Back in my days as a daycare teacher, I let the kids go crazy with coffee filters and markers. The possibilities are endless.
  6. Potted plants. Put a coffee filter at the bottom of your pot, and the dirt won’t fall out of the bottom.
  7. Have you ever opened a bottle of wine, only to discover bits of the cork fell in? Pour the wine through the coffee filter, and no more cork! You can use this for other beverages that need filtering, too. I don’t like pulp in my orange juice, but if my hubby brings home the wrong kind… no worries! Use a filter. Can’t find your tea ball? That’s ok! Put the loose tea in a filter, tie it with string, and you’re all set.
  8. Microwave splatter stopper. Place a filter on top of your plate, and you can rest knowing you won’t have to clean up splatters.
  9. Grease soaker-upper. Out of paper towel, but have a hankerin’ for some bacon or fries? I have two words for you: coffee. filter. (By the way, I also use them to soak up the grease on my pizza. Yes, I have been told I’m strange for doing that. Thank you for asking.)
  10. Clean your sunglasses. No explanation needed.
  11. Popcorn pouch (& other snacks, too!) Perfect size for your kids to hold their popcorn in, and it helps soak up the buttery (but yummy!) mess. Also works great for hot dogs and tacos.
  12. Wannabe bento boxes. This is another one I do a lot! If I’m out of sandwich baggies, or am just going through a phase where I don’t feel like buying them, I use coffee filters to separate my daughter’s food for her school lunch. I put two or three filters in a reusable plastic container, and assemble her lunch – sandwich in one, carrots in the next, and grapes in the other. Works GREAT.
  13. I have two daughters who do their nails every other day. We run out of cotton balls. A lot. So what can they use to remove nail polish? Paper towel doesn’t work. Toilet paper doesn’t work. The next best thing? Coffee filters.
  14. Shine your shoes! They say your shoes say a lot about who you are. Keep them looking great with coffee filters and a little shoe polish.
  15. Oil blotters. You can pay quite a bit of money for oil blotters (those little sheets that you can press onto your face mid-day to absorb oil.) Coffee filters are so much cheaper, especially when you may use several a day in the summer, and they work just as well.

Do you have any clever ways you use coffee filters? Share with the class and leave a comment below!

Love & Blessings,

Shandy

***********************

Be sure to visit Shandy’s personal blog Aprons ‘n Pearls for crafts, recipes, home keeping tips & more!

If you have any questions, just ask below in the comment section, or send me an email at: shandy@girlfriendscoffeehour.com

At Home with GCH: Meal Planning 101 – Pantry / Freezer Challenge

This week, I am blogging TODAY, only because I would like to challenge you to something. Then I will be back on this blog again on Thursday, February 7th, to see how you are doing! Some of you may not like this challenge, but let’s take a serious look at this, and see what we can do.  If you have followed along with me for the past month, you should have freezer meals on hand, and your Pantry/Freezer lists updated.  Right?  So this challenge shouldn’t be too difficult for most of you.  I know some of you may be a bit behind, but now would be a great time to get caught up with this series.

I would like to challenge you to a Pantry/Freezer Challenge, for the entire month of February (just 28 days).  You will be limited to just what is in your pantry and freezer!  So you will have to be creative!  The Pantry/Freezer Challenge is a great way to trim the budget, keep close accounts on what you have, and rotate your current stock to avoid waste.

Each Thursday, I will come back here to update you on how the Challenge is going on my end, and I would love to hear how it’s going on your end as well.


What this Pantry/Freezer Challenge is NOT:

  • It’s not about NOT buying ANY groceries for the month of February.  You will need things, such as milk, eggs, bread, fresh fruits/veggies, etc.  This challenge is only for the bigger items, like meat, canned vegetables, staples, etc.
  • It is not about living on beans and weenies for the entire month.  It’s about going through what is in your pantry and freezer and making meals with those ingredients until you run out, and it becomes time to go grocery shopping again for the big stuff.
  • This Challenge does NOT include times you go out to eat.  It’s only about what is eaten at home.

We want to see how long we can go before we have to go buy the main grocery items that we typically would.  We also want to see how much money we can save this month!! 


What this Pantry/Freezer Challenge Is:

  • It’s about saving money!!  I read today that the average family of four spends $151 a week on groceries; that’s over $600 a month on groceries; almost $7,500 a year!  Wow!  Think of the savings that we would accumulate each month if we could do a Pantry/Freezer Challenge in our homes, at least one week a month! Think about it, one week without groceries equals a yearly savings of $1,812 (based on the above average).
  • It’s about being focused on what you have on hand already!
  • It’s about using what we already have on hand, so we don’t let food go to waste!
  • It’s about being good stewards!


How this Challenge works:

  • If you haven’t already done so, you will need to make a list of every single thing that is in your pantry and your freezer.
  • Plan your meals for each week according to what is on your Pantry/Freezer lists.
  • ONLY go to the grocery store when you need things such as milk, eggs, cheese, fresh fruits/veggies, paper goods, cleaning products, etc.
  • Keep track of what you are spending on the minimal amount of groceries that you will purchase.
  • Check in on our blog each Thursday to let us know how you are doing.  In checking in, I also want to hear how much you have spent for groceries, in the prior week.
  • Plan leftovers into your menu planning!
  • If you eat it, write it down.  Keep a food journal to go back to at the end of the month to see what kind of meals you actually did eat for the month!  You may be surprised!
  • EMAIL ME IF YOU NEED MORE RECIPE IDEAS!


CARE TO JOIN ME?

I’m looking to find a few people who are willing to take on this Challenge, with me!  Are you up for it?  If so, comment below and let me know you’re all in!  Then send me an email (listed below), so I can have a way of contacting you through the week to see how you are doing.

Now, since I typically blog on Thursday’s for At Home with GCH, I switched days with another blogger for just this week, so I could get this message out to you in time to accept this challenge, if you so choose.  With that said, that means that I will not be back again, until Thursday, February 7th.  Thursday is my normal blogging day.  I will check up on you then to see how you are doing, AND give you an update of how I am doing with the challenge, too!  Are You Ready?  Here we go….


Let’s do this together!


Have a GREAT week, Ladies!

Christi

_________________________________

To contact Christi in regards to this blog, please email her at: 

Christi@GirlfriendsCoffeeHour.com

At Home with GCH: Korean Dumplings (Mandu)

mandu fried

“Mandu” in Korean, “Gyoza” in Japanese, “pot stickers” or “wontons” at your favorite Chinese restaurant—whatever you call them, everyone loves dumplings!  You can buy them frozen in many Asian grocery stores, but why not make them at home?  It’s fun, and best of all, YOU have control over what does—or does not—go into your food.

You shouldn’t have any trouble tracking down the ingredients for this recipe.  Fresh ginger and wonton skins can be found at nearly all grocery stores.  If you can’t find ground pork, you could try ground turkey instead.  Napa cabbage works best in this recipe, but you can use regular green cabbage; just make sure you shred it finely.

Ready to make dumplings?  Let’s go!

Korean Dumplings  (Mandu)

Ingredients:

  • 1/2 pound ground pork
  • 1 large carrot, shredded or chopped in a food processor
  • about 1/2 cup cabbage, shredded
  • 4 green onions, minced
  • 2 tablespoons grated fresh ginger
  • 2 cloves garlic, finely minced
  • 1 tablespoon sesame oil
  • 2 tablespoons soy sauce
  • 1/2 teaspoon salt, plus more for the cabbage
  • 1 package gyoza skins (mine had 25 skins in the package)

Directions:

  1. After you’ve shredded your veggies or chopped them in the food processor, sprinkle with a good teaspoon of salt, focusing on the cabbage. Let sit for 15 minutes or so, and then squeeze out the water. You can do this by hand, or put them in a strainer and press with your hands or the back of a spoon. You don’t want watery filling.
  2. Add pork and veggies to a mixing bowl. Then add the ginger, garlic, sesame oil, soy sauce and salt. Stir to combine or use your fingers to make sure everything is really well mixed.
  3. To fill dumplings, hold a gyoza skin in your left hand, and spoon a teaspoonful (don’t be tempted to over-fill!) of filling into the middle. Dip your finger into a bowl of water and wet one half of the edge of the skin, making a C. Fold the other half over and press to seal. I gave mine two little pleats, just to be pretty, but a straight fold is fine too.


mandu raw

To cook: you can add these to soup, or just boil them in chicken broth and add some green onions and a little soy sauce  or miso paste for a really fast dumpling soup. I like mine fried. Heat a tablespoon of sesame oil in a skillet and add your dumplings. Cook for 2 or 3 minutes on medium-low heat until they get golden and crispy (watch carefully, they burn quickly!). Flip the dumplings, add 3 tablespoons of water to the pan, and cover. This steams them and cooks the filling evenly. After 5 minutes, remove lid and cook until golden and crispy. Serve with a dipping sauce of 2 tablespoons soy sauce, 1 tablespoon rice wine vinegar, 1 tablespoon sugar, and freshly ground black pepper.


Explore, experiment, enjoy! — Dana


Please visit me at Frugal Girlmet for more unique recipes!


If you would like to contact Dana in regards to this blog, please email her at Dana@girlfriendscoffeehour.com