January 10, 2025

4 Benefits to Sorting Activities for Young Children

Our first order of business today is to announce the Pumpkin Painting Contest winners! We ended up with only 2 entries, so we decided to feature both here on At Home w/  Girlfriends Coffee Hour.

1 Pumpkin Decorated for Both Halloween and Thanksgiving from Organized 31

3 Fine Motor Pumpkin Activities {Fine Motor Friday} from School Time Snippets

Thank you both so much for entering the contest. Your ideas were excellent, and I just may use them in our homeschool real soon!

Now on to our topic for the day! 
4 Benefits to Sorting Activities for Young Children www.girlfriendscoffeehour.com #homeschool

I homeschool multiple children from pre-k, elementary, middle school, on up to high school. We read various books, complete different lessons, and participate in certain types of play, all according to the age of the child, as well as the needs of the family at the moment. Much of the time we need something to keep the little ones busy while Mommy cooks or siblings are completing independent work, or simply wanting some time to themselves. One of the activities that I have found that all of my children enjoy is sorting. They sort toys, crayons, beads, books, legos, etc. This activity is especially beneficial to young children. I’ve explained the reasons why below.

4 Benefits to Sorting Activities for Young Children

  1. Sorting activities can be used to teach organization at a young age.  Grouping items by shape, color, texture, and size are all a part of learning to organize.  Allowing your child to learn this while he is young will mean he is a step ahead of the organization game as he grows older.
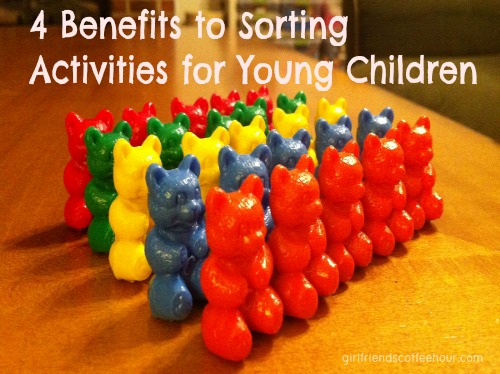
  2. Sorting keeps them busy! My two little ones can sit for a very long time sorting bears, crayons, colored pencils, lids, magnetic letters, especially if it is a new activity or one they have not done recently.  My 4 year old creates bear rainbows &  bear armies, and also engages in pretend play as she sorts.  I love to listen to some of the conversations she has as she sits at our table with bears in hand.
  3. Sorting also teaches early math skills. Children can see, when they line their items up, how rows and columns are formed.  They learn to count, and often begin to add and subtract without being taught.  It comes naturally!
  4. I believe sorting also teaches responsibility. We have taken great care with our sorting bears. They are very special toys in our home and are only played with in a certain way (gently) and in certain areas (at the table or during blanket time). Since we have these ‘rules’ in place, our daughters tend to take more care with their sorting toys while playing, as well as when cleaning up afterwards.

Need more ideas for bringing sorting into your day?

Have your preschooler:

  • sort silverware
  • help you sort laundry
  • separate fruit by type, color, or size
  • sort shoes by ownership
  • sort books according to softcover or hardcover

These are just a few more ideas that I hope will be helpful to you!

Do you have a favorite sorting item in your homeschool?  What benefits have you seen come to your children through sorting?

How to Make a Decorative Wreath

20131112_071346


One of my favorite things to make for my home is a decorative wreath. I have several that I have made throughout the years. This wreath is a good one to try for your first time decorating a wreath.

Items Needed:

· Grapevine Wreath – I like to use the medium size ones, but any size is fine
· 3 – 4 silk flower stems, various kinds
· Ivy or any other type of greenery
· Wire Cutters
· Hot Glue Gun
· Wreath Hanger

Directions:

· Cut off the excess flower stems, leaving about 4-6 inches of the stem.
· Arrange the flowers where you want them on the wreath. I tend to start on the edges and work my way down. Insert the stem in between the grapevine wreath. If needed, hot glue the flowers in place. A lot of times, I do not use the hot glue if the flowers are wedged in place real well.
· Wrap the greenery around the wreath and glue in place.
· Hang on a wreath hanger.   Enjoy!

Have Fun and Happy Crafting

Amy

The Five B’s: Butternut, Brussels Sprouts, Baby Bellas, Bacon, and Balsamic

2013-11-06 18.45.34


Raise your hand, please, if you—like me—are planning out and testing recipes to serve at your Thanksgiving Day meal!  Over the next few weeks, both here on the blog and also over in our FaceBook GCH-Fellowship page, we will be chatting about recipes for the big feast.  Last Friday, Dana shared that “…it is always good to have a couple of side dish recipes in mind.”  She gave us her recipe for a delicious-looking side dish salad here on the At Home with GCH blog.

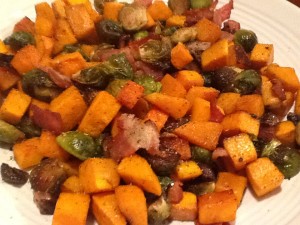
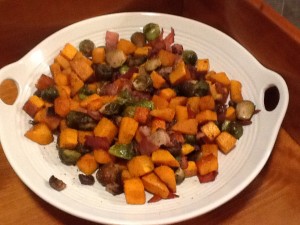
So today I am giving you a recipe entitled The Five B’s: bacon (yum!), butternut (oh, yum!), brussels sprouts (yumm-o!), baby bellas (yum-yum!) and balsamic (yummy!)….silly, I know.  But seriously, consider trying this as a side dish for your Thanksgiving feast!  Easy to prepare (the veggies can be prepped the day before).  And the prepared dish can be popped into the oven the moment you take the bird out!  It will be done and piping hot when your bird has finished resting and been carved.  This dish definitely fits into our healthy but oh-so-yummy point of view!  Enjoy!

2013-11-06 18.45.52

Five B’s: Butternut, Brussels Sprouts, Baby Bellas, Bacon and Balsamic

Ingredients:

3-4 tablespoons olive oil, divided
1/2# thickly sliced bacon, chopped
1+1/2# Brussels sprouts, trimmed and halved
1 medium-large butternut squash, cleaned and cubed
8 ounce container Baby Bellas, cleaned and quartered
3 tablespoons balsamic vinegar
2 tablespoons maple syrup (the REAL stuff, please!)
1+1/2 teaspoon coarse kosher salt
1 teaspoon fresh ground pepper
1/2 teaspoon ground allspice
pinch fresh grated nutmeg

Preparation:

  • Preheat oven to 400.
  • In a medium-sized saute pan, heat 1 tablespoon of oil over medium heat. Add the chopped bacon and cook 8-10 minutes ‘til crispy. Lay out on a paper towel to drain; set aside.
  • Lightly oil a large sheet pan (or two!) with olive oil.
  • In a very large bowl, or stockpot, pour in the prepared veggies…Brussels sprouts, butternut squash, Baby Bella mushrooms…along with 1-2 tablespoons olive oil; stir well to evenly disperse the oil and season well with salt & pepper.
  • In a small bowl, whisk together balsamic vinegar, additional 1 tablespoon olive oil, and maple syrup. Drizzle this mixture over the vegetables and toss so that they are evenly coated.
  • Spread out vegetables in a single layer (very important!) in the pan(s); sprinkle with salt, pepper, allspice and nutmeg.
  • Roast in the oven for about 20 minutes; carefully remove pan(s) stir and flip over the veggies so that the other side can caramelize. Place back in over and continue to cook for an additional 10-15 minutes or ‘til the veggies are slightly brown and caramelized.
  • Remove from oven and, just before serving, top with crumbled bacon

♥  ♥  ♥  ♥  ♥

God loves you ♥  (Don’t ever forget that!)

♥  coleen

Frozen Pea Salad

Frozen Pea Salad Resized

Here we go, ladies – we’re heading into the holiday season!  Every time I go to the supermarket now I see dozens of magazines at the check out, with photos of glorious turkeys and fantastic centerpieces.  But let’s be honest – not everyone will have to make a turkey this year. In my case, my newlywed brother-in-law and his wife will be hosting Thanksgiving, so they are in charge of the turkey.  But it’s always good to have a couple of  side dish recipes in mind.  I’m usually responsible for making at least one pie and cornbread stuffing, plus some kind of vegetable  dish.  This year, I plan to bring this Frozen Pea Salad.

Before you think I’ve gone off the deep end, No, the peas are not frosty little balls of ice.  They are thawed and cold, but not actually frozen anymore.  The version of this recipe my Mom used to make featured sour cream and a little mayonnaise.  I’ve switched that out for Greek yogurt to up the protein and lower the fat a little bit.  This can easily be doubled or tripled, depending on how many people you are serving, but I would suggest not adding in the cashews and bacon until you are ready to eat, so the textures stay distinct.  It’s sweet and salty, crunchy and chewy, cold and delicious!  If you need an easy, off-beat vegetable side dish, read on, friends!

Frozen Pea Salad

Ingredients:

  • 1 pound frozen peas
  • 1/2 cup Greek yogurt (or more, to taste)
  • 2 green onions, finely sliced
  • salt and pepper
  • 1 cup salted, roasted cashews (you can break them up a little or leave them whole)
  • 4 slices bacon, fried crisply and drained

Directions:

  1. Take the peas out of your freezer and empty the bag into a Pyrex or other casserole dish.  Set them by the stove as you fry the bacon.  The heat from the stove will help the peas thaw.
  2. Fry the bacon crispy, drain it well, blot with paper towels, and dice.
  3. Are your peas thawed yet?  If not, microwave them for thirty seconds at a time, stirring well each time, just until the ice melts and you can squish a pea between your fingers.  You still want them very cold, just not icy and crunchy.  When thawed and still very cold, drain any extra water in the bowl.  Mix in yogurt and green onion, and season with salt and pepper.  Refrigerate until ready to serve.
  4. When serving, sprinkle the pea salad with cashews and bacon.  If you have leftovers, either keep the cashews and bacon separate, or make sure they stay on top.  If they get mixed into the salad and then saved that way, they will soften up.  It will still be delicious, but it won’t have the crunchy versus soft texture difference that makes this salad so fun!

Explore, experiment, enjoy! — Dana


To view even more of Dana’s unique recipe, you can visit her at Frugal Girlmet!

School Projects in a Jiffy

School Projects in a Jiffy.

amynov6-3.jpg

For me, being a crafty person has paid off this week. Tristan, my sixth grader, told me last night that he had a science project due in the morning.  Luckily, we had all the supplies he needed at the house.  Below is a list of items that would be good to have on-hand if you have schoolaged children.  This is also what Tristan used for his diorama science project.

Items Needed:

Paint
Paint brushes
Box (shoe box or decorative box)
Foam animals
Plastic Trees
Plastic Rocks
Glue Gun
Stick Glue
Note cards
Tape
Pens, Pencils, or Markers

Directions:

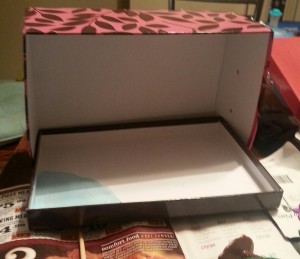
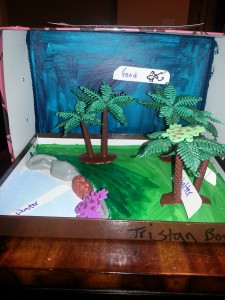
Tristan’s project was to create an animal habitat. We looked through the house, his toys, and my art supplies and found what we had in order to create an animal habitat. It turns out, that we had enough items to create a rain forest with frogs.

Tristan painted the scenery: blue for the sky, light blue for the pond, and green for the grass.  He hot-glued the rocks, trees and frogs in place.  He then labeled the parts of the habitat with a marker and cut out pieces of note cards.  He  used the stick glue to glue those in place.

Tristan had to make a presentation about his project, so he made notes on a note card and taped it to the top of the box.

Below is the before and after project.  I am so proud of Tristan.  He did a great job with very little direction from me. This is something fun to do with your kids. Hope you give it a try.

amynov6-1.jpg


amynov6-2.jpg


Have Fun!

Amy

How to Help Your Homeschooled Child Pursue His Interests

The longer we homeschool, and the older my children get, and the more experience I get ‘under my belt’, the easier it seems to allow my children to pursue their own interests. Don’t get me wrong…sometimes I do still worry and wonder if I’m doing this ‘right.’  I think we all do that on occasion, no matter how long we homeschool or what our homeschooling methods are.  However, I have seen my children learn and grow so much in the areas where I have been able to let go and give them greater control and ownership.

My oldest two children absolutely love drawing!  They are now in their 2nd year of formal art classes, but before that they simply pursued it on their own.  My eldest daughter is an avid photographer.   She has a photography blog and also submits photos to National Geographic Kids-My Shot, and was even chosen as the ‘Photographer to Watch’ one week.  My eldest son pursues writing with a passion. He spends a lot of time planning and writing fiction stories and is considering participating in National Novel Writing Month.

How to Help Your Homeschooled Child Pursue His Interests www.girlfriendsoffeehour.com #homeschool #childledlearning

Are you wondering how to facilitate your child’s learning through his interests?  Here are a few ideas for you that I think will help!

Ways Your Child Can Pursue His Interests

  • Does your child want to learn to draw? Allow him or her to check out books from the library on ‘How-to Draw_____.’  There is an almost unlimited supply of these books available to teach your child how to draw dinosaurs, cars, cats, dragons, people, faces, birds, buildings, and so much more.  Utilize art classes through a local art studio or via your homeschool co-op.  Perhaps you are an artist and can help your child learn this skill yourself.
  • If your child has a strong interest in writing, purchase several special notebooks that he can use just for this.  He may take notes, write shorts stories, create outlines for stories, draw illustrations that he wants to use with some of his stories. He can use these notebooks to help get his ideas out of his head and down on paper to see it!  Using the computer to write is also valid.  This will teach your child how to type, but is also sometimes easier for those kiddos who want to write but have a bit more difficulty with the physical aspect of it.  There are also online venues such as blogs, and sometimes magazines or places such as The Bionicle Wiki, which my own son has utilized in his writing for several years now.
  • Maybe your child wants to learn how to take better photographs. You can help her by purchasing a relatively inexpensive camera (maybe for Christmas this year?). She can get to know her camera by reading the instructions and then simply practicing in your own back yard.  She will learn the best times of day to take certain types of pictures, when the wildlife is out and available as subjects, and greatly improve her skill. There are also sometimes classes available, either online or in your town, that will teach how to use a specific type of camera or more general classes that are more of a ‘Photography 101’ kind of course.  One thing we are considering is an apprenticeship.  Is there someone in your area who would be willing to spend some time with your child, teaching her how to take photos, taking her out to find the perfect location to capture wildlife, or showing her how to set up the perfect family photo shoot?  Find out and ask!
  • Maybe your children are a bit younger, like some of mine, and you don’t really know what their greatest interests are yet.  That’s okay!  I am allowing my children to experiment with different things.  My younger son is taking an art class this year.  He is learning to draw with markers.  What he has done so far has turned out pretty well, but at this point I don’t see it as being his passion.  He is also taking his first science class.  He is actually loving it, so it could be that he develops an interest there, much like his older sister has. S he loves animals and is always ready to learn new information about them.  If we have a questionabout animals, we ask her first.  I call her our ‘resident animal expert.’  One thing I do see emerging is my son’s interest in comic books and writing comics himself.  That covers several topics of interest at once: writing, drawing, and reading.  His favorite? Calvin and Hobbes, to which he was introduced by his father.

Would you like to learn just a bit more about how my son has pursued his writing?  Read Writing Center Tools for the Relaxed Homeschooler.

There are many other areas where our children seek out their own studies.  They also do have some more ‘formal’ work, though we are very relaxed here.  My hope it that, even if you are very structured and traditional in your homeschooling methods, this post has helped you to see how easy it can be to allow your children to pursue their interests. And the best part?  That counts as school, too!

I hope to see you here next week, when we will reveal our Pumpkin Painting Contest winners.  There is still time to enter, so head on over to see what it’s all about!

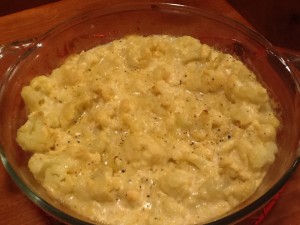
Cauliflower Mac and Cheese

Ok…I am really excited about this recipe…hope you like it, too!  Cauliflower Mac and Cheese!  Oh, yeah.  This has all kinds of tags associated with it: healthy but oh-so-yummy, paleo, low-carb, gluten free, low fat, vegetarian, comfort food (if you think of any additional, let me know, please!).
Here on our Monday installment of At Home w/ GCH, we have been featuring recipes which include Fall in-season fruits and veggies.  This week is our final blog on the subject. Our featured veggie is Cauliflower. Here are some nutritional facts about this ‘superfood.’
“We” love cauliflower here in our household.  I say, “we” because every time I tell my husband, Robert, that I have a new way to fix cauliflower, he never (may I repeat, never) responds enthusiastically.  But I am happy to report that every time (may I repeat, every time) he eats the dish I’ve prepared, his response is always (may I repeat, always) enthusiastic.  Ok—it’s taken me a while to figure this out but apparently the cauliflower dishes he grew up eating were just boiled, (overcooked), soggy, gray cauliflower-yucky!   I trust that if you have had experiences similar to Robert’s, you will try this Cauliflower Mac and Cheese and have a new yummy experience!  Enjoy!

Cauliflower Mac and Cheese2013-11-01 19.11.26

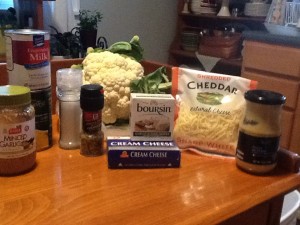
Ingredients:

1 large head cauliflower, cut into small florets
1 can evaporated milk
1/2 cup chicken or vegetable broth 2013-11-01 17.36.09
2 ounces cream cheese, cubed (or goat cheese, or Boursin)
2 teaspoons Dijon mustard
1 tablespoon chopped garlic
1/2 cup shredded sharp Cheddar cheese, plus 1/4 cup for topping the casserole
kosher salt, freshly ground black pepper
1/4 teaspoon nutmeg (freshly grated, if possible)

Directions:

  • Preheat the oven to 375.
  • Bring a large pot of water to a boil, seasoning the water with salt.
  • Lightly grease a 2 quart baking dish with butter or cooking spray.
  • When the water comes to a full boil, toss in the cut-up cauliflower; return to a boil and parboil ‘til crisp-tender, about 5 minutes.
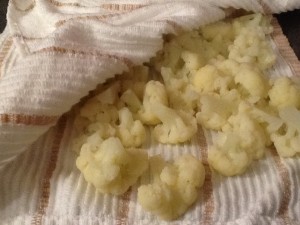
  • Drain well in colander, and then lay out on a clean dishtowel and pat dry. <The drier the cauliflower, the better the cheese sauce will cling to it.>

2013-11-01 18.33.57

  • Transfer the cauliflower to the baking dish and set aside.
  • Bring the evaporated milk and broth to a simmer in a small saucepan over medium low heat.
  • Whisk in the cream cheese, mustard, chopped garlic; continuously whisking ‘til smooth.
  • Add the 1/2 cup of shredded cheese, along with the seasonings and whisk just ‘til the cheese melts, about 2 minutes.
  • Pour the cheese sauce over the cauliflower, and stir gently to combine thoroughly.
  • Top with the remaining 1/4 cup cheese and bake for approximately 15 to 20 minutes. Turn up the oven temp to 425, and bake for 5 additional minutes; just ‘til it begins to brown.
  • Let cool 5 minutes before serving.

♥  ♥  ♥  ♥  ♥

God loves you!  ♥  (Don’t ever forget that!)

♥  coleen

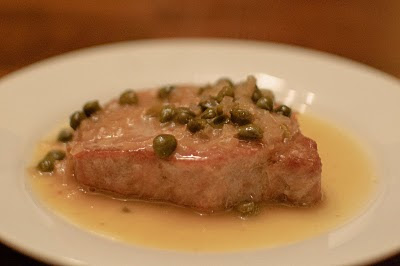
Oven-Roasted Pork Chops with Lemon-Caper Sauce


Where others have a sweet tooth, I have a sour tooth.  I’ve been known to use only vinegar, and skip the oil, when dressing my salad.  I eat cornichons like other people eat bon-bons.  So when I saw this recipe for Oven-Roasted Pork Chops with Lemon-Caper Sauce, I knew I was going to like it.

Using a recipe from my Complete America’s Test Kitchen TV Show Cookbook (which I highly recommend!), I made a few changes to work with what I had.  If you don’t have a shallot, feel free to use a red onion – just mince as finely as possible.  These pork chops were easy, quick, and nearly fool-proof.  They were tart and tangy (but not pucker, so if you are not a sour-lover like me, you won’t be put off.)

Oven-Roasted Pork Chops with Lemon-Caper Sauce

Ingredients:

  • 4 pork chops, about 1 1/2 inches thick, trimmed of excess fat
  • 2 tablespoons oil or bacon fat for cooking
  • 1 medium shallot, minced
  • 1 cup chicken broth
  • 1/4 cup lemon juice (about 2 lemons)
  • 2 tablespoons capers, drained
  • 3 tablespoons butter

 Directions:

  1. Preheat oven to 450*F.  Heat the oil in a large skillet over high heat, and brown the pork chops on one side, for about 2 minutes.  Flip and brown the other side, another 2 minutes.
  2. Transfer the chops to a foil-lined baking sheet or large, wide baking dish (so they aren’t crowded or touching each other.)  Roast in the oven until the internal temperature reaches 140*F on a thermometer, about 15 minutes, turning them over halfway through cooking time.  Remove from the oven, place on a platter, and cover with aluminum foil. Let the chops rest for about 5 minutes, and check to make sure the internal temperature has reached 150*F.
  3. While the chops are in the oven, add the shallot to the skillet you cooked the pork chops in, and cook over medium heat until softened, about 30 seconds (about 2 minutes if you are using an onion.)
  4. Increase the heat and add the broth, stirring to scrape up any bits stuck to the pan.  Add the lemon juice and capers and cook until the sauce reduces to about 1/3 cup, about 4 minutes.
  5. Off the heat, whisk the butter into the sauce, and pour over the pork chops.

Explore, experiment, enjoy! — Dana


To view even more of Dana’s unique recipe, you can visit her at Frugal Girlmet!

5 Ways to Keep Your Littlest Homeschoolers Busy

Homeschooling can be a challenge any day of the week. Add in a toddler or preschooler (or both!), and it can become downright difficult if you don’t have a plan for keeping them busy! Today I have some ideas for you that are engaging as well as educational, and should help corral those younger ones while you read aloud, help their sibling with math, or try to prepare a meal.

5 Ways to Keep your Littlest Homeschoolers Busy www.girlfriendscoffeehour.com #homeschool


5 Ways to Keep Your Littlest Homeschoolers Busy

  • Utilize blanket time (or room time/playpen time) while you read to older siblings. Place a blanket on the floor for each child; choose, or have your child help you choose, a few select toys to play with during this time (2 to 3 at most); set the timer for prescribed amount of time, 5 to 45 minutes (training will be needed, but you can teach your child to stay in one place for the full 45 minutes, perhaps longer, with a little practice).  During the learning phase, don’t expect to be able to get alot done, but after a few days to a week for most children, you will be able to get some good learning time in. Try this several times a day in short amounts, or a couple of times per day for a longer stretch of time!
  • Give your child his or her own ‘work’ to complete during your learning time. Find fun coloring or tracing pages, easy sorting activities, or books for your child to look at while you work with a sibling.  Have him sit right next to you while doing this to ensure that he stays engaged and you remain aware of what he is doing.
  • Take your lessons outside.  Set up for reading or doing math problems at a table near an area where your smaller children can safely play.  This is a great time during warmer months to introduce water or sand play, pull out the Play Dough and paints, or experiment with other messy play like shaving cream painting, tracing letters in cornmeal, or pushing trucks through a bin of corn kernels.
  • Have older children play with the younger children while you work with their sibling. If you have older children, you may find a way to schedule times for each of them to play with your younger children while you teach another sibling his English lesson or practice reading. Then switch and work with the other child.  Even younger children can be put ‘in charge’ of a sibling who is younger than them, if they are in a nearby room and have access to mama as needed.
  • Spend time with your youngest children first.  You may find it easier and more productive to take your smallest children outside, or to spend some time doing a special activity, first thing in the morning.  Your older children can use this time to complete chores and any independent work they may have (handwriting, silent reading, essays, research, typing, etc.).  This often helps the younger children be in a better frame of mind to play on their own for a bit while you spend some time with their older siblings. Their ‘tank’ has been filled and they are ready to get started with their day!

Still need some fun and practical ideas? Here are a few blog posts on the topic that you may find helpful.

How Do I Keep My Preschooler Busy? by Kendra over at Prechoolers and Peace.

Keeping Toddlers Busy During Homeschool & Baby and Toddler Busy Ideas by Karen over at Teach Beside Me.

Planning Busy Activities for Toddlers During Homeschool from Tabitha of Meet Penny.

Sensory Bottle Fun by Lara at Lara’s Place and a Cup of Grace.

Great Preschool Activities from Monique at Living Life and Learning.

Chili in a Pumpkin

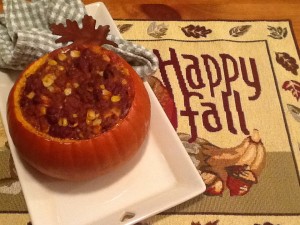
Here on our Monday installment of At Home w/ GCH, we have been featuring recipes which include Fall in-season fruits and veggies.  This week’s recipe is baked in a pumpkin…I’m thinking that you can’t get much more autumnal than a pumpkin!  This is super easy…and makes for a fabulous presentation.  You can use one pumpkin and serve all of your happy eaters a ‘slice’ of pumpkin.  Or (which I am going to do for our Thanksgiving feast) you could purchase those adorable little ‘Jack Be Little’ pumpkins and serve one per customer!  I wouldn’t suggest too large a pumpkin though; they can be very stringy…not appetizing at all!  Optimally, use a pumpkin that is called ‘pie’ pumpkin; these are approximately 1-3 pounds and are of a size that can easily be held in the palm of your hand. Check out these incredible nutritional facts, too.  Alternately, you could make a Vegetarian Chili to serve in your pumpkin; here is a recipe that you might check out.  Or, of course, your family’s favorite chili recipe!  <3

Chili in a Pumpkin

2013-10-24 20.24.55

Ingredients
1 2#-3# “pie” pumpkin 
1# ground beef
2-3 tablespoons olive oil
1 medium-sized sweet onion, chopped
1 large red bell pepper, chopped
4-5 ounces Baby Bella mushrooms, chopped
3 tablespoons chopped garlic (I use jarred)
1-28ounce can crushed tomatoes
1-15 ounce can dark red kidney beans, rinsed
1-15 ounce can black beans, rinsed
1 package taco seasoning (or try this)
1-2 cups frozen corn, defrosted
Optional toppings: sour cream, shredded cheese, chopped avocado, salsa

Directions

Pumpkin:

  • Preheat the oven to 375.
  • Carefully slice the “cap” off of the pumpkin. Discard the cap. Clean the seeds thoroughly out.
  • Lightly oil the inside of the pumpkin, and season well with salt&pepper.
  • Place the pumpkin into a baking pan, and bake for 40-45 minutes (depending on the size of your pumpkin, it will be less or more time).  Remove from oven when a sharp knife inserted into the flesh (inside) of the pumpkin is tender but not mushy.

Chili:

  • While the pumpkin is baking, saute the ground beef ‘til all the pink is cooked out.  Drain away the excess liquid and set the cooked meat aside.
  • In the same pan, add 2 tablespoons olive oil to heat over medium heat; add the chopped onion and mushrooms.  Saute for 5-6 minutes.
  • Add in the chopped bell pepper; stir well.  Saute the veggies for approximately 6-7 minutes ‘til just beginning to get slightly brown.
  • Lower heat and add chopped garlic.  Stir constantly for 1 additional minute.
  • Increase heat to medium-high, pour in the chopped tomatoes and the taco seasoning mix.  Stir.
  • Finally add back the cooked meat as well as the beans; stir well ‘til all is combined.
  • Bring just to a boil; and lower heat so the mixture is gently simmering.
  • Simmer away until the pumpkin is ready.

Assembling:

  • When the pumpkin is tender, remove from oven.
  • Stir the corn into the meat-veggie-bean mixture, and then pour this mixture into the pumpkin.
  • Return to oven and bake for approximately 30 minutes.  (Again, this will depend on the size of your pumpkin.)
  • Remove from oven; slice into serving size pieces.
  • Serve with your choice of toppings.  Enjoy!

♥  ♥  ♥  ♥  ♥

God loves you!  ♥  (Don’t ever forget that!)

♥  coleen