April 26, 2024

Southern Cassoulet

Southern Cassoulet

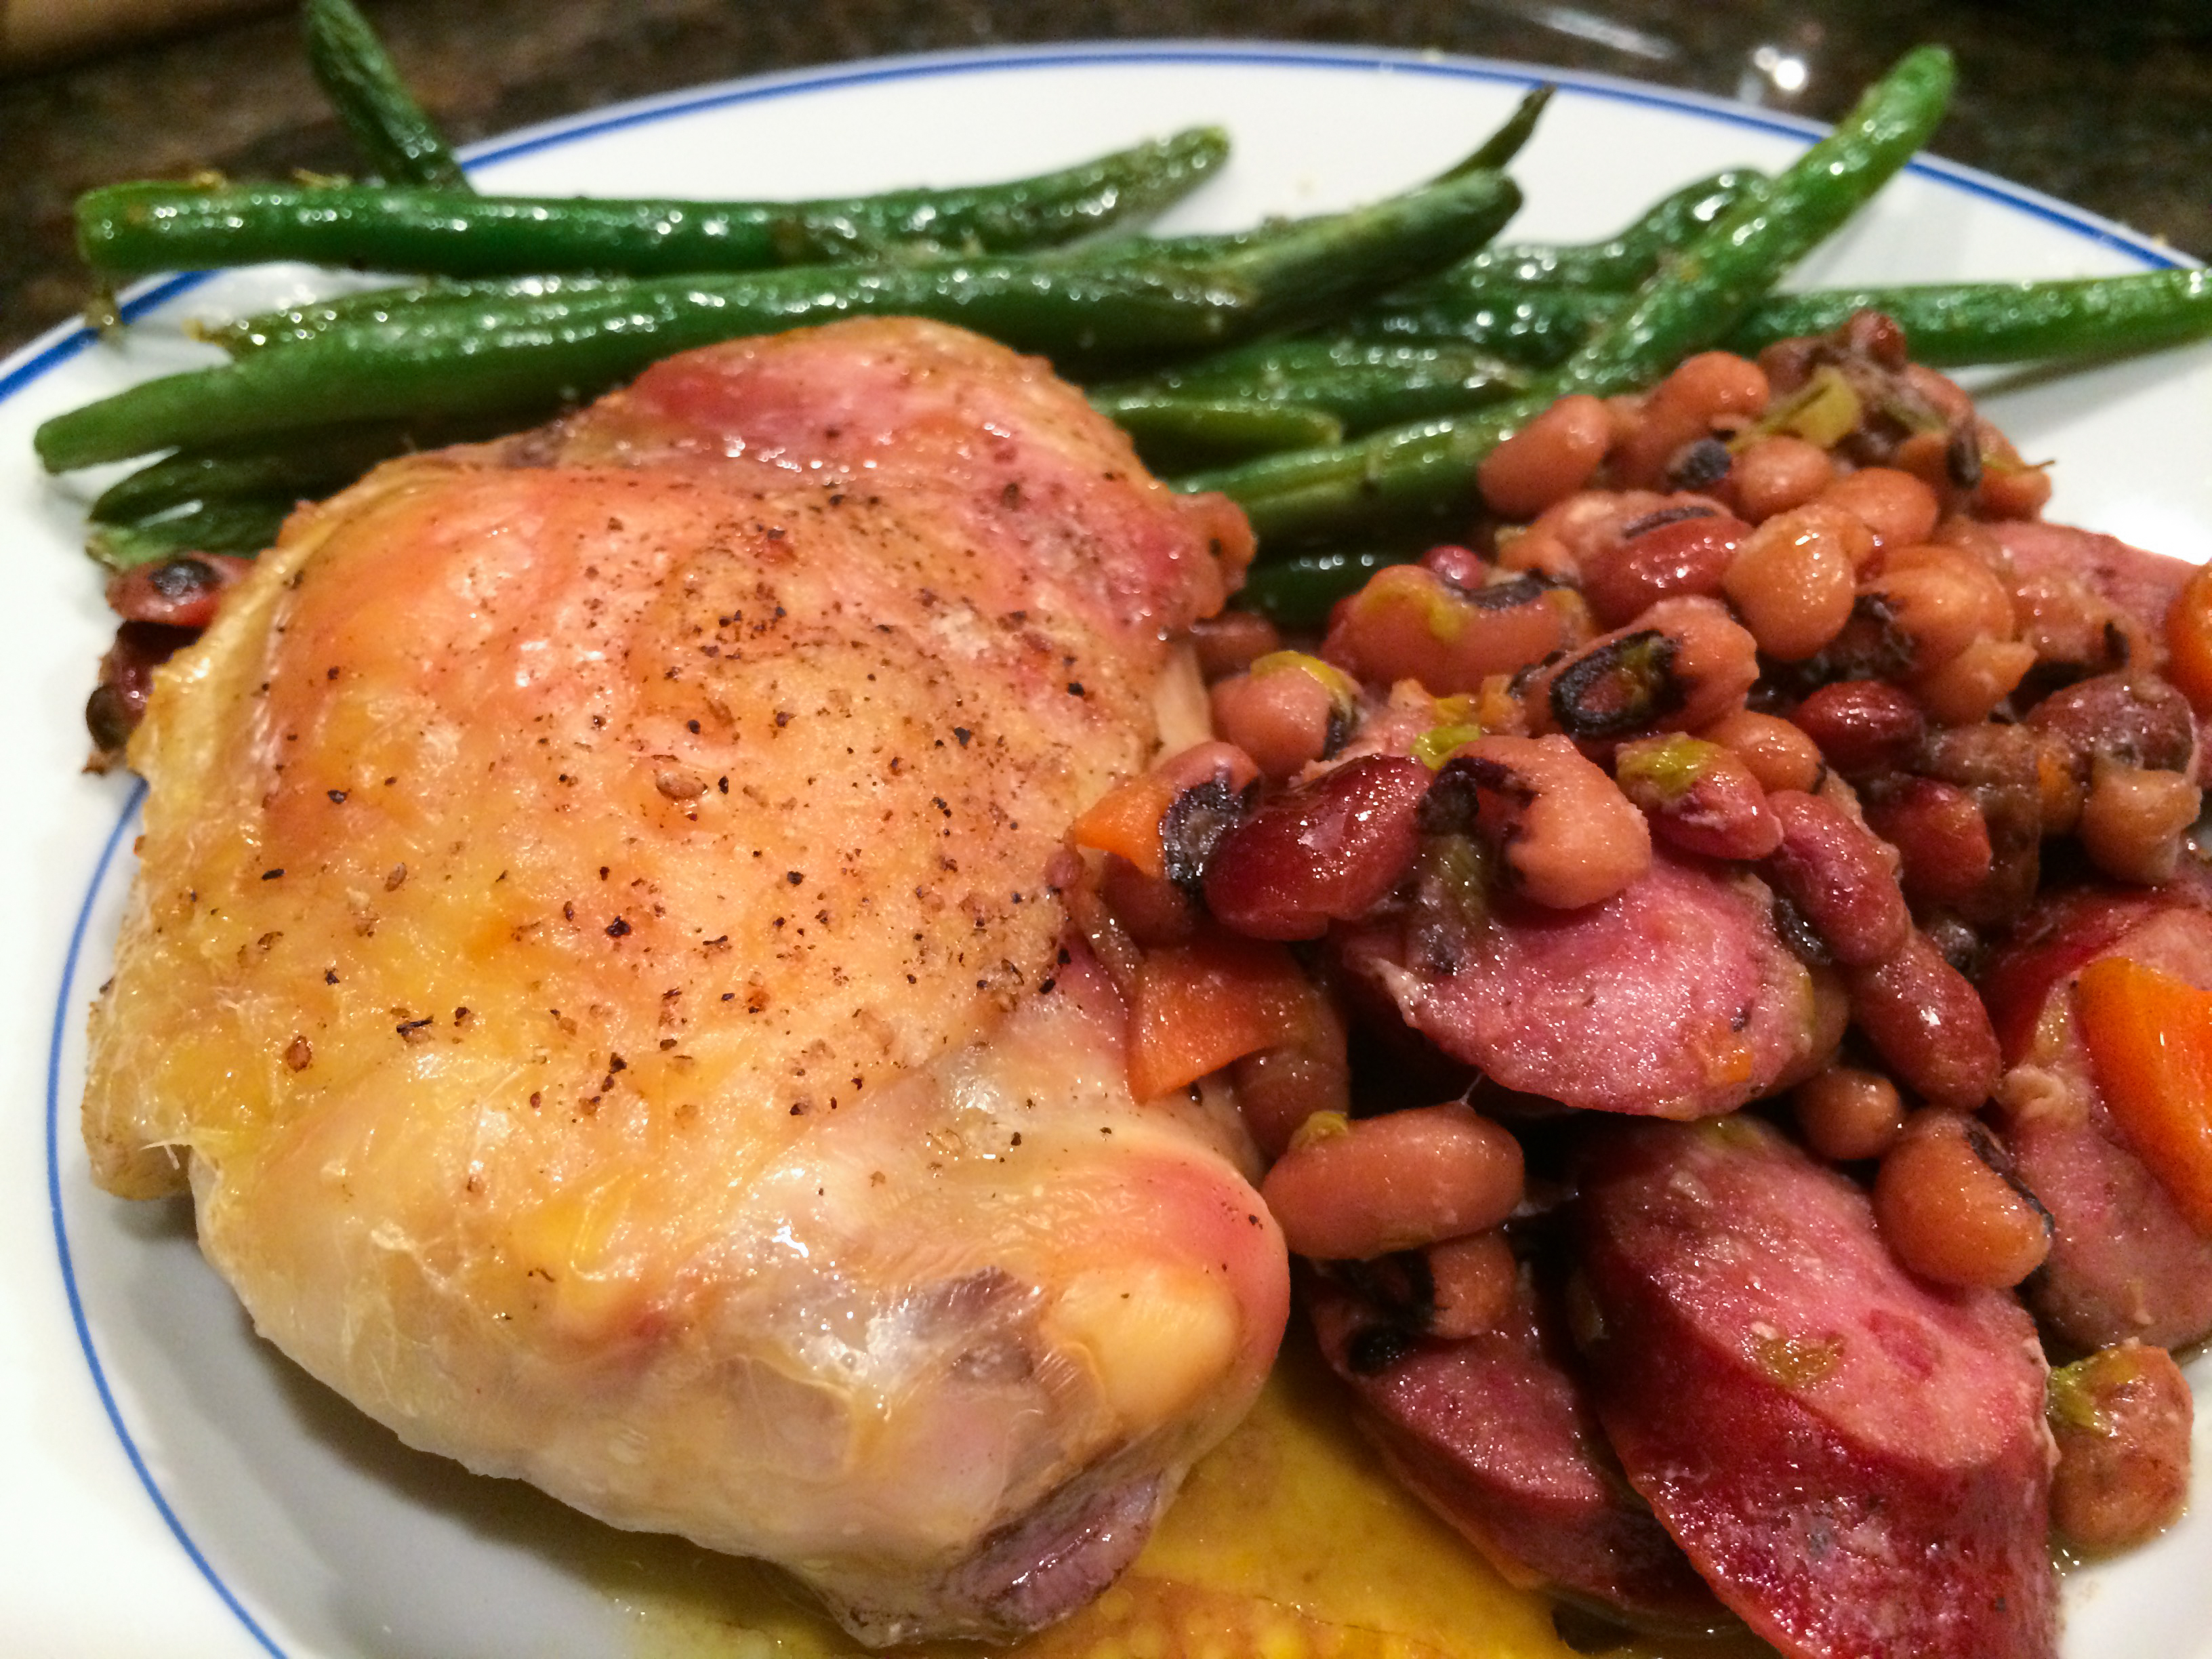
I know, it’s a weird title – French and Southern food together?  But this dish makes sense once you eat it.  Black-eyed peas are a good luck food for the New Year in the South, so why not dress it up a little with this interpretation of a French classic?  I present to you:  Southern Cassoulet!

Authentic cassoulet can take several days to prepare, and involves making a duck confit.  Too expensive and time consuming for me!  Chicken thighs sub in nicely.  Cook the black-eyed peas during the day (or use canned).  To make this even quicker, use two cans of white Northern beans.  I used just plain smoked sausage, but try out a pound of whatever kind of sausage you like.  Did you get a big Le Creuset pot for Christmas?  Now’s your chance to put your new enameled Dutch oven to the test!

Southern Cassoulet

Ingredients:

  • 1 pound dried black-eyed peas (or use two cans of other beans)
  • 1 pound smoked sausage, sliced
  • 2 large carrots, chopped
  • 3  stalks celery, chopped (use the leaves too)
  • 20 whole cloves of garlic (optional, but I thought they were delicious)
  • 1 large sprig of rosemary, minced (or use 1 teaspoon dried rosemary)
  • 4-6 large chicken thighs, skin on, bone in
  • 3 teaspoons olive oil
  • salt and pepper to taste

Directions:

  1. Cook the beans in plenty of water until tender.  This can take two hours or so.  If you are using canned beans, skip ahead.
  2. In a very large enameled Dutch oven, cook the sausage.  Add the carrot, celery, garlic cloves, and rosemary.  Add a little olive oil if things start to stick.  Saute over medium heat for 10 minutes until the vegetables are soft.
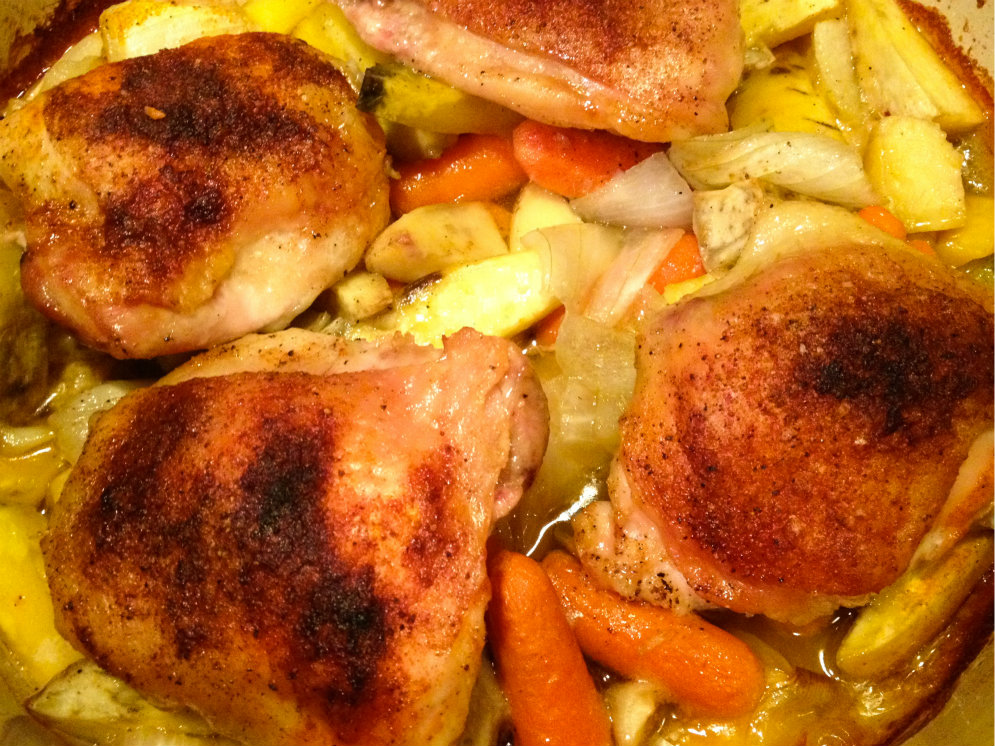
  3. Take the pot off the heat.  Drain the beans and add them to the sausage and vegetables, and stir to combine.  Season with salt and pepper.  On top of the bean mixture, place the chicken thighs, skin-side up.  Season with salt and pepper, and drizzle with the olive oil.
  4. Bake at 400*F for at least an hour, or until the chicken is cooked through with crispy skin.
  5. Good luck and have a Happy New Year!

Explore, experiment, enjoy! — Dana


To view even more of Dana’s unique recipe, you can visit her at Frugal Girlmet!

Polish Sandwich

Polish Sandwich

Ladies, I’m not proud of this entry.  I mean, I AM proud of it, because this sandwich is seriously delicious!  It’s my attempt at copycatting a recipe from a hot dog chain in Southern California called Der Wienerschnitzel.  It comes pretty close to the original Polish Sandwich, with melted Swiss cheese, snappy sauerkraut, and tart pickles.  I haven’t been to Wienerschnitzel in years, yet I still found myself craving one of these babies.  (Sometimes you just gotta scratch that itch.)

But seriously, I am going to eat better next year.  No—really!  Bread will become a special treat, sugar will become verboten, and my veggie uptake will increase!  So as we finish out this year, I decided to give in to the desire for a Polish Sandwich, as a farewell to some not-so-healthy habits.  These sandwiches easy to make, and so satisfying.  You can use hot dogs or any kind of Polish-type sausage you like.  Try yellow or spicy brown mustard.  Find some good rye bread and make this sandwich.  You’ll take one bite and say Danke!

Polish Sausage

For each sandwich you will need:

  • a 5-inch piece of Polish sausage, or hot dogs, cut in half lengthwise
  • pat of butter
  • 2 slices rye bread
  • 1 slice Swiss cheese
  • 1/4 – 1/2 cup Sauerkraut, warmed up
  • 1 large dill pickle, cut lengthwise into quarters
  • yellow or brown mustard

Directions:

  1. Cook sausage or hot dogs until done and hot all the way through.
  2. Meanwhile, in a large pan, heat the pat of butter.  Put both slices of rye bread down in the butter.  Top one slice of bread with the Swiss cheese.  Cook over low until the cheese melts and the bottoms of the bread are lightly toasted.
  3. To assemble:  Place the plain (non-cheese) slice of bread on the bottom and squirt with mustard.  Top with two halves of the sausage (or three halves of the hot dogs, cut side down.  In between the sausage, place as many of the quartered pickles as you like.  Cover the sausage and pickles with hot sauerkraut.  Top with cheese-y slice of rye bread.  Cut in half and eat hot.

Explore, experiment, enjoy! — Dana


To view even more of Dana’s unique recipe, you can visit her at Frugal Girlmet!

Thanksgiving Burger

thanksgiving burger

If you’re anything like me, Thanksgiving is one of your favorite times of the year.  The best food, the best company (family, friends, fortuitous strangers), and the best traditions.  If you can’t wait for that one day a year, make this Thanksgiving Burger!

The secret ingredient is a box of bread stuffing mixed in with the turkey.  It adds moisture and the unmistakeable seasonings that really make this burger special.  Your toppings can vary—add gravy, sweet potatoes, whatever you like!  I made mine easy, with a quick smear of mayo, cranberry sauce, and lettuce.

Ready to taste the season before the day gets here?  Let’s give thanks!

Thanksgiving Burger

Ingredients:

  • 1 box bread stuffing mix (I used Stove Top)
  • 20 ounces ground turkey
  • 1/8 teaspoon granulated garlic
  • 1/4 teaspoon celery salt
  • 1 can cranberry sauce
  • for each serving:  1 hamburger bun, mayonnaise, a few leaves of lettuce

Directions:

  1. Prepare the stuffing mix according to the directions on the box.  Let cool a little.
  2. Combine 1 cup of prepared stuffing with the turkey.  (Refrigerate the rest of the stuffing and eat it later, or use it on top of casseroles!)  Form four 5-ounce burgers, and refrigerate for at least an hour so they firm up a little.
  3. Fry the burgers in a non-stick pan.  Use a little oil of your choice, and cover the pan with aluminum foil.  Cook on medium heat for about 6-8 minutes, until done on one side with a little crust.  Flip, cover, and cook again.
  4. To serve:  give a light coating of mayo to both top and bottom hamburger buns.  Add a couple teaspoons of cranberry sauce to the bottom bun, then the lettuce.  Top with the burger and the top bun.  Serve hot!

Explore, experiment, enjoy! — Dana


To view even more of Dana’s unique recipe, you can visit her at Frugal Girlmet!

Spinach Salad with Sundried Tomato Vinaigrette

Spinach Salad with Sun-dried Tomato Vinaigrette

This recipe, Spinach Salad with Sundried Tomato Vinaigrette, came from one of those happy accidents we all sometimes have.  Serendipity!  (Does anyone remember those books?) I was in the middle of  making a Caesar salad for dinner one night, and realized I was out of both eggs and anchovy paste!  I had half of a vinaigrette made, so I looked in the refrigerator for something to make it pop, worthy of a dinner salad.  There—far, far back on the shelf—was a nearly empty jar of sun-dried tomatoes.  Hmmm….

I put the ingredients for the dressing I’d already mixed in my food processor and emptied the jar of sun-dried tomatoes right in on top. I had about 2 tablespoons of sun-dried tomatoes and almost a quarter cup of sun-dried tomato-flavored oil. Whiz, whiz!!  And taste – amazing!  Tart and tangy but it needed something a little creamy and fatty to offset it.  Aha!  Avocado and goat cheese!  Now, if you don’t have fresh herbs, just use small pinches of dried…or skip it, no biggie.  Dinner is done!  Et tu Caesar?  Who needs ya?!

Spinach Salad With Sun-dried Tomato Vinaigrette

Ingredients:

  • 1/2 teaspoon Dijon mustard
  • 1 clove garlic
  • 1 tablespoon fresh basil leaves (I use the flowers from my plants, too)
  • 1/2 teaspoon fresh oregano
  • 1/2 teaspoon fresh thyme
  • 1 tablespoon rice wine vinegar
  • splash of balsamic vinegar
  • salt and pepper
  • 2 tablespoons sun-dried tomatoes packed in oil, plus as much of the oil as you can get out of the jar
  • olive oil
  • 1 bag of baby spinach leaves (wash again, no matter what the bag says!)
  • 1/2 red bell pepper, sliced
  • 1 avocado, sliced
  • 2 ounces soft goat cheese, crumbled
  • cherry tomatoes, sliced in half

Directions:

  1. In your food processor, buzz together the mustard, garlic, herbs, and vinegars to combine.  Make sure the garlic and herbs are well broken down.
  2. Add the sun-dried tomatoes along with as much oil as you can get out of the jar; and salt and pepper.  Combine again.  Check the consistency and add olive oil if you’d like to thin out the dressing.
  3. Assemble the salad – a big bed of spinach, with bell pepper, sliced avocado, goat cheese, and cherry tomatoes on top.  Apply dressing liberally!

To make it a meal, you can add black olives and leftover cooked chicken (come to think of it, grilled shrimp might be good on this too!)  Serve with crusty bread and a white or rosé wine.

Explore, experiment, enjoy! — Dana


To view even more of Dana’s unique recipe, you can visit her at Frugal Girlmet!

Beef Stroganoff

Beef Stroganoff GCH resizeThis recipe is one of my favorites in the “Comfort Food” category.  Beef Stroganoff is easy and filling, especially if you serve it over rice or noodles.  We just eat it straight from the bowl, paired with a salad or roasted vegetables.

Now before you think I’m crazy for using so much wine in a stew, remember that all the alcohol cooks off. You will not get tipsy from your entree, I promise!  Make sure you use a wine that you will want to drink, because this recipe leaves you enough for a glass or two with dinner.  You can use red – like cabernet sauvignon, merlot, or pinot noir – or white – like pinot grigio or chardonnay.  Don’t use anything sweet, though.  Nice and dry is the secret.  And if you are really, really opposed to wine…you can use beef broth instead.

This recipe also calls for dried mushrooms.  I get big bags of dried, sliced shiitake mushrooms at the Korean supermarket.  Any Asian grocery store should carry dried mushrooms for cheap.  If you can’t find them, you can use fresh button or cremini mushrooms.  The difference will be the cooking time – you’ll need to sauté them for longer so that you can cook most of the water out of them.  Just experiment until it looks right – it’s not rocket science.

Ready for a fall stew that will warm your belly and delight your tastebuds?  Let’s go!

Beef Stroganoff

Ingredients:

  • 1 1/2 to 2 pounds ground beef
  • 1 large onion, sliced
  • 1 cup dried, sliced mushrooms (or use one pound fresh mushrooms, sliced)
  • 2 cups dry red or white wine
  • 1 tablespoon fresh snipped dill (or use 1/2 teaspoon dried dill)
  • 1/4 teaspoon smoked paprika (optional, but nice)
  • 1 teaspoon Dijon mustard
  • 1 cup whole milk yogurt (or use sour cream or creme fraiche)

Directions:

  1. If using dried mushrooms:  In a bowl, pour in one cup of the wine.  Microwave for about a minute so it’s hot, or at least very warm.  Add the dried mushrooms to the hot wine to rehydrate them.  Place another bowl on top so the mushrooms stay submerged in the wine.  Let steep until Step 3.
  2. In a large pot, brown the ground beef.  You don’t need to add any extra fat, since the fat will melt out of the meat.  When brown, remove beef with a slotted spoon to a bowl.  Leave the fat and juices in the pot.
  3. Add the sliced onion to the pot and sauté over medium.  If using fresh mushrooms, add them together with the onion.  If using dried mushrooms, add the mushrooms AND the wine they were soaking in when the onion starts to turn golden, about 8 minutes.
  4. When the mushrooms and onion are soft and golden, add the beef back to the pot, along with the other cup of wine, the dill, paprika, and mustard.  Cover with a lid and turn the heat to low.  Simmer for 5 minutes to combine.
  5. Turn off the heat, stir in the yogurt, and serve hot.

Explore, experiment, enjoy! — Dana


To view even more of Dana’s unique recipe, you can visit her at Frugal Girlmet!

Maple-Roasted Chicken and Vegetables

Maple-Roasted Chicken and Vegetables resize

This recipe is one of those great finds:  Nutritious?  Absolutely…and Paleo too (if that’s your thing).  Easy?  You bet!  It’s a one-pot masterpiece with a quick prep time and easy clean-up.  Delicious?  Incredibly!  My family ate it all and there were no leftovers.  What is this delightful dinner?  Maple-Roasted Chicken and Vegetables!

For this recipe, you need chicken thighs with the bone and the skin still on.  Rubbed with a little olive oil, the skin crisps up and keeps the meat tender.  You can use whatever root vegetables you like.  I used baby carrots, Korean sweet potatoes (red skin with white flesh) and onions.  You could also try parsnips, turnips, butternut squash, apples, or even beets!  This recipe also calls for smoked paprika, which gives it a little smoky bite but not a lot of heat.  If you don’t have it, try a sprinkle of dried herbs instead, or even some curry powder!  Ready?  Let’s go!

Maple-Roasted Chicken and Vegetables

Ingredients:

  • 2 pounds chicken thighs, bone-in, skin on
  • 1 cup baby carrots
  • 3 sweet potatoes, peeled and sliced into baby carrot-sized fingers
  • 1 onion, cut into small wedges
  • 2 tablespoons olive oil
  • 2 tablespoons maple syrup
  • salt and pepper
  • 1/2 teaspoon sweet smoked paprika

Directions:

  1. Heat the oven to 400*F.  Use a large Dutch oven or large baking dish.  On the bottom of the pan, toss together the baby carrots, sliced sweet potato, and sliced onion.  Add one tablespoon olive oil and toss with the root vegetables.  Season with salt and pepper.
  2. Place the chicken thighs on top of the vegetables, skin side up.  Pat the skin dry with a paper towel.  Drip a little oil onto the thighs and rub it in with your fingers.  You want a thin coating of oil over all the skin.  Drizzle the maple syrup over the chicken, then season with salt, pepper, and the paprika.
  3. Cook uncovered for one hour or more, until the chicken registers at least 165*F on a meat thermometer.
  4. Serve with the vegetables.

Explore, experiment, enjoy! — Dana


To view even more of Dana’s unique recipe, you can visit her at Frugal Girlmet!

Kimchee Jjigae (Kimchee Stew)

Kimchee Jjigae resize

My blog is called The Frugal Girlmet, because I like to use everything I can in the kitchen and do my best to make sure nothing goes to waste.  Kimchee Jjigae is the Korean embodiment of this principle.  A little background:  Kimchee is a fermented, spicy cabbage dish that, together with rice, is the backbone of Korean cuisine.  Traditionally, Korean families made kimchee in the summer, in gigantic clay pots.  They buried the pots in the ground to preserve them, and the family ate the kimchee over the course of the winter.  Winters are very cold in Korea, so that helped preserve the kimchee…but it still got old.  What to do with overripe kimchee – throw it away?  NO!  Koreans use every last bit of their resources, which is how Kimchee Jjigae came to be.  They made a stew out of the last of their kimchee, adding  meat to make it more filling, and served it with rice for a complete and frugal meal.

The only ingredient you MUST use in this stew is kimchee.  Everything else can vary by region, resources, or personal taste.  One of the most common varieties has pork as the protein component, and this is the way I make it.  You can cut up a few pork chops, or use any leftover pork you have.  I made a pork roast in the crockpot the night before and reserved about 2 cups of meat for this stew.  Other types of Kimchee Jjigae use canned tuna, tofu, other seafood or fish, and even Spam!  During the Korean War, American GIs brought Spam with them, and Koreans adopted it too.  Another variation that was born in the Korean War is called Budae Jjigae, which translates to “Army Stew.”  American soldiers made their own version of Kimchee Jjigae by adding ramen noodles, meat, seafood, and other vegetables to make their rations last longer.

If you like spicy foods, you will love this.  If you feel a cold or sinus infection coming on, this will clear it right out (it’s loaded with Vitamin C and probiotics)!  If your family likes chili, you should really give this Kimchee Jjigae recipe a try.  Feeling brave?  Feeling frugal?  Read on!

Kimchee Jjigae

Ingredients:

  • 1 small onion, sliced fine, or one bunch of green onions, sliced
  • 1 tablespoon sesame oil (or other oil)
  • 2 cups pork (see note above)
  • 2 cups kimchee, preferably old kimchee
  • about 1/2 cup kimchee juice (that red pepper water in the bottom of the jar!)
  • 2 cups water
  • rice to serve
  • sesame seeds, dried seaweed, or sliced green onions for garnish

Directions:

  1. In a large pot with a lid, add the sliced onions and oil.  Cook over medium heat for a minute or two.
  2. While the onion is cooking, chop the pork.  If you are using raw pork, you have two options:  you can add it in whole and then remove it when it’s cooked and chop it up.  You can also slice it thinly and add it now.  I think it’s easiest to use leftover pork that you can quickly chop or shred.
  3. Add the pork, kimchee, kimchee juice, and water to the pot.  Adjust the heat so the stew simmers.  Cover with a lid and cook for 30 minutes.
  4. Serve with rice, and garnish with sesame seeds, dried seaweed, or green onion tops.

Leftovers will keep in the refrigerator for about a week.


Explore, experiment, enjoy! — Dana


To view even more of Dana’s unique recipe, you can visit her at Frugal Girlmet!


Chicken and Rice


Chicken and Rice resize

This is a recipe I learned when I was in 7th grade Home Economics. (Do they still offer that in schools?)  I liked it so much, I brought the recipe home and asked my Mom if I could make dinner for the family for the first time.  I did – and it was a success!  How’s that for boosting your kitchen self-confidence?  Your kids can make this too:  Chicken and Rice!

There are any number of variations you do make:  add onions or garlic to the rice.  Sauté the mushrooms in wine and herbs before you add them to the casserole.  Marinate the chicken in Italian dressing first.  Parboil brown rice and use that instead of white rice.  The sky is the limit, or you can keep it simple.  I made it like this last night and my whole family loved it.  Yours will too!

Chicken and Rice

Ingredients:

  • 1 can cream of mushroom soup
  • 1 can of milk (see below)
  • 1 cup white rice
  • 8 ounces fresh mushrooms, chopped
  • 6 boneless, skinless chicken thighs
  • salt and pepper

Directions:

  1. Preheat the oven to 375*F.  In a large casserole or baking dish, spray some cooking spray on the bottom and sides.  Evenly place the six chicken thighs in the dish.  Season with salt and pepper.
  2. In a large bowl, empty the can of cream of mushroom soup.  Fill that empty can with milk and mix with the soup.  Add in the rice.  Chop the mushrooms and add to the soup mixture.  Add salt and pepper, stir, and pour over the chicken.  You want the rice mixture to be evenly distributed in the dish.  Depending on the size of your dish, that may mean it nearly covers the chicken, or not even halfway.  Just spread it out so it lies pretty flat.
  3. Cover the dish with foil and bake for an hour.  Check for doneness – you want the thighs to be 175*F.  Serve hot!

Explore, experiment, enjoy! — Dana


To view even more of Dana’s unique recipe, you can visit her at Frugal Girlmet!


Sriracha Butter

Sriracha Butter resize

Are you a griller?  Admittedly, I am not.  The two things I avoid, as far as cooking goes, are baking with yeast (it hates me and refuses to cooperate) and the grill.  I love it when my husband or my Dad grill up something, and I will prepare everything for the fire—as long as I am not the one doing it.  Why?  I don’t know.  I’ve never done it and I guess I’m intimidated.  So even though we live in sunny Southern California, we eat pan-fried steaks much more often than grilled.  Sound boring?  Not when you serve them with Sriracha Butter!

This is a Martha Stewart recipe I found in the back of her magazine this summer.  If you haven’t tried it yet, Sriracha is a brand of hot sauce that is beloved for it’s spicy, fruity bite.  If you don’t have Sriracha handy, try another hot sauce – just not something that’s got too much fire!  The other ingredient that makes this butter special is the anchovies.  I didn’t have any, but I always have a tube of anchovy paste in my fridge (for this Caesar salad recipe and this Green Goddess dressing).  HINT: Any time you see an anchovy fillet in a recipe, you can substitute one inch of anchovy paste.

We ate this on sirloin steaks that were very lean, so the added flavor and fat from the butter were a welcome addition.  My spice-shy daughter loved it and even put some on her steamed cauliflower!  Ready to try it?  Let’s go!

Sriracha Butter

Ingredients:

  • 1 stick butter, softened
  • 2 anchovy fillets, minced (or use a 2-inch squeeze of anchovy paste)
  • 1 tablespoon Sriracha or other chili sauce
  • 1 clove garlic, minced
  • salt to taste (I didn’t add any extra salt to mine)

Directions:

  1. Mash the softened butter together with the anchovies, Sriracha, and garlic.  Taste to see if you want any more salt.  Refrigerate until ready to use.  Melt on steaks, cooked vegetables, or potatoes.

Explore, experiment, enjoy! — Dana


To view even more of Dana’s unique recipe, you can visit her at Frugal Girlmet!

Shrimp with Cilantro Pesto

Shrimp with Cilantro Pesto resize

One thing that will bum me out, without fail, is seeing a wilted, mushy bunch of herbs that I didn’t get to in time.  Just makes me feel terrible.  So I had this nearly full bunch of cilantro in my produce drawer and no clue what to make with it.  Aha!  How about try it in pesto?  This recipe for Shrimp with Cilantro Pesto was a big hit at dinner last night!

You can cook the shrimp however you like.  Here, we just pan-fried them quickly with salt and pepper, and let the pesto do the heavy lifting in the flavor category.  This comes together so quick it’s laughable.  Make the pesto whenever you like – even the day before – and keep in the fridge until you are ready to eat.  We ate this with roasted baby potatoes and roasted broccoli.  The pesto was especially delicious on the potatoes.  Try it and see!

Shrimp with Cilantro Pesto

Ingredients:

  • 1 large bunch cilantro
  • 1/3 cup toasted pepitas
  • 1 teaspoon minced garlic
  • juice of 1 lemon or lime
  • 1/3 cup olive oil
  • salt and pepper
  • 1 pound shrimp, peeled
  • 1 tablespoon olive oil

Directions:

  1. Wash and shake the cilantro and trim about half an inch off the bottom of the stems.  Place them in the bowl of a food processor.  Blend with the pepitas, garlic, lemon juice, and olive oil.  Taste and add salt and pepper to your liking.  Pour into a bowl and store in the fridge until ready to use.
  2. Prepare the shrimp: peel the shell off, remove the tail, and de-vein.  Season with salt and pepper and drizzle with olive oil.  Heat a pan on medium-high, and quickly sauté the shrimp.  They will only take about 2 minutes per side – don’t let them get tough and overdone!  Remove shrimp from pan to a plate and serve with the cilantro pesto (and a squeeze of lemon if you like.)

Explore, experiment, enjoy! — Dana


To view even more of Dana’s unique recipe, you can visit her at Frugal Girlmet!