November 5, 2024

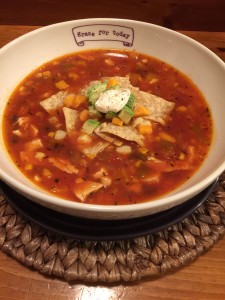
Turkey Tortilla Soup

A fitting final recipe contribution, I think.  When looking back through the past three years of healthy but oh-so-yummy recipes I’ve had the joy to blog here on At Home with GCH, soup recipes seemed to be my most often written.  (Makes sense, since my husband Robert loves soup more than anything!)  If you would like to review any of the others, just type ‘SoupPalooza’ into our search bar on the GCH homepage.

Now this recipe is one I have never made…but I know that many of you are fans of Chicken Tortilla Soup.   I switched it up  because I had a nice batch of homemade turkey stock…and some leftover turkey, too.  (This recipe could just as easily be made with traditional chicken and chicken broth or stock.)  And for those of you who like things spicy…simply add the whole can of chipotle in adobo sauce or a little finely-diced jalapeno tossed in when sauteeing the veggies.  Enjoy!

tkytortillasoup

Turkey Tortilla Soup

2 T olive oil
1 small sweet onion, diced
1 or 2 stalks celery, diced
1 red AND 1 green bell pepper, diced
1 medium zucchini, small dice
3 T chopped garlic
1 to 2 chipotle in adobo sauce, chopped (from a can)*
1 can chunky-diced tomatoes, 28 ounces
1 can tomato paste
1 can diced green chiles
5 cups turkey stock (homemade, or boxed)
2 cups corn (fresh or frozen)
2 cans black beans
2-3 cups shredded leftover turkey
garnishes:
2 cups corn tortilla chips, broken up into large pieces
1 cup shredded Monterey or pepper Jack cheese
1/2 cup sour cream
1/4 red raw onion, chopped
1 ripe avocado, diced and dressed with the juice of 1/2 lemon

  • heat the olive oil in a medium stockpot over medium heat
  • add the onion, celery, zucchini, and diced peppers; cook, stirring occasionally ‘til softened and just beginning to brown, 3 to 5 minutes
  • add the chopped garlic, and seasonings, and cook for an additional 1 minute, stirring constantly
  • stir in the tomatoes, tomato paste, green chiles, and stock; scrape the bottom of the pan to loosen any cooked-on bits
  • bring to a boil over medium-high heat, then reduce the heat to medium low and simmer, uncovered, ‘til the broth has reduced by about a third…20 to 30 minutes
  • add in the corn, beans, and shredded turkey; continue to gently simmer ‘til heated through
  • carefully taste and add s&p if needed
  • turn heat off, and let sit for 15 minutes or so; prep garnishes while you wait
  • serve soup with garnishes alongside

 ♥   ♥   ♥   ♥   ♥

God loves you!  ♥  (Don’t ever forget that!)

♥  coleen
Chicken Enchiladas (Gluten-free)

Who loves Tex-Mex food?  Raise your hand!  Me, too!  And the crazy thing—my husband, Robert, has said for years now, ’Um, no thanks!’  Somehow he got it in his head that all Mexican, Tex-Mex, Cal-Mex food had to be spicy.  (And Robert does not enjoy SPICY!)  So, recently I have been preparing an occasional dish to try and introduce him to one of my most favorite cuisines…successfully, I might add!  Olé!

Recently, Aldi (Do you shop there?  You should!)  introduced a new line of gluten-free products…really quite good, very good quality!  One of the items is a ‘flour’ tortilla.  They are amazing…just like a really good wheat flour tortilla that I remember (soft, pliable, thin) from before we went gluten free.  So I went back and bought not one, not two, but three packages…oh the options!  These Chicken Enchiladas were my first choice!  I prepared them with a tomatillo salsa (oh, yum!) but certainly they can be made with traditional salsa equally well.   (And, please, make this recipe using traditional ingredients (NOT gluten-free) as well!  Enjoy!

2014-05-22 20.25.09

Chicken Enchiladas

ingredients:
1/2 red pepper, sliced thin
1 medium sweet onion, sliced into halfmoons
2 tablespoons olive oil
sea salt, freshly ground pepper
2 tablespoons (divided) chipotle chili powder
3 cups cooked chicken, shredded
2+ cups enchilada sauce  **gf recipe below
1 cup frozen corn (defrosted)
1 cup tomatillo salsa (or traditional salsa)
1 can (15 ounces) black beans, rinsed and drained
1 cup sour cream
1 cup shredded Mexican-blend cheese

directions:

  • preheat oven to 350
  • lightly oil the bottom of a large (9 x 13) baking pan, and pour in ½ cup of the enchilada sauce
  • saute the veggies with the olive oil for 7 or 8 minutes ‘til softened.  season with salt, pepper, and 1 tablespoon of the chipotle chili powder.  set aside
  • in a large mixing bowl, combine the shredded chicken, corn, black beans, sour cream, 1 tablespoon chili powder, ½ cup of the enchilada sauce, ½ cup of the salsa, ½ cup of the shredded cheese; mix well
  • pour 1 cup of the enchilada sauce into a shallow saute pan (or a bowl)
  • now, set up a little production line with the baking pan, the chicken mixture, the pan with enchilada sauce, and an empty plate…this gets messy; you’ll thank me for it!  😉
  • take 1 tortilla, run it through the enchilada sauce to coat; place it on the plate.  take 1 good handful (1/3-1/2 cup) of the chicken mixture and spread it down the center of the tortilla; roll the tortilla up; place in baking pan with seam-side down.  repeat ‘til all tortillas are filled. (*tip: you might want to trim the edges of the filled tortillas to fit nicely into the baking pan)
  • pour the sauteed veggies across the top of the filled tortillas
  • (if there is any enchilada sauce left, pour that over the top…don’t want to waste that!)
  • sprinkle the remaining shredded cheese over the top, too
  • bake for 15-20 minutes ‘til bubbly and cheese is melted
  • serve with sour cream, salsa, and guacamole

** here are two really good, homemade, gluten-free, chemical and additive-free recipes for enchilada sauce.  also, Nicole from GFOAS has a nice recipe for homemade ‘flour’ tortillas!

http://glutenfreeonashoestring.com/enchiladas-saucy-smokin/
http://glutenfreehomemaker.com/enchilada-sauce/


♥  ♥    ♥  ♥

God loves you!  ♥  (Don’t ever forget that!)

♥  coleen

Crockpot Pork Tacos

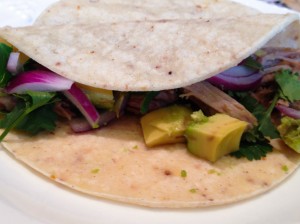
Crockpot Pork Tacos resize

If your idea of Mexican food is based on the dollar menu at Taco Bell, you are in for a treat!  Authentic Mexican food is easy to make at home and is quite healthy for you.  This Monday was Cinco de Mayo, so I made these Crockpot Pork Tacos, and they were muy delicioso!

In Mexico, and in authentic Mexican restaurants here in California, there is no shredded lettuce or cheddar cheese.  Tacos are simple and small and are often eaten on-the-go, so they’re not all covered in sauces or messy vegetables.  Chopped onions and cilantro are usually the only thing you’ll see, with a squeeze of lime.  I added avocado to mine because it pairs great with the pork.  It’s a traditional accompaniment to tacos and adds a creamy note to balance out the sharpness of the raw onions.

As far as the pork goes, I usually use a big shoulder roast, but you can use whatever pork roast you like.  The seasoning is simple here, but you can spice it up as much as you want.  Try adding a can of chipotles in adobo sauce for a smoky flavor, or a jar of salsa verde to the crockpot.

Finally, tacos are kind of like sandwiches.  You can make a thousand different kinds of sandwiches and all are tasty.  But if you only ever eat a turkey sandwich, you may never know how much you’d love a Reuben.  So:  if taco night at your house always means ground beef and diced tomatoes, you owe it to yourself to try something new.  Ready?  Vamanos!

Crockpot Pork Tacos

Ingredients:

  • 1 large pork roast, 2 or 3 pounds
  • 2 tablespoons salt
  • 1 teaspoon garlic powder
  • 1 teaspoon ground cumin
  • 1/2 cup fresh cilantro, roughly chopped
  • 1/2 red onion, diced
  • 1 or 2 avocados, sliced or diced
  • corn tortillas
  • lime or lemon wedges, to serve

Directions:

  1. Combine the salt, garlic powder, and cumin, and rub all over the outside of the pork roast.  Place in your crockpot and cook for 8 hours on low.  When done, the pork should pull apart easily.
  2. Warm up your tortillas:  I wrap a few tortillas in a clean, damp dish towel and microwave for 20 seconds.  If you try to use them cold, they’ll crack!
  3. Shred your pork with two forks, or chop roughly.  To serve, put about 1/3 cup of shredded pork in the center of a tortilla.  Sprinkle with cilantro, onion, and avocado.  Squeeze lime over taco.  Eat several.  Don’t wipe your hands on your pants!

If you have leftovers, and I always do, I usually skip the tortilla and just eat the pork, reheated in the microwave, covered in cilantro, onions, and avocado.  Skip the carbs, and squeeze lots of lime!

Explore, experiment, enjoy! — Dana


To view even more of Dana’s unique recipe, you can visit her at Frugal Girlmet!

Cinquo de Mayo Salad and Salsa

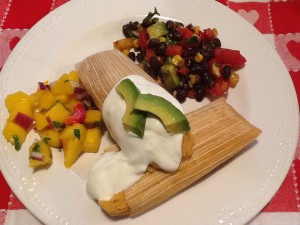
Who loves Mexican food? Raise your hand! Oh, me, too! So in keeping with the Festival of Cinquo de Mayo, we enjoyed a delicious Tex-Mex meal over the weekend. Of course, I wanted to keep to our healthy but oh-so-yummy point of view. Included below are two healthy, full of fresh ingredients and easy recipes for side dishes: a Black Bean warm salad and a simple mango salsa. Enjoy!

2014-05-04 19.14.29

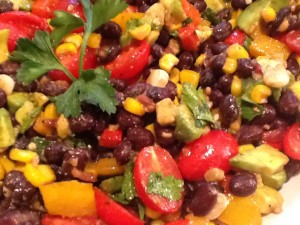
Black Bean Salad

Ingredients:2014-05-04 19.09.00
1 cup corn, either frozen, or cut fresh off the cob
1/2 yellow bell pepper, diced
1/2 red bell pepper, diced
1/2 small red onion, finely chopped
1 heaping tablespoon chopped garlic (I use jarred)
1/2 teaspoon chipotle chili powder
1 tablespoon, plus additional 1/8 cup, extra-virgin olive oil
1 (15 ounce) can black beans, drained and rinsed
Sea salt, freshly ground pepper
1 cup grape or cherry tomatoes, halved
2 teaspoons minced, seeded jalapeno pepper (optional)
1 small avocado, halved, pitted and diced
1 teaspoon lime juice, fresh if possible
1/4 cup chopped fresh cilantro, leaves and stems

Directions:

  • Cook the bell pepper and onions in the olive oil 5-6 minutes over medium-high heat in a saute pan.
  • Add the corn, and cook for 3-4 minutes more.
  • Then add the chili powder and chopped garlic, and cook for 1 more minute stirring constantly so that the garlic does not burn.
  • Reduce heat and toss in the black beans to warm through.
  • Add the additional olive oil and toss to coat evenly. Adjust seasoning with sea salt and pepper.
  • Remove from the heat and gently fold in the tomatoes, (jalapeno pepper, if using) avocado, and cilantro.   Serve immediately.

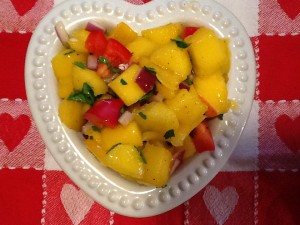
Simple Mango Salsa2014-05-04 19.08.18

Ingredients:
1 large mango, peeled, pitted, and cut into medium-size dice
1/2 small red onion, finely chopped
1/2 cup red bell pepper, diced
2-3 tablespoons chopped fresh cilantro
1/4 cup fresh lime juice
2 teaspoons minced seeded jalapeño pepper (optional)

Directions:
Gently combine all ingredients in a small bowl; chill in refrigerator ‘til ready to serve.

Deviled Eggs

2014-04-13 19.03.55

Okay, before we go any further…if you want to make deviled eggs for your Easter celebration meal…go to the store TODAY and buy your eggs.  Seriously, really fresh eggs are v-e-r-y difficult to peel!  Been there…done that!  Anyone else?  And also, may I suggest you purchase the very best (i.e., the most nutritious, healthiest) egg your money can buy.  Yes, they may be a bit more expensive but SO worth it!

Our recipe today is for classic deviled eggs AND variations.  I think that once Spring has sprung, most gatherings where food is involved have a plate or two of deviled eggs on the table.  I know this is true for our family; how about yours? And I am sure that all of us have had ‘the world’s best’ deviled eggs…and probably some of the world’s worst, too.

In my quest to present to you the BEST, I took a peek at the way that Alton Brown (of the Food Network) does his hard-boiled eggs.  Mr. Brown is a food geek (don’t we love that about him?) and a scientist.  So, he is a valued source for me when I want to get down to the basics.  Want to know how Alton Brown prepares his hard-“boiled” eggs?  Check out this video.

Pretty cool, hmmm? (I know…punny! How can steamed eggs be cool?!?) His is a great method, and, by my experience, works perfectly each and every time. These eggs turn out with tender whites and beautifully yellow yolks…with not a bit of a tinge of that green edging that so many hard-boiled eggs have! Now here on the Monday installment of At Home w/ GCH, I try to present recipes to make healthy but-oh-so-yummy! foods. Today’s recipe fits within those parameters because we have reduced the amount of mayonnaise and lightened the mixture up with some plain Greek yogurt. The average deviled egg half, prepared traditionally, contains approximately 60-65 calories. Now that is not too bad if you are only putting one half on your plate…but, honestly, who eats just one half? Prepared using the following basic recipe (not the variations), each deviled egg half has approximately 30 calories. (So to me that means I can indulge and eat both halves!)

2014-04-13 20.22.31

Deviled Eggs (And Variations)

Ingredients:
8 perfectly steamed eggs (see video below)

3 tablespoons mayo (even better: use canola mayo)
3 tablespoons plain Greek yogurt
2 teaspoons Dijon mustard
1-2 teaspoons pickle juice (we like bread&butter pickles)
freshly ground lemon pepper, to taste
smoked paprika

Directions:

  • With a sharp knife, halve each of the eggs, removing the yolk; set aside.
  • Using a wire mesh strainer, push the egg yolks through the mesh one at a time. (Or, if you prefer, simply mash the yolks to the consistency you prefer)
  • Add the mayo, yogurt, and mustard to the yolks and combine. Slowly add the pickle juice ‘til very creamy
  • Add pepper to taste
  • Dust with smoked paprika

Decision time: either use this healthy but-oh-so-yummy version of the classic egg filling or try any or all of the varieties below!

  • To fill the egg white halves, you can either simply use a small spoon, or fill a sandwich bag with the mixture <don’t forget to squeeze out the air AND seal the bag!>, then snip just the tip off one corner, and swirl the yolk mixture into the indentation of each egg half.

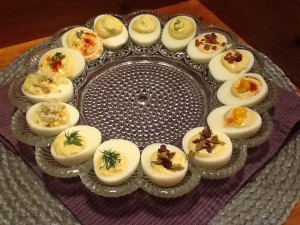
Variations: (shown in the picture above)

To the yolk mixture, you can add any one of the following:

  • finely chopped avocado and a squeeze of lime juice, OR
  • a sprinkle of garam masala (or curry powder); top with a small mango chunk,

Or top with:

  • a bit of fresh dill, or snipped fresh chives
  • finely chopped apple and walnuts; then top w/ a bit of blue cheese
  • chopped Greek olives and a bit of feta cheese
  • finely chopped tomatoes and some crumbled bacon

God loves you!  ♥  (Don’t ever forget that!)

♥  coleen
 

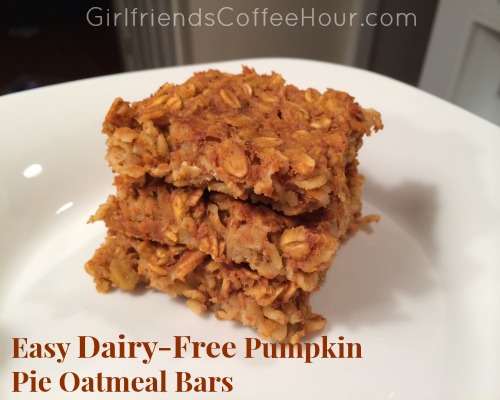
Easy Dairy-Free Pumpkin Pie Oatmeal Bars

When I was baking recently, I made two pumpkin pies for my family. I tend to forget that there is always a little batter left over until I am in the midst of pie-making! When I discovered this yet again, I began to think about what I could do with the leftovers. I ended up preparing 4 mini gluten-free pumpkin pies. I simply placed the leftover batter atop some leftover oatmeal from that morning, then baked in the oven.

They turned out pretty tasty, and I was inspired to consider other delights I could create using my pumpkin pie mixture. The result is this recipe for Easy Dairy-Free Pumpkin Pie Oatmeal Bars. I hope you enjoy them as much as we did!

Easy Dairy-Free Pumpkin Oatmeal Bars www.girlfriendscoffeehour.com #dairyfree

Recipe for Easy Dairy-Free Pumpkin Pie Oatmeal Bars

  • Prepare Libby’s Famous Pumpkin Pie mixture. (I did substitute almond milk for the evaporated milk due to dairy sensitivities in our family.) Or, if you have your own delicious pumpkin pie mixture, prepare that!
  • Add 3 cups of Old Fashioned Oats to the mixture and stir well.
  • Coat rectangular cookie sheet with about 2 tablespoons of oil.
  • Measure out 5 cups of your mixture onto the cookie sheet.
  • Spread evenly on pan.
  • Bak in oven at 375 degrees for about 30 minutes, or until golden and slightly crisp around the edges.
  • Let cool for about 10 mintues, then cut into squares.
  • Serve warm, or allow to cool completely before serving.

These bars make a lovely dessert when served with a dollop of (dairy free) ice cream on the side.  Also delicious with a bit of almond milk poured over top for breakfast!

Do you make a lot of homemade items?  Do your get your kids into the kitchen with you to bake?  Do you make cooking a part of your homeschooling?  Tell us how this works in your family!  Leave a comment below.

How to Help Your Homeschooled Child Pursue His Interests

The longer we homeschool, and the older my children get, and the more experience I get ‘under my belt’, the easier it seems to allow my children to pursue their own interests. Don’t get me wrong…sometimes I do still worry and wonder if I’m doing this ‘right.’  I think we all do that on occasion, no matter how long we homeschool or what our homeschooling methods are.  However, I have seen my children learn and grow so much in the areas where I have been able to let go and give them greater control and ownership.

My oldest two children absolutely love drawing!  They are now in their 2nd year of formal art classes, but before that they simply pursued it on their own.  My eldest daughter is an avid photographer.   She has a photography blog and also submits photos to National Geographic Kids-My Shot, and was even chosen as the ‘Photographer to Watch’ one week.  My eldest son pursues writing with a passion. He spends a lot of time planning and writing fiction stories and is considering participating in National Novel Writing Month.

How to Help Your Homeschooled Child Pursue His Interests www.girlfriendsoffeehour.com #homeschool #childledlearning

Are you wondering how to facilitate your child’s learning through his interests?  Here are a few ideas for you that I think will help!

Ways Your Child Can Pursue His Interests

  • Does your child want to learn to draw? Allow him or her to check out books from the library on ‘How-to Draw_____.’  There is an almost unlimited supply of these books available to teach your child how to draw dinosaurs, cars, cats, dragons, people, faces, birds, buildings, and so much more.  Utilize art classes through a local art studio or via your homeschool co-op.  Perhaps you are an artist and can help your child learn this skill yourself.
  • If your child has a strong interest in writing, purchase several special notebooks that he can use just for this.  He may take notes, write shorts stories, create outlines for stories, draw illustrations that he wants to use with some of his stories. He can use these notebooks to help get his ideas out of his head and down on paper to see it!  Using the computer to write is also valid.  This will teach your child how to type, but is also sometimes easier for those kiddos who want to write but have a bit more difficulty with the physical aspect of it.  There are also online venues such as blogs, and sometimes magazines or places such as The Bionicle Wiki, which my own son has utilized in his writing for several years now.
  • Maybe your child wants to learn how to take better photographs. You can help her by purchasing a relatively inexpensive camera (maybe for Christmas this year?). She can get to know her camera by reading the instructions and then simply practicing in your own back yard.  She will learn the best times of day to take certain types of pictures, when the wildlife is out and available as subjects, and greatly improve her skill. There are also sometimes classes available, either online or in your town, that will teach how to use a specific type of camera or more general classes that are more of a ‘Photography 101’ kind of course.  One thing we are considering is an apprenticeship.  Is there someone in your area who would be willing to spend some time with your child, teaching her how to take photos, taking her out to find the perfect location to capture wildlife, or showing her how to set up the perfect family photo shoot?  Find out and ask!
  • Maybe your children are a bit younger, like some of mine, and you don’t really know what their greatest interests are yet.  That’s okay!  I am allowing my children to experiment with different things.  My younger son is taking an art class this year.  He is learning to draw with markers.  What he has done so far has turned out pretty well, but at this point I don’t see it as being his passion.  He is also taking his first science class.  He is actually loving it, so it could be that he develops an interest there, much like his older sister has. S he loves animals and is always ready to learn new information about them.  If we have a questionabout animals, we ask her first.  I call her our ‘resident animal expert.’  One thing I do see emerging is my son’s interest in comic books and writing comics himself.  That covers several topics of interest at once: writing, drawing, and reading.  His favorite? Calvin and Hobbes, to which he was introduced by his father.

Would you like to learn just a bit more about how my son has pursued his writing?  Read Writing Center Tools for the Relaxed Homeschooler.

There are many other areas where our children seek out their own studies.  They also do have some more ‘formal’ work, though we are very relaxed here.  My hope it that, even if you are very structured and traditional in your homeschooling methods, this post has helped you to see how easy it can be to allow your children to pursue their interests. And the best part?  That counts as school, too!

I hope to see you here next week, when we will reveal our Pumpkin Painting Contest winners.  There is still time to enter, so head on over to see what it’s all about!

Pumpkin Painting Contest and Linky Party

Last week we had fun featuring Fun Fall Recipes for the Homeschool Family, as well as looking through those that some of you added to the linky party. Thanks for joining in! I can’t wait to try some of those recipes. We have a lot of fall days left!

Recently, I took my two littlest girls out to a local pumpkin patch with a friend. They had a blast experiencing bounce houses, slides, and a corn bin to play in for the first time. I even went down one of the slides with my friend’s little girl since she had an infant and couldn’t do it herself. I was a bit nervous, but we both made it through unscathed!

One of the fun activities they enjoyed while there was pumpkin painting. Included in the price of admission was a pumpkin and there were supplies available for painting, an apron to keep our clothes clean, and a little table to place them on to dry while we played throughout the rest of the park. Here are their two pumpkins:

Pumpkin Painting Contest & Linky Party www.girlfriendscoffeehour.com #fallfun

Not bad for 3 and 4 year olds, eh?

I did collect a few other pumpkins and brought them home for my older kids and I to paint. My husband decided to get in on the action, too, and I’m sharing his work of art with you today.

Pumpkin Painting Contest & Linky Party www.girlfriendscoffeehour.com #fallfun

Didn’t he do a wonderful job?

Last week we asked you to work on your pumpkins and then come link up with us this week. Did you get your pumpkins painted? If not, or if you are just now joining us, you still have plenty of time to paint them and then enter the contest.

Pumpkin Painting Contest Rules

  • collect pumpkins
  • paint them with a fun, fall theme (family-friendly, please)
  • come back here to enter the contest
  • have fun!

This linky party will be open until November 13, 2013, and we will announce the winner on November 15, 2013, with our next linky party! If you win, we will feature your pumpkin here on November 15th!

Enter the Pumpkin Painting Contest now!

*Note: If you would like to enter but do not have your own blog, you are not left out! Please head over to At Home w/GCH on Facebook and leave your photos on the thread there. Cannot wait to see what you have for us!


How to Homeschool: Homeschooling Methods, Curriculum, and Resources

How to Homeschool: Homeschooling Methods, Curroculum, and Resources www.girlfriendscoffeehour.com #homeschool

When I first began homeschooling I knew nothing about methods used for homeschooling.  My model was the school system and that is really all I knew!  I happened to find a curriculum the first year, for my daughter, which used a Charlotte Mason approach.  We loved it! Living books…Christ-centered…what more could I want?

This week I’m going to list some links to different methods of homeschooling, list some of the curriculum that we have used and recommend, as well as share a few resources that I still find helpful today!

Homeschooling methods

1. Charlotte Mason

What is the Charlotte Mason method?

Simply Charlotte Mason

Heart of Dakota Publishing

Ambleside Online

Living Books Curriculum

Lifetime Books & Gifts

The Charlotte Mason Way: A brand new consulting site for those interested in learning how to best implement the Charlotte Mason method in their homeschool.

2. Unschooling

What is unschooling?

Sandra Dodd

The Natural Child Project

3. Unit Studies

What is a Unit Study?

Unit Studies by Amanda Bennett

Homeschool in the Woods

4. Classical

Classical Education

Classical Homeschooling

Classical Conversations

5. Notebooking

Tutorial: What is notebooking?

Notebooking Pages

The Notebooking Fairy

6. Eclectic

What Exactly is Eclectic Homeschooling?

All of the above listed methods and many others could be used within this method of ‘eclectic’ homeschooling!

Of course, there are also other methods of homeschooling. I’ve listed just a few to start.

Favorite homeschool curricula & providers:

Apologia

The Prairie Primer

Heart of Dakota

Music 4 Little Learners

Teaching Textbooks

Polka Dot Publishing: Life of Fred

Learning Adventures

Media Angels, Inc.

Character Concepts

Lifestyle of Learning

Other recommended resources:

Unschooling Rules, Clark Aldrich

Charlotte Mason Companion, Karen Andreola

The Simplicity of Homeschooling, Vicki Goodchild

The Unschooling Handbook, Mary Griffith

The Relaxed Homeschool, Mary Hood

Wading Through the Lists

Now, this is quite a long list of companies and resources for you to work through.  My suggestion is that you begin with the homeschooling methods.  If you are new to homeschooling, or maybe you just feel you need a change, reading about the different methods will help you to figure out what kind of homeschooler you are, or perhaps the kind you would like to be.  After that, you may want to begin searching through the various other links for curriculum companies and other books and resources I’ve listed.  All of the listed curriculum and resources following are items I have used in our homeschool at some time over the last 7 years.  Many of them are favorites, such as the unschooling handbook.  Even if you have no interest in becoming an unschooler, I highly recommend this book.  It is a wonderful resource and will get you thinking about what learning can actually look like!

I do hope you have found this list of homechooling methods, curriculum, and resources helpful. Please take time to sort through them. It will be worth it, I promise!

Be sure to come back next week. I’m planning to discuss Homeschool Field Trips.

Basil Pesto

Here on our At Home with GCH blog, Monday’s are always focused on healthy but oh-so-yummy! recipes. We are continuing our series of summer recipes featuring in-season produce. Our featured ingredient this week is basil!  We can all identify the pungent aroma of basil…mmmm!  Basil has all kinds of health benefits <who knew?!>; check out some info here.  While basil is definitely ‘in-season’ here at the height of the summer growing season, it actually is easily grown as a houseplant.  Consider purchasing a small pot of basil (even in the grocery store) and keeping it in a cute little pot right on your sunniest windowsill.  Easily you could be pinching off a handful of leaves to make into pesto, or scatter some into a Caprese Salad, or slicing them up to finish off your best pot of spaghetti sauce all winter long!  Enjoy!

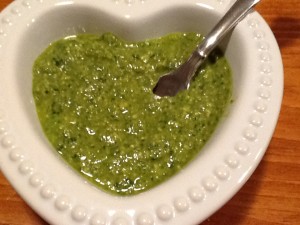
2013-08-29 22.52.06

Pesto

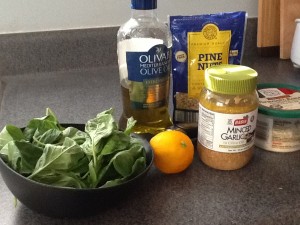
Ingredients:
2 cups basil2013-08-28 17.06.40
2 cups baby spinach leaves
3 tablespoons (or more!) chopped garlic (I use jarred)
2/3 cup pine nuts
1 cup freshly grated Parmesan
1 teaspoon kosher salt
1 teaspoon freshly ground black pepper
1/2 lemon, juiced
2/3 cup olive oil

Directions:

  • Place the  pine nuts and garlic in the bowl of a food processor and blend for 15 seconds.
  • Add the basil, spinach, salt, and pepper.
  • With the food processor running, slowly pour the olive oil and the lemon juice into the bowl through the feed tube.
  • Process until the pesto is thoroughly pureed.
  • Add the Parmesan and puree ‘til thoroughly incorporated (30-40 seconds).
  • Use immediately. *See below for hints on storing the extra pesto.  Enjoy!

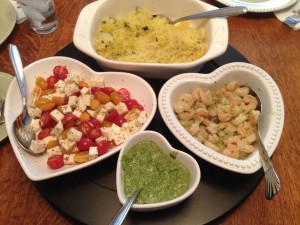
2013-08-28 18.05.05

This is how we enoyed the pesto: Mix 1/4 – 1/3 cup into a pound or so of shrimp sauteed with LOTS of garlic.  Bread on the side.  As you can see, we also enjoyed a delicious Caprese salad (click link above for recipe) as well as spaghetti squash sauteed along with some zucchini.  No complaints were heard!  🙂

Store extra pesto in the refrigerator for up to 1 week in a small container with a very thin film of olive oil on top (to seal out air).  Can also be frozen in an ice cube tray, or (my favorite) in mini-muffin cups.  To do this, wipe the muffin tin compartments with a paper towel dipped in olive oil.  Spoon in a heaping tablespoon of pesto into the compartments.  Place in freezer.  After a couple of hours, remove tin from freezer.  Set gently into a sink with just a little bit of hot water; this should loosen the individual portions of pesto.  Pop them all into a freezer container…you will be so glad you did!

♥  ♥  ♥  ♥  ♥

God loves you!  ♥  (Don’t ever forget that!)

♥  coleen