January 10, 2025

Baked Potato Soup – Load It Up

Yum!  Do you enjoy a baked potato with all the fixin’s?  I must admit I do!  What is your favorite topping?  Mine is bacon. And even choosing just what to put on top…when my husband gets done “loading” his potato, it is a masterpiece (and he enjoys every bite)!  But we’ve learned a few things about the balancing act with carbs…and so, a loaded baked potato finds it’s way onto my plate once in a blue moon.  However, this soup…now this i can enjoy perhaps every full moon!

A friend had asked me for a recipe for this soup. (I had never even heard of ‘Baked Potato Soup!’)   You can only imagine the variety of recipes to be found out on the internet!  Well, you can easily guess just what they were “loaded” with—many more calories than I desire to serve to my husband and guests (and me)!   And we surely couldn’t include a recipe like most of those I saw on our Monday post on the At Home w/ GCH blog!

So here is how I made our healthy-but-oh-so-yummy version—this recipe includes cauliflower. Using cauliflower as a main ingredient does a number of things in a healthy and yummy way:

  • provides our bodies with more veggies
  • and for those of you trying to sneak veggies into your family’s repertoire…perfect!
  • keeps the carb count down (approximately the same # of carbs in an entire head of cauliflower as in one russet potato)
  • bulks up the soup so it is thick and creamy without exhorbitant quantities of heavy cream and cheese (lots of fat and calories)

I encourage you to try this soup…it is a very satisfying comfort food but is light on the carbs and the fat calories.  A nice treat!  Enjoy!

Loaded Baked Potato Soup

Healthy but oh-so-yummy Loaded Baked Potato Soup

Healthy but oh-so-yummy Loaded Baked Potato Soup

Ingredients
soup:
2 medium-sized russet* potatoes, washed and dried
1 head of cauliflower, rough chopped
1+1/2 cups chicken, or vegetable, broth
1+1/2 cups 2% milk (warmed)
salt and freshly ground black pepper
toppings:
2 slices bacon, cooked and crumbled (you can use turkey bacon if you wish)
1/2 cup light sour cream
1 cup shredded very sharp cheddar cheese
dried parsley

Directions

  • First get the baked potatoes going. After scrubbing them, pierce potatoes with a fork in 4 or 5 places. I prepared mine in the microwave oven (on high for 5 minutes; turn over and cook another 3-5 minutes, until tender). Or, you can bake them at 400° for approximately 1 hour or until tender. Either way, when potatoes are done, cool for 10-15 minutes. Then they can be peeled and chopped. This recipe is also a great way to use up leftover baked potatoes!
  • While the potatoes are cooking and cooling, you can prepare the other main ingredients. Here’s how I cook bacon: I stack the slices and, using kitchen scissors, I cut it into approximately 1+1/2″ to 2″ pieces. I find that the bacon cooks much more quickly and evenly this way. Place the pieces into a COLD small frying pan, heat over medium heat. Once the bacon starts frying, I reduce the heat a bit and cook to the desired degree of doneness, keeping a careful eye so that it does not burn. I like to cook bacon over a medium low heat so that most of the fat is rendered out. Using a slotted spoon or spatula, remove the bacon, leaving the drippings, and place onto a couple of paper towels to finish draining. Set aside for topping the soup.
  • Now while the bacon is cooking, place the cut-up cauliflower into a medium-sized pot along with the broth. Bring to a boil, reduce heat, then cover and simmer ‘til tender. Do not drain.
  • Once cauliflower is cooked, add warmed milk and the chopped baked potatoes to the pot, and bring back to a boil. Reduce heat and gently simmer ‘til thoroughly heated, stirring once or twice; this will take just a couple of minutes. Remove pot from heat and scoop out about 1/3 of the veggies; set aside.
  • Now you are going to puree (smooth out) the soup. I use an immersion or stick blender** to puree. Other options would be to use a potato masher, or to puree the soup in your blender. You must be very careful doing it this way because it is hot! See below for tips (just ‘cause God loves you…we don’t want to see you get hurt!). Once pureed, place pot back on very low heat, add back in the reserved veggies, the sour cream, half the parsley, and season to taste with salt and pepper. heat on very low ‘til nice and hot, stirring occasionally.

Now to “load” your potato soup!  Ladle soup into each bowl.  Top each serving with 2 tablespoons of shredded cheese, a sprinkle of the remaining parsley, and some of the crumbled bacon. Healthy but-oh-so-yummy!

   ♥      ♥      ♥      ♥      ♥ 

God loves you!  ♥   (Don’t ever forget that!)

♥   Coleen

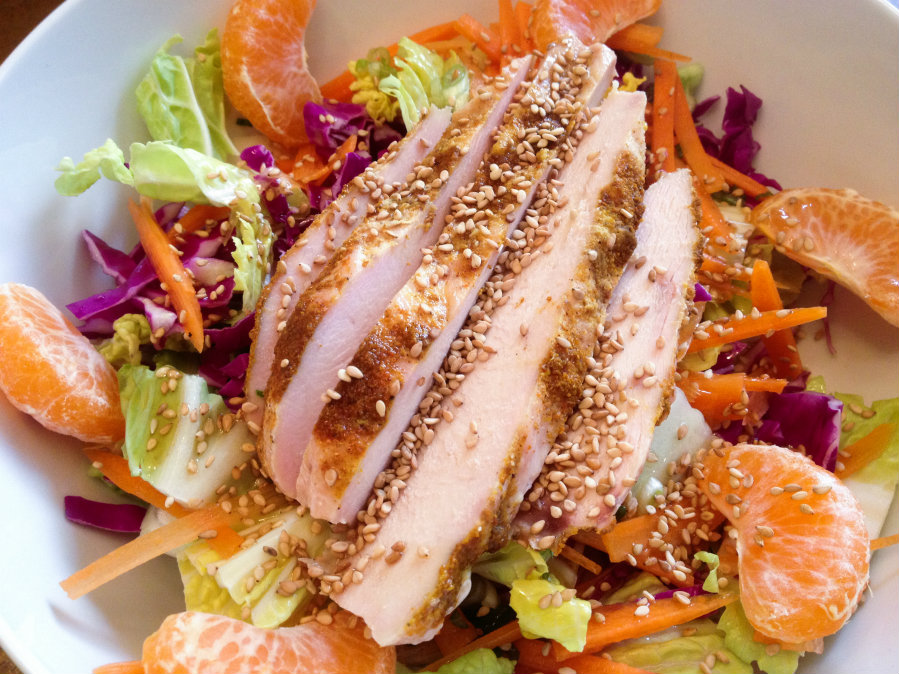
Chinese Chicken Salad

Chinese Chicken Salad Resize

As Coleen pointed out in her post on Monday, this is National Soup Month!  She will be sharing some of her favorite soups with us.  And what makes a better meal than soup and salad?   One of my favorite salads is Chinese Chicken Salad!

This is perfect for winter, because all of the ingredients are in season now.  Instead of canned mandarin oranges, you can probably find fresh ones now – I’ve got Clementines and Satsumas left and right at my grocery store.  Red cabbage and carrots are always around, as are green onions.  For the base, I used Napa cabbage, but if you don’t have that, you can use any kind of lettuce you like, or really finely chopped green cabbage.  I cooked some extra chicken breasts last night so I could chop them up cold and throw them over the salad, but you can use whatever chicken you like – roasted, store-bought rotisserie, or even breaded chicken nuggets!

This recipe serves two as part of a lunch or dinner menu.  Try this salad with any soup you like, or paired up with a sandwich, wrap, or pasta dish.  Filling, nutritious and delicious – and it won’t break any of your New Year’s resolutions!

Chinese Chicken Salad

Ingredients:

  • 1 small head Napa cabbage, or romaine lettuce
  • 1/2 head small red cabbage
  • 2 carrots
  • 2 or 3 green onions
  • 2 mandarin oranges
  • 2 cooked chicken breasts, or 3 cups chopped cooked chicken
  • 2 tablespoons sesame oil
  • 2 tablespoons rice vinegar
  • 1 tablespoon sesame seeds
  • salt and pepper to taste

Directions:

  1. Chop the Napa cabbage into inch-wide strips.  Finely slice the red cabbage.  Place both in a salad spinner and rinse under cold water, then spin dry.
  2. Cut the carrots into matchsticks.  Finely slice the green onions.  Peel the oranges and remove as much of the white pith as possible.  Separate into segments.  Dice or thinly slice the chicken breasts.
  3. To assemble:  In two very large bowls, mix together the cabbages, carrots, and onions.  Arrange the oranges and chicken breasts on top.  Drizzle each salad with one tablespoon each of sesame oil and rice vinegar, and sprinkle the sesame seeds, salt, and pepper on top.

Explore, experiment, enjoy! — Dana


To view even more of Dana’s unique recipe, you can visit her at Frugal Girlmet!

Six Steps to Ridding Your Shelves of Extra Homeschool Curriculum

Six Steps to Ridding Your Shelves of Extra Homeschool Curriculum www.GirlfriendsCoffeeHour.com #homeschool #organizing

Welcome back to part 2 of Organizing Your Homeschool for a Brand New Year! This week we will tackle what to do with your extra curriculum and other items that were not cleared out last week.

Ridding Your Shelves of Extra Homeschool Curriculum www.GirlfriendsCoffeeHour.com #organization #homeschool

Six Steps to Ridding Your Shelves of Extra Homeschool Curriculum 

  1. Determine which items you want to sell and which you would like to donate.
  2. List items on Ebay, hold a garage sale, find a local consignment shop or sale to participate in, or post them on Facebook or your blog as For Sale. Or collect your items all year and participate in your local homeschool curriculum sale at the end of the school year. Often, there are several taking place in any area.
  3. Take boxes and bags of the items you will not try to sell to your local Goodwill, or donate to a church or neighborhood family you know that could use extra clothing, toys, and books. There may be a local shelter or daycare that needs what you have.
  4. Check with local churches if you do not know of anyone in need. My church has a section on their web site for posting items needed or items being offered for sale or donation.
  5. Post a notice in your local homeschool group’s forum or in any Facebook groups you may be a part of (if allowed) about items you would like to donate to homeschool families. I often hear of or from people looking for free or low-cost items because they don’t want to spend a lot before trying, or they just don’t have the extra money to spend at the time. You have the opportunity to be a huge blessing to another homeschooling family by donating your gently used books.
  6. Another possibility is to offer your books and homeschool curriculum for loan or rent. I do not know the ins and outs of this myself, but I feel sure you could do a little research to find out more. Many families simply do not have room to store curriculum permanently, or perhaps they just don’t care to. This could be a workable solution for you and them!

Do you have more suggestions for clearing off your homeschool shelves? Please share in the comments. If you missed Part 1 of this series, please be sure to visit Organizing Your Homeschool for a Brand New Year


*   *   *   *   *   *   *   *   *   *

Interested in joining us for our next Online Bible Study that starts on January 13, 2014?   Click HERE for more details!

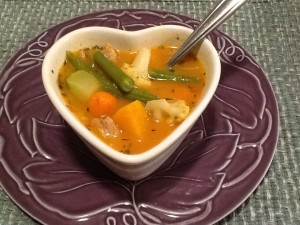
SoupPalooza2014 – Turkey Veggie Soup

SoupPalooza time again! January is National Soup Month, and for my hubby, Robert, we have entered his ‘happy zone!’  The man will eat soup every single day! So, just like January 2013, I am indulging him and have committed to serving soup at one meal per day for the entire month.

2014-01-05 16.54.40

Here on our healthy but oh-so-yummy! Monday’s on the At Home w/ GCH blog, we will be promoting soup, soup, and soup for the next four weeks. Each week will focus on a different type of soup, i.e., veggie-based, creamy, chunky, meaty, etc. And don’t forget to utilize the search button on our website to check out soups from SoupPalooza 2013 along with soups that our Dana has shared with us, too!  With all of the ch-ch-chilly temperatures around the country recently, perhaps soup will feature more in your menu planning, too!

Turkey Veggie Soup

Ingredients
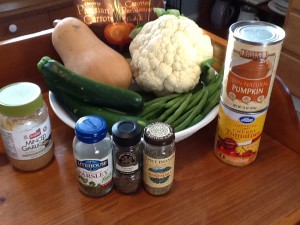
4 quarts homemade turkey stock (or your choice of boxed broth)2014-01-05 14.09.29
3-4 cups of cooked turkey meat, shredded
1 small sweet onion, finely diced
1 stalk celery, thinly sliced
2 tablespoons chopped garlic in oil (jarred)
2 tablespoon olive oil
1/2 medium-large butternut squash, peeled and cubed
1 can (15 oz) stewed or crushed tomatoes
1/2 can (15 oz) pumpkin puree (NOT seasoned!)
3 tablespoons chopped parsley
1 tablespoon chopped thyme
1 tablespoon chopped rosemary
2 garlic cloves (crushed)
salt and pepper to taste
6-8 ounces green beans (if using frozen, defrost)
2 cups cauliflower florets (ditto)
1 cup cubed zucchini
8 ounces carrots (I used frozen)
optional: cooked rice, quinoa, or tiny pasta

Directions

  • In a large soup (or stock) pot, heat olive oil over medium-high heat, and then add onion and celery. Saute for 5 minutes.
  • Add cubed butternut squash and saute for an additional 10 minutes, stirring only once or twice, ‘til just beginning to brown.
  • Add chopped garlic and saute for 1 minute, stirring constantly.
  • Stir in stock, tomatoes, and pumpkin puree, mixing thoroughly.
  • Add vegetables (zucchini, cauliflower, carrots, and green beans) and seasonings. Bring to a boil.
  • Reduce heat, cover, and simmer for 15 or so minutes ‘til veggies are getting tender.
  • Using a slotted spoon, remove about half of the veggies to a bowl and set aside.
  • Turn heat very low, and puree the broth and remaining veggies ‘til smooth using an immersion stick blender (or very carefully! puree in a blender container).
  • Add back in the reserved veggies along with the cooked meat. Heat ‘til nice and hot.  Enjoy!

   ♥      ♥      ♥      ♥      ♥ 

God loves you!   ♥  (Don’t ever forget that!)

♥  coleen

*   *   *   *   *   *   *   *   *   *   

Interested in joining us for our next Online Bible Study that starts on January 13, 2014?   Click HERE for more details!

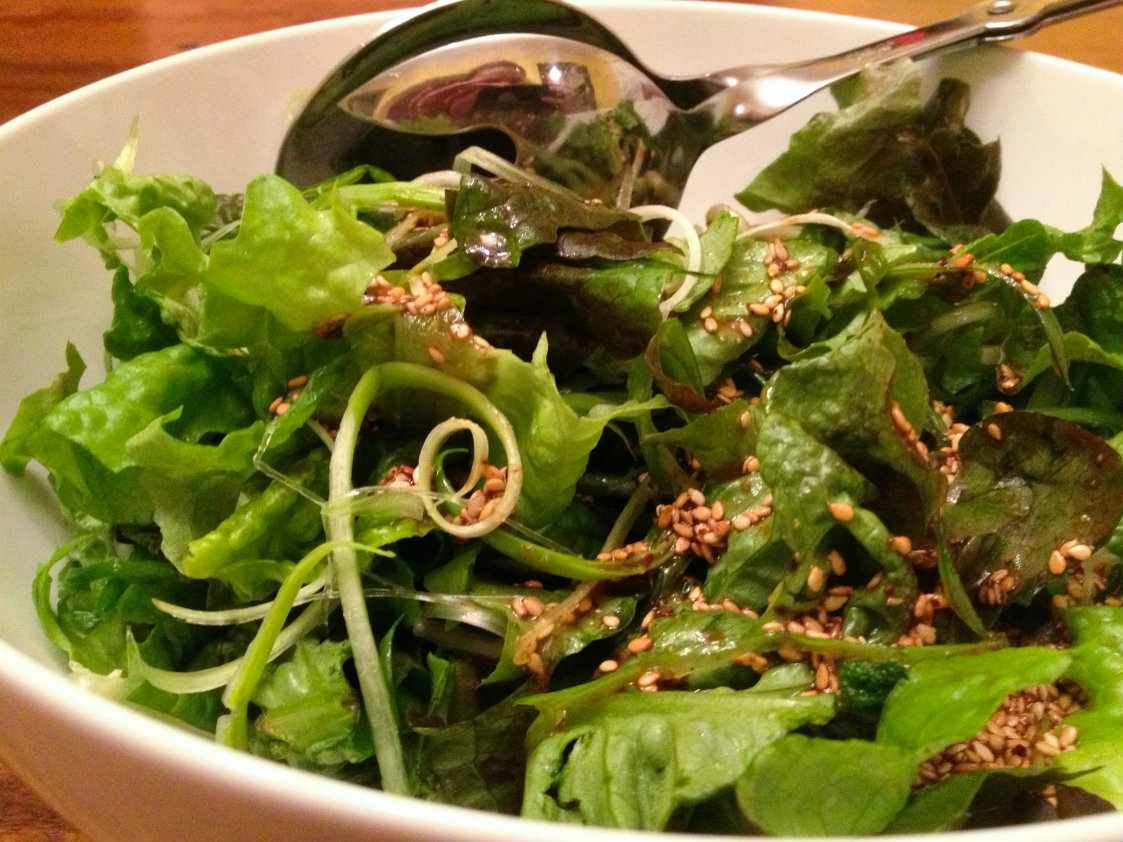
Korean Green Onion Salad – Pa Muchim

Pa Muchim Resize

Korean Green Onion Salad, or Pa Muchim (pronounced “pah moo cheem”) is a staple at Korean BBQ restaurants and homes alike.  It is frequently paired with pork belly or other fatty meats, as a counterbalance to all the rich flavors and textures.  I find it spicy and weirdly refreshing!

Yes, this salad has a lot of green onion in it.  So much so that you should probably share it with whoever you’re going to be hanging out with that day.  I wouldn’t eat a big plate of this and then go out on a first date!  Cutting the green onions into long strips can be a little tricky.  If it’s not working out for you or you get frustrated, you can just turn the onion on a bias and cut long diagonal slices – they don’t have to be strips cut lengthwise.  Red leaf lettuce is most commonly used, but you can try green leaf or romaine too.  As for the dried red pepper, just use one of those little packets of crushed red pepper that always comes with a pizza delivery!

Next time you grill or fry something rich and delicious, pair it with this spicy and cleansing salad.  (And for more motivation, check out how healthy green onions are for you!)

Korean Green Onion Salad (Pa Muchim)

Ingredients:

  • 1 bunch green onions (anywhere from 4 to 8 onions)
  • 1 head red leaf lettuce
  • 2 teaspoons soy sauce
  • 1 teaspoon sugar
  • 2 teaspoons rice vinegar (or you can substitute apple cider vinegar)
  • 2 teaspoons sesame oil
  • 1/2 teaspoon crushed red pepper flakes (optional, but try it if you have them!)
  • 2 tablespoons toasted sesame seeds

Directions:

  1. Slice onions lengthwise into thin strips, or you can cut them on a very severe bias into long ovals.  Put the onions into a bowl of ice water and let soak for fifteen minutes.  This crisps them, and also removes some of the sliminess from the insides.
  2. While the onions are soaking, wash the lettuce and cut it into bite-sized strips.  If your lettuce is a little limp, soak it in ice water too!
  3. Make the dressing:  combine soy sauce, sugar and rice vinegar in a small Tupperware cup with a lid.  Shake well to combine.  Add sesame oil and red pepper flakes and shake again.
  4. Drain the lettuce and onions, dry them if you can:  Either roll up in a dish towel, or spin in a salad spinner.  Combine lettuce and onions in a large bowl, toss with dressing, and sprinkle with sesame seeds.  Serve immediately.

Explore, experiment, enjoy! — Dana


To view even more of Dana’s unique recipe, you can visit her at Frugal Girlmet!

7 Ways to Stay Focused as You Work Towards the Goal of Decluttering

Each year, as we enter the new year, many of us begin to set goals or make resolutions. Personally, I don’t make resolutions. I choose a few goals and try to meet those throughout the year. For me, changing the wording helps with that feeling of less-than that often comes when I don’t meet the goal. This way, I still have the rest of the year to succeed!

This month I will be writing a series of posts for At Home w/ GCH that discuss getting our homeschools organized for the new year. With this series, I am hoping to help many of you, as well of myself, as we focus on just one task each week. Feel free to take more than one week to complete each task, though. It will probably take longer than that for me here, since I am also in the midst of homeschooling and working each day, too!

7 Ways to Stay Focused as You Work Towards the Goal of Decluttering www.GirlfriendsCoffeeHour.com #organization #homeschool

This week our task is decluttering. I am sorry to say that my home is often cluttered. The job of decluttering seems to be a constant work in progress, and can very easily get me overwhelmed if I don’t focus.

7 Ways to Stay Focused as You Work Towards the Goal of Decluttering www.GirlfriendsCoffeeHour.com #organization #homeschool

7 Ways to Stay Focused as You Work Towards the Goal of Decluttering

  1. Set a timer and work for a specific amount of time, then take a break. You will be impressed with how much you actually accomplish in that concentrated amount of time.
  2. Start with one small space. A desk, a drawer, a shelf. Simply beginning is half the battle.
  3. Throw away extraneous papers that are lying around.
  4. File bills, pay stubs, and other important documents.
  5. Purchase plastic or cloth bins to use as storage (found at places like Target, Walmart, or Goodwill and other thrift stores).
  6. Sort toys and books into ‘like’ piles and place them in bins together. This simple step helps so much when it is time for you and your children to clean up!
  7. Label the bins according to the item—blocks, books, Mr. Potato Head, cars, etc.

Do you have tips and tricks for decluttering? Please leave your suggestions in the comments section below! Be sure to check Organizing Your Homeschool for a Brand New Year  for other posts as we move forward with this organizational series throughout the month of January.

Shepherds Pie with Cauliflower Mash

Oh, so yummy!  My husband loves Shepherd’s Pie—and so I indulge him!   We’ve had Shepherd’s Pie with beef filling, chicken filling, turkey filling, vegetable filling.  We’ve had it topped with traditional mashed potatoes, with mashed sweet potatoes, with mashed turnips, and like this—our favorite way—with mashed cauliflower!  I always have my eye out for new variations!  This recipe fits into our healthy but oh-so-yummy category in a couple of ways:

  • it is low-carb (with the absence of potatoes)
  • it  is made with natural ingredients that you can pronounce (as the gravy is made from scratch), and not a can of cream of something or other
  • it is low in fat/high in protein (using boneless chicken breast as the protein and just 1/3 cup of shredded cheese and 1/3 cup Parmesan)

This recipe could easily be doubled and baked in an 11 x 13 baking dish.  Enjoy!

Shepherds Pie with Mashed Cauliflower Topping 

shepherdspie

Filling Ingredients:

1 sweet onion, chopped in pieces about 1/2 inch dice
4-6 ounces baby bella mushrooms, wiped clean and sliced chunky
2-3 tablespoons chopped garlic in oil (from a jar)
4+ teaspoons olive oil
1# boneless chicken breast, pounded flat, cut into 1″ cubes

1 tablespoon butter, or coconut oil
2 tablespoons brown rice flour (or all-purpose flour)
1/4 cup white wine (or broth)
1+1/4 cups chicken broth

1 bag frozen mixed vegetables (your choice), defrosted

Topping Ingredients:

1 medium-sized head of cauliflower, cored and chopped into small pieces
1/4 cup milk
1/3 cup finely grated parmesan cheese
salt and freshly ground black pepper to taste

1/3 cup shredded cheese (sharp cheddar, smoked gouda) *use a flavorful cheese

Instructions:

  • Preheat oven to 375.
  • Bring a medium-sized pot of salted water to a boil. Add cauliflower and simmer ‘til  soft enough to mash easily (10-12 minutes).
  • Drain cauliflower very well; place back into pot and  “mash” the cauliflower along with the milk and Parmesan.
  • Season very well with salt and pepper to taste.
  • While the cauliflower cooks, heat 2 teaspoons of olive oil in a large frying pan and saute the cut-up chicken.  Cook ’til just getting brown but don’t overcook.
  • Reduce heat to low, and add the chopped garlic for the last minute (don’t let the garlic burn).  Remove pan from stove; set aside cooked chicken.
  • Wipe pan with paper towels to remove bits.
  • Then add 2 additional teaspoons olive oil; and saute chopped onions for 3 minutes.  Add chopped mushrooms and saute for 4-5 minutes more to caramelize.
  • Reduce heat to low; add 1 tablespoon butter, and sprinkle flour over the mushroom-onion mixture, stirring with a whisk or wooden spoon.
  • ‘Cook’ this mixture for 3 minutes (to reduce the flour-y taste) occasionally scraping the pan.
  • Then gradually whisk in the wine ’til the mixture is smooth.
  • Slowly whisk in the  broth and your gravy will come together.  Gently simmer for 5 minutes.
  • Add back the cooked chicken and the defrosted veggies and heat together for 1-2 minutes.
  • Spread the chicken-vegetable-gravy mixture in the bottom of a 8 cup casserole dish.
  • Top with the cauliflower mixture, and spread across the pan almost to the edges.
  • Bake for 20 minutes, and then top with the shredded cheese.
  • Continuing baking another 10 minutes or so ’til bubbly.  (If top is not lightly browned, can be carefully placed under broiler for 2-3 minutes.)  Enjoy!

   ♥      ♥      ♥      ♥      ♥ 

God loves you!     (Don’t ever forget that!)

♥  coleen

Zoe’s Crockpot Chicken

Zoe's Crockpot Chicken resize

This past weekend, I invited my best friend and her family up to our house for dinner.  Instead of trying to make a meatloaf large enough to feed eight people, I decided to use my two crockpots to save time and effort in my prep.  In the one, a mushroom pot roast.  In the other, I made a lightly curried pot of chicken thighs.  I wasn’t sure if my friends’ kids would like it – they’re eight and ten years old, and I didn’t know if it would be a hit.  Ten year-old Zoe took one bite and her face lit up.  “Mama,” she excitedly told my friend, “you have to ask Dana for this recipe so you can make it at home!”  I have to tell you, I’ve never been so proud of a recipe in all my life!  This, then, will be called Zoe’s Crockpot Chicken.

You can use one or two pounds of boneless, skinless chicken thighs.  If you use one pound, you’ll have more sauce, and will probably want to serve this over rice or noodles.  If you use two pounds, like I did this time, it’s a thicker stew and doesn’t need anything under it – but jasmine rice would certainly be delicious.  Use any store-bought curry powder you like.  I have two, and the one I used this time was just a $4 jar from Trader Joe’s – nothing fancy.  I also used half a head of cauliflower, diced.  It doesn’t add much to the flavor, but it adds nutrition and body to the sauce.  I like to garnish with a big dollop of plain yogurt, and if you have cilantro, sprinkle some of that on top.  If you need a quick chicken dish that promises to please grown-ups and kids alike, check this one out.

Zoe’s Crockpot Chicken

Ingredients:

  • 1 large onion, sliced fine
  • 1 or 2 pounds chicken thighs
  • 2 tablespoons curry powder
  • 1/2 teaspoon salt
  • 15 ounce can of diced tomatoes (I like fire-roasted)
  • plain yogurt and cilantro to garnish, optional
  • rice or noodles, optional

Directions:

  1. Place the sliced onions on the bottom of the crock pot.  Layer the chicken thighs on top.  Season well with curry powder and salt.  Open the can of tomatoes and dump on top.
  2. Cover and cook on high for 4 hours or low for 6 hours.  When ready to serve, shred the chicken with a fork and mix all the ingredients.  Serve on top of optional rice, garnish with optional yogurt and cilantro, and enjoy!

Explore, experiment, enjoy! — Dana


To view even more of Dana’s unique recipe, you can visit her at Frugal Girlmet!

Table Decorations for Women’s Christmas Luncheon

Merry Christmas Everyone!!!

On behalf of myself and my boys, Tristan and Asher, I would like to wish you all a very Merry Christmas Day. Recently I celebrated with my church, River City Church in Owensboro, KY, attending the Women’s Christmas Luncheon. It was a lot of fun and a great way to fellowship with others. I would like to share with you some of my ideas that I used to put together to make table settings and chair decorations for the luncheon.

Items Needed to Decorate the Table:

20131213_2034542 Tablecloths (a long white one and a gold shorter one overlapping)
8 Red Napkins – poinsettia design
8 Placemats
8 Poinsettia Dish settings with silverware, coffee cups, and drinking glasses
2 Silk poinsettias
Greenery – I had one premade with snowmen
Tealights
Greenery Tealight Holders

Arrange the placements, napkins, dishes, cups, and silverware around the table. Place the decorations of your choice in the middle of the table.

Items Needed to Decorate the Chairs:

20131213_203520Gold ribbon
Red mesh Ribbon
Narrow red ribbon
3″x5″ Canvas
Red and White acrylic paints
Green paint marker
Paint brushes
Hot Glue gun

Paint the canvas using the red and white paint. Let dry. Write a favorite Bible verse with the green paint marker. Let dry. Cut about 8” of the narrow red ribbon, form a loop, and hot glue to the back of the canvas to hang the decoration.
Using the gold ribbon and the painted canvas, tie it to the top of the chair with a double knot. Now, tie the red mesh ribbon on top of the gold ribbon, it will curl up. Then take another piece of gold ribbon and make a simple bow. Tighten and you are done. (Use this photo to see the details.)

Everyone will love the time and effort you took to make things beautiful!

Merry Christmas!

Amy

Discipling Our Children at Home

Over the last several months, the teaching team at our church has been speaking about discipleship. They have taught us what a disciple is, which is basically a student; what it looks like to disciple others, which is to bring friends and family along with us on our journey with Jesus; how time, talent, and treasure are all a part of being a disciple (giving); and so much more! If you are interested in hearing the messages in this series, please listen here.

Discipling Our Children at Home www.GirlfriendsCoffeeHour.com #goandmake #homeschool #discipleship

As we began this series, and moved forward each week, I wondered whether I was discipling anyone. I am a disciple myself, a follower of Christ, and I am striving to lean in and follow Him even more carefully as the weeks and months go on. I do write for a few blogs as a contributor and on my own blog, and those could be considered a way of discipling. I pray that what I write encourages someone along their faith-walk at some point. But I kept asking myself, who am I discipling? How can I disciple someone?

Then it dawned on me.

Those I am discipling every day are my children.

You may think that is an odd realization since, as a mom in her 8th year of homeschooling, I am with my children all day, every day. Still, it took me a while. I guess I was looking outward, towards a church ministry area or leading a bible study in my neighborhood, as many of my friends and acquaintances are doing. However, in this season of my life, while I am busy homeschooling and raising my five children from ages 3 to 16, I have limited opportunities to disciple those outside of my own home. But what a ripe-for-the-harvest ‘field’ I have right here before me! Once I realized this, I was even able to encourage another friend who was asking the same questions that I had been asking.

Homeschooling. This is our ‘discipleship program’! What a blessing it is to be able to be home, to learn together, to stop academics as needed to teach biblical principles and to correct behavior, to discipline, and to disciple, as we walk the homeschooling journey together with our children.

I want to encourage you, homeschool mama, as you move through each day and especially in this holiday season—do not compare yourselves to others. God has given you very specific duties to carry out with your own children! Perhaps you can fit in some volunteer hours at church or in a shelter in your area, or in some other setting where you are able to disciple others. Maybe you were able to participate in the Christmas cookie exchange, hang hundreds of tiny lights on the exterior of your home, and bake holiday breads for 10 days straight in preparation for the local holiday bake sale.

If you cannot and did not, please do not despair.

God has you in this season right now to pour into your children. On the days when it seems too difficult, and you feel like you have nothing left, lean further into Him. He will give you the strength, the wisdom, His words to pour into and speak over your children, and to lead them just a bit closer to Him each day!

Do you have any suggestions for discipling our children? I would love to hear them, so please leave a comment below!