January 9, 2025

Pickled Red Beet Eggs

Pickled RB Eggs hand resize

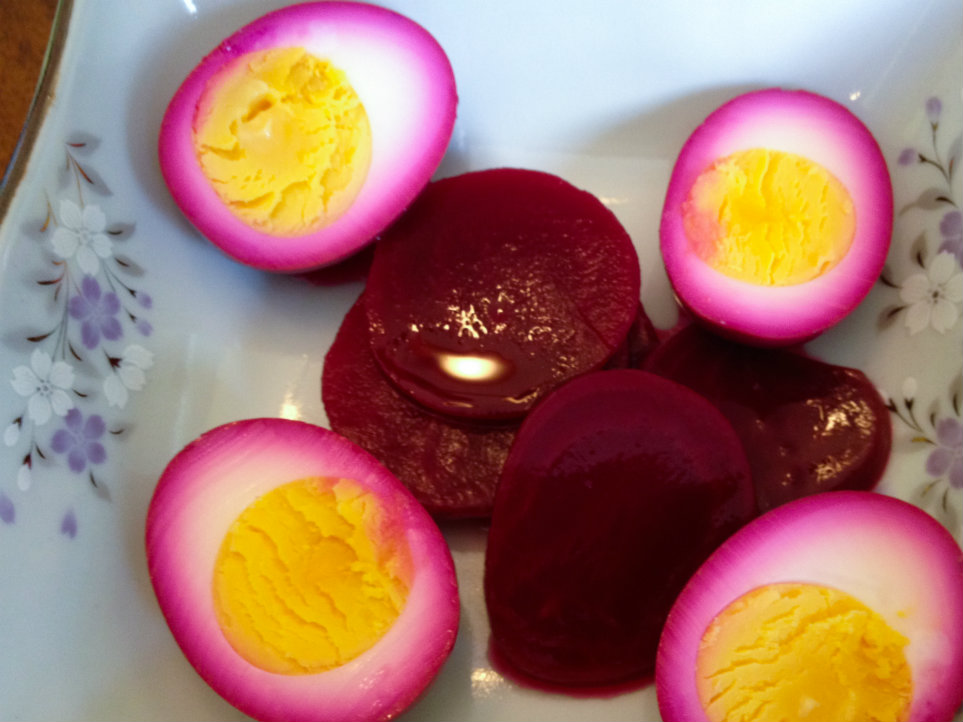
I remember as a kid being very sad one Easter Sunday.  It was because, when I peeled one of the eggs I worked so hard to paint and dye and sticker-ize and bedazzle—all that work—the inside looked just like a plain, un-dyed egg!  (I hope my Mom told me that beauty is only skin deep.)  But later on in the day, I was delighted when my Mom took the big container of Pickled Red Beet Eggs out of the refrigerator! When you cut into one of these purple beauties – surprise! – the color went all the way through to the yolk!

This recipe is a great way to use up those hardboiled eggs.  I’ve found my kids like dyeing them way more than they like eating them, so I am usually guaranteed half a dozen eggs to use in this dish.  This is an old Pennsylvania Dutch recipe that came from my Mom and her mother, in Lancaster County, Pennsylvania.  You can adjust the ratio of vinegar to sugar, but I like how these are sweet-tart and firm.  Some people add very thinly sliced onions to the beet brine, and others add whole cloves.  I like them with just these 4 ingredients.

You’ll want to let these soak for at least 2 days.  I wouldn’t let them sit more than a week, but I really doubt they’ll last that long!  Make sure the eggs and beets are in a deep and narrow container so everything is submerged – if you go shallow and wide, your eggs won’t color evenly and you’ll have to rotate them at least 2 times a day.  So raid the kids’ Easter baskets and start pickling!

Pickled RB Eggs resize

Pickled Red Beet Eggs

Ingredients:

  • 6 eggs
  • 2 cans sliced beets (not pickled beets)
  • 1/3 cup sugar
  • 1/2 cup vinegar (you can use white or apple cider)

Directions:

  1. In a sauce pan, place eggs in one layer.  Fill pan, covering the eggs with an inch of water.  Cook on high until a boil is just reached, then immediately remove from heat and cover with a lid.  Set a timer for 13 minutes.  When the time is up, drain the eggs and fill the pan with ice and water.  Let cool.
  2. Peel the cooled eggs and put them in a deep container with a lid.  Dump the two cans of beets and their juice into the container, followed by the sugar and vinegar.  Swirl around to dissolve.  Store in the refrigerator for at least 2 days, making sure the eggs are submerged (or turning them if they are not.)  Cut eggs in half and serve with beets.

Explore, experiment, enjoy! — Dana


To view even more of Dana’s unique recipe, you can visit her at Frugal Girlmet!

Get This Workout for Results in Your Weight and Fitness

change

Have you ever said things like this? 

  1. “I have been doing this workout for the past ten years, why am I not seeing any results?”
  2. “When I used to workout, I did…….,  now I can’t stick with anything?”

What is going on?  What is happening?

First, if you are like me, you like routine and schedules.  But even with a routine, workout programs have to change for there to be results in your weight and fitness.

Second, the reason you may not be able to stick with your workout is because your life and body may be different in this season of life.  Think back how your life was when you were consistently exercising.   How is it different today?  Consistency is what gets results in your weight and fitness goals and, if you are trapped by thinking you have to exercise the way you did in the past, consistentcy will always be a struggle.

If you cannot fit in a workout to your schedule or you have hit a plateau in your fitness or motivation, look at changing one of four things.  Try these suggestions for your workouts:

Your TYPE of Exercise

  • 1 minute intervals of jogging during your walk every 5 minutes for 30 minutes.  This will save time by allowing you to accomplish more during a shorter period of time.
  • Replace one day of cardio with strength training.  Be sure you are lifting the appropriate amount of weight to get results and think outside of the box. After designing a strength training program at home for a client, she is more consistent because she does not feel the pressure to get to the gym for a workout.

Your INTENSITY or How Hard You Work

  • Decrease your exercise time and work a little harder by either walking faster or increasing your intensity on an exercise machine.
  • Increase your weights in your strength training program.  If you are lifting the same amount of weight as you were last year, it is time to increase your weight by 1-5 lbs.

   Your DURATION of Work Out

  • Pick one day a week to add an extra 15 minutes to your cardio time.  Avoid putting this pressure on yourself to do it for every workout which can lead to feeling overwhelmed and giving up.

Your FREQUENCY or Number of Days You Work Out

  • Add one more day of exercise to your schedule.   What?  That can’t happen, right?  Think about this, decrease your time of exercise so that you can fit it in, work harder during that time and add another day for a quick workout.

The Bible tells us in Ecclesiastes 3:1,

There is a time for everything, and a season for every activity under heaven.”

As women, we go through different seasons of life. It may be time for you to change our way of thinking to get results in your weight and fitness.

In Good Health,

Crystal

Deviled Eggs

2014-04-13 19.03.55

Okay, before we go any further…if you want to make deviled eggs for your Easter celebration meal…go to the store TODAY and buy your eggs.  Seriously, really fresh eggs are v-e-r-y difficult to peel!  Been there…done that!  Anyone else?  And also, may I suggest you purchase the very best (i.e., the most nutritious, healthiest) egg your money can buy.  Yes, they may be a bit more expensive but SO worth it!

Our recipe today is for classic deviled eggs AND variations.  I think that once Spring has sprung, most gatherings where food is involved have a plate or two of deviled eggs on the table.  I know this is true for our family; how about yours? And I am sure that all of us have had ‘the world’s best’ deviled eggs…and probably some of the world’s worst, too.

In my quest to present to you the BEST, I took a peek at the way that Alton Brown (of the Food Network) does his hard-boiled eggs.  Mr. Brown is a food geek (don’t we love that about him?) and a scientist.  So, he is a valued source for me when I want to get down to the basics.  Want to know how Alton Brown prepares his hard-“boiled” eggs?  Check out this video.

Pretty cool, hmmm? (I know…punny! How can steamed eggs be cool?!?) His is a great method, and, by my experience, works perfectly each and every time. These eggs turn out with tender whites and beautifully yellow yolks…with not a bit of a tinge of that green edging that so many hard-boiled eggs have! Now here on the Monday installment of At Home w/ GCH, I try to present recipes to make healthy but-oh-so-yummy! foods. Today’s recipe fits within those parameters because we have reduced the amount of mayonnaise and lightened the mixture up with some plain Greek yogurt. The average deviled egg half, prepared traditionally, contains approximately 60-65 calories. Now that is not too bad if you are only putting one half on your plate…but, honestly, who eats just one half? Prepared using the following basic recipe (not the variations), each deviled egg half has approximately 30 calories. (So to me that means I can indulge and eat both halves!)

2014-04-13 20.22.31

Deviled Eggs (And Variations)

Ingredients:
8 perfectly steamed eggs (see video below)

3 tablespoons mayo (even better: use canola mayo)
3 tablespoons plain Greek yogurt
2 teaspoons Dijon mustard
1-2 teaspoons pickle juice (we like bread&butter pickles)
freshly ground lemon pepper, to taste
smoked paprika

Directions:

  • With a sharp knife, halve each of the eggs, removing the yolk; set aside.
  • Using a wire mesh strainer, push the egg yolks through the mesh one at a time. (Or, if you prefer, simply mash the yolks to the consistency you prefer)
  • Add the mayo, yogurt, and mustard to the yolks and combine. Slowly add the pickle juice ‘til very creamy
  • Add pepper to taste
  • Dust with smoked paprika

Decision time: either use this healthy but-oh-so-yummy version of the classic egg filling or try any or all of the varieties below!

  • To fill the egg white halves, you can either simply use a small spoon, or fill a sandwich bag with the mixture <don’t forget to squeeze out the air AND seal the bag!>, then snip just the tip off one corner, and swirl the yolk mixture into the indentation of each egg half.

Variations: (shown in the picture above)

To the yolk mixture, you can add any one of the following:

  • finely chopped avocado and a squeeze of lime juice, OR
  • a sprinkle of garam masala (or curry powder); top with a small mango chunk,

Or top with:

  • a bit of fresh dill, or snipped fresh chives
  • finely chopped apple and walnuts; then top w/ a bit of blue cheese
  • chopped Greek olives and a bit of feta cheese
  • finely chopped tomatoes and some crumbled bacon

God loves you!  ♥  (Don’t ever forget that!)

♥  coleen


Tzatziki Wrap

Tzatziki Wrap resize

What a fun word to say:  Tzatziki!  With spring in full swing now, I am in love with using fresh herbs in as many ways possible.  This recipe for my Tzatziki Wrap uses a small handful of dill. Dill is a lovely thing to grow in a windowbox, if you can, or in your garden, because it goes with so many other flavors and cuisines.  If you have leftover dill after making the tzatziki, use it on fresh or smoked salmon.

Tzatziki is just a fancy way to say “yogurt dip.”   It is found in Greek and Mediterranean dishes, and goes well with all grilled meats—chicken, beef, lamb, salmon—as well as vegetarian dishes like falafel.  Blend this up in your food processor in five minutes, and enjoy for lunch or a light dinner tonight!

Tzatziki Wrap (Makes two wraps)

Ingredients:

  • 1/2 cup plain yogurt (Greek yogurt or regular.  Avoid nonfat as the texture is too runny)
  • 1 big handful dill sprigs, any tough parts trimmed away
  • juice of 1/2 lemon
  • salt and pepper
  • 1 teaspoon minced garlic
  • 1/2 large cucumber, peeled and seeded
  • 1/2 red bell pepper
  • 1/2 green bell pepper
  • 1 cup baby spinach, or a few leaves of romaine lettuce
  • 1 cooked chicken breast
  • tortillas or pita bread for wrapping

Directions:

  1. Make the tzatziki:  In a food processor or blender, blend the yogurt, dill, lemon juice, salt, pepper, and garlic together.  Cut the half a cucumber in half again, and add one half to the blender and combine.  (You should now have one-quarter of a cucumber left.  Math!)  Refrigerate the tzatziki until ready to use.
  2. Slice the peppers and cucumber into very fine strips.  If you are using romaine lettuce, wash and dry the leaves and stack them on a cutting board.  Cut the leaves into fine strips.  Mix the peppers, cucumber, and lettuce in a large bowl and toss to combine.
  3. Very thinly slice the chicken breast.  Prepare your tortilla or pita bread for filling.  (I always warm up tortillas in the microwave, covered with a damp paper towel, so they’re pliable and won’t break.)  Fill tortilla with chicken breast slices, vegetables, and a big drizzle of tzatziki.  Roll up and eat, with more tzatziki if you like.

Cutting carbs, or do you have leftover wrap filling?  Toss with tzatziki and eat it like a salad!  It also goes great as a dip—try with carrots.

Explore, experiment, enjoy! — Dana


To view even more of Dana’s unique recipe, you can visit her at Frugal Girlmet!
Healthy Crockpot Chicken Tortilla Soup

chicken tortilla soupIt is one the busiest times of the year for me. With two kids at baseball park almost every night of the week and balancing work and home life, once again, I could not survive without my Crockpot.

One of my new favorite recipes is this Healthy Crockpot Chicken Tortilla Soup.  It leaves you feeling full, yet it is  light and healthy, and a crowd pleaser at my home.  Check out these easy ingredients and directions.

Healthy Crockpot Chicken Tortilla Soup

Ingredients

1# boneless, skinless chicken breast
1 (15 ounce) can of sweet whole corn, drained
1 (15 ounce) can of diced tomatoes, drained
1 (15 ounce) can of pinto beans, drained
5 cups of chicken stock
1 medium onion, chopped
1 medium red pepper, chopped
2 cloves of garlic, chopped
½ teaspoon chili powder
2 teaspoon ground cumin
1+½ teaspoon kosher salt
1 teaspoon pepper

Directions

1. Place chicken breast in Crockpot
2. Pour all ingredients over chicken and stir together
3. Cook 4 hours on high or 7 hours on low
4. Prior to serving, remove chicken and shred with fork and knife; place back in Crockpot

Serves 8
Calories – 300
Fat – 3grams
Protein – 30grams
Fiber – 9grams

Tip:  To kick it up a little for the kids, I add a little shredded cheese with a healthy portion of crushed tortilla chips on top.  Add this to your menu this week and double it, if desired.  With this Healthy Crockpot Chicken Tortilla Soup, you can have two meals in one week for those busy late night evenings.

In Good Health,

Crystalball season

Strawberry Muffins (GF)

2014-04-03 11.47.32

So, I don’t know about your area, but we have had strawberries in abundance here in upstate NY…and they have been beautiful and fragrant and delicious!  My granddaughter, Kaylie Joy, just LOVES strawberries!  I had made a batch of these muffins and when she tasted one, she asked if we could bake some together…how could i say ‘no’?!  We actually doubled the ingredients and it worked very well. And we baked them up as a dozen standard size muffins and 3 dozen mini-muffins.  In either size, they baked beautifully!

kayliemuffins
This recipe (adapted from a similar one over at the Spunky Coconut – one of my very favorite gluten free, refined sugar free blogger/bakers) fits well into our healthy but-oh-so-yummy point of view:

  • uses honey or agave nectar and liquid stevia rather than refined white sugar
  • are gluten free with protein-rich almond flour and a bit of brown rice flour replacing wheat flour

Strawberry Muffins (make approximately 14)

2014-04-04 14.56.51

Ingredients:
2 cups almond flour
1/2 cup brown rice flour
1/2 teaspoon baking soda
1/2 teaspoon finely ground sea salt
1 cup fresh strawberries
1/2 cup coconut oil, liquified
1/3 cup honey or agave nectar
6-8 drops vanilla liquid stevia
1/2 teaspoon vanilla extract
3 large eggs, at room temperature

Directions:

  • preheat oven to 350
  • line muffin cups with paper liners
  • wash and dry strawberries; chop finely (not mushed, but small)
  • sift together the dry ingredients; set aside
  • pour liquified coconut oil, sweeteners, and extract into bowl
  • using electric mixer, beat for one minute, then add eggs one at a time
  • slowly add dry ingredients, beating just ’til thoroughly combined
  • by hand, gently fold in strawberries
  • scoop into muffin cups, filling almost to brim
  • bake at 350 degrees for about 25 minutes
  • remove from muffin pan onto cooling rack; allow to completely cool


Tip: Coconut oil needs to liquify in order to be blended into a batter. Depending on the time of year (summer..no problem; winter…a problem) you might need to warm it up. You could either scoop out the required amount of coconut oil and place it in a glass measuring cup on your stovetop as the oven preheats. Or it can be microwaved for approximately 30+ seconds (depending on the quantity you need) and then stirred. Either way add it into your mixing bowl and combine with other liquid ingredients prior to adding room temperature eggs.

♥   ♥   ♥   ♥   ♥

God loves you!  ♥  (Don’t ever forget that!)

♥  coleen

Irish Soda Bread

Irish Soda Bread resize

For last week’s recipe, I needed a carton of buttermilk.  I still had quite a bit left, and I knew I wanted to use it all up, so I found a few recipes that fit the bill.  None, however, sounded as tasty as this one for Irish Soda Bread!

A “soda bread” is simply a quick bread that uses baking soda and /or baking powder to rise, as opposed to yeast.  That means you don’t need to wait for it to rise, or worry about the yeast being old and feeble (or killing it with water that is too hot … or not hot enough to wake it up … Have I mentioned lately I hate baking with yeast?!?!)  This recipe comes together in a food processor, but if yours isn’t big enough to fit all the ingredients, or you just like using a pastry cutter, you can certainly put some elbow grease into it and do it the old-fashioned way.

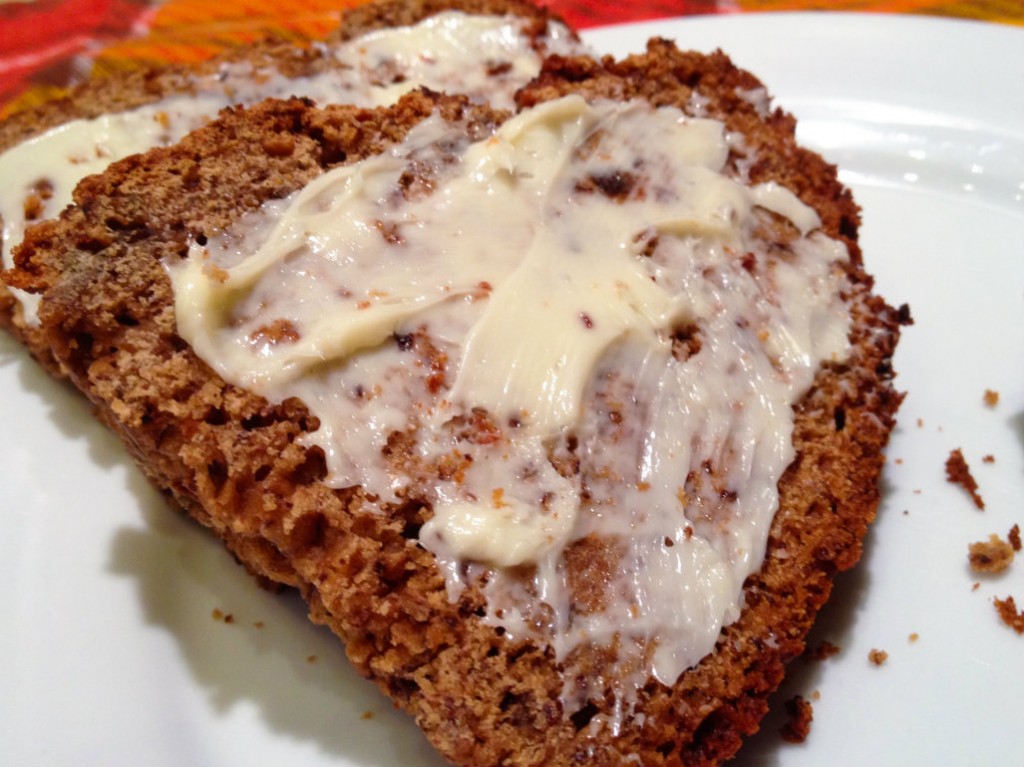
This recipe is based on a Martha Stewart recipe, but I made a few changes.  The biggest change is that, unlike regular soda bread that is kind of bland and dotted with raisins, this one has chopped currants throughout, so it is more of a currant-flavored bread.  Also, the original recipe called for caraway seeds, but I used anise seeds instead.  This bread keeps on the counter, wrapped tightly in plastic wrap and foil, for a few days.  Cut a big slice, cover it with butter, and match it up with your favorite coffee or tea.

Irish Soda Bread

Ingredients:

  • 4 cups flour
  • 1/4 cup sugar
  • 1 teaspoon salt
  • 2 teaspoons baking powder
  • 2 tablespoons anise seed
  • 4 tablespoon cold butter, cubed
  • 1 10-ounce box currants (or use 2 cups of raisins)
  • 1 1/2 cups buttermilk
  • 1 egg
  • 1 teaspoon baking soda
  • 3 tablespoons buttermilk

Directions:

  1. Preheat oven to 350*F.  Butter a large round Pyrex baking dish, all the way to the top.
  2. In the bowl of a large food processor, blend together the flour, sugar, salt, baking powder, and anise seed.  Add the cold butter cubes and pulse to blend.  Add in the currants and blend again.
  3. In a large bowl, beat together the buttermilk, egg, and baking soda.  Add this to the food processor and blend again until thoroughly mixed.  It will be wet and sticky!
  4. Scoop the bread dough into the buttered Pyrex dish and smooth into a mound.  With a brush or the back of a spoon, brush the top with the 3 tablespoons of buttermilk.  Bake for 70-80 minutes, or until a toothpick comes out clean.

Why Would We Want to Honor God with our Body by How We Eat and Exercise?

Why

Last week, in my blog, I encouraged you to think of the way you exercise and eat as an opportunity to honor God.  It can be motivating to do it unto Him and not out of our own desires and needs.  However, what if that is still not motivating enough?  How do we even get to the point of wanting to honor Him in all that we do, including how we eat and exercise?  If it is still a struggle, let me share with you what I have learned from my own experiences and why I now want to honor God with my body by how I eat and exercise.

God’s Love and Grace

My friend, when I think about where I would be without God’s love and grace in my life, I am overwhelmed with appreciation toward Him. He has set me free from the bondage of sin and shame and given me a life of joy and peace.  Let us not take for granted John 3:16 and remember that God sent His ONLY son to die for us. Ephesians 1:4 says He chose us to be ‘holy and blameless.’  In verse 6 he reminds us that He “freely” bestows on us His grace.  I am so blessed to walk in His amazing grace everyday that I want to honor Him in EVERYTHING I do.

By accepting and understanding the fullness of His love, grace, and forgiveness, you may discover you have a heart to give back to God.

My Confidence is in Him, Not Others 

Have you gone on crazy diets or tried to stay motivated to exercise because of what you, others around you, or someone from your past has said about the way you should look?  Ladies, we do not have to be imprisoned by the media, what others say, or the voices in our head.  Those pressures can lead to yo-yo dieting or extreme exercise which finally leads to quitting because of a lack of motivation.  How beautiful is it to hear God tell us that we are wonderfully made.

I will give thanks to You, for I am fearfully and wonderfully made;
Wonderful are Your works, and my soul knows it very well.
Psalms 139:14

Once we can become confident in who we are in Christ, and believe what He says about us, our motivation is for Him and not for ourselves or others.

If you are struggling to stay motivated, I encourage you today to stop “trying” to eat healthy and exercise on your own.  Take some time and devote yourself to learning and accepting two things that can change your life.

  1. God’s love, grace, and forgiveness He freely gives you

  2. What God says and feels about you

When we understand these truths, God’s says in John 8:32 that the truth will set us free.  Through this freedom, our motivation can change to give back and

 Honor God with our Body by How We Eat and Exercise

In Good Health,

Crystal

Lemon – Mustard Roasted Baby Potatoes

2014-03-29 20.57.45Sometimes I find that I am preparing the same boring side dishes to serve with our meals.  How about you?  So I always have my eye open for little tweaks or twists on the ‘same old, same old’ standards…like roasted potatoes.  These were on my menu this week. So I planned on buying some red potatoes.  And then, when I was at the grocery store, I found some lovely baby red potatoes.  Oh, happy me!

2014-03-29 20.08.29

Take a look around in the produce aisle at the grocery store or at the Farmer’s market.  They come in either red or yellow (Yukon Gold) or (my favorites!) even purple varieties.  When you find them, buy ‘em!  You will not regret it!  They can be boiled, steamed, roasted, baked, grilled…I suppose you could even microwave them.

These Lemon-Mustard Potatoes will get some crispy edges and have a yummy coating baked right on!  We enjoyed them with baked tilapia filets and steamed fresh green beans.  This recipe makes approximately 4 servings…easily doubled!

2014-03-29 21.05.09

Lemon – Mustard Roasted Baby Potatoes

Ingredients:
3 tablespoons extra-virgin olive oil
Zest of 1 large lemon
Juice of that lemon (approximately 3 tablespoons)
2 tablespoons Dijon mustard
1 tablespoon fresh thyme (or dried, if that is all you have)
1/2 teaspoon sea salt
1/2 teaspoon freshly ground black pepper (I used lemon pepper)

1 1/2 pounds baby red potatoes
1/2 teaspoon kosher salt
1/2 teaspoon freshly ground black pepper

Directions:

  • Preheat oven to 375. Line a heavy baking sheet with foil. Set aside.

For the vinaigrette:

  • Zest and juice the lemon.
  • In a large bowl, whisk together the lemon juice, lemon zest, olive oil, mustard, thyme, salt, and pepper until smooth. Remove 2 tablespoons of the vinaigrette and set aside. (I used this extra bit to coat the fish filets.)

Prepare the potatoes:

  • Scrub the potatoes.
  • Cut in half any that are larger so that all of the potatoes are approximately the same size.
  • Place the prepared potatoes into the bowl along with the vinaigrette.
  • Stir to thoroughly coat them.
  • Pour out onto the lined baking sheet.
  • Bake for 15 minutes, then turn over.
  • Check the potatoes with a thin-bladed knife after 25 minutes. They are done when the knife easily slides right through the potato. They might take up to 45 minutes depending on their size. (If not quite done, continue roasting.)
  • When done, scoop into a serving bowl and sprinkle with a bit more salt and pepper. Enjoy!

♥  ♥  ♥  ♥  ♥

God loves you!  ♥  (Don’t ever forget that!)

♥  coleen


Sweet Pea Soup

Sweet Pea Soup resize

I call both of my girls “Sweet Pea.”  My Mom called me “Sweet Pea” too.   So when I was working on a recipe to use up the last of my buttermilk and stumbled on this tempting combination of peas and mint, I couldn’t help but give it a cute name:  Sweet Pea Soup!

Peas and mint are a natural springtime match-up.  This soup comes together in half an hour, and with another half hour to chill,  it will be ready to eat.  I used both frozen peas and pea pods (which are all over my Farmer’s Market, and probably yours, too.)  If you can’t find pea pods, just double the frozen peas and use a full pound.  The recipe calls for you to strain the blended soup, which gives it a more silky, smooth texture.  You can skip this step if you are in a hurry, or if you like a little thicker body to your soup.  Either way I think you’ll love it, and so will all the “Sweet Pea’s” in your life!

Sweet Pea Soup

Ingredients:

  • 1 cup pea pods, any kind
  • 1 onion (sweet Vidalia would be nice, but I just used a regular white onion), chopped
  • 3 tablespoons butter
  • 8 ounces frozen peas
  • 2 cups chicken stock
  • 1 cup buttermilk
  • 1 handful mint leaves (save a few pretty ones for garnish)
  • salt to taste

Directions:

  1. In a large pot, heat the pea pods and onion in the butter.  Cook over medium heat for ten minutes until the onion is getting soft.
  2. Add the frozen peas and chicken stock.  Cook on medium for ten minutes.
  3. Turn off the heat.  Pour in buttermilk and mint.  Blend with an immersion blender, or transfer to a large blender and blend in batches until smooth.  Taste and add salt to your liking.
  4. Strain the soup through a mesh sieve (or not, your choice.)  Cool in the refrigerator for half an hour.  Serve chilled, with additional mint leaves for garnish.

Explore, experiment, enjoy! — Dana


To view even more of Dana’s unique recipe, you can visit her at Frugal Girlmet!