November 15, 2024

Stuffed Cabbage Soup

Stuffed Cabbage Soup

In the dead of winter, there’s nothing better than a hot bowl of soup.  With this Stuffed Cabbage Soup, you get all the flavors of a delicious, labor-intensive meal, without all the hard work!

I based this soup on a dish your Polish grandmother might make—called galumpkis—meat, rice and vegetables rolled up in soft cabbage leaves and baked in a savory tomato sauce.  Don’t have a Polish grandmother?  Never fear!  This soup comes together in half an hour and is very forgiving.  No green onions?  Garnish with dill!  Don’t eat rice?  Serve with a dollop of sour cream or Greek yogurt!  You can use ground beef, pork, or even turkey here.  Or do what I did and use leftover meatloaf or hamburgers.  See?  Easy!

Stuffed Cabbage Soup

Ingredients:

  • 2 cloves garlic, minced
  • 1 tablespoon olive oil or bacon fat
  • 4 cups thinly sliced cabbage
  • 2 cups chicken, beef, or vegetable stock
  •  2 cups water
  • 1 pound cooked ground beef (I used last night’s leftover meatloaf and broke it into small pieces)
  • 1/2 cup minced carrots
  • 1 15-ounce can of diced tomatoes
  • 1 teaspoon paprika
  • 1 teaspoon toasted and ground fennel seeds (or use ground fennel or anise)
  • 2 green onions, minced
  • rice, to serve

Directions:

  1. In a very large pot, sauté the minced garlic in the oil for one minute.  Add the sliced cabbage and stir.  Cook for about 5 minutes.
  2. Add the stock and the water.  Crumble the meat into the soup and add the carrots.  Stir to combine.
  3. Add the tomatoes, paprika, and ground fennel.  Turn the heat to medium-low and cover with a lid.  Cook for about 15 minutes.
  4. To serve:  Ladle soup into a big bowl.  Add a scoop of rice and sprinkle with minced green onions.  Eat hot!

Explore, experiment, enjoy! — Dana


To view even more of Dana’s unique recipe, you can visit her at Frugal Girlmet!


Southern Cassoulet

Southern Cassoulet

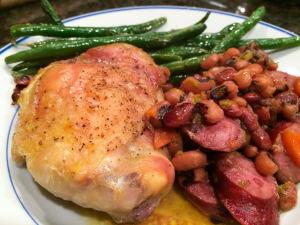
I know, it’s a weird title – French and Southern food together?  But this dish makes sense once you eat it.  Black-eyed peas are a good luck food for the New Year in the South, so why not dress it up a little with this interpretation of a French classic?  I present to you:  Southern Cassoulet!

Authentic cassoulet can take several days to prepare, and involves making a duck confit.  Too expensive and time consuming for me!  Chicken thighs sub in nicely.  Cook the black-eyed peas during the day (or use canned).  To make this even quicker, use two cans of white Northern beans.  I used just plain smoked sausage, but try out a pound of whatever kind of sausage you like.  Did you get a big Le Creuset pot for Christmas?  Now’s your chance to put your new enameled Dutch oven to the test!

Southern Cassoulet

Ingredients:

  • 1 pound dried black-eyed peas (or use two cans of other beans)
  • 1 pound smoked sausage, sliced
  • 2 large carrots, chopped
  • 3  stalks celery, chopped (use the leaves too)
  • 20 whole cloves of garlic (optional, but I thought they were delicious)
  • 1 large sprig of rosemary, minced (or use 1 teaspoon dried rosemary)
  • 4-6 large chicken thighs, skin on, bone in
  • 3 teaspoons olive oil
  • salt and pepper to taste

Directions:

  1. Cook the beans in plenty of water until tender.  This can take two hours or so.  If you are using canned beans, skip ahead.
  2. In a very large enameled Dutch oven, cook the sausage.  Add the carrot, celery, garlic cloves, and rosemary.  Add a little olive oil if things start to stick.  Saute over medium heat for 10 minutes until the vegetables are soft.
  3. Take the pot off the heat.  Drain the beans and add them to the sausage and vegetables, and stir to combine.  Season with salt and pepper.  On top of the bean mixture, place the chicken thighs, skin-side up.  Season with salt and pepper, and drizzle with the olive oil.
  4. Bake at 400*F for at least an hour, or until the chicken is cooked through with crispy skin.
  5. Good luck and have a Happy New Year!

Explore, experiment, enjoy! — Dana


To view even more of Dana’s unique recipe, you can visit her at Frugal Girlmet!
Polish Sandwich

Polish Sandwich

Ladies, I’m not proud of this entry.  I mean, I AM proud of it, because this sandwich is seriously delicious!  It’s my attempt at copycatting a recipe from a hot dog chain in Southern California called Der Wienerschnitzel.  It comes pretty close to the original Polish Sandwich, with melted Swiss cheese, snappy sauerkraut, and tart pickles.  I haven’t been to Wienerschnitzel in years, yet I still found myself craving one of these babies.  (Sometimes you just gotta scratch that itch.)

But seriously, I am going to eat better next year.  No—really!  Bread will become a special treat, sugar will become verboten, and my veggie uptake will increase!  So as we finish out this year, I decided to give in to the desire for a Polish Sandwich, as a farewell to some not-so-healthy habits.  These sandwiches easy to make, and so satisfying.  You can use hot dogs or any kind of Polish-type sausage you like.  Try yellow or spicy brown mustard.  Find some good rye bread and make this sandwich.  You’ll take one bite and say Danke!

Polish Sausage

For each sandwich you will need:

  • a 5-inch piece of Polish sausage, or hot dogs, cut in half lengthwise
  • pat of butter
  • 2 slices rye bread
  • 1 slice Swiss cheese
  • 1/4 – 1/2 cup Sauerkraut, warmed up
  • 1 large dill pickle, cut lengthwise into quarters
  • yellow or brown mustard

Directions:

  1. Cook sausage or hot dogs until done and hot all the way through.
  2. Meanwhile, in a large pan, heat the pat of butter.  Put both slices of rye bread down in the butter.  Top one slice of bread with the Swiss cheese.  Cook over low until the cheese melts and the bottoms of the bread are lightly toasted.
  3. To assemble:  Place the plain (non-cheese) slice of bread on the bottom and squirt with mustard.  Top with two halves of the sausage (or three halves of the hot dogs, cut side down.  In between the sausage, place as many of the quartered pickles as you like.  Cover the sausage and pickles with hot sauerkraut.  Top with cheese-y slice of rye bread.  Cut in half and eat hot.

Explore, experiment, enjoy! — Dana


To view even more of Dana’s unique recipe, you can visit her at Frugal Girlmet!

Cornbread Stuffing with Sage and Sausage


Cornbread Stuffing with Sage and Sausage

How much of a recipe purist are you?   When you make a recipe for the first time, do you follow the directions to the letter, or do you start right in with the alterations?   When I make something for the first time, I like to be faithful to the source.  When I eat the finished product is when I start making changes in my mind for next time—Needs more salt.  Add cilantro and green onions.  Use more yogurt and less mayo….  So the first time I made Tyler Florence’s recipe for Cornbread Stuffing, I really liked it…but I knew I wanted to change some things and make it my own.  So here it is, just in time for your holiday parties: Cornbread Stuffing with Sage and Sausage!

This is a simple recipe that I make in two steps.  First is the cornbread, and second are the rest of the ingredients.  I even make the cornbread a day or two ahead—don’t worry if it’s a little stale, because you’ll be rehydrating it and baking it again.  Use any kind of sausage you like.   I make this with a one-pound log of plain old breakfast sausage, but you can try something spicier, smokier, or even get crazy and use chorizo!   The other thing you will want is fresh sage.  Use as much as you like – I use at least 3 tablespoons of minced fresh sage, but I think you could get crazy and use up to a quarter cup of it, if you really wanted it herb-y.  If you buy a bunch of sage, use the rest in roast turkey or chicken recipes – they’re a natural match.  (And I just saw this recipe that uses sage that looks amazing!  Replace the dried sage in the recipe for double the amount of fresh sage.)  For the cornbread, I always use Jiffy cornbread mix, because that’s what I grew up eating.  If you have a brand of mix you like better, or you make cornbread from scratch, try that.  The measurements might be a little different, but this recipe is really forgiving.  Just adjust your wet ingredients to make sure you get the right finished consistency.

Cornbread Stuffing with Sage and Sausage

Ingredients:

  • 4 boxes of Jiffy cornbread mix (or make your own cornbread)
  • 1 pound sausage, any kind
  • 3 onions, sliced into fine strings
  • 3 tablespoons (or more!) of minced fresh sage
  • 2 cups chicken or turkey stock
  • 1 cup milk
  • 4 eggs
  • salt and pepper
  • butter to grease the pans (or use a non-stick spray of your choice)

Directions:

  1. Bake the 4 boxes of cornbread mix according to the directions on the box.  I didn’t bother with muffin tins and just made the whole batch in a 9″x13″ cake pan.  Let cool.  You can make the cornbread a day or two in advance.
  2.  In a large pot, cook the sausage.  If you are using links, slice into small half-moons.  If you are using bulk sausage, cook and break it up with a spoon so you have little chunks.  When cooked, remove from the pan to the largest mixing bowl you have.  Do not drain the pan!
  3. While the sausage is cooking, cut the onions into skinny strings.  Cook the onions in the fat rendered from the sausage (or add more butter or olive oil if there isn’t a lot in the pan.)  Cook for about 15 minutes on medium, stirring so they don’t burn, until they are soft and caramel-colored.  Remove the onions to the big mixing bowl.
  4. Using your hands, crumble the cornbread into the bowl with the onions and sausage.  Add the minced sage and mix.
  5.  In a smaller bowl, mix together the stock, milk, and eggs.  Pour it over the cornbread mixture and fold to combine.  Season the whole thing with salt and pepper.
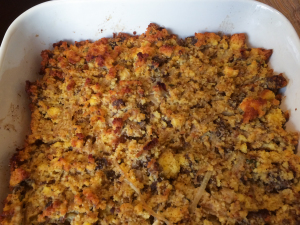
  6. Turn the cornbread out into a large greased casserole dish and bake uncovered for about 25 minutes at 375*F.  You’ll want to let it get a little crusty and brown on top.

Explore, experiment, enjoy! — Dana


To view even more of Dana’s unique recipe, you can visit her at Frugal Girlmet!
Rosemary Chicken and Potatoes

Rosemary Chicken and Potatoes

Once again, I’m presenting a recipe so simple, I almost hesitate to call it a “recipe.”  This takes 5 minutes to put together, and is so quick and simple you’re going to laugh if you’re not making this already.  This one pot Rosemary Chicken and Potatoes is the best!

If you don’t have a big Le Creuset Dutch oven (or something similar; I’m not a stickler for name brands), it’s time to put it on the Christmas list.  This heavy enameled pot makes stews on the stove top as well as roasted meats and veggies in the oven a snap.   The tricks to this recipe are the fresh rosemary and the bone-in, skin-on chicken thighs.  The rosemary has to be fresh, because the oils that come out of the chopped leaves are what perfume the whole dish.  The chicken skin gets crispy and keeps the chicken moist.  Make sure that you don’t use too many thighs when you make this.  You want some space between the chicken pieces, so the air can circulate around them and crisp up the skin.

Ready for the easiest and tastiest one pot meal around?  Let’s go!

Rosemary Chicken and Potatoes

Ingredients:

  • 1 pound potatoes, any kind
  • 1 large  or 2 small onions
  • 1 1/2 – 2 pounds skin-on, bone-in chicken thighs (five thighs work best for us)
  • olive oil
  • salt and pepper
  • 1 large sprig of fresh rosemary

Directions:

  1. Preheat the oven to 375*F.  Wash the potatoes and cut into bite-sized chunks.  Cut the onion into large chunks.  Combine in the bottom of a large Dutch oven.
  2. Place the chicken thighs, skin side up, on top of the potatoes and onions.  Make sure there is space between the chicken pieces – you don’t want to crowd the pan too much.  Drizzle the whole pan—chicken pieces and down into the potatoes—with olive oil; use about 4 tablespoons.  Season the oiled chicken with salt and pepper.
  3. Strip the leaves from the rosemary and mince.  Sprinkle over the chicken and potatoes.
  4. Bake for one hour.  After an hour, set the temperature in the oven to 400*F, and cook for another 15-30 minutes, until the skin is golden and crispy.  Serve hot!

Explore, experiment, enjoy! — Dana


To view even more of Dana’s unique recipe, you can visit her at Frugal Girlmet!

Whole Wheat Ginger Snaps

Whole Wheat Ginger SnapsI saw Coleen’s post on Monday for her delicious-looking cupcakes, and I could almost taste them!  She used molasses, which got me thinking about that dark, almost smoky-sweet flavor.  I knew what I wanted – ginger snaps!  So I poked around online, found a recipe I liked, modified it for my house, and voila:  Whole Wheat Ginger Snaps!

These go great with milk for the kids, or coffee for grown-ups.  Heck, get a double dose of spicy and have these cookies with a chai latte!  There are plenty of pantry staple spices here, but the two kickers are molasses and candied ginger.  Check in the dried fruit section of the store.  I keep my candied ginger in the freezer – it will keep indefinitely (and if it’s out of sight, I won’t eat the whole bag in one sitting!)  I like to have it in the house because a big bite of it can calm a nauseous tummy.

If you have a cookie exchange this season, wow them with these boldly flavored cookies.  Your friends will thank you!

Whole Wheat Ginger Snaps

Ingredients:

  • 1 3/4 cups whole wheat flour
  • 2 teaspoons baking soda
  • 2 teaspoons ground ginger
  • 1 teaspoon cinnamon
  • 1 teaspoon salt
  • 1/2 teaspoon nutmeg
  • 1/2 teaspoon garam masala (or use 1/4 teaspoon ground cloves and 1/4 teaspoon finely ground pepper)
  • 1 cup packed brown sugar
  • 1 1/4 sticks butter, room temperature
  • 1 egg, room temperature
  • 1/4 cup molasses
  • 1/2 cup candied ginger, minced

Directions:

  1. First, put the butter in a large bowl and let it come to room temperature.  Put the egg next to it.
  2. In a medium bowl, mix together the flour with the baking soda, ground ginger, cinnamon, salt, nutmeg, and garam masala.
  3. In a large bowl, cream the butter with the brown sugar.  Mix in the egg and molasses.  Add in the minced candied ginger.
  4. A little at a time, mix the flour mixture into the butter mixture.  Refrigerate for one hour.
  5. Preheat the oven to 350*F.  On a Silpat liner or parchment paper, scoop out teaspoon-sized balls of cookie dough.  These will spread out, so give them some room.  I used a melon baller and it worked well.  Bake for 13 minutes.
  6. Let cool on the cookie sheet for a minute, then remove to a wire cooling rack.
  7. Don’t let the kids see these before dinner or you will be pestered until it’s time for dessert.

Explore, experiment, enjoy! — Dana


To view even more of Dana’s unique recipe, you can visit her at Frugal Girlmet!


Leftover Link-aPalooza

My girls, admiring the turkey!

My girls, admiring the turkey!

Esteemed Ladies of Girlfriends Coffee Hour, I come to you with my apron in hand.  I ask for your mercy.  I don’t have a new recipe for you on this Black Friday…this day after Thanksgiving.  Let me explain.

We moved to Austin, Texas two week ago, from sunny Los Angeles.  This was our first Thanksgiving apart from family, friends, and “home”.  I didn’t make any new recipes, and I didn’t even make anything that challenging:  mashed potatoes, roasted vegetables, and pumpkin pie.  My husband made the turkey and gravy, and we bought rolls from the grocery store.  And you know what?  I was pretty happy with it!  Sometimes it’s nice to not stress over big events.  So instead of jumping through hoops to make a new recipe specifically for a blog post today, I’m just going to post links to stuff I MIGHT make.

That’s right.  I’ve got the turkey carcass on the stove already, making a delicious-smelling stock.  I’m not sure what I’ll do with the rest of the meat, mashed potatoes, cranberry sauce, and gravy.  But here are some recipes I’ll probably be checking out tomorrow, Saturday, and Sunday.  And instead of worrying about it, I’m going to focus more on my kids, my husband, my health, and my sleep.  🙂

Ready for Link-aPalooza?  Let’s go!

This is for breakfast, minus the corn, and plus a little cranberry sauce:

http://www.foodnetwork.com/recipes/danny-boome/bubble-and-squeak-with-corn-puree-recipe.html

Still more mashed potatoes?  Maybe some Colcannon!

http://frugalgirlmet.blogspot.com/2012/03/colcannon.html

Lots of leftover cranberry sauce?  Go Ikea-style!

http://www.epicurious.com/articlesguides/holidays/thanksgiving/leftovers-cranberry-sauce/recipes/food/views/Swedish-Meatballs-350172

Stuffing from last week’s Thanksgiving Burger?

http://www.kraftrecipes.com/recipes/stuffing-topped-vegetable-bake-138240.aspx

And if you have extra pie?  EAT IT UP!!!

God Bless you all.  — Dana

Thanksgiving Burger

thanksgiving burger

If you’re anything like me, Thanksgiving is one of your favorite times of the year.  The best food, the best company (family, friends, fortuitous strangers), and the best traditions.  If you can’t wait for that one day a year, make this Thanksgiving Burger!

The secret ingredient is a box of bread stuffing mixed in with the turkey.  It adds moisture and the unmistakeable seasonings that really make this burger special.  Your toppings can vary—add gravy, sweet potatoes, whatever you like!  I made mine easy, with a quick smear of mayo, cranberry sauce, and lettuce.

Ready to taste the season before the day gets here?  Let’s give thanks!

Thanksgiving Burger

Ingredients:

  • 1 box bread stuffing mix (I used Stove Top)
  • 20 ounces ground turkey
  • 1/8 teaspoon granulated garlic
  • 1/4 teaspoon celery salt
  • 1 can cranberry sauce
  • for each serving:  1 hamburger bun, mayonnaise, a few leaves of lettuce

Directions:

  1. Prepare the stuffing mix according to the directions on the box.  Let cool a little.
  2. Combine 1 cup of prepared stuffing with the turkey.  (Refrigerate the rest of the stuffing and eat it later, or use it on top of casseroles!)  Form four 5-ounce burgers, and refrigerate for at least an hour so they firm up a little.
  3. Fry the burgers in a non-stick pan.  Use a little oil of your choice, and cover the pan with aluminum foil.  Cook on medium heat for about 6-8 minutes, until done on one side with a little crust.  Flip, cover, and cook again.
  4. To serve:  give a light coating of mayo to both top and bottom hamburger buns.  Add a couple teaspoons of cranberry sauce to the bottom bun, then the lettuce.  Top with the burger and the top bun.  Serve hot!

Explore, experiment, enjoy! — Dana


To view even more of Dana’s unique recipe, you can visit her at Frugal Girlmet!

CrockPot Black Bean Soup

I love my Crockpot. I have found, however, that almost all the recipes in my Crockpot cookbooks are for meat-based entrees. That’s all well and good, but there are some times you want something lighter, or vegetarian (or that isn’t made with a can of cream of chicken soup!) I ordered a book on Amazon.com, hoping to find something new and different, and I did: “Fresh From the Vegetarian Slow Cooker” by Robin Robertson.

The recipe for Black Bean Soup was easy to follow, and I had everything I needed for it already in my pantry and fridge – and I’m betting you do, too. This came out better than I expected!  The texture was both chunky and smooth after I used my immersion blender (you can put your soup in the blender or food processor and pulse lightly, or even use a potato masher to get your desired consistency.)
Serve this with chopped green onions, cilantro, sour cream, shredded cheese, salsa, tortilla chips—any or all of the above.  Terrific!
 
(Sorry about the photo. It’s bean soup, and it’s delicious and nutritious, but there’s just no way to make it look glamorous in a photo!)
gchdanablackbeansoup
 
Black Bean Soup
(recipe courtesy “Fresh From the Vegetarian Slow Cooker” by Robin Robertson)
 
Ingredients:
  • 1 tablespoon olive oil
  • 1 medium onion, chopped
  • 1 carrot, chopped
  • 1/2 green (I used red) bell pepper, seeded and minced
  • 2 garlic cloves, minced
  • 2 cans (15.5-ounces each) black beans, drained and rinsed
  • 1 can diced tomatoes, left undrained
  • 4 cups stock (I used less, probably closer to 3 cups)
  • 2 bay leaves
  • 1 teaspoon ground cumin
  • 1 teaspoon dried thyme
  • 1/4 teaspoon cayenne pepper
  • salt and pepper
  • 2 teaspoons fresh lemon juice (optional)
Directions:
  1. Heat oil in a large skillet over medium heat. Add the onion, carrot, bell pepper, and garlic; cover and cook until softened, about 5 minutes.
  2. Transfer the cooked vegetables to a slow cooker, add the beans, tomatoes and their juice, stock, bay leaves, cumin, thyme, and cayenne, and season with salt and black pepper. Stir to combine. Cover and cook on LOW for 8 hours.
  3. Remove and discard the bay leaves and taste to adjust the seaosonings.  Just before serving, stir in the lemon juice, if using. To thicken, puree at least 2 cups or up to one half of the soup solids with an immersion blender used right in the CrockPot, or ladled into a regular blender or food processor and returned to the CrockPot.  Serve hot.

Explore, experiment, enjoy! — Dana


To view even more of Dana’s unique recipe, you can visit her at Frugal Girlmet!

Spinach Salad with Sundried Tomato Vinaigrette

Spinach Salad with Sun-dried Tomato Vinaigrette

This recipe, Spinach Salad with Sundried Tomato Vinaigrette, came from one of those happy accidents we all sometimes have.  Serendipity!  (Does anyone remember those books?) I was in the middle of  making a Caesar salad for dinner one night, and realized I was out of both eggs and anchovy paste!  I had half of a vinaigrette made, so I looked in the refrigerator for something to make it pop, worthy of a dinner salad.  There—far, far back on the shelf—was a nearly empty jar of sun-dried tomatoes.  Hmmm….

I put the ingredients for the dressing I’d already mixed in my food processor and emptied the jar of sun-dried tomatoes right in on top. I had about 2 tablespoons of sun-dried tomatoes and almost a quarter cup of sun-dried tomato-flavored oil. Whiz, whiz!!  And taste – amazing!  Tart and tangy but it needed something a little creamy and fatty to offset it.  Aha!  Avocado and goat cheese!  Now, if you don’t have fresh herbs, just use small pinches of dried…or skip it, no biggie.  Dinner is done!  Et tu Caesar?  Who needs ya?!

Spinach Salad With Sun-dried Tomato Vinaigrette

Ingredients:

  • 1/2 teaspoon Dijon mustard
  • 1 clove garlic
  • 1 tablespoon fresh basil leaves (I use the flowers from my plants, too)
  • 1/2 teaspoon fresh oregano
  • 1/2 teaspoon fresh thyme
  • 1 tablespoon rice wine vinegar
  • splash of balsamic vinegar
  • salt and pepper
  • 2 tablespoons sun-dried tomatoes packed in oil, plus as much of the oil as you can get out of the jar
  • olive oil
  • 1 bag of baby spinach leaves (wash again, no matter what the bag says!)
  • 1/2 red bell pepper, sliced
  • 1 avocado, sliced
  • 2 ounces soft goat cheese, crumbled
  • cherry tomatoes, sliced in half

Directions:

  1. In your food processor, buzz together the mustard, garlic, herbs, and vinegars to combine.  Make sure the garlic and herbs are well broken down.
  2. Add the sun-dried tomatoes along with as much oil as you can get out of the jar; and salt and pepper.  Combine again.  Check the consistency and add olive oil if you’d like to thin out the dressing.
  3. Assemble the salad – a big bed of spinach, with bell pepper, sliced avocado, goat cheese, and cherry tomatoes on top.  Apply dressing liberally!

To make it a meal, you can add black olives and leftover cooked chicken (come to think of it, grilled shrimp might be good on this too!)  Serve with crusty bread and a white or rosé wine.

Explore, experiment, enjoy! — Dana


To view even more of Dana’s unique recipe, you can visit her at Frugal Girlmet!