March 28, 2024

Oven-Roasted Pork Chops with Lemon-Caper Sauce

Pork Chop with Capers
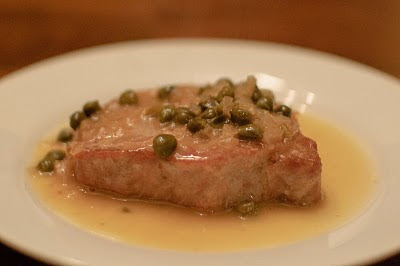
Where others have a sweet tooth, I have a sour tooth.  I’ve been known to use only vinegar, and skip the oil, when dressing my salad.  I eat cornichons like other people eat bonbons.  So when I saw this recipe for Oven-Roasted Pork Chops with Lemon-Caper Sauce , I knew I was going to like it.
Using a recipe from my “Complete America’s Test Kitchen TV Show Cookbook”, I skipped the step of brining my pork chops, mostly because I didn’t read the recipe far enough in advance to do it before dinner. They came out fine without it, and were very juicy. These were easy, quick, and nearly fool-proof. They were tart and tangy (but not puckery, so if you are not a sour-lover like me, you won’t be put off.) 
 
Oven-Roasted Pork Chops with Lemon-Caper Sauce
(adapted from The Complete America’s Test Kitchen TV Show Cookbook)
 
Ingredients:
  • 4 pork chops, about 1+1/2 inches thick, trimmed of excess fat
  • 2 tablespoons vegetable oil
  • 1 medium shallot, minced
  • 1 cup chicken broth
  • 1/4 cup juice from 2 lemons
  • 2 tablespoons capers, drained
  • 3 tablespoons butter, softened
Directions:
  1. Preheat oven to 450 degrees. Heat the oil in a large skillet over high heat, and brown the pork chops on one side, for about 2 minutes. Flip and brown the other side, another 2 minutes.
  2. Transfer the chops to a foil-lined baking sheet, or large, wide baking dish (so they aren’t crowded or touching each other.) Roast in the oven until the internal temperature reaches 140 to 145 degrees on a thermometer, about 15 minutes, turning them over halfway through the cooking time. Remove from the oven, place on a platter, and cover with aluminum foil. Let them rest for about 5 minutes, and check to make sure the internal temperature has reached 150 degrees.
  3. While the chops are in the oven, add the shallot to the skillet you cooked the pork chops in, and cook over medium heat until softened, about 30 seconds.
  4. Increase the heat and add the broth, stirring to scrape up any bits stuck to the pan. Add the lemon juice and capers and cook until the sauce reduces to about 1/3 cup, about 4 minutes.
  5. Off the heat, whisk in the butter, and pour over the pork chops.

Korean Sweet and Spicy Chicken


Korean Sweet and Spicy Chicken

This Korean Sweet and Spicy Chicken is GOOD.  My family scarfed it up last night.  If you don’t have gochujang – Korean red pepper paste that is both fruity and fiery – you can add hot sauce instead.  The longer you marinate the chicken, the better, but don’t go more than 24 hours.  You can put this together in the morning before work and come home and cook it.  Serve with rice, a salad, or a full table of ban chan!

Korean Sweet and Spicy Chicken

Ingredients:

  • 2 pounds boneless, skinless chicken thighs, sliced into strips
  • 1/4 cup soy sauce
  • 1 tablespoon gochujang – or more! – or hot sauce of choice
  • 2 tablespoons ketchup
  • 3 tablespoons brown sugar or honey
  • 1 teaspoon grated ginger
  • 3 cloves garlic, minced
  • 2 tablespoons rice or apple cider vinegar
  • 1 tablespoon sesame oil
  • 1 tablespoon vegetable or olive oil
  • sliced green onions and sesame seeds, to serve

Directions:

  1. Place the chicken in a large Ziplock bag, or other resealable / Tupperware-type container.  Add the soy sauce, gochujang, ketchup, brown sugar, ginger, garlic, vinegar, and sesame oil.  Mix thoroughly to combine.  Let marinate at least one hour, but less than 24 hours.
  2. In a large skillet, add 1 tablespoon vegetable or olive oil.  When hot, add the chicken in two batches, stirring occasionally, and making sure both sides get browned, about 5-8 minutes per batch.  Discard any leftover marinade.  Serve chicken heaped in a bowl, topped with sliced green onions and sesame seeds.
Explore, experiment, enjoy! — Dana

To view even more of Dana’s unique recipe, you can visit her at Frugal Girlmet

Chocolate Zucchini Muffins

choc zucchini muffins

Happy Fall, everyone!  Time to harvest – clean out your garden, gather all your herbs, and start prepping for the cold.  If you have any zucchini left on your vines, pick them and make this!  Ready?  Go!

Chocolate Zucchini Muffins

Ingredients:

  • 1/3 cup unsweetened cocoa powder
  • 2 cups flour (I used half regular flour, half whole wheat)
  • 1 teaspoon baking powder
  • 1 teaspoon baking soda
  • 1/2 teaspoon salt
  • 1/2 teaspoon cinnamon
  • 1 teaspoon vanilla
  • 1 stick butter, melted 
  • 2 eggs
  • 1 ripe banana
  • 1/2 cup brown sugar
  • 2 zucchini, grated
  • 1/2 bag chocolate chips (about 6 oz. or 2/3 cup)
Directions:
  1. Preheat oven to 350F.  Grease muffin tin or use paper liners.  (I just use Pam.)
  2. In a bowl, combine first six ingredients (all the dry ones).  
  3. In a larger bowl, whisk vanilla and melted butter into eggs, then mash the banana and add that to the mixture.  Whisk in sugar and stir in grated zucchini.  Stir in the chocolate chips.
  4. A little at a time, stir the dry ingredients into the wet.  Pour into muffin tin and bake for 20-25 minutes.  
This recipe made 18 muffins for me.  We ate a bunch and froze the rest.  To thaw, microwave for 30 seconds, but be careful, the chocolate chips get all hot and melty again!
Explore, experiment, enjoy! — Dana

To view even more of Dana’s unique recipe, you can visit her at Frugal Girlmet

Pease Porridge

Pease Porridge

“Pease porridge hot, pease porridge cold, pease porridge in the pot, nine days old!”

 Yes, it’s a real dish; and, yes, it’s delicious hot (but I would recommend skipping it cold – and DEFINITELY don’t eat anything left out for a week!)  With fall coming next week, I thought I’d beat the rush and share my recipe for Pease Porridge.

Okay, I’ll be honest…this is just Split Pea Soup with less liquid added.  It comes out more like a stew—or even a pudding—when I make it like this.  Same ingredients though — if you want soup, just add 2 more cups of water or broth.  Easy!   You can add other ingredients to it as well – maybe a diced potato along with the veggies, or a smoked turkey leg as well as the ham.  Warm up your belly with this old favorite!

Pease Porridge

Ingredients:

  • 8 ounces of ham, diced (use Soyrizo for a vegetarian version)
  • 1 onion, diced
  • 1 cup diced carrots
  • 1 cup diced celery
  • 1 pound bag of split peas
  • 4 cups chicken broth
  • 2 cups water
  • 1 bay leaf
  • salt and pepper

Directions:

  1. In a large pot, saute the ham for a few minutes.  Add the onion, carrots, and celery and stir over medium heat until the onion is translucent.
  2. Add the peas, broth, water, and bay leaf.  Cover and simmer until thickened, 30 – 45 minutes.  Add more water if you like a thinner consistency (or add up to a full two or more cups of water or broth to make split pea soup.)  Taste and season with salt and pepper.

Explore, experiment, enjoy! — Dana


To view even more of Dana’s unique recipe, you can visit her at Frugal Girlmet

Pickled Okra


Pickled Okra

When we moved to Texas last year, I wanted to find some plants to grow in the flower bed.  I put in some basil, which I have to water nearly every day to keep alive and healthy, and the rosemary is pretty hardy.  The other edible that does well here in the sun is okra, but I hadn’t eaten enough of it last year to really decide if it was something I wanted to grow.  Then I had a Bloody Mary at a Cajun restaurant – and instead of olives on my toothpick, I found Pickled Okra!  It was love at first bite.

This is really my first time doing anything with these little guys, and I still have a  lot to learn.  They turned out tangy, crunchy, and delicious…and make me want to experiment more with them.  So, if you like a good cheese plate, add some of these offbeat pickles and keep everyone on their toes!

Pickled Okra

Ingredients:

  • 1 large clamshell small fresh okra (between 1 and 2 pounds)
  • 2 cups water
  • 2 cups white vinegar
  • 1/2 cup salt – use Kosher if you have it
  • 6 cloves garlic, peeled and smashed
  • 1 tablespoon mustard seeds
  • 1 teaspoon dried dill
  • 2 tablespoon sugar
  • 2 chopped hot peppers, or 1 teaspoon dried pepper flakes (optional)

Directions:

  1. Prepare the okra:  wash them and trim the tops.  You still want a little stem left, but not too much – I think between 1/4 – 1/2″ inch is good.
  2. Make the brine:  Add the rest of the ingredients to a large pot and bring to a boil.
  3. Pack the cleaned and trimmed okra into pint jars for canning.  First make a layer that point up, with the stems on the bottom.  Fill the jar with more okra, pointing down with the stems facing up, and jam them in there.  Depending on the size of the okra and how tight you pack them in, this will fill 2 or 3 pint jars.
  4. When the brine is boiling, pour the brine over the okra.  Make sure to spoon in the garlic cloves and spices – don’t waste that flavor!  If you don’t have enough brine to cover your okra, add boiling water to the jar so all your jars are filled to the top.
  5. At this point you can either hot water process them so they are shelf-stable, or just put the lids on tight and store in the fridge.  They’ll be good for a couple weeks in there if the brine goes to the top of the container.

Explore, experiment, enjoy! — Dana


To view even more of Dana’s unique recipe, you can visit her at Frugal Girlmet

Baked Salmon with Pesto Sauce


Baked Salmon with Pesto Sauce

Salmon is my favorite fish to make at  home.  It seems more substantial than fish like sole or trout, and its strong, meaty texture and flavor give it a lot of flexibility.  Make this Baked Salmon with Pesto Sauce and find out for yourself!

You can of course use store-bought pesto, but if you have basil growing in your garden, the rest is easy to rustle up at home.  This is how I like pesto – you can alter this to suit your tastes.  If you have any leftover pesto, try it on scrambled eggs, roasted vegetables, chicken, and of course over pasta!  (Or, want a different spin on pesto?  Try Coleen’s version!)

Baked Salmon with Pesto Sauce

Ingredients:

  • 1 large salmon filet, about 1/2 pound or more
  • 1 tablespoon olive oil
  • salt and pepper
  • 1 cup basil leaves
  • 2 garlic cloves
  • juice of 1/2 lemon
  • 1 tablespoon grated Parmesan cheese
  • 2 tablespoons pine nuts
  • 3 tablespoons – 1/3 cup olive oil

Directions:

  1. Preheat your oven to 375*F.  Line a baking sheet with aluminum foil.
  2. Place the salmon skin-side down on the baking sheet, and drizzle with one tablespoon of olive oil.  Season the salmon with salt and pepper.  Bake for 10 minutes, or until firm in the thickest part of the filet.
  3. While the salmon is in the oven, put the basil and garlic cloves in the bowl of a small food processor.  Pulse to combine.
  4. Add the lemon juice, Parmesan cheese, and pine nuts, and blend again.  Add 3 tablespoons of olive oil and blend.  Taste for seasoning – more lemon?  More Parmesan?  More garlic?  You can add more olive oil for a thinner texture – as much as half a cup if you like your pesto really thin.
  5. Serve the salmon hot from the oven with a healthy pour of pesto over the top.  Refrigerate leftovers.

Explore, experiment, enjoy! — Dana


To view even more of Dana’s unique recipe, you can visit her at Frugal Girlmet

Sausage Mushroom Frittata

Sausage Mushroom Frittata

When I was a kid, my Mom made two quiches as part of her dinner menu rotation:  a spinach quiche, and a sausage mushroom version.  I loved them both.  And I was going to make one for this week’s Girlfriends’ Coffee Hour blog post and then I realized:  I don’t need a crust!  I can turn my Mom’s quiche recipe into this Sausage Mushroom Frittata, which is just as tasty, saves calories when you don’t include a crust, and cooks up quicker to boot!

You can use any kind of cheese you like.  I think my Mom used Swiss, but my girls don’t like it, so I used Monterey Jack.  You can also mix some cheese into the egg mixture for a richer taste, but I wanted mine to be a lower-calorie meal.  I used bulk breakfast sausage (the kind you get in a tube, by the bacon), but you can use any kind of sausage.  Serve a slice of this frittata hot, with maybe a side salad and a piece of nice bread.  You can also have this for breakfast, of course, with some fruit or toast.  Get crazy – get cooking!

Sausage Mushroom Frittata

Ingredients:

  • 8 ounces bulk sausage
  • 8 ounces button or cremini mushrooms, sliced
  • 6 eggs
  • 1/3 cup whole milk (or use half and half for a richer taste)
  • salt and pepper
  • 2 or more slices of Swiss or Jack Cheese

Directions:

  1. In an oven-proof skillet, cook the sausage, crumbling it with your spoon as it cooks.  After 3 minutes, add the mushrooms.  Season them with a little salt – this helps draw the water out of the mushrooms.  Cover and simmer on medium for five minutes.
  2. Lift the lid and let all the water in the pan cook off.  If the pan looks dry, you can add a tiny bit of olive oil or butter and mix that in.  If it looks like the sausage left enough fat to lubricate the pan, go to Step 3.
  3. In a large bowl, whisk the eggs with the milk.  Season with salt and pepper.
  4. Turn on the broiler in your oven.
  5. Pour the eggs over the sausage mixture and stir a few times.  When the edges look set, put the cheese on top of the eggs and place the pan in the oven.   Make sure it’s not too close to the broiler!
  6. Broil for about 3-5 minutes.  Keep an eye on this!  Take it out when things look golden and bubbly.  Slice and serve hot!

Explore, experiment, enjoy! — Dana


To view even more of Dana’s unique recipe, you can visit her at Frugal Girlmet

Moo-less Chocolate Pie

moo-less chocolate pie

If you’ve never had tofu before, this Moo-less Chocolate Pie may be the dish to break you in softly.  Soft tofu is a master of disguise, and here it takes the place of dairy and eggs to form a soft custard base.  Serve this to anyone who swears they hate tofu, and see if you can change their mind!

There are dozens of ways you can customize this.  Use a graham cracker crust like I did, or a regular pie crust instead of the chocolate pie crust.  Drizzle with homemade caramel, or serve with strawberries.  Walnuts or pecans would be delicious too, with a light pour of hot fudge.  Or go classic and just serve with whipped cream.

Moo-less Chocolate Pie
(Recipe Courtesy of Alton Brown)

Ingredients:

  • 2 cups chocolate chips
  • 1/3 cup coffee liqueur (or use black coffee)
  • 1 block silken tofu
  • 1 teaspoon vanilla extract
  • 1 tablespoon honey
  • 1 prepared chocolate wafer crust

Directions:

  1. Place a small metal bowl over a sauce pan of simmering water.  Melt the chocolate chips and the coffee liqueur together in the bowl.  Stir in the vanilla.
  2. Pour the chocolate mixture into the jar of a blender or food processor.  Add the tofu and honey and mix until liquified and smooth.
  3. Pour the chocolate-tofu mixture into the pie crust and refrigerate for two hours, or until set.

Explore, experiment, enjoy! — Dana


To view even more of Dana’s unique recipe, you can visit her at Frugal Girlmet

Wheat Berry Salad

Wheat Berry Salad

If you’ve never had wheat berries, you’re in for a treat!  These grains have a delightful chewiness and enough fiber to fill you up.  Combine them with a mild vinaigrette, some fresh vibrant herbs, and a little tangy fruit, and you have the perfect salad.

You may need to search around to find wheat berries, also known as hard winter wheat.  Whole Foods and other health food stores will have them in the bulk section.  They cook up just like any other grain (barley or rice); I actually cooked mine in my rice cooker.  This salad keeps in the fridge for a few days…so have some with dinner, or breakfast, or whenever you like.  Also try subbing out the dried blueberries with raisins, dried cherries, minced dried apricots, dried cranberries – you get the idea.

Wheat Berry Salad

Ingredients:

  • 1 cup wheat berries
  • 1/2 cup dried blueberries
  • 1/2 cup chopped parsley
  • 3 green onions, diced
  • 3 tablespoons olive oil
  • 1/2 lemon, juiced
  • salt and pepper
  • optional:  a few tablespoons of crumbled feta or goat cheese

Directions:

  1. In a heavy pot with a lid, or in a rice cooker, pour in the wheat berries, as well as two cups of water.  Bring to a boil, then cover and simmer for about 30 minutes.
  2. The wheat berries should absorb all the water from the pot.  If not, drain them.  Pour them into a large bowl.  Add the blueberries, parsley, and green onions.  Toss to mix.
  3. Add the olive oil, lemon juice, and salt and pepper.  Taste for seasoning.  Keep  in the fridge until ready to eat.  When serving, you can sprinkle some crumbled feta or goat cheese over the top.

Explore, experiment, enjoy! — Dana


To view even more of Dana’s unique recipe, you can visit her at Frugal Girlmet

Muddy Buddies

… also known as People Puppy Chow.  I really can’t describe for you how delicious and addictive this stuff is.  I first had People Puppy Chow at a friend’s house as a kid, and it was a game changer!  From then on it always showed up at parties and potlucks and is an easy win.

Full disclosure:  I didn’t make this batch.  A friend dropped it off for us, and I’ve had to hide it, because my older girl is allergic to peanut butter, and I didn’t want to salivate over this stuff when she can’t have any.  My days of Muddy Buddies may be limited, but yours don’t have to be.  Make this for the next party / movie night / kids sleepover, and enjoy!

People Puppy Chow

Muddy Buddies / People Puppy Chow

Ingredients:

  • 2 cups of chocolate chips
  • 1 cup smooth peanut butter
  • 1/2 stick butter
  • 1/2 teaspoon vanilla extract
  • 1 box of Crispix or Chex cereal
  • 1 box powdered sugar

Directions:

  1. In a saucepan over medium-low heat, stir together the chocolate chips, peanut butter, butter, and vanilla, until smooth and melted.
  2. Empty the box of cereal into the largest bowl you have.  Pour the chocolate mixture over the cereal and stir to completely coat.
  3. In a large paper grocery bag, pour in the powdered sugar, then pour in the coated cereal.  Close up the top and shake and toss to cover the cereal in powdered sugar.
  4. Dump it all out of the bag onto a few baking sheets to cool.  Separate any big clumps.  Try not to eat it all at once!

Explore, experiment, enjoy! — Dana


To view even more of Dana’s unique recipe, you can visit her at Frugal Girlmet