December 22, 2024

Moo-less Chocolate Pie

moo-less chocolate pie

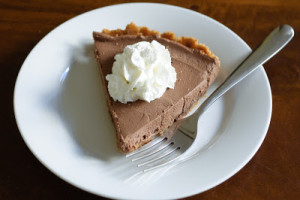
If you’ve never had tofu before, this Moo-less Chocolate Pie may be the dish to break you in softly.  Soft tofu is a master of disguise, and here it takes the place of dairy and eggs to form a soft custard base.  Serve this to anyone who swears they hate tofu, and see if you can change their mind!

There are dozens of ways you can customize this.  Use a graham cracker crust like I did, or a regular pie crust instead of the chocolate pie crust.  Drizzle with homemade caramel, or serve with strawberries.  Walnuts or pecans would be delicious too, with a light pour of hot fudge.  Or go classic and just serve with whipped cream.

Moo-less Chocolate Pie
(Recipe Courtesy of Alton Brown)

Ingredients:

  • 2 cups chocolate chips
  • 1/3 cup coffee liqueur (or use black coffee)
  • 1 block silken tofu
  • 1 teaspoon vanilla extract
  • 1 tablespoon honey
  • 1 prepared chocolate wafer crust

Directions:

  1. Place a small metal bowl over a sauce pan of simmering water.  Melt the chocolate chips and the coffee liqueur together in the bowl.  Stir in the vanilla.
  2. Pour the chocolate mixture into the jar of a blender or food processor.  Add the tofu and honey and mix until liquified and smooth.
  3. Pour the chocolate-tofu mixture into the pie crust and refrigerate for two hours, or until set.

Explore, experiment, enjoy! — Dana


To view even more of Dana’s unique recipe, you can visit her at Frugal Girlmet
Fruit Pizza

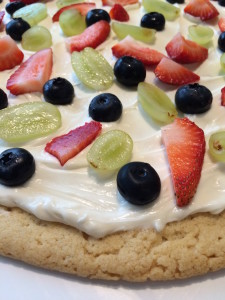
Fruit Pizza Close

My daughter turned four last week, and we had her friends over for an old-school birthday party:  pizza, some play time, and cake.  Except…instead of cake…I presented her with another pizza:  this Fruit Pizza!  All the kids thought it was hilarious – and then the glorious silence of small children who are too busy eating to talk!

This is incredibly easy.  Just make sure you give yourself enough time for the cookie to cool before you frost it.  You can use homemade sugar cookie dough, but a log of store-bought cookie dough saves time and is just as good.  Decorate with any fruits you like – the more colorful the better! – but if you think you might have a lot of leftovers, save really delicate or juicy fruits – like kiwi, mandarin oranges, or bananas – until you are ready to eat it.

Fruit Pizza

Ingredients:

  • 1 tube of refrigerated sugar cookie dough
  • 6 ounces softened cream cheese
  • 1/2 cup powdered sugar
  • 1/2 teaspoon vanilla extract
  • 2 – 4 tablespoons milk (optional, to thin out the frosting)
  • squeeze of lemon (optional, but I like a more balanced frosting)
  • 2 cups sliced fruit of your choice – berries, halved grapes, sliced kiwi, mandarin oranges, whatever you like – the more colorful, the better!

Directions:

  1. Preheat oven to 350*F.  Cover your largest baking sheet (or a pizza stone!) with parchment paper.  Spread out the cookie dough into a big circle.  (I put a plastic baggie over my hand because the dough was sticking and it worked well.)  Flatten to about 1/4″ thick.  Bake until lightly golden – it took about 22 minutes for me.  Keep in mind – the dough will spread a lot!  If you don’t have a very large baking sheet, you may want to make your pizza oval-shaped, just so it doesn’t climb up the sides of your baking sheet when it spreads.  Remove from the oven and set aside to cool.
  2. In a large mixing bowl, beat together the softened cream cheese,  vanilla extract, and powdered sugar.  If you would like a smoother frosting, add a tablespoon of milk at a time, until you reach your desired texture.  Also you can add a squeeze of lemon (it balances out the sweetness.)
  3. When the cookie crust is cool, cover with the frosting, but leave a border around the edges (so you can see the pizza “crust”).  Decorate with sliced fruit and serve.  Keep refrigerated.

Explore, experiment, enjoy! — Dana


To view even more of Dana’s unique recipe, you can visit her at Frugal Girlmet!

At Home with GCH: Strawberry Shortcake (Gluten-Free)


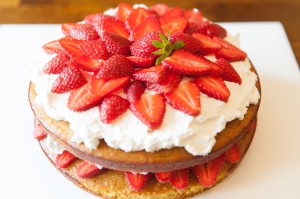
Strawberry Shortcake Whole

Strawberry Shortcake is one of those comfort food recipes that everyone’s Mom or Grandmom makes a version of.  When Spring arrives and berries finally come to the store, what better way to dress up a plain old cake than with sweet, juicy fruit?  I wanted to make a healthier version, so I adapted a recipe for a coconut flour cake, spruced up with orange zest, from Nourishing Days.  Add whipped cream and a basket of berries and you’re in business!


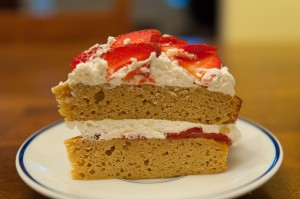
Strawberry Shortcake Cut
Strawberry Shortcake (Gluten-Free)

Ingredients:

  • 12 eggs
  • 1/2 cup coconut oil (or butter), softened
  • 1/2 cup coconut milk (or regular milk)
  • 1/4 cup honey (or more, if you like)
  • 2 teaspoons vanilla extract
  • 1 teaspoon grated orange zest
  • 2 tablespoon orange juice
  • 1 cup coconut flour
  • 1 teaspoon baking powder
  • 1 teaspoon salt
  • 1 cup strawberries, sliced thin
  • 1 pint heavy whipping cream
  • 1 teaspoon vanilla extract
  • optional – 1 or 2 teaspoons sugar (I didn’t use them, since my berries were really sweet.  If your strawberries aren’t as sweet as you’d like, add the sugar to the whipping cream)

Directions:

  1. Preheat the oven to 350*F.  Grease two 8-inch round cake pans, and then cut a circle of parchment paper for the bottom of each pan, and grease that too.  (You can do this without parchment paper, but you will need to be really liberal with the coconut oil / butter / cooking spray on the bottom of the pan.  The cake stuck the first time I made it, so the next time I used parchment paper, and it was perfect!)
  2. In a very large bowl, using a stand mixer or a hand mixer, beat the eggs until frothy.  Beat in the softened coconut oil and milk, blending well.  Mix in the honey, vanilla, orange zest and orange juice.  Beat until foamy again.
  3. In a small bowl, stir together the coconut flour, baking powder and salt.  Then, a little at a time, blend the flour mixture into the egg mixture.  Mix well, making sure there are no lumps.
  4. Divide the batter between the two prepared pans and bake for 35-40 minutes.  When a toothpick comes out dry, remove from the oven and cool for ten minutes.  Remove from pans, and finish cooling on a rack.
  5. While the cake is cooling, place the beaters of your hand mixer and a metal mixing bowl in the freezer for half an hour.  Slice the strawberries and put back in the fridge until ready to use.
  6. When the beaters and bowl are very cold, beat the whipping cream with the vanilla (and optional sugar) until stiff peaks form.  To decorate:  spread a very thin layer of whipped cream on the top of one cake.  Make concentric circles of strawberry slices (use half the strawberries, saving the other half for the top), then cover with a thick layer of whipped cream.  Place the other cake on top of this, cover with the rest of the whipped cream and the rest of the strawberries.  Refrigerate until ready to serve.

This is not a very sweet cake, since it relies on the berries for sweetness.  If your berries are not sweet enough for your taste, you can add more honey to the cake, and the optional sugar to the whipped cream.

Explore, experiment, enjoy! — Dana


To view even more of Dana’s unique recipe, you can visit her at Frugal Girlmet!