January 11, 2025

How To Put Together a Prayer Journal

Each day, we hear many different prayer requests; some of them are not even spoken out loud, but they are seen.  How is it possible to keep track of all of these requests when there are so many of them!  We have our spouse, self, kids, marriage, finances, grandchildren, outside family members, friends, community/church leaders, government officials, and our Country, that we should be praying over every day.

I have been on the lookout for the perfect Prayer Journal, and I think I have finally found something that will work for me.  I want to share it with you today; PLUS, you will get FREE downloads at the end of this blog!!  I hope you will utilize these free downloads and then let me know how this journal works for you!

PJ1

My Prayer Journal Cover

Items Needed:

3-ring Notebook (what’s called a View Binder)

Sheet Protectors (at least 10)

College-lined Notebook Paper

Washi-Tape, if you want to decorate your cover and/or pages

Index tabs

Directions:

1. Print out the free downloads found below

2. Insert each printout into a sheet protector

3. Attach an index tab onto the sheet protector for each category (listed below)

4. Insert sheet protectors into the 3-ring notebook in the following order:

  • Worship — this section is to be used for praising and worshiping God for who He is in your life!  I’ve also printed out a list of the names of God so when I need to pray for provision, or healing, I can pray to Jehovah Jireh, or Jehovah Raphe, and so on.
  • Confess — this section is to be used for any kind of confession you need to make.  1 John 1:9 says that “if we confess our sins, He is faithful and just to forgive us our sins and to cleanse us of all unrighteousness.”  This is so important to confess our sins, so He is able to forgive us, and then cleanse us of all that unrighteousness, so that we are then in right-standing with Him, again!  🙂
  • Thanks — this section is for thanking God for anything you can think of that you are thankful for, i.e., your spouse, kids, marriage, health, family, job, provisions, church, freedom to worship Him, and so on.
  • Calendar – here you will add all 12 months of the year.  Then you will add in any birthdays or anniversaries of family and friends.  Then you will go to this calendar each day, to see who you will be praying for on a specific day.  For anniversaries, I pray over the marriage of that friend or family member.  I will also list specific days for prayer requests such as friends/family doctor visits, surgeries and so on, so I can be praying over them on that particular day.
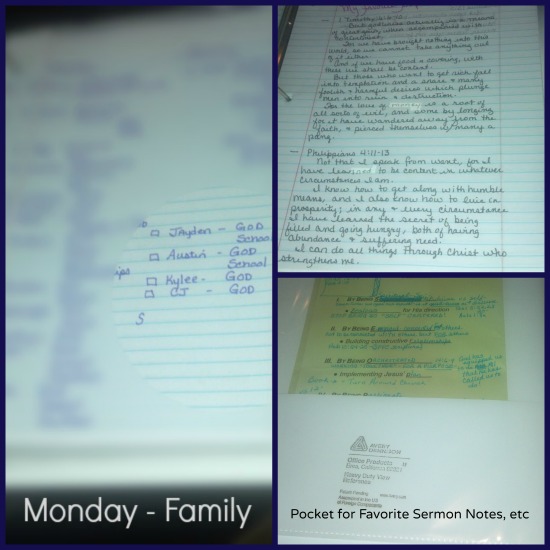
  • Daily –  MONDAY: Family – spouse, self, kids, marriage, jobs, ministries, and each of my ten grandchildren!  TUESDAY: My Christian Friends.  WEDNESDAY: Non-Christian friends, that they might find Jesus as their Lord and Savior, and any other needs that they may have.  THURSDAY: Girlfriends Coffee Hour Leaders / Members / Ministry, and my Church Leaders – Pastors, Deacons, Board of Elders, and so on.  FRIDAY: our country, President, government officials, local community officials.
  • Apply – this section is to reflect my quiet time w/God and how I am going to apply to my life the things that I heard God speaking to me that morning.  I think it is truly necessary to not only have that quiet time, but to meditate on the “how” of what God is saying to you!
  • Journal – this section reflects any devotions, poems, sermons, radio or online messages that have spoken to you, or anything else you would like to journal in regards to your spiritual walk.
  • Favorite Scriptures – here I list all of the Scriptures that have spoken to me over the years.
  • Worship Songs – this section I use for praise and worship songs that I have found on YouTube, or sung in church, that spoke to my heart.  I want to remember these songs, so when I need to spend some personal time with Him, or want to praise Him or worship Him in song, I can come to this section to find the songs that fit the need I have for that day.  I LOVE this section!!

Since I use a full size notebook, I don’t carry this with me throughout the day; but I do carry a small notebook.  That way I can write down the requests as I go through my day, and then enter them into my prayer journal at the end of the day.  Everything is kept in one place—nice, neat, and tidy…just the way I like it!!

To download your FREE Prayer Journal sheets, just click on the links below.  Save them to your computer, and then print them out when you are ready to put together your very own Prayer Journal.  Again, once you start using this system, I would love to hear back from you to see how you are doing with it!

PrayerJournalCollage

A peek into the inside of my Prayer Journal

God’s blessings on your day!

Christi 

__________________________

FREE Downloads

To download each page, click on the link, save the page to your computer.  To print a 5.5″ x 8.5″ cover page for the smaller 3-ring notebooks, just set your printer to print 2 per page.  You will have an extra cover page, but you could also use the extra pages to create a prayer journal for a friend as a gift! 🙂

Apply Page

Calendar Page

Confess Page

Daily Page

Favorite Scriptures Page

Journal Cover Page

Journal Page

Thanks Page

Worship Songs Page

Worship Page

GF Sour Cream Chocolate Cupcakes w/ Frosting

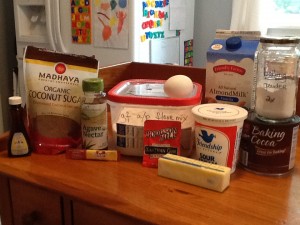
Here on our At Home with GCH blog, Monday’s are always focused on healthy but oh-so-yummy! recipes.  This week’s recipe is for my husband.  (Actually, he is the guinea pig for all of my recipes.  Now he would tell you he is the ‘welcome recipient’ of the firstfruits of all my blog foods.)  So, we were at the store the other day, stocking up on a few gluten free flour varieties when he spotted one we don’t have in our pantry—quinoa flour.  That got my attention…but so did the price!  Oh. My.  But before I was done being aghast about the cost, he had spied a recipe on the back of the package for Sour Cream Chocolate Cupcakes.  Even though I nixed the purchase of the flour, I promised to still make the cupcakes.  Here we go!

2013-09-10 21.00.47

Sour Cream Chocolate Cupcakes

Ingredients:
1+1/2 cups gluten free flour blend *
1+1/2 teaspoons baking powder  2013-09-10 15.44.34
3/4 teaspoon instant coffee granules
1/2 teaspoon kosher salt
1 teaspoon ground cinnamon
1/2 teaspoon xanthan gum
1/2 cup warmed almond milk
1/2 cup cocoa powder
1/2 cup sour cream
6 tablespoons unsalted butter, room temperature
1/2 cup agave nectar
1/4 cup coconut (or palm) sugar
1 large egg
1 teaspoon vanilla extract

Directions:

  • Preheat oven to 325.
  • Line regular sized 12 cup muffin tin with liners.
  • In a medium sized bowl, whisk together the first six ingredients—the dry ingredients—and set aside.
  • In a small bowl, whisk together the warm milk and the cocoa powder.  Then stir in the sour cream; set aside.
  • Set up a stand mixer with the paddle attachment; add the butter and beat for 3 or 4 minutes on medium ‘til light and fluffy.
  • Beat in the agave nectar.  Add the coconut sugar, and beat ‘til light and fluffy again.
  • Add the egg and vanilla extract beating ‘til the egg is totally incorporated.
  • Stir in the sour cream/chocolate mixture.
  • Add the dry ingredients to the wet ingredients mixing on the slowest speed just ‘til they are thoroughly mixed together.
  • Divide the batter into the paper-lined muffin tin filling to about 3/4 full (this is a stiff batter).
  • Bake for 15-20 minutes ‘til tops spring back when lightly touched and toothpick comes out clean.
  • Cool for just 3 or 4 minutes in muffin tin then remove and set gently onto a wire rack to cool completely.

Chocolate Cream Cheese/Whipped Cream Frosting

Ingredients:
1 cup + 2 tablespoons heavy cream, cold
8 ounce package cream cheese, at room temperature
2 tablespoons agave nectar
1 teaspoon vanilla extract , pinch of kosher salt
4 tablespoons cocoa powder
1/2 cup powdered sugar

Directions:

  • Chill bowl and beaters in freezer for 10 minutes.
  • Beat 1 cup heavy cream in chilled bowl ‘til stiff peaks form.  Set aside.
  • In separate bowl, beat softened cream cheese along with agave nectar, vanilla , and salt for 3 minutes ‘til light.
  • Sift in the cocoa powder and the powdered sugar. Beat on low for 30-45 seconds ‘til smooth.
  • Add in the rest of the heavy cream and beat ‘til light and creamy.
  • Take 1/3 of the whipped heavy cream and mix in on lowest speed ‘til incorporated.
  • Remove bowl from stand mixer and fold in the rest of the whipped heavy cream ‘ til combined.
  • Pipe (or spread) onto top of cupcakes.  Enjoy!

♥  ♥  ♥  ♥  ♥

God loves you!  ♥  (Don’t ever forget that!)

♥  coleen

Korean-American Pork Ribs (Dwaeji Galbi)


Korean-American Pork Ribs

Mmmm, ribs!  I love them so, especially when they’re sloppy and tangy, even though I hate getting messy.  My mother-in-law made her version of this Korean dish – and while they were tasty, and chewy, they were too spicy for my taste, and WAY too hot for the children!  I wanted the best of both worlds:  tangy American-style, and spicy Korean-style.  I think I made it work.  These are my Korean-American Pork Ribs!

I found the rack of ribs really cheap at my Korean grocery store.  And instead of using the traditional Korean hot chili paste (gochujang), I used a chipotle in adobo sauce.  It added just the right amount of heat without being overwhelming, and also gave everything a smoky flavor that you can’t get without a real wood chip smoker.  Everything else is pretty easy to find at the store.  If you have any leftover ginger, peel it and freeze it.  It will keep forever in there, and will be easier to grate when it’s frozen.

Koreans eat these as snacks or with lots of vegetable ban chans.  They’re also a bar food favorite, so try these with a cold beer, if you like!

Korean-American Pork Ribs  (Dwaeji Galbi)

Ingredients:

  • 3 pounds pork ribs
  • 1/2 cup brown sugar
  • 1- or 2-inch piece of fresh ginger, peeled and grated
  • 1/4 cup soy sauce
  • 2 tablespoons sesame oil
  • 1/2 onion
  • 3 cloves garlic
  • 1/4 cup ketchup
  • 2 tablespoons yellow mustard
  • 1 chipotle in adobo sauce (or more if you want it spicy!)
  • diced green onion and sesame seeds, for garnish

Directions:

  1. Cut the ribs apart into individual pieces.  Place in a very large bowl.
  2. In a food processor or blender, add sugar, ginger, soy sauce, sesame oil, onion, garlic, ketchup, mustard, and chipotle.  Blend until smooth.  Pour over ribs, toss to coat, and refrigerate for at least 4 hours – overnight, if you can.
  3. When ready to cook, preheat oven to 400*F.  Place a baking rack over a baking sheet lined with foil (this make clean up much easier!)  Bake for about 45 minutes, turning the ribs and basting then with leftover marinade every 15 minutes.  Garnish with diced green onions and sesame seeds.

Explore, experiment, enjoy! — Dana


To view even more of Dana’s unique recipe, you can visit her at Frugal Girlmet!

How to Homeschool: Homeschool Field Trips

How To Homeschool: Homeschool Field Trips www.girlfriendscoffeehour.com #homeschool #fieldtrips

One thing that has been lacking in our homeschool over the years has been field trips. We have been a part of several, but not as many as I would have liked.  This has been mostly due to several moves that we have made, hence needing to take time to settle in, meet new friends, and learn the ins and outs of the homechool laws in our new state. Over the last few years we have also had two new babies and have not lived near family, so we really could not participate in field trips unless we could include the younger children, as well.  The result has been that we have become homebodies.

However, we are mostly settled into our new home in our new state, feel confident that God sent us here, and have no plans to move any time soon. So we have begun to get involved in field trips. I have even planned a couple recently, and have ideas for more. That is what I will be sharing with you today, ideas for field trips, in the hopes that they will spark some ideas in you for your area and family!

List of Homeschool Field Trip Ideas

  • Local museums
  • The library: learn about the Dewey Decimal System
  • A local science center
  • Fire station
  • Police station
  • Play at local college
  • Apple-picking
  • Pumpkin patch
  • Grocery store tour
  • Restaurant tour
  • Farmer’s Market: learn about the produce and economics, as well
  • Local craft fair
  • Potato digging
  • Artisan Chocolate Shop
  • Local T-shirt making company
  • Soda-bottling company
  • Automobile manufacturer
  • Local bakery
  • Horse or cattle ranch: learn how to care for the animals, what they eat, etc.
  • Tour of a movie theater, behind-the-scenes
  • Radio or  TV station, behind-the-scenes tour

Planning for a Homeschool Field Trip

Planning a field trip does not have to be difficult. Our family is actually going next week to take a tour of our local Chick-fil-A. All I did was send a Facebook message to the location in our city. The Director of Marketing responded quite quickly and has been very pleasant to work with in the planning!

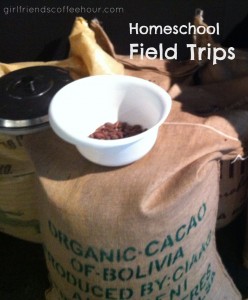
We also visited a local artisan chocolate shop over the summer. I used the same method to contact the owners of the shop, whom I actually knew from my church, and they, also, were very excited to work with me to plan a trip. We actually ended up planning three because, well, homeschool mamas love chocolate! During our tour, we got a rundown about how they make their bars and truffles, as well as learning about the cacao bean. Oh, and we were given samples. Yum!

I encourage you to contact the owners, or possibly the Director of Marketing, for local businesses. The worst they can do is say no. And you may just be surprised when they respond with an enthusiastic “Yes!” So get to brainstorming. Feel free to start with my list above.

What are your favorite field trip ideas? List them in the comments section below!

Happy Homeschooling!

One Way to Stick to an Exercise Program #10 – Make it a Part of Your Lifestyle

Are you tired of feeling guilty on Monday for your weekend?  Do you ever feel you should give up because you have not exercised in a week?   Then it is time to change the way you think and make exercise a part of your lifestyle.

To stick to an exercise program, we have to think of exercise as a part of our life.  That is why I am always skeptical when I hear about crazy workout programs or unrealistic times/places women attempt to exercise.  If it does not fit into your lifestyle, it simply will not work.

Let me share my personal example.  Before children, I worked out 6 days a week 1-1.5 hours a day.  However, there is no way with two children, a job, after school activities, volunteer work, and my desire to be a good wife that I am able to do that today.  If I thought I had to do that, I would definitely give up and quit. But because exercise is a part of who I am, I had to change my expectations and develop a program that works for me and my schedule.  I am able to stick to it because it is a part of my lifestyle and I make it fit for me.

I have such a passion for working with women to create a personal exercise and eating program that work with their lifestyle because I see so many give up when they feel hopeless.  It can work no matter how busy life gets.  There just has to be a change in thinking.

Number 10  in our top ten ways to stick to an exercise program:

Make it a part of your lifestyle

In Good Health,

Crystal

Message Balloons

Message Balloons:  A great way to remember your lost loved ones on the anniversary of their death.

Amy1

My dad died in 2009.  When the next year came around, my family and I wanted to get together in honor of our father.  So we began something that has become an annual tradition. The grandkids especially enjoy it.

We get about a dozen helium balloons and take them out to the cemetery. We chose purple and white balloons in honor of pancreatic cancer research which is what my dad died from.

Each  person was given a balloon and a black sharpie in order to write a message to Dad or to Grandad on them.  After everyone has finished, we say a prayer then we release the balloons together at the same time.  We tell the kids that the balloons are going up to heaven and that granddaddy will get their message.  They think that is the neatest thing ever. I hope you give this a try.
This can be done anywhere.  My sister lives in Florida and they have gone to the beach and let balloons off there.  And now, on my son’s birthday, he always wants to give a balloon to Granddaddy. It really is a sweet way for them to connect with someone that they don’t even see anymore but definitely someone that we want them to remember.
—–

Below are instructions on how to do this and what you would need. It is  very simple actually.

Items needed:
Helium balloons — the amount needed depends on how many people will be there.

Sharpie™  –any color

Directions:
Write your message on the balloon with a Sharpie™.  Example: “Dad, I love you and I miss you!  Rest in peace.  Your daughter, Amy.”

After everyone has written their message on their balloon, gather around and take a moment of silence and/or say a prayer in honor of your lost loved one.
Release all the balloons at once.

I LOVE watching them drift off into the air and taking pictures of them.


Amy2

This a very special tradition for me and my family and I’m honored to share it with you.


With love,
Amy 🙂

Stuffed Peppers

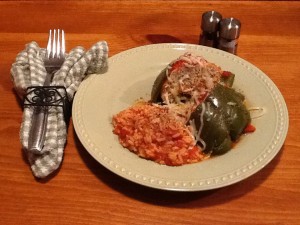
Here on Mondays on our At Home w/GCH blog we usually focus on recipes that are healthy but oh-so-yummy!  We have been making some very yummy dishes using in-season veggies; and this week will be our last one—Stuffed Peppers.  I actually consider this week’s recipe a nice bridge into the fall as it is such a comfort food dish!  Have you ever made Stuffed Peppers on the stovetop instead of in the oven?  That is how we are doing it this week.  Get yourself some nice firm large green bell peppers…maybe from the Farmers Market, and let’s get started.  Enjoy!

Stove Top Stuffed Peppers2013-09-11 20.06.03

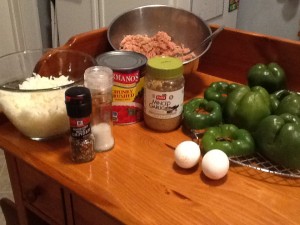
Ingredients:
1 cup rice
1/2 tablespoon butter  2013-09-11 19.05.00
1 cup water
1 cup chicken broth

4 large green bell peppers
1# ground chicken (or turkey or beef)
1/2# raw chicken sausage
1 large egg
kosher salt, freshly ground pepper
3 (or more) tablespoons chopped garlic
1 (28 ounce) can crushed tomatoes
1 cup chicken broth
Shredded cheese, or grated Parmesan (optional)

Directions:

  • In a small saucepan, heat the butter over medium heat.  Add the raw rice, and saute, stirring constantly for one minute.  Carefully add in the liquids and bring quickly to a boil.  Reduce the heat to very low, cover, and let cook (approximately 15 minutes) ‘til all liquid is absorbed.  Empty the cooked rice out onto a plate or pan, and allow to cool.
  • While the rice is cooking, take a large dutch oven (I used an 8 quart pan) and place your peppers in to make sure they fit sitting upright. Once you have the right sized pan, fill 3/4 with water, cover and bring to a boil.  Cut the lids from the peppers (perhaps save the lids to cut up into a salad) and clean them out.  When the water is boiling, put the peppers in for 5-7 minutes depending on how large they are to parboil them.  Carefully remove from the water, and drain upside down.
  • Empty the pot of water, and place back on stove over low heat.  Add the crushed tomatoes, the broth and the remaining 2 tablespoons chopped garlic; bring to a simmer.
  • Meantime, in a large bowl, break up the eggs and add the chopped garlic and the meat; generously season with the salt and pepper; mix thoroughly.  Stir in about half of the cooled rice (save the rest to serve alongside the stuffed peppers).
  • Now to fill the peppers: just before you fill the parboiled peppers, use a knife tip to poke a hole into each of the “bumps” on the pepper bottoms.  This will allow the sauce to ooze up into the peppers while simmering.  Scoop up some of the meat/rice mixture.  Fill them firmly but don’t really pack it down; if you do, it will be too dense when cooked.  Carefully ease the filled peppers–right side up–into the heated tomato sauce.  Take care to sit them up so they won’t fall over…spilling out the meat.
  • Using a large spoon or gravy ladle, scoop up some tomato sauce and pour over each of the filled peppers totally covering the meat.  Increase the heat so that the sauce begins to boil, place a lid on the pot and then reduce the heat to a simmer.  Every 10 minutes or so, again pour a little sauce over the top of each pepper, replacing the lid on the pot.  They should be done in 45 minutes or less, depending on their size.  The meat in the stuffed peppers should be firm when done.  I use a thermometer to verify that they have reached at least 160 degrees, just to be safe.
  • Oh, and add some of the leftover delicious tomato sauce to the rice you set aside; serve that along with the Stuffed Peppers!  Yummy!

♥  ♥  ♥  ♥  ♥

God loves you!  ♥  (Don’t ever forget that!)

♥  coleen

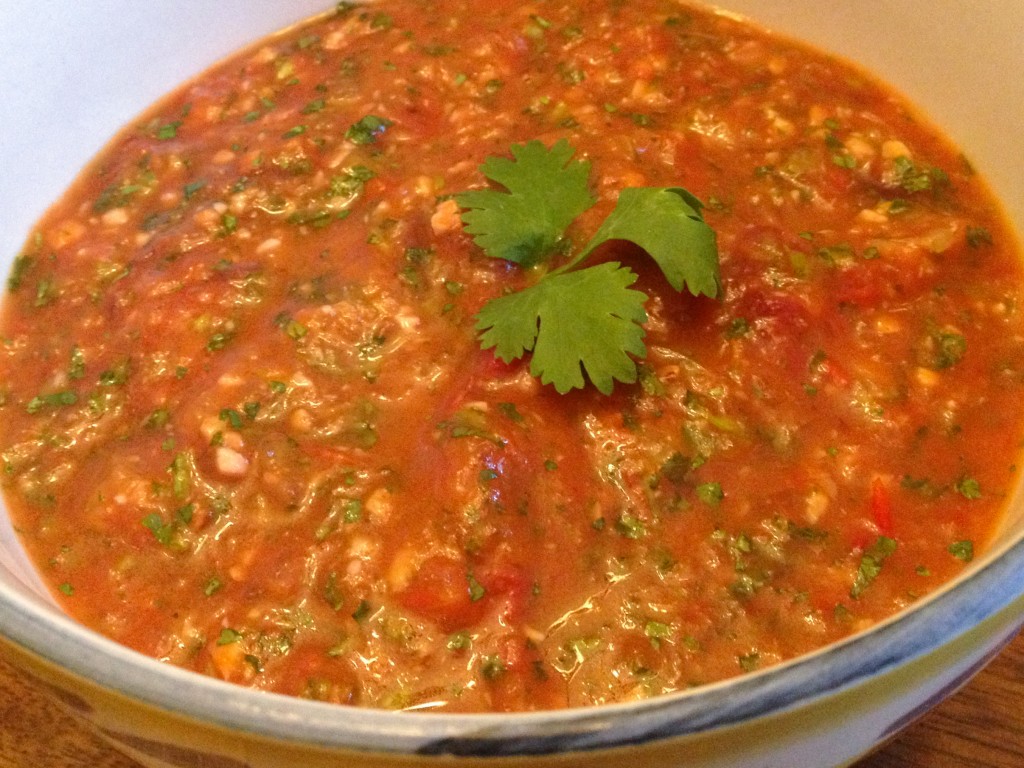
Roasted Chipotle Salsa

Roasted Chipotle Salsa


I planted my garden a little late this year, so my tomatoes are just getting ripe now.  My husband loves tomatoes in any form, in any dish.  As for me, the ONE food I don’t like is plain raw tomatoes.  I keep them off my sandwiches and salads.  Every other preparation is fine with me – ketchup, tomato sauce, anything with cooked tomatoes – and especially salsa!  And while I like raw tomato salsas a lot, I like this Roasted Chipotle Salsa even better!

Chiptole peppers in adobo sauce are easy to find – just check your local grocery store in the “ethnic” aisle with all the other Mexican food.  They’re cheap, and they are nearly pickled in the adobo sauce, so once you open the little can, you can keep the rest of the peppers and sauce in a small container in your fridge for months.  (A little Ball jar, or leftover jelly jar, is perfect for this.)  Then, if you find you love the smoky, mild heat of chipotles, use some of the others in your jar to make this dinner salad.  If you can’t find fresh cilantro at your store, you can leave it out, but it really adds a burst of freshness to this spicy sauce!

This recipe made a little more than a cup for me.  That said, my husband and I ate it all in one night!  It was “taco” night at our house, but we were using lettuce leaves instead of taco shells.  Ground beef with onions, avocado slices, and this salsa – delish!

Roasted Chipotle Salsa

Ingredients:

  • 3 regular-sized ripe tomatoes (around 1/2 pound, or a little more)
  • 1/2 onion
  • 3 cloves garlic
  • 2 teaspoons olive oil
  • salt
  • 1 chipotle pepper in adobo sauce (or more if you like it spicy!)
  • 1/2 teaspoon ground cumin
  • small handful cilantro, about half a cup
  • 1/2 lime or lemon

Directions:

  1. Preheat oven to Broil.  Line a baking sheet with aluminum foil.  Slice the tomatoes in half, removing any core or stem you don’t like.  Slice the onion into rounds.  Peel and smash the garlic cloves.  Lay these out on the baking sheet and drizzle lightly with olive oil.  Season with salt.
  2. Broil the vegetables until they start turning brown and are very juicy – about 8-10 minutes, depending on your oven.  Remove from the oven.  Pour the vegetables and any juices into a food processor.  Add in the cumin, chipotle pepper, cilantro, and hit start.  Process for a few seconds, then squeeze in the lime juice.  Process again – leave it chunky!  Taste for seasoning – maybe more salt or lime?  Process again until you reach your desired consistency.  I like mine to still have some texture and not be a puree.  Refrigerate until ready to use.  Tortilla chips, burritos, enchiladas – even over scrambled eggs – this stuff is yummy!

Explore, experiment, enjoy! — Dana


To view even more of Dana’s unique recipe, you can visit her at Frugal Girlmet!

How to Homeschool: Homeschooling Methods, Curriculum, and Resources

How to Homeschool: Homeschooling Methods, Curroculum, and Resources www.girlfriendscoffeehour.com #homeschool

When I first began homeschooling I knew nothing about methods used for homeschooling.  My model was the school system and that is really all I knew!  I happened to find a curriculum the first year, for my daughter, which used a Charlotte Mason approach.  We loved it! Living books…Christ-centered…what more could I want?

This week I’m going to list some links to different methods of homeschooling, list some of the curriculum that we have used and recommend, as well as share a few resources that I still find helpful today!

Homeschooling methods

1. Charlotte Mason

What is the Charlotte Mason method?

Simply Charlotte Mason

Heart of Dakota Publishing

Ambleside Online

Living Books Curriculum

Lifetime Books & Gifts

The Charlotte Mason Way: A brand new consulting site for those interested in learning how to best implement the Charlotte Mason method in their homeschool.

2. Unschooling

What is unschooling?

Sandra Dodd

The Natural Child Project

3. Unit Studies

What is a Unit Study?

Unit Studies by Amanda Bennett

Homeschool in the Woods

4. Classical

Classical Education

Classical Homeschooling

Classical Conversations

5. Notebooking

Tutorial: What is notebooking?

Notebooking Pages

The Notebooking Fairy

6. Eclectic

What Exactly is Eclectic Homeschooling?

All of the above listed methods and many others could be used within this method of ‘eclectic’ homeschooling!

Of course, there are also other methods of homeschooling. I’ve listed just a few to start.

Favorite homeschool curricula & providers:

Apologia

The Prairie Primer

Heart of Dakota

Music 4 Little Learners

Teaching Textbooks

Polka Dot Publishing: Life of Fred

Learning Adventures

Media Angels, Inc.

Character Concepts

Lifestyle of Learning

Other recommended resources:

Unschooling Rules, Clark Aldrich

Charlotte Mason Companion, Karen Andreola

The Simplicity of Homeschooling, Vicki Goodchild

The Unschooling Handbook, Mary Griffith

The Relaxed Homeschool, Mary Hood

Wading Through the Lists

Now, this is quite a long list of companies and resources for you to work through.  My suggestion is that you begin with the homeschooling methods.  If you are new to homeschooling, or maybe you just feel you need a change, reading about the different methods will help you to figure out what kind of homeschooler you are, or perhaps the kind you would like to be.  After that, you may want to begin searching through the various other links for curriculum companies and other books and resources I’ve listed.  All of the listed curriculum and resources following are items I have used in our homeschool at some time over the last 7 years.  Many of them are favorites, such as the unschooling handbook.  Even if you have no interest in becoming an unschooler, I highly recommend this book.  It is a wonderful resource and will get you thinking about what learning can actually look like!

I do hope you have found this list of homechooling methods, curriculum, and resources helpful. Please take time to sort through them. It will be worth it, I promise!

Be sure to come back next week. I’m planning to discuss Homeschool Field Trips.

Decorative Floral Arrangements for the Home

Amy1
One of my favorite things to do is make different crafts with silk flowers. Today, I will show you how to create a flower arrangement in a decorative vase. It is really simple,  and makes your home beautiful!

Items needed:
Vase (any type)
Silk flowers (any variety)
Eucalyptus
Styrofoam craft ball or block (size proportionate to the vase you choose)
Wire pliers

Directions:
Insert the Styrofoam ball into the bottom of the vase. You may have to trim the Styrofoam so it will fit into the vase.

Begin arranging the silk flower stems anyway you like by inserting the stem into the Styrofoam. If the stems are too long, cut the stems with the wire pliers before inserting it into the vase.

Insert the eucalyptus in between the flowers.

Continue to arrange the flowers until you like the final product.

Amy2

Have fun and happy crafting,

Amy 🙂