May 3, 2024

Chinese Chicken Salad

Chinese Chicken Salad Resize

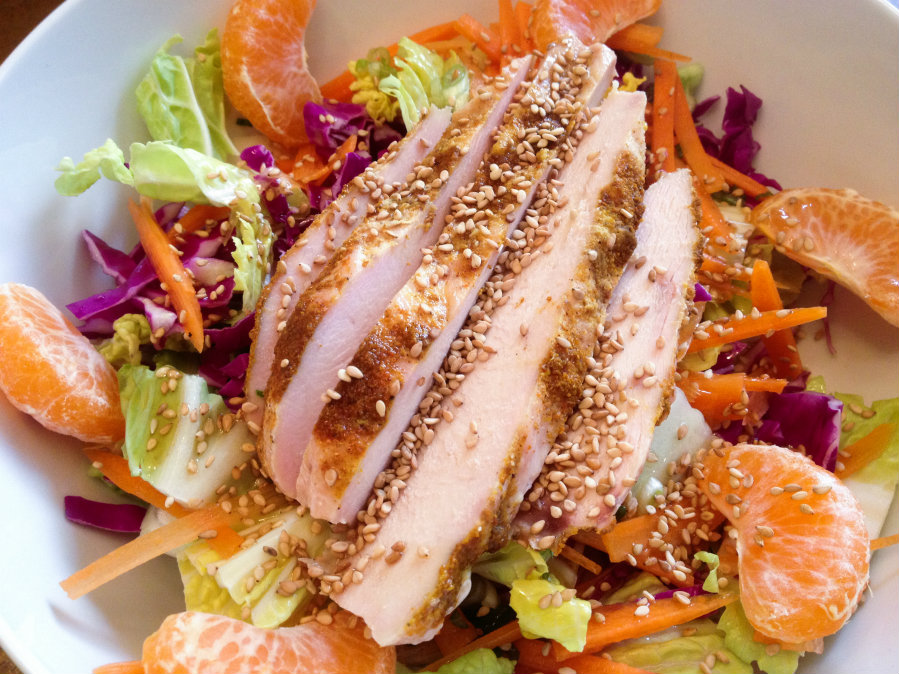
As Coleen pointed out in her post on Monday, this is National Soup Month!  She will be sharing some of her favorite soups with us.  And what makes a better meal than soup and salad?   One of my favorite salads is Chinese Chicken Salad!

This is perfect for winter, because all of the ingredients are in season now.  Instead of canned mandarin oranges, you can probably find fresh ones now – I’ve got Clementines and Satsumas left and right at my grocery store.  Red cabbage and carrots are always around, as are green onions.  For the base, I used Napa cabbage, but if you don’t have that, you can use any kind of lettuce you like, or really finely chopped green cabbage.  I cooked some extra chicken breasts last night so I could chop them up cold and throw them over the salad, but you can use whatever chicken you like – roasted, store-bought rotisserie, or even breaded chicken nuggets!

This recipe serves two as part of a lunch or dinner menu.  Try this salad with any soup you like, or paired up with a sandwich, wrap, or pasta dish.  Filling, nutritious and delicious – and it won’t break any of your New Year’s resolutions!

Chinese Chicken Salad

Ingredients:

  • 1 small head Napa cabbage, or romaine lettuce
  • 1/2 head small red cabbage
  • 2 carrots
  • 2 or 3 green onions
  • 2 mandarin oranges
  • 2 cooked chicken breasts, or 3 cups chopped cooked chicken
  • 2 tablespoons sesame oil
  • 2 tablespoons rice vinegar
  • 1 tablespoon sesame seeds
  • salt and pepper to taste

Directions:

  1. Chop the Napa cabbage into inch-wide strips.  Finely slice the red cabbage.  Place both in a salad spinner and rinse under cold water, then spin dry.
  2. Cut the carrots into matchsticks.  Finely slice the green onions.  Peel the oranges and remove as much of the white pith as possible.  Separate into segments.  Dice or thinly slice the chicken breasts.
  3. To assemble:  In two very large bowls, mix together the cabbages, carrots, and onions.  Arrange the oranges and chicken breasts on top.  Drizzle each salad with one tablespoon each of sesame oil and rice vinegar, and sprinkle the sesame seeds, salt, and pepper on top.

Explore, experiment, enjoy! — Dana


To view even more of Dana’s unique recipe, you can visit her at Frugal Girlmet!

Frozen Pea Salad

Frozen Pea Salad Resized

Here we go, ladies – we’re heading into the holiday season!  Every time I go to the supermarket now I see dozens of magazines at the check out, with photos of glorious turkeys and fantastic centerpieces.  But let’s be honest – not everyone will have to make a turkey this year. In my case, my newlywed brother-in-law and his wife will be hosting Thanksgiving, so they are in charge of the turkey.  But it’s always good to have a couple of  side dish recipes in mind.  I’m usually responsible for making at least one pie and cornbread stuffing, plus some kind of vegetable  dish.  This year, I plan to bring this Frozen Pea Salad.

Before you think I’ve gone off the deep end, No, the peas are not frosty little balls of ice.  They are thawed and cold, but not actually frozen anymore.  The version of this recipe my Mom used to make featured sour cream and a little mayonnaise.  I’ve switched that out for Greek yogurt to up the protein and lower the fat a little bit.  This can easily be doubled or tripled, depending on how many people you are serving, but I would suggest not adding in the cashews and bacon until you are ready to eat, so the textures stay distinct.  It’s sweet and salty, crunchy and chewy, cold and delicious!  If you need an easy, off-beat vegetable side dish, read on, friends!

Frozen Pea Salad

Ingredients:

  • 1 pound frozen peas
  • 1/2 cup Greek yogurt (or more, to taste)
  • 2 green onions, finely sliced
  • salt and pepper
  • 1 cup salted, roasted cashews (you can break them up a little or leave them whole)
  • 4 slices bacon, fried crisply and drained

Directions:

  1. Take the peas out of your freezer and empty the bag into a Pyrex or other casserole dish.  Set them by the stove as you fry the bacon.  The heat from the stove will help the peas thaw.
  2. Fry the bacon crispy, drain it well, blot with paper towels, and dice.
  3. Are your peas thawed yet?  If not, microwave them for thirty seconds at a time, stirring well each time, just until the ice melts and you can squish a pea between your fingers.  You still want them very cold, just not icy and crunchy.  When thawed and still very cold, drain any extra water in the bowl.  Mix in yogurt and green onion, and season with salt and pepper.  Refrigerate until ready to serve.
  4. When serving, sprinkle the pea salad with cashews and bacon.  If you have leftovers, either keep the cashews and bacon separate, or make sure they stay on top.  If they get mixed into the salad and then saved that way, they will soften up.  It will still be delicious, but it won’t have the crunchy versus soft texture difference that makes this salad so fun!

Explore, experiment, enjoy! — Dana


To view even more of Dana’s unique recipe, you can visit her at Frugal Girlmet!

Creamed Kale


Creamed Kale

My favorite side dish in restaurants is creamed spinach.  There’s just something about it that I crave.  And lucky for me, it’s not hard to make at home.  But spinach is a little fussy – it goes mushy in the fridge really quickly, so I don’t have it on hand unless I’m cooking it that day.  But kale on the other hand … that hearty veggie will hang out in your fridge for a few days without appreciable loss of texture or taste.  So I had 2 bunches of curly kale hogging space in my fridge and decided to see if I could cream it.  In short, yes I did!  Creamed Kale for dinner!

Use whatever hearty green you have – kale, chard, or spinach.  If you are using spinach, just wash and blanch it quickly.  Kale and chard need more time in the pot to soften up, so plan accordingly.  I made this with one part whole milk and one part half-and-half, but I think next time I can just use whole milk.  If you like a richer flavor, use all half-and-half.  As for the onion, I used just a regular brown onion.  I think a sweet variety would be even better, so if you see Vidalias or Walla Wallas, pick one up!  Also, I left it out, but you can certainly add a little (or a lot, your choice) grated parmesan cheese to garnish.  Ready to check it out?  Let’s go!

Creamed Kale

(serves 2 as a side dish)

Ingredients:

  • 2 bunches kale, any kind, or chard, or spinach (see note above if using spinach)
  • 1 onion
  • 3 tablespoons butter, divided
  • 1/2 cup whole milk
  • 1/2 cup half-and-half
  • 1 teaspoon corn starch
  • salt and pepper
  • 1/8 teaspoon grated nutmeg

Directions:

  1. Set a large pot of water to boil.  Prepare the kale:  tear out the tough center stem, and tear the leaves into bite-sized pieces.  Wash well.
  2. Slice the onion as fine as possible – you want thin strings.  In a large pan, cook the onions in 2 tablespoons of butter, stirring to make sure they don’t burn.
  3. Boil the kale for about 3 or 4 minutes.  You don’t want it too soft – a little chew is nice.  Remove to an ice bath.  When cool enough to handle, squeeze out as much water as possible from the kale.
  4. When the onions are soft and browning, add the kale to the pan.  In a bowl, whisk together the milk, half-and-half, and cornstarch.  Pour over kale and onions and stir to incorporate.  Turn the heat down to medium low and simmer for 3 minutes until thick and creamy.  Season with salt, pepper, and nutmeg.  Stir in last tablespoon of butter, then serve hot.

Explore, experiment, enjoy! — Dana


To view even more of Dana’s unique recipe, you can visit her at Frugal Girlmet!

Baked Italian Cauliflower

Baked Italian CauliflowerResize


After I had my second daughter, my friend Sunita brought over dinner for my family.  Not only was that a lovely, thoughtful gesture, but it was a tasty one too!  Sunita made a huge casserole of baked rigatoni  and cauliflower in a spicy tomato sauce, spiked with gobs of melty cheese.  I won’t tell you how quickly I ate up dinner (and all the leftovers) – but it was fast!  Here is a link to the original recipe.  However, my husband and I don’t eat pasta anymore, and my girls aren’t really that into it either.  I wanted to see if I could make the same tasty dish, simplified a little, without the noodles.  I think I did!

Baked Italian Cauliflower is a tasty side dish and will go well with baked meatballs, chicken breasts, whatever you have going!  The only ingredient that may be a little difficult to locate is the cheese.  The recipe calls for 8 oz. of fontina, which is a semi-soft, creamy cheese.  It melts like a dream!  If you can’t find it, you could substitute 2/3 cup shredded mozzarella and 1/3 cup shredded swiss cheese.  It won’t be exactly the same, but you’ll still get the gooey, smooth texture from the mozzarella and a little bite from the swiss.  As for the pepper, I used one of those red pepper flake packets that always comes to your house when you order pizza.  Do you have as many of those packets in a kitchen drawer as I do?  If not, use other red pepper flakes, or even a 1/2 teaspoon of Sriracha or other hot pepper sauce.  I’ll let you decide how spicy you want your dish to be.  For me, the pizza pepper packet was enough!

Once you make this (and love it!) you can add in other things to your cauliflower casserole:  cooked Italian sausage or ground beef, slices of summer squash, or some very finely chopped herbs – basil and parsley would be yummy.  Bake this tonight and tell me how you like it!

Baked Italian Cauliflower

Ingredients:

  • 1 large head of cauliflower
  • 1 onion
  • 8 ounces fontina cheese
  • 1-14 ounce can fire-roasted tomatoes
  • 1-6 ounce can tomato paste
  • 1/2 teaspoon red pepper flakes, or more, to taste
  • salt and pepper

Directions:

  1. Preheat the oven to 400*F.  Wash the cauliflower and cut out the core, then chop into bite-sized florets.  Microwave in a covered bowl, with a few tablespoons of water, for 8-10 minutes.  The cauliflower should be cooked but still firm.
  2. Drain the water off and add the cauliflower to a very large mixing bowl.  Chop the onion into very thin slices and add to the cauliflower.  Dice the cheese into tiny cubes, about 1 centimeter square, and add to the bowl.  Mix in tomatoes, tomato paste, red pepper flakes, and salt and pepper.  Stir to combine.
  3. Pour cauliflower mixture into a large casserole dish and bake for 45 minutes.  Keep an eye on it towards the end to make sure any exposed cheese doesn’t get too brown.  Serve hot!

Explore, experiment, enjoy! — Dana


To view even more of Dana’s unique recipe, you can visit her at Frugal Girlmet!