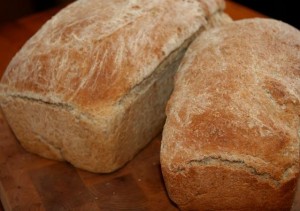
When it comes to bread, there is nothing better to me than homemade! I love the way the bread makes my home smell while it is baking in the oven. I have always been a homemaker at heart, and there is nothing more special to me than to make a couple of loaves of homemade bread for my family. My hubby works hard each day, for us, and he deserves something special for dinner. I love a lot of things homemade, but this recipe is my all-time favorite. I hope you will give it a try and let me know what you think of it!
Homemade Bread
Makes 4 loaves
Ingredients:
2 (.25 ounce) packages active dry yeast
4 1/2 cups warm water (110 degrees to 115 degrees)
6 tablespoons sugar
2 tablespoons salt
1/4 cup shortening, melted and cooled
12 cups all-purpose flour, divided
Directions
- In a large mixing bowl, dissolve yeast in water. Add sugar, salt and shortening; stir until dissolved. Add half the flour; beat until smooth. Mix in enough remaining flour to form a soft dough that cleans the bowl. Turn onto a floured surface. Knead 8-10 minutes or until smooth and elastic.
- Place in a greased bowl, turning once to grease top. Cover and allow to rise in a warm place until doubled, about 1-1/2 hours. Punch dough down. Cover and let rise again for 30 minutes.
- Divide dough into four parts and shape into loaves. Place in four greased 9″ x 5″ x 3″ loaf pans (I use Pampered Chef Loaf Pans). Cover and let rise in a warm place until just to the top edge of the loaf pan*, about 30 minutes. Bake at 375 degrees F for 30-35 minutes or until golden brown. Remove from pans and allow to cool on wire racks.
*If you don’t want that dry-flour look on the top of your bread (as shown in the picture above), brush butter all over the top of the loaf before removing the bread from the loaf pan. It not only makes the bread taste delicious, but it also gives the bread a nice golden brown color.
We like a denser bread versus a light and airy bread, so I only allow the bread to rise just to the top edge of the loaf pans before going into the oven. If you want a lighter, airy bread, you will let it rise a little higher before placing in the oven. Keep in mind that the bread will rise a bit further during the baking process.
Enjoy!!


That looks so good, Christi! It’s raining here and I would love to bake a batch of this. I have everything in the pantry. I’ll let you know if it turns out in all this humidity! Thanks!
Please do! There is nothing better to me than the smell of bread baking in the oven, especially on a rainy or cold day!! (Well, ok. Maybe a Chocolate Chip Cookies run a close race…but I’ll stick w/ the bread!!) 🙂
looks so yummy! i love that this recipe makes an abundance of bread, too! <3
This bread is amazingly easy and delicious. The family loved it. Big hit!!! I used a little different trick for the rising time. I set the bowl on top of my computer tower and the heat from the computer was perfect for rising! In fact, the rising time was much shorter than mentioned in the recipe! That’s just a fun little side note. I’m not suggesting it would work for everyone. I just know it worked for me today! Thanks for a recipe that is definitely in my “Favorite Recipes” file!!!
Haha! Oh that is so funny CG!! Rising bread dough on the computer tower…that is too cool!! 🙂 I’m so happy you and your family loved the recipe!! It is definitely my favorite. Happy it’s made it into someone else’s home! 🙂